In this tutorial, we will share how to add your WordPress site in Yandex webmaster tools to monitor your search engine traffic.
What is Yandex?
Yandex is a popular search engine like Google and Bing based in Russia. You can optimize your site for SEO in Yandex to get more visitors from Russia.
Yandex has a range of tools like generalized search engine, image search, email, videos, maps and more. It also has webmaster tools to help you rank your site, monitor traffic stats, search queries, keywords, and more.
You can connect your WordPress site with Yandex using the Yoast SEO plugin. It works similar to Google search console and Bing Webmaster tools.
Adding WordPress Site in Yandex Webmaster Tools
Before we start, you would need a Yandex Webmaster tools account to connect your site. Once you have created your account, you can login to your WordPress site to configure Yandex webmaster tools with Yoast SEO plugin.
Let’s take a look on how you can add your site in Yandex webmaster tools and start optimizing it right away.
Step 1: Create an Account at Yandex
First thing you need to do is login to your Yandex webmaster tools account. If you don’t have a Yandex account, then you can create one using this link.
After creating the account, you’ll see the Yandex Webmaster page. On this page, you need to click on the ‘+‘ button in top bar to add your site in Yandex.
In the site address field, you need to add your website’s full domain name and click on the Add button.
Note: If your main domain uses ‘www’ in the URL, then you need to add it before the domain (for example www.wpcademy.com)
On the next page, you will be asked to verify website ownership by adding meta content in your WordPress site. Go ahead and copy the content code from this page because you will need it in Step 2.
Step 2: Login to WordPress Admin Area and Add the Code
Now you need to login to your WordPress admin area and add the verification code in the Yoast SEO webmaster settings.
Simply head over to the SEO » General area and click on the Webmaster tools tab.
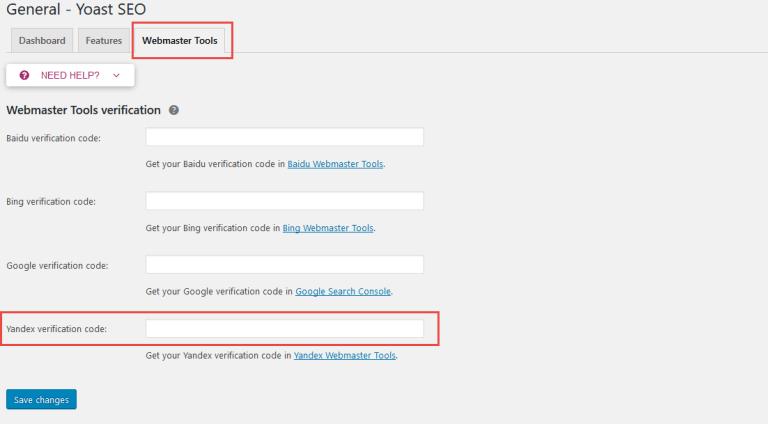
Next, you need to paste the code in the Yandex verification code field and click on the Save Changes button.
After adding the code in your WordPress site, you need to go back to the Yandex Webmaster tools page where you copied the code from and click on the Check button to verify ownership.
After successful verification, it will show your username that has the rights to manage your site in Yandex Webmaster tools. You can also delegate the rights to other users by adding their username and clicking on the Delegate rights button.
Now that your site is verified and added in Yandex Webmaster tools, you can see traffic stats, search errors, search queries, internal and external links, site information, robots.txt analysis, audit pages for mobile, and more on the Yandex dashboard. You can use the menu on left side of the screen to find any information that you may need.
Yandex Webmaster tools have options for site optimization that are filtered from troubleshooting to important settings like robots.txt and .htaccess. You can further optimize your robots.txt for SEO separately and regularly perform WordPress maintenance tasks to keep your site up to date.