How To Install Eclipse Luna on CentOS 7

Install Eclipse Luna on CentOS 7

Eclipse is an open source and free multi-language and multi-platform (Windows , Linux and Mac) software development program that used to build JAVA based web applications. It is written in Java program and can be used to develop Java based applications and other various plugins, including languages like C, C++, PHP, Perl, Python, Ruby and Rails framework.

This article assumes you have at least basic knowledge of linux, know how to use the shell, and most importantly, you host your site on your own VPS. The installation is quite simple. We will show you through the step by step installation Eclipse on CentOS 7.

Step 1. First, Install Java required packages.

 yum install java

Check if java installed:

 java -version

Step 2. Download Eclipse Luna.

Download latest eclipse package. This guide uses Eclipse IDE for Java Developers version. Another popular versions are Eclipse IDE for Java EE Developers and Eclipse for PHP Developers. Select also 32-bit or 64-bit version depending on your system.

Extract Eclipse package (example /opt/):

 tar -zxvf eclipse-java-luna-SR1-linux-gtk-x86_64.tar.gz -C /opt

Make symbolic link to bin directory:

 ln -s /opt/eclipse/eclipse /usr/bin/eclipse

Step 3. Create Gnome desktop launcher.

 ##nano /usr/share/applications/eclipse.desktop

Add the following lines of code it, save and close the file:

[Desktop Entry]
Encoding=UTF-8
Name=Eclipse 4.4.1
Comment=Eclipse Luna
Exec=/usr/bin/eclipse
Icon=/opt/eclipse/icon.xpm
Categories=Application;Development;Java;IDE
Version=1.0
Type=Application
Terminal=0

Step 4. Start Eclipse.

From Desktop terminal run the following command to launch Eclipse:

 eclipse

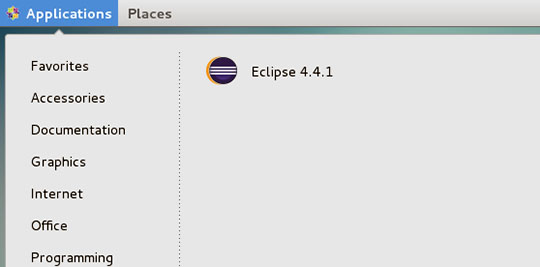
From Desktop menu Gnome 3 Eclipse 4.4.1:

CentOS-7-Eclipse-4.4-Luna-Gnome

Congratulation’s! You have successfully installed Eclipse. Thanks for using this tutorial for installing Eclipse Luna on CentOS 7 system. For additional help or useful information, we recommend you to check the official Eclipse web site.

You Might Also Like:  How To Install Eclipse Luna on Ubuntu 14.04

How To Install Seafile on CentOS 6

Install Seafile on CentOS 6

Seafile is a open source cloud storage software. It offers file sharing and syncing for individual users and groups, it provides client side encryption and easy access from mobile devices. Also easily integrated with local services such as LDAP and WebDAV or can be deployed using advanced network services and databases like MySQL, SQLite, PostgreSQL, Memcached, Nginx or Apache Web Server.

This article assumes you have at least basic knowledge of linux, know how to use the shell, and most importantly, you host your site on your own VPS. The installation is quite simple. We will show you through the step by step how to install Seafile on CentOS 6.

Install Seafile on CentOS 6

Step 1. First, Install required packages.

yum -y update
yum -y install python-imaging MySQL-python python-simplejson python-setuptools

Step 2. Download and install the latest version of Seafile.

Create a new user that will be used to run the seafile services:

adduser seafile
passwd seafile
su -seafile

You need to download the last relase of Seafile:

wget https://bitbucket.org/haiwen/seafile/downloads/seafile-server_4.0.6_x86-64.tar.gz
tar xfz seafile-server_4.0.6_x86-64.tar.gz
cd seafile-server_4.0.6/

Run this script which will create the required databases and directories for the Seafile server and and answer all questions using the following configuration options, after the script verifies the existence of all Python required modules:

 ./setup-seafile-mysql.sh

After Seafile server successfully installs, it will generate some useful information such as what ports needs to be open on your Firewall to allow external connection and what scripts to handle in order to start the server.

Step 3. Configure Iptables or firewall

# nano /etc/sysconfig/iptables
-A INPUT -p udp -m state --state NEW --dport 8000 -j ACCEPT
-A INPUT -p tcp -m state --state NEW --dport 8000 -j ACCEPT

Restart iptables to apply rules using the following command:

 service iptables restart

Step 4. Starting the Seafile services.

Now run the ‘seafile.sh’ and ‘seahub.sh’ scripts to start the Seafile server.

su - seafile
cd seafile-server_4.0.6
./seafile.sh start
./seahub.sh start

Step 5. Accessing Seafile.

Seafile will be available on HTTP port 8000 by default. Open your favorite browser and navigate to http://yourdomain.com:8000 or http://server-ip:8000. Enter the admin email id and password to login  which you have created at the time of installation. If you are using a firewall, please open port 8000 to enable access to the control panel.
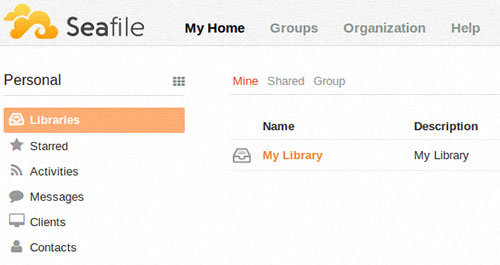
seafile-web-interface-login

Congratulation’s! You have successfully installed Seafile. Thanks for using this tutorial for installing Seafile open source cloud storage on CentOS 6 system.

You Might Also Like: How To Install Seafile on Ubuntu 14.04

How To Install Seafile on Ubuntu 14.04

Install Seafile on Ubuntu 14

Seafile is a open source cloud storage software. It offers file sharing and syncing for individual users and groups, it provides client side encryption and easy access from mobile devices. Also easily integrated with local services such as LDAP and WebDAV or can be deployed using advanced network services and databases like MySQL, SQLite, PostgreSQL, Memcached, Nginx or Apache Web Server.

This article assumes you have at least basic knowledge of linux, know how to use the shell, and most importantly, you host your site on your own VPS. The installation is quite simple. We will show you through the step by step How To Install Seafile on Ubuntu 14.04.

Install Seafile on Ubuntu 14.04

Step 1. First, you need to update the system to ensure that we have all of the latest software installed.

 apt-get update

Step 2. Install required packages.

Install LAMP:

 sudo apt-get install apache2 mysql-server php5 libapache2-mod-php5

Install Python modules:

 sudo apt-get install python2.7 sqlite python-simplejson python-setuptools python-imaging python-mysqldb

Step 3. Download the Seafile components.

You need to download the last relase of Seafile:

 wget https://bitbucket.org/haiwen/seafile/downloads/seafile-server_4.0.6_x86-64.tar.gz

Extract the tarball into the current directory:

 
tar xzvf seafile-server*
cd seafile-server*

Step 4. Install Seafile server.

Run this script which will create the required databases and directories for the Seafile server and and answer all questions using the following configuration options, after the script verifies the existence of all Python required modules:

 ./setup-seafile-mysql.sh

After Seafile server successfully installs, it will generate some useful information such as what ports needs to be open on your Firewall to allow external connection and what scripts to handle in order to start the server.

Step 5. Starting the Seafile services.

Create startup script for the Seafile server like this:

 #nano /etc/init.d/seafile
#!/bin/bash
# Change the value of "user" to your linux user name
user=haiwen
# Change the value of "seafile_dir" to your path of seafile installation
seafile_dir=/data/haiwen
script_path=${seafile_dir}/seafile-server-latest
seafile_init_log=${seafile_dir}/logs/seafile.init.log
seahub_init_log=${seafile_dir}/logs/seahub.init.log
# Change the value of fastcgi to true if fastcgi is to be used
fastcgi=false
# Set the port of fastcgi, default is 8000. Change it if you need different.
fastcgi_port=8000
case "$1" in
        start)
                sudo -u ${user} ${script_path}/seafile.sh start >> ${seafile_init_log}
                if [  $fastcgi = true ];
                then
                        sudo -u ${user} ${script_path}/seahub.sh start-fastcgi ${fastcgi_port} >> ${seahub_init_log}
                else
                        sudo -u ${user} ${script_path}/seahub.sh start >> ${seahub_init_log}
                fi
        ;;
        restart)
                sudo -u ${user} ${script_path}/seafile.sh restart >> ${seafile_init_log}
                if [  $fastcgi = true ];
                then
                        sudo -u ${user} ${script_path}/seahub.sh restart-fastcgi ${fastcgi_port} >> ${seahub_init_log}
                else
                        sudo -u ${user} ${script_path}/seahub.sh restart >> ${seahub_init_log}
                fi
        ;;
        stop)
                sudo -u ${user} ${script_path}/seafile.sh $1 >> ${seafile_init_log}
                sudo -u ${user} ${script_path}/seahub.sh $1 >> ${seahub_init_log}
        ;;
        *)
                echo "Usage: /etc/init.d/seafile {start|stop|restart}"
                exit 1
        ;;
esac

Add directory for log files:

 mkdir /path/to/seafile/dir/logs

Create a file /etc/init/seafile.conf:

 #nano /etc/init/seafile.conf
start on (started mysql
and runlevel [2345])
stop on (runlevel [016])

pre-start script
/etc/init.d/seafile-server start
end script

post-stop script
/etc/init.d/seafile-server stop
end script,

Make the seafile-sever script executable:

 sudo chmod +x /etc/init.d/seafile

Now try using the service and command to start a new Seafile server instance:

 service seafile start

Step 6. Accessing Seafile.

Seafile cloud storage will be available on HTTP port 8000 by default. Open your favorite browser and navigate to http://yourdomain.com:8000 or http://server-ip:8000. Enter the admin email id and password to login  which you have created at the time of installation. If you are using a firewall, please open port 8000 to enable access to the control panel.

Install Seafile on Ubuntu 14.04

Congratulation’s! You have successfully installed Seafile. Thanks for using this tutorial for installing Seafile open source cloud storage on Ubuntu 14.04 system.

You Might Also Like: How To Install Seafile on CentOS 6
How To Install Exim Mail Server on CentOS 6

Install Exim Mail Server on CentOS

Exim is free software distributed under the terms of the GNU General Public License, and it aims to be a general and flexible mailer with extensive facilities for checking incoming e-mail. The Exim security record is much better than sendmail. Advanced features are queue handling, address routing and testing.

This article assumes you have at least basic knowledge of linux, know how to use the shell, and most importantly, you host your site on your own VPS. The installation is quite simple. We will show you through the step by step how to Install Exim Mail Server on CentOS 6.

Step 1. First, we need to install the latest EPEL repository RPM suited to your architecture.

## RHEL/CentOS 6 64-Bit ##
# wget http://download.fedoraproject.org/pub/epel/6/x86_64/epel-release-6-8.noarch.rpm
# rpm -ivh epel-release-6-8.noarch.rpm
## RHEL/CentOS 6 32-Bit ##
# wget http://download.fedoraproject.org/pub/epel/6/i386/epel-release-6-8.noarch.rpm
# rpm -ivh epel-release-6-8.noarch.rpm


Step 2. Install the Exim package.

 yum install exim-mysql -y

Step 3. Disable Postfix (the default MTA).

By default, CentOS using Postfix as MTA. Follow is how to disable and enable exim on CentOS. First, we stop the service and disable postfix for autostart:

service postfix stop
chkconfig postfix off

Step 4. Set Exim as the default MTA.

Next we change the default Postfix MTA to Exim. Press “2” enter to select Exim:

# alternatives --config mta
There are 2 programs which provide 'mta'.

  Selection    Command
-----------------------------------------------
*+ 1           /usr/sbin/sendmail.postfix
   2           /usr/sbin/sendmail.exim
Enter to keep the current selection[+], or type selection number: 2

Step 5. Start Exim service.

chkconfig exim on
service exim start

Step 6. Accessing Exim.

Now you are done with Exim installation. Let’s verify is the MTA working as expected:

$ echo 'Hello, welcome to the jungle exim MTA' | mail -s 'Exim testing email' 
# tail -F /var/log/exim/mainlog

Congratulation’s! You have successfully installed Exim. Thanks for using this tutorial for installing Exim Mail Server on CentOS 6 systems. Learn more from Exim Internet Mailer official Documentation.

How To Install CentOS Web Panel on CentOS 6

Install CentOS Web Panel

CentOS Web Panel is a free alternative to cPanel and provides plenty of features and designed for newbie who want to build a working hosting server easily and to take control or manage his/her server all in an intuitive web interface without having to open any SSH console. CentOS Web Panel provides Apache, Varnish, suPHP & suExec, Mod Security, PHP version switcher, Postfix and Dovecot, MySQL Database Managment, PhpMyAdmin, CSF Firewall, CageFS, SSL Certificates, FreeDNS (DNS server) and many more.

This article assumes you have at least basic knowledge of linux, know how to use the shell, and most importantly, you host your site on your own VPS. The installation is quite simple. I will show you through the step by step installation CentOS Web Panel on CentOS 6.

Install CentOS Web Panel on CentOS 6

Step 1. First, you need to update the system to ensure that we have all of the latest software installed.

 yum update -y

Step 2. Setup Hostname.

You can use the following command for hostname setup:

 hostname srv1.wpcademy.com

Step 2. Downloading and install CentOS Web Panel script.

cd /usr/local/src
wget http://centos-webpanel.com/cwp-latest

Once you download the installer on your server, you are ready to start with the installation process. Installation will take approximately 5-15 minutes depends on your server speed and power. To do so, use the command below:

 sh cwp-latest

Step 3. Accessing CentOS Web Panel.

CentOS Web Panel will be available on HTTPS port 2031 by default. Open your favorite browser and navigate to https://yourdomain.com:2031 or http://server-ip:2030. To log in, you can use ‘root’ as user and your root password. If you are using a firewall, please open port 2030 to enable access to the control panel.

Congratulation’s! You have successfully installed CentOS Web Panel. Thanks for using this tutorial for installing CentOS Web Panel web server management on CentOS 6 system.

How To Install Virtualmin on Ubuntu 14.04

install virtualmin on ubuntu

Virtualmin is an advanced web server management panel, and a very good alternative to cPanel, with the same administration structure based on root users, resellers, and clients. Once installed, you will be able to manage Apache, Nginx, PHP, DNS, MySQL, PostgreSQL, mailboxes, FTP, SSH, SSL, Subversion/Git repositories and many more.

This article assumes you have at least basic knowledge of linux, know how to use the shell, and most importantly, you host your site on your own VPS. The installation is quite simple. I will show you through the step by step installation virtualmin on Ubuntu 14.04.

Step 1. First, you need to update the system to ensure that we have all of the latest software installed.

 apt-get update

Step 2. Downloading and install Virtualmin script.

 wget http://software.virtualmin.com/gpl/scripts/install.sh

Once downloaded, do a chmod +x to make the script executable:

 chmod +x install.sh

Now it is time to running virtualmin install script. Installation will take approximately 5-15 minutes depends on your server speed and power. To do so, use the command below:

./install.sh
### During the installation it will ask you for the host name make sure you enter this correctly ###

Step 3. Accessing Virtualmin.

Virtualmin web based monitoring will be available on HTTPS port 10000 by default. Open your favorite browser and navigate to http://yourdomain.com:10000 or http://server-ip:10000. If you are using a firewall, please open port 10000 to enable access to the control panel.

Congratulation’s! You have successfully installed virtualmin. Thanks for using this tutorial for installing virtualmin web server management on Ubuntu 14.04 system. For additional help or useful information, we recommend you to check the official virtualmin web site.

You Might Also Like: How To Install Virtualmin on CentOS 6

How To Install Virtualmin on CentOS 6

install virtualmin on centos

Virtualmin is an advanced web server management panel, and a very good alternative to cPanel, with the same administration structure based on root users, resellers, and clients. Once installed, you will be able to manage Apache, Nginx, PHP, DNS, MySQL, PostgreSQL, mailboxes, FTP, SSH, SSL, Subversion/Git repositories and many more.

This article assumes you have at least basic knowledge of linux, know how to use the shell, and most importantly, you host your site on your own VPS. The installation is quite simple. I will show you through the step by step installation virtualmin on CentOS 6.

Step 1. First, you need to update the system to ensure that we have all of the latest software installed.

 yum update

Step 2. Install Virtualmin.

Virtualmin can be installed in a number of ways an automated install script or manual Installation. Now you can enter this command to get the installer:

 wget http://software.virtualmin.com/gpl/scripts/install.sh

Once downloaded, do a chmod +x to make the script executable:

 chmod +x install.sh

Now it is time to install VirtualMin. To do so, use the command below:

./install.sh
### During the installation it will ask you for the host name make sure you enter this correctly ###

Step 3. Accessing Virtualmin.

Virtualmin web based monitoring will be available on HTTPS port 10000 by default. Open your favorite browser and navigate to http://yourdomain.com:10000 or http://server-ip:10000. If you are using a firewall, please open port 10000 to enable access to the control panel.

Congratulation’s! You have successfully installed virtualmin. Thanks for using this tutorial for installing virtualmin web server management on CentOS 6 system. For additional help or useful information, we recommend you to check the official virtualmin web site.

You Might Also Like: How To Install Virtualmin on Ubuntu 14.04