How To Install phpMyAdmin 4.8.5 with Nginx on Ubuntu 18.04 LTS

Install phpMyAdmin with Nginx on Ubuntu 18

phpMyAdmin is a web-based client written in php for managing MySQL and MariaDB databases. It provides a user friendly web interface to access and manage your databases. To ease usage to a wide range of people, phpMyAdmin is being translated into 72 languages and supports both LTR and RTL languages.

This article assumes you have at least basic knowledge of Linux, know how to use the shell, and most importantly, you host your site on your own VPS. The installation is quite simple and assumes you are running in the root account, if not you may need to add ‘sudo’ to the commands to get root privileges. I will show you through the step by step installation phpMyAdmin with Nginx on an Ubuntu 18.04 LTS (Bionic Beaver) server.

Install phpMyAdmin with Nginx on Ubuntu

Step 1. First, make sure that all your system packages are up-to-date

sudo apt-get update
sudo apt-get upgrade


<strong> Step 2. Installing phpMyAdmin on Ubuntu 18.04 LTS.
</strong>

Use this command to install phpmyadmin on Ubuntu 18.04:
[php]
sudo apt install phpmyadmin

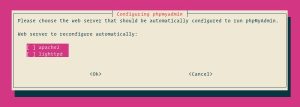
The installer will ask you to choose the web server that should be automatically configured to run phpMyAdmin. There is no option to choose Nginx, press TAB to select OK and then Enter. We’ll configure Nginx in the next section.
configuring-phpmyadmin-web-server

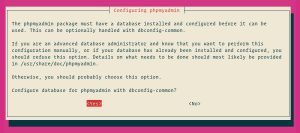
Next, the installer will ask you whether you want to use dbconfig-common tool to set up the database. Select Yes and hit Enter.
configuring-phpmyadmin-database

Enter a password for phpMyAdmin to register with the database, select OK and press Enter.
configuring-phpmyadmin-password

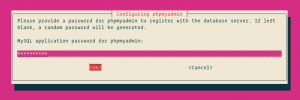
You will be prompted to confirm the password, enter the same password, select OK and press Enter.
configuring-phpmyadmin-confirm-password

Step 3. Configure Administrative MySQL.

Start by logging in to the MySQL server as the root user:

sudo mysql

From within the MySQL shell execute the following commands which will create a new administrative user and grant appropriate permissions:

CREATE USER 'padmin'@'localhost' IDENTIFIED BY 'change-with-your-secure-password';GRANT ALL PRIVILEGES ON *.* TO 'padmin'@'localhost' WITH GRANT OPTION;

Step 4. Configure Nginx to serve phpMyAdmin.

 In Nginx, virtual host file can be found in etc/nginx/snippets directory. Let’s create a file called “phpmyadmin.conf”:
sudo nano /etc/nginx/snippets/phpmyadmin.conf 

Add the following content:

location /phpmyadmin {
    root /usr/share/;
    index index.php index.html index.htm;
    location ~ ^/phpmyadmin/(.+\.php)$ {
        try_files $uri =404;
        root /usr/share/;
        fastcgi_pass unix:/run/php/php7.2-fpm.sock;
        fastcgi_index index.php;
        fastcgi_param SCRIPT_FILENAME $document_root$fastcgi_script_name;
        include /etc/nginx/fastcgi_params;
    }

    location ~* ^/phpmyadmin/(.+\.(jpg|jpeg|gif|css|png|js|ico|html|xml|txt))$ {
        root /usr/share/;
    }
}

Then, add the following line to each domain’s server block where you want to access phpMyAdmin using: domain.com/phpmyadmin:

include snippets/phpmyadmin.conf;
### /etc/nginx/conf.d/domain.com.conf

server {

    # . . . other code

    include snippets/phpMyAdmin.conf;

    # . . . other code 

}

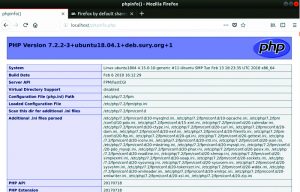
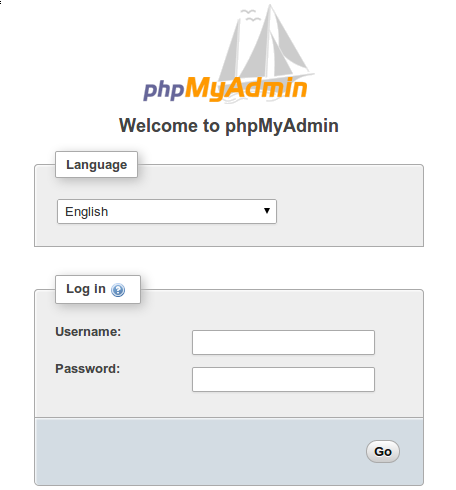
Step 5. Finally, test phpMyAdmin.

Now open your browser and surf to http://youripaddress/phpMyAdmin and your phpmyadmin will ask you for user and password of your mysql installation, you can use root as user and the root mysql password, or any other mysql user/password.


phpMyAdmin-login

Congratulation’s! You have successfully installed phpMyAdmin. Thanks for using this tutorial for installing phpMyAdmin with Nginx on Ubuntu 18.04 LTS system. For additional help or useful information, we recommend you to check the official phpMyAdmin web site.

How To Install PHP 7.2 on Ubuntu 18.04 LTS

Install PHP 7.2 on Ubuntu 18

PHP (recursive acronym for PHP: Hypertext Preprocessor) is an open source, popular general-purpose scripting language that is widely-used and best suited for developing websites and web-based applications. It is a server-side scripting language that can be embedded in HTML.

This article assumes you have at least basic knowledge of Linux, know how to use the shell, and most importantly, you host your site on your own VPS. The installation is quite simple and assumes you are running in the root account, if not you may need to add ‘sudo’ to the commands to get root privileges. I will show you through the step by step installation PHP 7.2 on a Ubuntu 18.04 (Bionic Beaver) server.

Install PHP 7.2 on Ubuntu 18.04 LTS

Step 1. First make sure that all your system packages are up-to-date

sudo apt update
sudo apt upgrade

Step 2. Installing PHP 7.2 on Ubuntu 18.04 LTS.

If Apache is installed and configured as your web server, then you can follow the steps below to install PHP 7.2:

sudo apt install php libapache2-mod-php

Once, the process is complete, execute the following command to restart your Apache service:

sudo systemctl restart apache2

Step 3. Installing PHP With Nginx Web Server.

Run the command below to install the latest version of PHP and the required PHP FPM packages:

sudo apt install php-fpm
[php]

Once the modules are installed, you can run the command below to check the status of your PHP FPM service:
[php]
systemctl status php7.2-fpm

Then, edit your Nginx server block and include the lines below to enable Nginx web server to process PHP files:

server {
        # . . . other code
        location~ .php$ {
            include snippets/fastcgi-php.conf;
            fastcgi_pass unix:/run/php/php7.2-fpm.sock;
        }
    }

Restart your Nginx web server for the configuration changes to take effect:

sudo systemctl restart nginx

Step 4. Installing PHP Extensions.

First, execute the command below to see all the available PHP modules:

sudo apt-cachesearch php7.2

To install one PHP 7.2 extension run the command:

sudo apt install php-[package name]

To test PHP, create a test file named info.php with he content below. Save the file, then browse to it to see if PHP is working:

nano /var/www/html/info.php

In this file, paste the following code:


<?php
phpinfo();
?>

php_ubuntu_test_18.04_LTS.

Try to access it at http://your_server_ip/info.php . If the PHP info page is rendered in your browser then everything looks good and you are ready to proceed further.


Congratulation’s! You have successfully installed PHP 7.2. Thanks for using this tutorial for installing PHP 7.2 on Ubuntu 18.04 LTS (Bionic Beaver) system. For additional help or useful information, we recommend you to check the official PHP web site.

How To Install Magento 2.3 on Ubuntu 18.04 LTS

Install Magento on Ubuntu 18

Magento is one of the worlds most widely used applications for managing E-Commerce sites. Magento is fully customizable to meet the users requirements and allowing them to create and launch a fully functional online store in minutes. Magento employs the MySQL relational database management system, the PHP programming language, and elements of the Zend Framework.

This article assumes you have at least basic knowledge of Linux, know how to use the shell, and most importantly, you host your site on your own VPS. The installation is quite simple and assumes you are running in the root account, if not you may need to add ‘sudo’ to the commands to get root privileges. I will show you through the step by step installation Magento on an Ubuntu 18.04 Bionic Beaver server.

Magento Features:

  • Analytics and Reporting – the script is integrated with Google Analytics and offers many different reports.
  • Product Browsing – multiple images for products, options for extensive reviews, wishlists and much more.
  • Catalog Browsing – easy navigation, advanced product filtering system, product comparison.
  • Catalog Management – inventory management, batch import and export of products, different tax rates per location, additional product attributes.
  • Customer Accounts – order status and history, e-mail and RSS feeds for products in the wishlist, newsletter subscription, default billing and shipping address.
  • Customer Service – enhanced features for customers’ accounts, Contact Us form, comprehensive order tracking and history, customizable order e-mails.
  • Order Management – create orders through admin area, create multiple invoices shipments and credit memos, call center order creation option.
  • Payment – different payment methods: credit cards, PayPal, Authorize.net,
  • Google Checkout, checks, money orders, support of external payment modules like Cybersource, ePay, eWAY and many more.
  • Shipping – shipping to multiple addresses, flat rating shipping, supports UPS,
  • UPS XML (account rates), FedEx (account rates), USPS and DHL.
  • Checkout – one page checkout, SSL support, checkout without having an account.
  • Search Engine Optimization – 100% Search Engine Friendly, Google SiteMap support.
  • International Support – multiple languages and currencies, list of allowed countries for registration, purchasing and shipping, localization.
  • Marketing Promotions and Tools – coupons, discounts and different promotion options.
  • Site Management – control of multiple web sites, multiple languages, tax rate with support for US and International markets, customizable outlook through templates.

Install Magento on Ubuntu 18.04 LTS

Step 1. First, make sure that all your system packages are up-to-date

sudo apt update
sudo apt upgrade

Step 2. Install LAMP (Linux, Apache, MariaDB and PHP) server.

A Ubuntu 18.04 LAMP server is required. If you do not have LAMP installed, you can follow our guide here. Also install all required PHP modules:

apt-get install php7.1-cli php7.1-mbstring php7.1-gd php7.1-opcache php7.1-mysql php7.1-json php7.1-mcrypt php7.1-xml php7.1-curl

Step 3. Installing Magento on Ubuntu 18.04.
First thing to do is to go to Magento’s download page and download the latest stable version of Magento, At the moment of writing this article it is version 2.3.0.

Next, unpack the Magento archive to the document root directory on your server:

unzip magento*.zip
cp -rf magento/* /var/www/html/

We will need to change some folders permissions:

chown -R www-data:www-data /var/www/html/
chmod -R 755 /var/www/html

Step 4. Configuring MariaDB for Magento.

By default, MariaDB is not hardened. You can secure MariaDB using the mysql_secure_installation script. you should read and below each steps carefully which will set root password, remove anonymous users, disallow remote root login, and remove the test database and access to secure MariaDB:

mysql_secure_installation

Configure it like this:

- Set root password? [Y/n] y
- Remove anonymous users? [Y/n] y
- Disallow root login remotely? [Y/n] y
- Remove test database and access to it? [Y/n] y
- Reload privilege tables now? [Y/n] y

Next we will need to log in to the MariaDB console and create a database for the Magento. Run the following command:

mysql -u root -p

This will prompt you for a password, so enter your MariaDB root password and hit Enter. Once you are logged in to your database server you need to create a database for Magento installation:

CREATE DATABASE magentodb;
GRANT ALL PRIVILEGES ON magentodb . * TO magento@'localhost' IDENTIFIED BY 'PASSWORD' WITH GRANT OPTION;
flush privileges;
exit

Step 5. Configuring Apache web server for Magento.

Create a new virtual host directive in Apache. For example, create a new Apache configuration file named ‘magento.conf’ on your virtual server:

touch /etc/apache2/sites-available/magento.conf
ln -s /etc/apache2/sites-available/magento.conf /etc/apache2/sites-enabled/magento.conf
nano /etc/apache2/sites-available/magento.conf

Add the following lines:

<VirtualHost *:80>
ServerAdmin [email protected]
DocumentRoot /var/www/html/
ServerName your-domain.com
ServerAlias www.your-domain.com
<Directory /var/www/html/>
Options FollowSymLinks
AllowOverride All
</Directory>
ErrorLog /var/log/apache2/your-domain.com-error_log
CustomLog /var/log/apache2/your-domain.com-access_log common

Save and close the file. Restart the apache service for the changes to take effects:

sudo a2ensite magento.conf
sudo a2enmod rewrite
sudo systemctl restart apache2

Step 6. Configure PHP for Magento.

Now here we should allow Magento to use enough PHP memory (it is recommended that PHP should be allowed 512 MB of RAM). To do that, run the commands below to open the configuration file:

sudo nano /etc/php/7.1/apache2/php.ini

Search for the line ‘memory_limit‘ in the file:

memory_limit = 128M
### And change the value to 512 ###
memory_limit = 512M

Restart Apache for the changes to take effect using the following command:

systemctl restart apache2

Step 7. Accessing Magento.

Magento will be available on HTTP port 80 by default. Open your favorite browser and navigate to http://yourdomain.com/ or http://server-ip and complete the required the steps to finish the installation. If you are using a firewall, please open port 80 to enable access to the control panel.

Congratulation’s! You have successfully installed Magento. Thanks for using this tutorial for installing Magento eCommerce in Ubuntu 18.04 LTS system. For additional help or useful information, we recommend you to check the official Magento web site.

How To Install OwnCloud 2.5.4 on Ubuntu 18.04 LTS

Install OwnCloud on Ubuntu 18

OwnCloud is a free and open-source software which enables you to create a private “file-hosting” cloud. OwnCloud is similar to DropBox service with the diference of being free to download and install on your private server. Owncloud made by PHP and backend database MySQL (MariaDB), SQLLite or PostgreSQL. OwnCloud also enables you to easily view and sync address book, calendar events, tasks and bookmarks. You can access it via the good looking and easy to use web interface or install OwnCloud client on your Desktop or Laptop machine (supports Linux, Windows and MacOS).

This article assumes you have at least basic knowledge of Linux, know how to use the shell, and most importantly, you host your site on your own VPS. The installation is quite simple and assumes you are running in the root account, if not you may need to add ‘sudo’ to the commands to get root privileges. I will show you through the step by step installation OwnCloud on a Ubuntu 18.04 (Bionic Beaver) server.

Install OwnCloud on Ubuntu 18.04 LTS

Step 1. First make sure that all your system packages are up-to-date

sudo apt-get update
sudo apt-get upgrade

Step 2. Install LAMP (Linux, Apache, MariaDB and PHP) server.

A Ubuntu 18.04 LAMP server is required. If you do not have LAMP installed, you can follow our guide here. Also install all required PHP modules:

apt-get install php7.1-cli php7.1-gd php7.1-opcache php7.1-mysql php7.1-json php7.1-mcrypt php7.1-xml php7.1-curl

Step 3. Installing OwnCloud 10 on Ubuntu 18.04 LTS.

First thing to do is to go to OwnCloud’s download page and download the latest stable version of OwnCloud, At the moment of writing this article it is version 10:

wget https://download.owncloud.org/community/owncloud-10.0.9.zip
unzip owncloud-10.0.9.zip
sudo mv owncloud /var/www/html/owncloud/

We will need to change some folders permissions:

chown -R www-data:www-data /var/www/html/owncloud/
chmod -R 755 /var/www/html/owncloud/

Step 4. Configuring MariaDB for OwnCloud.

By default, MariaDB is not hardened. You can secure MariaDB using the mysql_secure_installation script. you should read and below each steps carefully which will set root password, remove anonymous users, disallow remote root login, and remove the test database and access to secure MariaDB:

mysql_secure_installation

Configure it like this:

- Set root password? [Y/n] y
- Remove anonymous users? [Y/n] y
- Disallow root login remotely? [Y/n] y
- Remove test database and access to it? [Y/n] y
- Reload privilege tables now? [Y/n] y

Next we will need to log in to the MariaDB console and create a database for the OwnCloud. Run the following command:

mysql -u root -p

This will prompt you for a password, so enter your MariaDB root password and hit Enter. Once you are logged in to your database server you need to create a database for OwnCloud installation:

CREATE DATABASE ownclouddb;
CREATE USER 'ownclouduser'@'localhost' IDENTIFIED BY 'YOURPASSWORD';
GRANT ALL ON ownclouddb.* TO 'ownclouduser'@'localhost';
FLUSH PRIVILEGES;
exit

Step 5. Configuring Apache web server for OwnCloud.

Create a new virtual host directive in Apache. For example, create a new Apache configuration file named ‘owncloud.conf’ on your virtual server:

touch /etc/apache2/sites-available/owncloud.conf
ln -s /etc/apache2/sites-available/owncloud.conf /etc/apache2/sites-enabled/owncloud.conf
nano /etc/apache2/sites-available/owncloud.conf

Add the following lines:

<VirtualHost *:80>
ServerAdmin [email protected]
DocumentRoot /var/www/html/owncloud/
ServerName your-domain.com
ServerAlias www.your-domain.com
<Directory /var/www/html/owncloud/>
Options FollowSymLinks
AllowOverride All
Order allow,deny
allow from all
</Directory>
ErrorLog /var/log/apache2/your-domain.com-error_log
CustomLog /var/log/apache2/your-domain.com-access_log common
</VirtualHost>

Now, we can restart Apache web server so that the changes take place:

a2ensite owncloud.conf
a2enmod rewrite
a2enmod headers
a2enmod env
a2enmod dir
a2enmod mime
systemctl restart apache2.service

Step 6. Accessing OwnCloud Configuration.

To configure ownCloud, we will use the web interface. So, go ahead and open up a web browser and point it to http://your-domain.com. You should see a web page like this. Enter username and password for the administrator user account, click on the ‘Advanced options’ hyperlink and enter the data directory (or leave the default setting), then enter database username, database password, database name, host (localhost) and click ‘Finish setup’.
Install-OwnCloud-9-on-Ubuntu-16.04
Install-OwnCloud-9-Ubuntu-16.04
OwnCloud-9-Ubuntu-16.04-Upload
Congratulation’s! You have successfully installed OwnCloud. Thanks for using this tutorial for installing OwnCloud on Ubuntu 18.04 LTS (Bionic Beaver) system. For additional help or useful information, we recommend you to check the official OwnCloud web site.

How To Install Mattermost 5.10.0 on Ubuntu 18.04 LTS

Install Mattermost on Ubuntu 18

Mattermost is an open source, private cloud Slack-alternative. A workplace messaging system for web, PCs and phones, released under the MIT license.

This article assumes you have at least basic knowledge of Linux, know how to use the shell, and most importantly, you host your site on your own VPS. The installation is quite simple and assumes you are running in the root account, if not you may need to add ‘sudo’ to the commands to get root privileges. I will show you through the step by step installation Mattermost on a Ubuntu 18.04 LTS (Bionic Beaver) server.

Install Mattermost on Ubuntu 18.04

Step 1. First make sure that all your system packages are up-to-date

sudo apt-get update
sudo apt-get upgrade

Step 2. Install LAMP (Linux, Apache, MariaDB and PHP) server.

A Ubuntu 18.04 LAMP server is required. If you do not have LAMP installed, you can follow our guide here. Also install all required PHP modules:

apt-get install php7.1-cli php7.1-gd php7.1-opcache php7.1-mysql php7.1-json php7.1-mcrypt php7.1-xml php7.1-curl

Step 3. Installing Mattermost Server on Ubuntu 18.04 LTS.

First thing to do is to go to Mattermost’s download page and download the latest stable version of Mattermost, At the moment of writing this article it is version 5.1.0:

wget https://releases.mattermost.com/5.1.0/mattermost-5.1.0-linux-amd64.tar.gz

Unpack the Mattermost archive to the document root directory on your server:

tar -xvzf mattermost*.gz
sudo mv mattermost /opt

Next, create a storage directory for file:

sudo mkdir /opt/mattermost/data

Set up a system user and group called mattermost that will run this service, and set the ownership and permissions:

sudo useradd --system --user-group mattermost
sudo chown -R mattermost:mattermost /opt/mattermost
sudo chmod -R g+w /opt/mattermost

Set up the database driver through the /opt/mattermost/config/config.json file. In it, search for “DriverName” and “DataSource” lines and change as follows:

"DriverName": "mysql"
"DataSource": "mattermostuser:new_password_here@tcp(localhost:3306)/mattermost?charset=utf8mb4,utf8&readTimeout=30s&writeTimeout=$""

Step 4. Create a systemd unit for Mattermost.

Create a systemd file for Mattermost, /etc/systemd/system/mattermost.service and, in it, paste the following configuration:

nano /etc/systemd/system/mattermost.service

Add following content:

[Unit]
Description=Mattermost
After=network.target
After=mariadb.service
Requires=mariadb.service

[Service]
Type=notify
ExecStart=/opt/mattermost/bin/mattermost
TimeoutStartSec=3600
Restart=always
RestartSec=10
WorkingDirectory=/opt/mattermost
User=mattermost
Group=mattermost
LimitNOFILE=49152

[Install]
WantedBy=mariadb.service

Next, run the commands below to start Mattermost service:

systemctl daemon-reload
systemctl start mattermost.service
systemctl enable mattermost.service

Step 7. Accessing Mattermost.

Mattermost will be available on HTTP port 8065 by default. Open your favorite browser and navigate to http://your-domain.com:8065 or http://ip-address:8065 and continue to configure Mattermost by entering an email address and creating an account. If you are using a firewall, please open port 8065 to enable access to the control panel.

Congratulation’s! You have successfully installed Mattermost. Thanks for using this tutorial for installing Mattermost on your Ubuntu 18.04 LTS (Bionic Beaver) system. For additional help or useful information, we recommend you to check the official Mattermost web site.

How To Install Fork CMS 5.5.2 on Ubuntu 18.04 LTS

Install Fork CMS on Ubuntu 18

Fork CMS is an open source content management system. It comes with an intuitive and user friendly interface. It offers powerful apps and killer themes that helps to make your website more shine.

This article assumes you have at least basic knowledge of Linux, know how to use the shell, and most importantly, you host your site on your own VPS. The installation is quite simple and assumes you are running in the root account, if not you may need to add ‘sudo’ to the commands to get root privileges. I will show you through the step by step installation Fork open source content management systems on a Ubuntu 18.04 (Bionic Beaver) server.

Install Fork CMS on Ubuntu 18.04 LTS

Step 1. First make sure that all your system packages are up-to-date

sudo apt-get update
sudo apt-get upgrade

Step 2. Install LAMP (Linux, Apache, MariaDB and PHP) server.

A Ubuntu 18.04 LAMP server is required. If you do not have LAMP installed, you can follow our guide here. Also install all required PHP modules:

apt-get install php7.1-cli php7.1-gd php7.1-opcache php7.1-mysql php7.1-json php7.1-mcrypt php7.1-xml php7.1-curl

Step 3. Installing Fork CMS on Ubuntu 18.04 LTS.

First thing to do is to go to Fork CMS’s download page and download the latest stable version of Fork CMS, At the moment of writing this article it is version 5:

wget https://www.fork-cms.com/frontend/files/releases/forkcms-5.3.1.tar.gz
tar -xvzf forkcms-5.3.1.tar.gz
sudo mv forkcms /var/www/html/forkcms

We will need to change some folders permissions:

chown -R www-data:www-data /var/www/html/forkcms/
chmod -R 755 /var/www/html/forkcms/

Step 4. Configuring MariaDB for Fork CMS.

By default, MariaDB is not hardened. You can secure MariaDB using the mysql_secure_installation script. you should read and below each steps carefully which will set root password, remove anonymous users, disallow remote root login, and remove the test database and access to secure MariaDB:

mysql_secure_installation

Configure it like this:

- Set root password? [Y/n] y
- Remove anonymous users? [Y/n] y
- Disallow root login remotely? [Y/n] y
- Remove test database and access to it? [Y/n] y
- Reload privilege tables now? [Y/n] y

Next we will need to log in to the MariaDB console and create a database for the Fork CMS. Run the following command:

mysql -u root -p

This will prompt you for a password, so enter your MariaDB root password and hit Enter. Once you are logged in to your database server you need to create a database for Fork CMS installation:

CREATE DATABASE forkcms;
CREATE USER 'forkcmsuser'@'localhost' IDENTIFIED BY 'new_password_here';
GRANT ALL ON forkcms.* TO 'forkcmsuser'@'localhost' IDENTIFIED BY 'user_password_here' WITH GRANT OPTION;
FLUSH PRIVILEGES;
EXIT;

Step 5. Configuring Apache web server for Fork CMS.

Create a new virtual host directive in Apache. For example, create a new Apache configuration file named ‘owncloud.conf’ on your virtual server:

touch /etc/apache2/sites-available/forkcms.conf
ln -s /etc/apache2/sites-available/forkcms.conf /etc/apache2/sites-enabled/forkcms.conf
nano /etc/apache2/sites-available/forkcms.conf

Add the following lines:

<VirtualHost *:80>
ServerAdmin [email protected]
DocumentRoot /var/www/html/forkcms
ServerName your-domain.com
ServerAlias www.your-domain.com
<Directory /var/www/html/forkcms/>
Options FollowSymLinks
AllowOverride All
Order allow,deny
allow from all
</Directory>
ErrorLog /var/log/apache2/your-domain.com-error_log
CustomLog /var/log/apache2/your-domain.com-access_log common
</VirtualHost>

Now, we can restart Apache web server so that the changes take place:

a2ensite forkcms.conf
a2enmod rewrite
systemctl restart apache2.service

Step 6. Accessing Fork CMS.

Fork CMS will be available on HTTP port 80 by default. Open your favorite browser and navigate to http://your-domain.com/install.php or http://server-ip/install.php and complete the required the steps to finish the installation. If you are using a firewall, please open port 80 to enable access to the control panel.

Congratulation’s! You have successfully installed Fork CMS. Thanks for using this tutorial for installing Fork open source content management systems on Ubuntu 18.04 LTS (Bionic Beaver). For additional help or useful information, we recommend you to check the official Fork CMS web site.

How To Install Zabbix 4.2 on Ubuntu 18.04 LTS

Install Zabbix on Ubuntu 18

Zabbix is an open source monitoring tool that is ideal for monitoring your cloud servers. Zabbix is very flexible, information can be retrieved using HTTP/SNMP or by installing a Zabbix agent on the machines to monitor, and allows a lot of customization.

This article assumes you have at least basic knowledge of Linux, know how to use the shell, and most importantly, you host your site on your own VPS. The installation is quite simple and assumes you are running in the root account, if not you may need to add ‘sudo’ to the commands to get root privileges. I will show you through the step by step installation Zabbix in Ubuntu 18.04 LTS Bionic Beaver.

Install Zabbix on Ubuntu 18.04 LTS

Step 1. First make sure that all your system packages are up-to-date

sudo apt-get update
sudo apt-get upgrade

Step 2. Install LAMP (Linux, Apache, MariaDB and PHP) server.

A Ubuntu 18.04 LAMP server is required. If you do not have LAMP installed, you can follow our guide here. Also install all required PHP modules:

apt-get install php7.1-cli php7.1-gd php7.1-opcache php7.1-mysql php7.1-json php7.1-mcrypt php7.1-xml php7.1-curl

Step 3. Installing Zabbix on Ubuntu 18.04 LTS.

The latest version of Zabbix Server is 3.4 but the version available on Ubuntu repositories is 3.0. To install version 3.4, you need to add Zabbix repositories for this version:

wget http://repo.zabbix.com/zabbix/3.4/ubuntu/pool/main/z/zabbix-release/zabbix-release_3.4-1+bionic_all.deb
dpkg -i zabbix-release_3.4-1+bionic_all.deb

After adding zabbix apt repository in your system, Now update package lists and install Zabbix using commands:

apt update
apt install -y zabbix-server-mysql zabbix-frontend-php zabbix-agent

Step 4. Zabbix Configuration.

sudo nano /etc/zabbix/zabbix_server.conf

Adjust the following values and make a note of the password you’ve chosen. You’ll need it later too.

DBName=zabbixdb
DBUser=zabbix
DBPassword=your_password_here

Step 5. Configure MariaDB Database for Zabbix.

By default, MariaDB is not hardened. You can secure MariaDB using the mysql_secure_installation script. you should read and below each steps carefully which will set root password, remove anonymous users, disallow remote root login, and remove the test database and access to secure MySQL.

mysql_secure_installation

Configure it like this:

- Set root password? [Y/n] y
- Remove anonymous users? [Y/n] y
- Disallow root login remotely? [Y/n] y
- Remove test database and access to it? [Y/n] y
- Reload privilege tables now? [Y/n] y

Next we will need to log in to the MariaDB console and create a database for Zabbix. Run the following command:

mysql -u root -p

This will prompt you for a password, so enter your MariaDB root password and hit Enter. Once you are logged in to your database server you need to create a database for the Zabbix software:

create user 'zabbix'@'localhost' identified by 'your_chosen_password_here';
create database zabbixdb;
grant all privileges on zabbixdb.* to 'zabbix'@'localhost';
flush privileges;
exit;

After creating the zabbix database and user we need to import the zabbix initial database using the below commands:

cd /usr/share/doc/zabbix-server-mysql
zcat create.sql.gz | mysql -u root -p zabbixdb

Step 6. Configure Apache web server for Zabbix.

First, we’ll move the Zabbix apache file from the package directory:

sudo cp /usr/share/doc/zabbix-frontend-php/examples/apache.conf /etc/apache2/conf-available/zabbix.conf
sudo a2enconf zabbix.conf
sudo a2enmod alias

We should adjust php timezone as per zabbix recommended settings:

### nano /etc/zabbix/apache.conf
    php_value max_execution_time 300
    php_value memory_limit 128M
    php_value post_max_size 16M
    php_value upload_max_filesize 2M
    php_value max_input_time 300
    php_value always_populate_raw_post_data -1
    php_value date.timezone Europe/Rome

Restart the Apache and zabbix service for the changes to take effect:

systemctl restart zabbix-server zabbix-agent apache2

Step 7. Accessing Zabbix.

will be available on HTTP port 80 by default. Open your favorite browser and navigate to http://your-domain.com/zabbix or http://server-ip/zabbix and complete the required the steps to finish the installation. If you are using a firewall, please open port 80 to enable access to the control panel.
zabbix-3.4-setup

Congratulation’s! You have successfully installed Zabbix. Thanks for using this tutorial for installing Zabbix Monitoring Tool on your Ubuntu 18.04 Bionic Beaver LTS system. For additional help or useful information, we recommend you to check the official Zabbix web site.