How To Install Kotlin Compiler on Ubuntu 16.04

Install Kotlin Compiler on Ubuntu 16

Kotlin is a new statically typed language from JetBrains. JetBrains is famous for its popular Java IDE IntelliJ. Kotlin was recently open sourced and the compiler made accessible through Github. This article will reveal the steps necessary to build and install the compiler and run a program. In this tutorial we will show you how to install Kotlin Compiler on Ubuntu 16.04 LTS.

Kotlin is a completely supported programming language by Google on the Android, and can be directly included in the Android Studio 3.0 IDE package as an alternative to the standard Java compiler.

This article assumes you have at least basic knowledge of Linux, know how to use the shell, and most importantly, you host your site on your own VPS. The installation is quite simple and assumes you are running in the root account, if not you may need to add ‘sudo’ to the commands to get root privileges. I will show you through the step by step installation Kotlin programming language on an Ubuntu 16.04 Xenial Xerus server.

Install Kotlin Compiler on Ubuntu 16.04

Step 1. First make sure that all your system packages are up-to-date

sudo apt-get update
sudo apt-get upgrade

Step 2. Installing Kotlin Programming Language.

An easier way to install Kotlin on UNIX based systems is by using SDKMAN!. Simply run the following in a terminal and follow any instructions:

curl -s https://get.sdkman.io | bash

Next, open a new terminal and install Kotlin with:

sdk install kotlin

Then, carry out this command additionally to add sdkman to your path:

source "$HOME/.sdkman/bin/sdkman-init.sh"

To test whether the kotlin has successfully installed in your machine, launch another terminal and start executing the below command:

kotlinc -version

Congratulation’s! You have successfully installed Kotlin. Thanks for using this tutorial for installing Kotlin programming language on your Ubuntu 16.04 LTS. For additional help or useful information, we recommend you to check the official Kotlin web site.

How To Install SpiderOak One on Ubuntu 16.04 LTS

Install SpiderOak One on Ubuntu 16

SpiderOak is a renowned cloud storage service, a free account allows you upload up to 2 GB of information to the cloud, all you want to do is to install Spideroak client on your desktop, smart phone or laptop and it will keep synchronizing your specified information from your neighborhood machine to the online cloud server. The backups are extremely important and this kind of free app that could automate the backup process is no less than a blessing.

This article assumes you have at least basic knowledge of Linux, know how to use the shell, and most importantly, you host your site on your own VPS. The installation is quite simple and assumes you are running in the root account, if not you may need to add ‘sudo’ to the commands to get root privileges. I will show you through the step by step installation SpiderOak One on a Ubuntu 16.04 Xenial Xerus server.

Install SpiderOak One on Ubuntu 16.04 LTS Xenial Xerus

Step 1. First make sure that all your system packages are up-to-date

sudo apt-get update
sudo apt-get upgrade

Step 2. Installing SpiderOak One on Ubuntu 16.04.

First create a source list file for SpiderOak:

nano /etc/apt/sources.list.d/spideroakone.list

Add the following line:

deb http://APT.spideroak.com/ubuntu-spideroak-hardy/ release restricted

Then execute the following command to import public key of SpiderOak repository:

apt-key adv --keyserver keyserver.ubuntu.com --recv-keys 573E3D1C51AE1B3D

Update package index and install SpiderOakOne:

apt-get update
apt-get install spideroakone

Step 3. Accessing SpiderOak One.

Once the SpiderOak One installation is complete, you can start SpiderOak by typing below command in the terminal or Going to Activities on Ubuntu:

SpiderOakONE

Congratulation’s! You have successfully installed SpiderOak One. Thanks for using this tutorial for installing SpiderOak One Server in Ubuntu 16.04 Xenial Xerus system. For additional help or useful information, we recommend you to check the official SpiderOak One web site.

How To Install Opera on Ubuntu 16.04 LTS

Install Opera on Ubuntu 16

Opera is a fast, secure and easy-to-use internet browser which works well on most of the Linux distributions. It’s now designed with an integrated ad blocker, battery saver and free VPN, so it saves time and resources for its own users. Also, Opera browser is stuffed with several other innovative features such as speed dialup, pop-up blocking, personal browsing and tabbed browsing.

This article assumes you have at least basic knowledge of Linux, know how to use the shell, and most importantly, you host your site on your own VPS. The installation is quite simple and assumes you are running in the root account, if not you may need to add ‘sudo’ to the commands to get root privileges. I will show you through the step by step installation Opera browser on Ubuntu 16.04 Xenial Xerus.

Install Opera on Ubuntu 16.04 LTS

Step 1. First make sure that all your system packages are up-to-date

sudo apt-get update
sudo apt-get upgrade

Step 2. Installing Opera on Ubuntu 16.04.

First, Go to the Opera browser for Linux download page. and download the deb package installer:

### 32-bit ###
wget http://download4.operacdn.com/ftp/pub/opera/desktop/40.0.2308.62/linux/opera-stable_40.0.2308.62_i386.deb

### 64-bit ###
wget http://download4.operacdn.com/ftp/pub/opera/desktop/40.0.2308.62/linux/opera-stable_40.0.2308.62_amd64.deb

Install Opera DEB package, forcing install of dependencies:

apt-get install apt-transport-https libcurl3
sudo dpkg -i opera-stable*.deb

Step 3. Accessing Opera Web Browser.

Once the Opera installation is complete, you can start Opera by typing below command in the terminal or Going to Activities on Ubuntu:

opera

opera_installation

Congratulations! You have successfully installed Opera. Thanks for using this tutorial for installing Opera browser in Ubuntu 16.04 Xenial Xerus systems. For additional help or useful information, we recommend you to check the official Opera web site.

How To Install OrientDB on Ubuntu 16.04

Install OrientDB on Ubuntu 16

OrientDB is an open source NoSQL database management system written in Java. It is a multi-model database, supporting graph, document, key/value, and object models, but the relationships are managed as in graph databases with direct connections between records.

This article assumes you have at least basic knowledge of Linux, know how to use the shell, and most importantly, you host your site on your own VPS. The installation is quite simple and assumes you are running in the root account, if not you may need to add ‘sudo’ to the commands to get root privileges. I will show you through the step by step installation OrientDB on a Ubuntu 16.04 (xenial xerus) server.

Install OrientDB on Ubuntu 16.04 LTS

Step 1. First, make sure that all your system packages are up-to-date

sudo apt-get update
sudo apt-get upgrade

Step 2. Installing Dependencies.

First of all, let’s install dependencies for OrientDB:

apt-get install oracle-java8-set-default git ant

Step 3. Installing OrientDB.

Download the latest version of OrientDB by executing the following command, At the moment of writing this article it is version 2.2.22:

wget -O orientdb-community-2.2.22.tar.gz http://orientdb.com/download.php?file=orientdb-community-2.2.22.tar.gz&os=linux

Once the package is downloaded we will untar and move the extracted folder to the /opt/orientdb:

tar -zxf orientdb-community-2.2.22.tar.gz
mv orientdb-community-2.2.22 /opt/orientdb

Step 4. Starting the OrientDB Server.

Change to the /opt/orientdb folder and start the OrientDB database server:

cd /opt/orientdb
sudo bin/server.sh

OrientDB should now prompt for the root password with a message like the one below:

+---------------------------------------------------------------+
|                WARNING: FIRST RUN CONFIGURATION               |
+---------------------------------------------------------------+
| This is the first time the server is running. Please type a   |
| password of your choice for the 'root' user or leave it blank |
| to auto-generate it.                                          |
|                                                               |
| To avoid this message set the environment variable or JVM     |
| setting ORIENTDB_ROOT_PASSWORD to the root password to use.   |
+---------------------------------------------------------------+

Step 5. Configure OrientDB Daemon.

Create a system user which we want to run OrientDB here we assume orientdb user:

useradd –r 0riendb –s  /sbin/nologin
chown –R orientdb:orientdb /opt/orientdb
nano /opt/orientdb/bin/orientdb.sh

Find the below line in the configuration and change them to:

# You have to SET the OrientDB installation directory here
ORIENTDB_DIR="/opt/orientdb"
ORIENTDB_USER="orientdb"

Once the configuration is done, change the configuration server file’s permission:

chmod 640 /opt/orientdb/config/orientdb-server-config.xml

Step 6. Install the Systemd service OrientDB.

First, we needed to copy the file to /etc/system/services folder:

cp /opt/orientdb/bin/orientdb.service /etc/systemd/system

Edit the OrientDB service file:

### nano /etc/systemd/system/orientdb.service

[Unit]
Description=OrientDB Server
After=network.target
After=syslog.target
[Install]
WantedBy=multi-user.target
[Service]
User=orientdb
Group=orientdb
ExecStart /opt/orientdb /bin/server.sh

Reload systemd daemon service:

systemctl daemon-reload

Start OrientDB and enable for starting at boot time:

systemctl start orientdb
systemctl enable orientdb

Congratulation’s! You have successfully installed OrientDB. Thanks for using this tutorial for installing OrientDB on Ubuntu 16.04 (xenial xerus) server. For additional help or useful information, we recommend you to check the official OrientDB web site.

How To Install Java (JRE or JDK) on Ubuntu 16.04

Install Java (JRE or JDK) on Ubuntu 16

In this tutorial we will show you how to install and configuration of java JRE or JDK on your Ubuntu 16.04 server. Many programs and scripts that require java to run it, but usually Java is not installed by default on VPS or Dedicated Server. This article assumes you have at least basic knowledge of linux, know how to use the shell, and most importantly, you host your site on your own VPS. The installation is quite simple and assumes you are running in the root account, if not you may need to add ‘sudo’ to the commands to get root privileges. I will show you through the step by step installation JRE (Java Runtime Environment) and JDK (Java Development Kit) on Ubuntu 16.04.

Install Java (JRE or JDK) on Ubuntu 16.04

Step 1. First make sure that all your system packages are up-to-date by running these following apt-get commands in the terminal.

sudo apt-get update
sudo apt-get upgrade

After your server has been fully updated, verify if java is installed or not:

java -version

If there is no java package installed ye, output will be something like:

The program 'java' can be found in the following packages:

* default-jre
* gcj-4.9-jre-headless
* gcj-5-jre-headless
* openjdk-7-jre-headless
* gcj-4.8-jre-headless
* openjdk-6-jre-headless
* openjdk-8-jre-headless
* openjdk-9-jre-headless
Try: apt install <selected package>

Step 2. Installing Java (JRE or JDK).

Once you have verified if Java is installed or not, choose the type of Java installation that you want with one the following:

sudo apt-get install openjdk-7-jre
sudo apt-get install openjdk-7-jdk

Another alternative Java install is with Oracle JRE and JDK. However, we would need to install additional repositories for a proper installation:

sudo apt-get install python-software-properties
sudo add-apt-repository ppa:webupd8team/java

Then, you will need to fully update the system with the following command and install it:

sudo apt-get update
sudo apt-get install oracle-java8-installer

Step 3. Verify Installed Java Version.

java -version

Result:

java version "1.8.0_74"
Java(TM) SE Runtime Environment (build 1.8.0_74-b02)
Java HotSpot(TM) 64-Bit Server VM (build 25.74-b02, mixed mode)

Step 4. Setup JAVA_HOME on Ubuntu 16.04.

Since many programs now days need a JAVA_HOME environment variable to work properly. We will need to find the appropriate path to make these changes. With the following command, you can view your installs and their path:

sudo update-alternatives --config java
sudo nano /etc/profile

Now that you are in the user profile file, add the following code, along with the Path of your installation from the previous step, to the bottom. ( Example: JAVA_HOME=”YOUR_PATH”):

export JAVA_HOME="/usr/lib/jvm/java-1.8.0-openjdk-1.8.0.51-1.b16.el7_1.x86_64"

Reload the file so all your changes could take effect with the following command:

source /etc/profile

Verify that your implementations are correct with the following command:

echo $JAVA_HOME

Congratulation’s! You have successfully installed Java. Thanks for using this tutorial for installing Oracle Java (JRE or JDK) on Ubuntu 16.04 Xenial Xerus system. For additional help or useful information, we recommend you to check the official Java web site.

How To Install uTorrent on Ubuntu 16.04

Install uTorrent on Ubuntu 16

uTorrent is a freeware and a closed source BitTorrent Client. One of the most used lightweight BitTorrent Client, Now it is available for Linux as uTorrent server. The µTorrent is designed to use minimal computer resources while offering functionality comparable to larger BitTorrent clients such as Vuze or BitComet and also it provides performance, stability, and support for older hardware and versions of operating system. It is available for Microsoft Windows and Mac OS X.

This article assumes you have at least basic knowledge of linux, know how to use the shell, and most importantly, you host your site on your own VPS. The installation is quite simple and assumes you are running in the root account, if not you may need to add ‘sudo’ to the commands to get root privileges. I will show you through the step by step installation uTorrent on a Ubuntu 16.04 server.

Install uTorrent on Ubuntu 16.04

Step 1. First make sure that all your system packages are up-to-date by running these following apt-get commands in the terminal.

sudo apt-get update
sudo apt-get upgrade

Step 2. Install dependency library.

Open Terminal and run the following command to install dependency libraries. Assign the password for the user when asked:

sudo apt-get install libssl1.0.0 libssl-dev

Step 3. Installing uTorrent.

First thing to do is to go to uTorrent’s download page and download the latest stable version of uTorrent, At the moment of writing this article it is version 3.3:

### 32 bit ###
wget http://download-new.utorrent.com/endpoint/utserver/os/linux-i386-ubuntu-13-04/track/beta/ -O utserver.tar.gz

### 64 bit ###
wget http://download-new.utorrent.com/endpoint/utserver/os/linux-x64-ubuntu-13-04/track/beta/ -O utserver.tar.gz

Move the downloaded tar.gz directory to /opt directory. Run the following commands or you can also do it manually:

sudo tar -zxvf utserver.tar.gz -C /opt/

Set an executable permission to the extracted directory for running the uTorrent server:

sudo chmod 777 /opt/utorrent-server-alpha-v3_3/

Run the command to link uTorrent server to the /user/bin directory:

sudo ln -s /opt/utorrent-server-alpha-v3_3/utserver /usr/bin/utserver

Finally, start uTorrent Server by executing the following command:

utserver -settingspath /opt/utorrent-server-alpha-v3_3/ &amp;

Step 4. Accessing uTorrent.

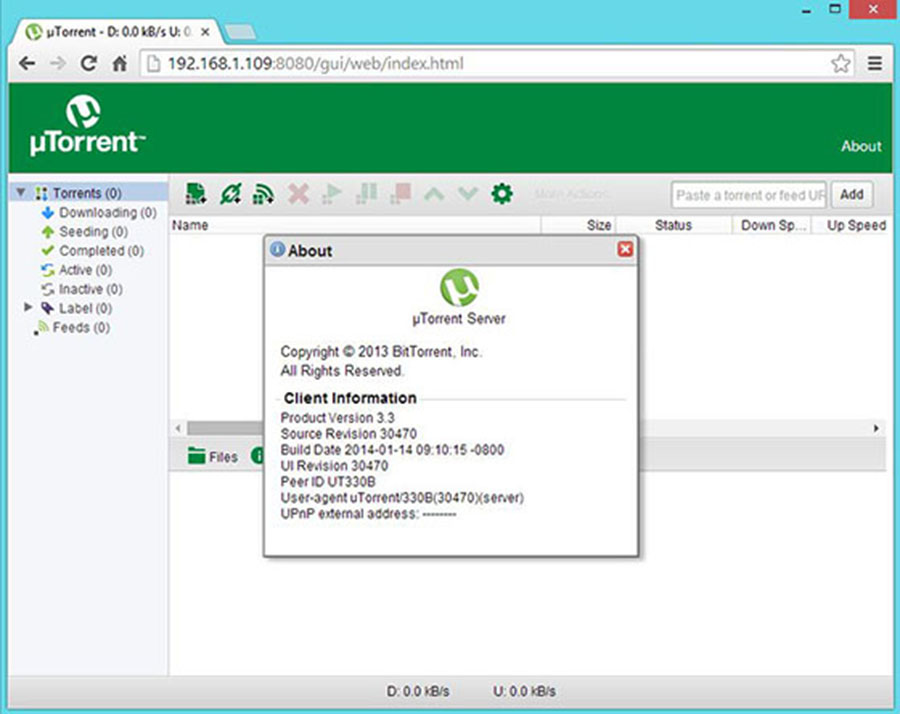
uTorrent will be available on HTTP port 8080 by default. Open your favorite browser and navigate to http://yourdomain.com:8080 or http://your-ip-address:8080/gui. It will ask you the username and password. The default username is admin and leave the password field empty. Also, if you are using a firewall, please open port 8080 to enable access to the control panel.
Utorrent-Ubuntu-14.04
Congratulations! You have successfully installed uTorrent. Thanks for using this tutorial for installing μTorrent (uTorrent) in Ubuntu 16.04 systems. For additional help or useful information, we recommend you to check the official uTorrent web site.

How To Install Nginx on Ubuntu 16.04

Install Nginx on Ubuntu 16

Nginx is a powerful web server software that can be used on your server. It is also known for its high performance and low memory usage which will allow fewer resources to be used but getting the job done efficiently. A popular set up is to use it as a proxy for Apache, which can then serve application requests. That will not be covered in this tutorial, though.

This article assumes you have at least basic knowledge of linux, know how to use the shell, and most importantly, you host your site on your own VPS. The installation is quite simple and assumes you are running in the root account, if not you may need to add ‘sudo’ to the commands to get root privileges. I will show you through the step by step installation Nginx on a Ubuntu 16.04 server.

Install Nginx on Ubuntu 16.04

Step 1. First let’s start by ensuring your system is up-to-date.

apt-get update
apt-get upgrade

Step 2. Installing Nginx.

Installing nginx package on Ubuntu 16.04 (Xenial Xerus) is as easy as running:

apt-get install nginx

After that, run the commands to enable Nginx to automatically startup when your server starts:

sudo systemctl enable nginx
sudo systemctl start nginx

To confirm if the Nginx service is indeed running, use the following command:

sudo systemctl status nginx

You can verify that Nginx is really running by opening your favorite web browser and entering the URL http://your-server’s-address, if it is installed, then you will see this:

nginx-default-page

This example is the default nginx web page on Ubuntu 16.04

Learn how to use Nginx server blocks here. If you’d like to build out a more complete application stack, check out this article on how to configure a LEMP stack on Ubuntu 15.04.

Congratulation’s! You have successfully installed Nginx. Thanks for using this tutorial for installing Nginx web server on your Ubuntu 15.04 system. For additional help or useful information, we recommend you to check the official Nginx web site.

You Might Also Like: How To Install LEMP on Ubuntu 16.04