How To Install Quod Libet on Ubuntu 16.04 LTS

Install Quod Libet on Ubuntu 16

Quod Libet is a free and open source GTK+ music player for Ubuntu. Quod Libet code is written in python and provides a simple user interface and uses the Mutagen tagging Library, its library organizer is able to handle big libraries of more 10,000 songs. It also supports most of the features you’d expect from a modern media player: Unicode support, advanced tag editing, Replay Gain, podcasts & Internet radio, album art support and all major audio formats.

This article assumes you have at least basic knowledge of Linux, know how to use the shell, and most importantly, you host your site on your own VPS. The installation is quite simple and assumes you are running in the root account, if not you may need to add ‘sudo’ to the commands to get root privileges. I will show you through the step by step installation OpenShot video editor on Ubuntu 16.04 Xenial Xerus server.

Install Quod Libet on Ubuntu 16.04 LTS

Step 1. First make sure that all your system packages are up-to-date by running these following apt-get commands in the terminal.

sudo apt-get update
sudo apt-get upgrade

Step 2. Installing Quod Libet.

First, you’ll need to add Quod Libet’s PPA (personal package archive) to your system:

add-apt-repository ppa:lazka/ppa
apt-get update

Next install the Quod Libet package by executing the following command:

apt-get install quodlibet

Once installed, next you can start Quod Libet by searching for it Unity Dash. If the app icon doesn’t show up, try logging out and logging back in.

Congratulations! You have successfully installed Quod Libet. Thanks for using this tutorial for installing Quod Libet music player in Ubuntu 16.04 Xenial Xerus systems. For additional help or useful information, we recommend you to check the official Quod Libet web site.

How To Install Apache Hadoop on Ubuntu 16.04 LTS

Install Apache Hadoop on Ubuntu

Apache Hadoop is a an open-source software framework written in Java for distributed storage and distributed process, it handles very large size of data sets by distributing it across computer clusters. Rather than rely on hardware to deliver high-availability, the library itself is designed to detect and handle failures at the application layer, so delivering a highly-available service on top of a cluster of computers, each of which may be prone to failures.

This article assumes you have at least basic knowledge of Linux, know how to use the shell, and most importantly, you host your site on your own VPS. The installation is quite simple and assumes you are running in the root account, if not you may need to add ‘sudo’ to the commands to get root privileges. We will show you through the step by step installation Apache Hadoop on an Ubuntu 16.04 Xenial Xerus server.

Install Apache Hadoop on Ubuntu 16.04 LTS

Step 1. First make sure that all your system packages are up-to-date by running these following apt-get commands in the terminal.

sudo apt-get update
sudo apt-get upgrade

Step 2. Installing Java (OpenJDK).

Since hadoop is based on java, make sure you have java jdk installed on the system. If you don’t have Java installed on your system, use following link to install it first.

Install Java JDK 8 on Ubuntu 16.04

[email protected] ~# java -version
java version "1.8.0_74"
Java(TM) SE Runtime Environment (build 1.8.0_74-b02)
Java HotSpot(TM) 64-Bit Server VM (build 25.74-b02, mixed mode)

Step 3. Installing Apache Hadoop.

To avoid security issues, we recommend to setup new Hadoop user group and user account to deal with all Hadoop related activities, following command:

sudo addgroup hadoopgroup
sudo adduser —ingroup hadoopgroup hadoopuser

After creating user, it also required to set up key based ssh to its own account. To do this use execute following commands:

su - hadoopuser
ssh-keygen -t rsa -P ""
cat /home/hadoopuser/.ssh/id_rsa.pub >> /home/hadoopuser/.ssh/authorized_keys
chmod 600 authorized_keys
ssh-copy-id -i ~/.ssh/id_rsa.pub slave-1
ssh slave-1

Download the latest stable version of Apache Hadoop, At the moment of writing this article it is version 2.8.1:

wget http://www-us.apache.org/dist/hadoop/common/hadoop-2.8.1/hadoop-2.8.1.tar.gz
tar xzf hadoop-2.8.1.tar.gz
mv hadoop-2.8.1 hadoop

Step 4. Configure Apache Hadoop.

Setup Hadoop environment variables. Edit ~/.bashrc file and append following values at end of file:

export HADOOP_HOME=/home/hadoop/hadoop
export HADOOP_INSTALL=$HADOOP_HOME
export HADOOP_MAPRED_HOME=$HADOOP_HOME
export HADOOP_COMMON_HOME=$HADOOP_HOME
export HADOOP_HDFS_HOME=$HADOOP_HOME
export YARN_HOME=$HADOOP_HOME
export HADOOP_COMMON_LIB_NATIVE_DIR=$HADOOP_HOME/lib/native
export PATH=$PATH:$HADOOP_HOME/sbin:$HADOOP_HOME/bin

Apply environmental variables to current running session:

source ~/.bashrc

Now edit $HADOOP_HOME/etc/hadoop/hadoop-env.sh file and set JAVA_HOME environment variable:

export JAVA_HOME=/usr/jdk1.8.0_74/

Hadoop has many of configuration files, which need to configure as per requirements of your hadoop infrastructure. Lets start with the configuration with basic hadoop single node cluster setup:

cd $HADOOP_HOME/etc/hadoop

Edit core-site.xml:

<configuration>
<property>
  <name>fs.default.name</name>
    <value>hdfs://localhost:9000</value>
</property>
</configuration>

Edit hdfs-site.xml:

<configuration>
<property>
 <name>dfs.replication</name>
 <value>1</value>
</property>

<property>
  <name>dfs.name.dir</name>
    <value>file:///home/hadoop/hadoopdata/hdfs/namenode</value>
</property>

<property>
  <name>dfs.data.dir</name>
    <value>file:///home/hadoop/hadoopdata/hdfs/datanode</value>
</property>
</configuration>

Edit mapred-site.xml:

<configuration>
 <property>
  <name>mapreduce.framework.name</name>
   <value>yarn</value>
 </property>
</configuration>

Edit yarn-site.xml:

<configuration>
 <property>
  <name>yarn.nodemanager.aux-services</name>
    <value>mapreduce_shuffle</value>
 </property>
</configuration>

Now format namenode using following command, do not forget to check the storage directory:

hdfs namenode -format

Start all hadoop services use the following command:

cd $HADOOP_HOME/sbin/
start-dfs.sh
start-yarn.sh

You should observe the output to ascertain that it tries to start datanode on slave nodes one by one. To check if all services are started well use ‘jps‘ command:

jps

Step 5. Accessing Apache Hadoop.

Apache Hadoop will be available on HTTP port 8088 and port 50070 by default. Open your favorite browser and navigate to http://yourdomain.com:50070 or http://server-ip:50070. If you are using a firewall, please open port 8088 and 50070 to enable access to the control panel.

Congratulation’s! You have successfully installed Apache Hadoop. Thanks for using this tutorial for installing Apache Hadoop on Ubuntu 16.04 system. For additional help or useful information, we recommend you to check the official Apache Hadoop web site.

How To Install Ionic Framework on Ubuntu 18.04 LTS

Install Ionic Framework on Ubuntu 18

In this tutorial we will show you how to install Ionic Framework on Ubuntu 18.04 LTS. Ionic Framework is the free, open source mobile UI toolkit for developing high-quality cross-platform apps for native iOS, Android, and the web—all from a single codebase.

This article assumes you have at least basic knowledge of Linux, know how to use the shell, and most importantly, you host your site on your own VPS. The installation is quite simple and assumes you are running in the root account, if not you may need to add ‘sudo’ to the commands to get root privileges. I will show you through the step by step installation ClamAV on a Ubuntu 18.04 LTS (Bionic Beaver) server.
Ionic Framework on Ubuntu 18.04 LTS Bionic Beaver

Step 1. First make sure that all your system packages are up-to-date by running these following apt-get commands in the terminal.

sudo apt-get update
sudo apt-get upgrade

Step 2. Installing Node.js.

First, use the following commands to install NPM and Node.js:

sudo apt-get install python-software-properties
curl -sL https://deb.nodesource.com/setup_8.x | sudo -E bash -
sudo apt-get install nodejs

Step 3. Installing Cordova.

Run the following command to install Cordova on your system using npm command:

sudo npm install -g cordova

Step 4. Installing Ionic Framework on Ubuntu 18.04 LTS.

Use NPM command to install Ionic framework on your system:

sudo npm install -g ionic

Verify the ionic installation:

ionic -v

Step 5. Create Ionic Application.

First, create a new Cordova project on your computer using the following command:

ionic start HelloM0na blank

Now use one of the following commands to enable iOS or Android platform:

ionic platform add ios
ionic platform add android

Congratulation’s! You have successfully installed Ionic Framework. Thanks for using this tutorial for installing Ionic Framework open source antivirus engine in Ubuntu 18.04 LTS Bionic Beaver system. For additional help or useful information, we recommend you to check the official Ionic Framework web site.

How To Fix 504 Gateway Time-out on Nginx Web Server

Fix 504 Gateway Time-out on Nginx

In this tutorial we are going to learn how to fix 504 gateway time-out on Nginx web server on Linux server. If you run a Nginx web server you may have already encountered the annoying 504 Gateway Time-out errors. This is pretty common error, are generated most probably by the PHP max execution time limit or by the FastCGI read timeout settings.

This article assumes you have at least basic knowledge of linux, know how to use the shell, and most importantly, you host your site on your own VPS. The installation is quite simple and assumes you are running in the root account, if not you may need to add ‘sudo’ to the commands to get root privileges. I will show you through the step by step installation to fix nginx 504 gateway timeout on the nginx webserver.

Fix 504 Gateway Time-out on Nginx

Changes in php.ini

Try raising max_execution_time setting in php.ini file (CentOS path is /etc/php.ini):

 max_execution_time = 150

Changes in PHP-FPM

Try raising request_terminate_timeout setting in php.ini file (CentOS path is /etc/php-fpm.d):

 request_terminate_timeout = 150

Changes in Nginx Config

Finally, add fastcgi_read_timeout variable inside our Nginx virtual host configuration:

location ~* \.php$ {
    include         fastcgi_params;
    fastcgi_index   index.php;
    fastcgi_read_timeout 150;
    fastcgi_pass    127.0.0.1:9000;
    fastcgi_param   SCRIPT_FILENAME    $document_root$fastcgi_script_name;
}

Reload PHP-FPM and Nginx

 
service php-fpm restart
service nginx restart

For Nginx as Proxy for Apache web server, this is what you have to try to fix the 504 Gateway Timeout error:

Add following variables to nginx.conf file:

proxy_connect_timeout       600;
proxy_send_timeout          600;
proxy_read_timeout          600;
send_timeout                600;

Once complete, simply reload Nginx:

 service nginx restart

Congratulation’s! You have successfully fix error nginx 504 gateway time out. Thanks for using this tutorial for fix 504 gateway timeout error in Linux system. For additional help or useful information, we recommend you to check the official Nginx web site.

How To Enable Gzip Compression on Nginx CentOS

Enable Gzip Compression on Nginx CentOS

Nginx is one of the most popular web servers in the world and is responsible for hosting some of the largest and highest-traffic sites on the internet. It is more resource-friendly than Apache in most cases and can be used as a web server or a reverse proxy. So today we’re going to learn how to setup enable Gzip compression on Nginx on CentOS 6 or 7. Compressing your scripts and images is a good idea to optimize your website’s load times.

This article assumes you have at least basic knowledge of linux, know how to use the shell, and most importantly, you host your site on your own VPS. In this post, I will talk about an easy way to enable GZIP compression on nginx servers. It’s really not that difficult. Let’s start with Nginx.

Enable Gzip Compression on Nginx

Step 1. Configure nginx.conf (/etc/nginx/nginx.conf)

gzip on;
gzip_http_version 1.0;
gzip_comp_level 2;
gzip_proxied any;
gzip_min_length  1100;
gzip_buffers 16 8k;
gzip_types text/plain text/html text/css application/x-javascript text/xml application/xml application/xml+rss text/javascript;
gzip_disable "MSIE [1-6].(?!.*SV1)";
gzip_vary on;

Step 2. Now, you simply need to restart your server.

 service nginx restart

If you wish to test if GZIP is enabled, use this command:

 curl -H "Accept-Encoding: gzip" -I https://wpcademy.com

With that file now in place, restart your server and you will now be serving site assets with gzip compression. Google takes site speed into account when ranking and placing your sites in their search engine so do your users a favor and strive for the fastest site possible, especially for mobile users.

Congratulation’s! You have successfully enable Gzip on Nginx. Thanks for using this tutorial for enable gzip compression Nginx on Linux system. For additional help or useful information, we recommend you to check the official Nginx web site.

How To Install Winusb on Ubuntu 14.04

install winusb ubuntu

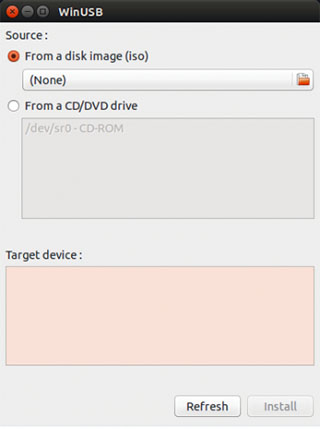
WinUSB is simple tool allows to create bootable Windows USB install stick from Ubuntu Linux.  It comprises of both GUI and command line tool and you can decide to choose which to use based on your preference. This tool supports Windows 7, 8, Vista, XP and can use either an ISO or a DVD as a source. Currently there is no version for Ubuntu 14.04 in Ubuntu Repository. To successfully install Winusb on Ubuntu 14.04, you need to install the Saucy version and run the dependencies fix switch to fix the dependencies.

This article assumes you have at least basic knowledge of linux, know how to use the shell, and most importantly, you host your site on your own VPS. The installation is quite simple. I will show you through the step by step installation Winusb on Ubuntu 14.04.

Step 1. Download the winusb package that is compatible with your operating system’s architecture

Open the terminal and run the following commands:

##for Ubuntu 32-Bit##
wget https://launchpad.net/~colingille/+archive/freshlight/+files/winusb_1.0.11+saucy1_i386.deb

##for Ubuntu 64-Bit##
wget https://launchpad.net/~colingille/+archive/freshlight/+files/winusb_1.0.11+saucy1_amd64.deb

Step 2. Install Winusb.

 sudo dpkg -i winusb_1.0.11+saucy1*

Step 3. Fix dependencies errors.

 sudo apt-get -f install

Step 4. Afterwards, you can search for WinUSB in Unity Dash and use it to create a live USB of Windows in Ubuntu 14.04.

winusb ubuntu

These three steps will install the WinUSB graphical interface and the WinUSB command line tool. The WinUSB GUI is much easier to use than the WinUSB command line tool.

Congratulation’s! You have successfully installed Winusb. Thanks for using this tutorial for installing Winusb on Ubuntu 14.04 system.

How To Install PHP 5.6 on Ubuntu 16.04 LTS

Install PHP 5.6 on Ubuntu 16

PHP (recursive acronym for PHP: Hypertext Preprocessor) is an open source, popular general-purpose scripting language that is widely-used and best suited for developing websites and web-based applications. It is a server-side scripting language that can be embedded in HTML. By default Ubuntu 16.04 (Xenial) now comes with PHP 7.0. You can install PHP 5.6 in parallel and switch between them using the following instructions.

This article assumes you have at least basic knowledge of linux, know how to use the shell, and most importantly, you host your site on your own VPS. The installation is quite simple and assumes you are running in the root account, if not you may need to add ‘sudo’ to the commands to get root privileges. I will show you through the step by step installation PHP 5.6 on a Ubuntu 16.04 (Xenial Xerus) server.

Install PHP 5.6 on Ubuntu 16.04 LTS

Step 1. First make sure that all your system packages are up-to-date

sudo apt-get update
sudo apt-get upgrade

Step 2. Installing PHP 5.6 on Ubuntu 16.04.

Use the following set of commands to enable PPA for PHP 5.6 in your Ubuntu system and install PHP 5.6:

sudo apt-get install -y software-properties-common
sudo add-apt-repository ppa:ondrej/php

Now, install PHP 5.6using the apt command:

apt-get install -y php5.6

Verify the PHP version using the following command:

php -V

Result:

PHP 5.6.32-1+ubuntu16.04.1+deb.sury.org+1 (cli)
Copyright (c) 1997-2016 The PHP Group
Zend Engine v2.6.0, Copyright (c) 1998-2016 Zend Technologies
 with Zend OPcache v7.0.6-dev, Copyright (c) 1999-2016, by Zend Technologies

Congratulation’s! You have successfully installed PHP 5. Thanks for using this tutorial for installing latest stable version of PHP 5.6 on Ubuntu 16.04 LTS (Xenial Xerus) system. For additional help or useful information, we recommend you to check the official PHP web site.