Easy Guide to Disable Automatic Updates in WordPress

disable Automatic Updates in WordPress

In this tutorial, we will learn how to disable automatic background updates in WordPress.

Configuring and Disabling Automatic WordPress Updates

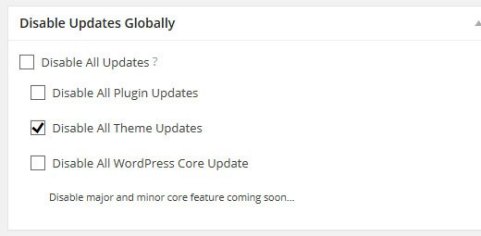
The easiest way to do this is by installing and activating Disable Updates Manager plugin.

Go to Settings » Disable Updates Manager to configure your settings.

Disable Updates Manager

Alternatively, you can disable automatic updates in WordPress by adding this line of code in your wp-config.php file:

 define( 'WP_AUTO_UPDATE_CORE', false );

This will disable all automatic WordPress updates.

However if you want to receive minor core updates, but disable theme and plugin updates, then you can do so by adding the following filters in your theme’s functions.php file or in a site-specific plugin.

Disable automatic WordPress plugin updates:

 add_filter( 'auto_update_plugin', '__return_false' );

Disable automatic WordPress theme updates:

add_filter( 'auto_update_theme', '__return_false' );

Now that you know how to disable automatic updates in WordPress, the question is should you disable it?

On our sites, we have disabled automatic plugin and theme updates while keeping the minor core updates enabled.

We are listing the pros and cons of automatic updates below to help you make the decision that’s best for you.

Pros

You don’t have to worry about updating minor WordPress releases which are pushed out for maintenance and security purposes.

This is something that you only got if you paid for managed WordPress hosting, but now it’s available for everyone (at least for minor releases).

You also have the benefit of knowing that if there was a crucial security issue with WordPress or a popular plugin, then WordPress will automatically update even if you are on a vacation, so your site is secure.

Cons

There is a slight chance that automatic updates can break your site. In our experience, the minor releases haven’t broken any of our sites yet.

But that’s because we are following the best practices and not modifying any core files. If you modify WordPress core files, then these automatic updates can override them.

Although it hasn’t happened yet, but if WordPress ever felt necessary to push a security update for a theme you are using, then there is a chance that it will break your website specially if you have modified your theme files.

Similar to that, automatic plugin updates can break your site as well because there are just too many variables (different server environments, plugin combinations, etc).

Now it’s important to know that these updates will not break majority of websites, but considering WordPress powers millions of websites, a small percentage can still be a lot of sites.

The worst part about this update was that the core team did not communicate with site-owners. So there is a very good chance that some people haven’t even realized that their SEO is at risk because of a security update that possibly deactivated their main SEO plugin.

Conclusion

Normally when WordPress core updates, there is an announcement that follows with it.

However with the past two automatic plugin updates, we haven’t seen a blog post or an email from WordPress.

It would be nice to have the WordPress team send an email when they push out security updates to a plugin. Also there should be a way to notify the site owner if the update wasn’t successful, so they can fix the issues as soon as possible.

Easy Guide to Create a Wiki Knowledge Base Using WordPress

In this tutorial, we will learn how to create a wiki knowledge base in WordPress.

WordPress Wiki & Knowledge Base Plugin

Knowledge Base Plugin

If you want to add a wiki knowledge base to your existing WordPress site, then the easiest way to do it is by using a WordPress wiki knowledge base plugin. There are several plugins available, but we recommend Knowledge Base by PressApps.

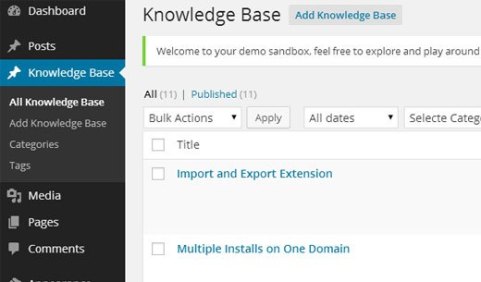
All you have to do is install and activate the plugin. Once activated, it adds a Knowledge Base tab in your WordPress admin area.

Knowledge Base Admin

Knowledge Base is it’s own custom post type with categories and tags which allows you to organize your documentation.

The best part about this is that you can add it on your main site, and it will match your brand style / formatting for the most part. It also comes with public / member only voting system, custom widgets, drag-drop functionality, etc. The downside is that it costs $20.

In our next method, we will show you how you can accomplish all of this for free, but it does involve code.

WordPress Wiki & Knowledge Base Code Snippet

Another way to add a wiki knowledge base to your existing WordPress site or even create a dedicated wiki site is to use the code snippet method.

The downside is that you have to copy/paste a little bit of code which can be scary for beginners. The upside is that it gives you more freedom, and it’s completely free unlike the first two options.

We will do our best to give step by step instructions.

Note: Before you start, please create a complete backup of your WordPress site.

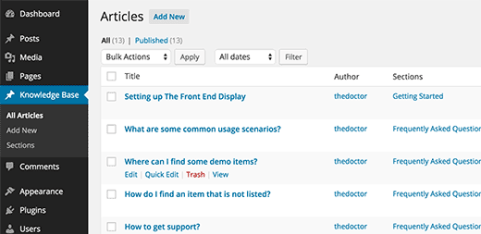
First thing you need to do is install and activate the Knowledgebase CPT plugin. This simple plugin creates a custom post type called knowledge_baseand a taxonomy called section.

This allows you to easily add your wiki articles and organize them into sections.

Adding knowledge base articles and sections

Once you have a few articles and sections, you would need to display them on your website. This is where you need to deal with a little bit of code.

Start by adding this code snippet into your theme’s functions.php file or a site-specific plugin.

function wpb_knowledgebase() {
// Get Knowledge Base Sections
$kb_sections = get_terms('section','orderby=name&hide_empty=0');
// For each knowledge base section
foreach ($kb_sections as $section) :
$return .= '


This code lists all the knowledge base articles under the section they were filed in.

Next all you need to do is create a new WordPress page and add [knowledgebase] shortcode inside it. Save your page and preview it.

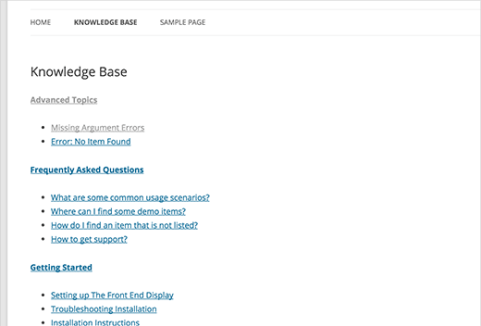
Plain knowledge base section with no CSS

It looks very plain right now, but we can add some styling to it. You can use this CSS as starting point and then continue editing to match your own colors.

Paste the following code in your theme’s style.css file.

.kb_section {
float: left;
width: 280px;
max-width: 280px;
margin: 10px;
background-color: #f5f5f5;
border: 1px solid #eee;
}
h4.kb-section-name {
background-color: #eee;
margin: 0;
padding: 5px;
}
ul.kb-section-list {
list-style-type: none;
list-style: none;
display: inline;
}   
li.kb-section-name {
list-style-type: none;
display: inline;
}
ul.kb-article-list {
list-style-type: none;
list-style: none;
}   
li.kb-article-name {
list-style-type: none;
}
div.kb_section:nth-of-type(3n+1) {clear:left;}
div.kb_section:nth-of-type(3n+3) {}

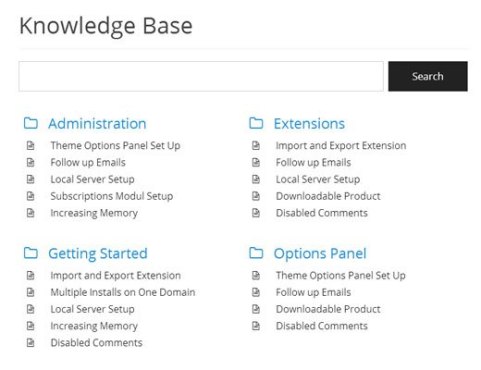
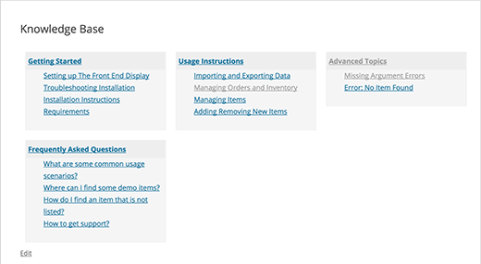
This how it looked on our demo site where we are using Twenty Twelve theme.

Styled knowledge base page in WordPress

By default, your sections will be displayed in alphabetical order. However if you want to change the order of sections, then you can do that by installing Custom Taxonomy Order NE plugin. This will allow you to drag-drop your sections in the right order.

Easy Guide to Optimize Your WordPress Robots.txt for SEO

In this tutorial, we will show you how to optimize your WordPress robots.txt for SEO and help you understand the importance of robots.txt file.

Why you Need a Robots.txt File?

Absence of a robots.txt file will not stop search engines from crawling and indexing your website. However, it is highly recommended that you create one. If you want to submit your site’s XML sitemap to search engines, then this is where search engines will look for your XML sitemap unless you have specified it in Google Webmaster Tools.

We highly recommend that if you do not have a robots.txt file on your site, then you immediately create one.

Create a Robots.txt file

Robots.txt file usually resides in your site’s root folder. You will need to connect to your site using an FTP client or by using cPanel file manager to view it.

It is just like any ordinary text file, and you can open it with a plain text editor like Notepad.

If you do not have a robots.txt file in your site’s root directory, then you can always create one. All you need to do is create a new text file on your computer and save it as robots.txt. Next, simply upload it to your site’s root folder.

Use Robots.txt file

The format for robots.txt file is actually quite simple. The first line usually names a user agent. The user agent is actually the name of the search bot you are trying to communicate with. For example, Googlebot or Bingbot. You can use asterisk * to instruct all bots.

The next line follows with Allow or Disallow instructions for search engines, so they know which parts you want them to index, and which ones you don’t want indexed.

See a sample robots.txt file:

User-Agent: *
Allow: /wp-content/uploads/
Disallow: /wp-content/plugins/
Disallow: /readme.html

In this sample robots.txt file for WordPress, we have instructed all bots to index our image upload directory.

In the next two lines we have disallowed them to index our WordPress plugins directory and the readme.html file.

Optimizing Your Robots.txt File for SEO

In the guidelines for webmasters, Google advises webmasters to not use robots.txt file to hide low quality content. If you were thinking about using robots.txt file to stop Google from indexing your category, date, and other archive pages, then that may not be a wise choice.

Remember, the purpose of robots.txt is to instruct bots what to do with the content they crawl on your site. It does not stop bots from crawling your website.

There are other WordPress plugins which allow you to add meta tags like nofollow and noindex in your archive pages. WordPress SEO plugin also allows you to do this. We are not saying that you should have your archive pages deindexed, but if you wanted to do it, then that’s the proper way of doing it.
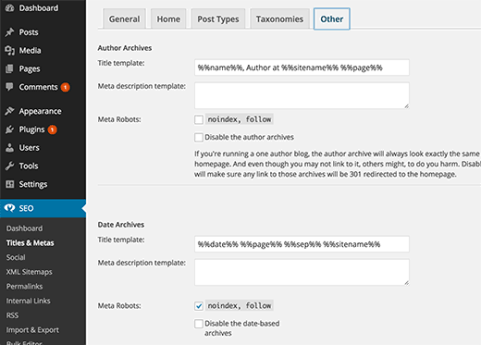
The proper way of adding noindex to archive pages in WordPress

You do not need to add your WordPress login page, admin directory, or registration page to robots.txt because login and registration pages have noindex tag added as meta tag by WordPress.

It is recommend that you disallow readme.html file in your robots.txt file. This readme file can be used by someone who is trying to figure out which version of WordPress you are using. If this was an individual, then they can easily access the file by simply browsing to it.

On the other hand if someone is running a malicious query to locate WordPress sites using a specific version, then this disallow tag can protect you from those mass attacks.

You can also disallow your WordPress plugin directory. This will strengthen your site’s security if someone is looking for a specific vulnerable plugin to exploit for a mass attack.

Adding Your XML Sitemap to Robots.txt File

If you are using Yoast’s WordPress SEO plugin or some other plugin to generate your XML sitemap, then your plugin will try to automatically add your sitemap related lines into robots.txt file.

However if it fails, then your plugin will show you the link to your XML Sitemaps which you can add to your robots.txt file manually like this:

Sitemap: http://www.yourdomain.com/post-sitemap.xml
Sitemap: http://www.yourdomain.com/page-sitemap.xml

What Does an Ideal Robots.txt File Should Look Like?

Honestly, many popular blogs use very simple robots.txt files. Their contents vary, depending on the needs of the specific site:

User-agent: *
Disallow:
 
Sitemap: http://www.yourdomain.com/post-sitemap.xml
Sitemap: http://www.yourdomain.com/page-sitemap.xml

This robots.txt file simply tells all bots to index all content and provides the links to site’s XML sitemaps.

User-Agent: *
Allow: /?display=wide
Allow: /wp-content/uploads/
Disallow: /wp-content/plugins/
Disallow: /readme.html
Disallow: /refer/
 
Sitemap: http://www.yourdomain.com/post-sitemap.xml
Sitemap: http://www.yourdomain.com/page-sitemap.xml
Sitemap: http://www.yourdomain.com/deals-sitemap.xml
Sitemap: http://www.yourdomain.com/hosting-sitemap.xml

By end of this tutorial now you know how to optimize your WordPress robots.txt file for SEO.

Easy Guide to Display the Latest Sticky Posts in WordPress

In this tutorial we will show you how to display the latest sticky posts in WordPress.

Latest Sticky Posts Demo

Note: This is an intermediate level tutorial and requires basic HTML / CSS knowledge + WordPress themes knowledge.

First thing you need to do is copy and paste this code snippet in your theme’s functions.php file or in a site-specific plugin.

function wpb_latest_sticky() { 
 
/* Get all sticky posts */
$sticky = get_option( 'sticky_posts' );
 
/* Sort the stickies with the newest ones at the top */
rsort( $sticky );
 
/* Get the 5 newest stickies (change 5 for a different number) */
$sticky = array_slice( $sticky, 0, 5 );
 
/* Query sticky posts */
$the_query = new WP_Query( array( 'post__in' => $sticky, 'ignore_sticky_posts' => 1 ) );
// The Loop
if ( $the_query->have_posts() ) {
    $return .= '


The code above queries the WordPress database to retrieve the 5 latest sticky posts. It then displays each sticky post’s title with a link in a list format. We have wrapped all that in a function and created a shortcode.

Now to display your latest sticky posts, you can use the shortcode [latest_stickies] in any WordPress post, page, or even a text widget.

If you would like to use shortcodes inside a text widget, then you will need to add this extra line of code in your theme’s functions.php or site-specific plugin.

 add_filter('widget_text', 'do_shortcode');

This snippet and function can very well be used in featured slider, or any other advanced feature that you would like to display on your site. This snippet is mostly geared toward a WordPress site that has a custom homepage or a magazine style look.

That’s all, we hope this tutorial helped you display latest sticky posts on your WordPress blog.