Easy Guide to Create a Wiki Knowledge Base Using WordPress

In this tutorial, we will learn how to create a wiki knowledge base in WordPress.

WordPress Wiki & Knowledge Base Plugin

Knowledge Base Plugin

If you want to add a wiki knowledge base to your existing WordPress site, then the easiest way to do it is by using a WordPress wiki knowledge base plugin. There are several plugins available, but we recommend Knowledge Base by PressApps.

All you have to do is install and activate the plugin. Once activated, it adds a Knowledge Base tab in your WordPress admin area.

Knowledge Base Admin

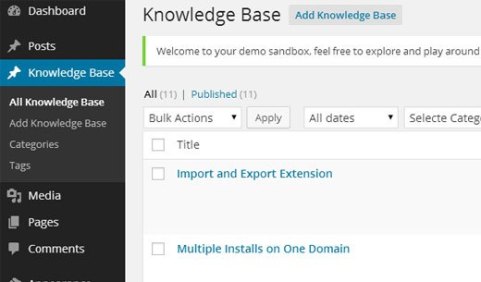
Knowledge Base is it’s own custom post type with categories and tags which allows you to organize your documentation.

The best part about this is that you can add it on your main site, and it will match your brand style / formatting for the most part. It also comes with public / member only voting system, custom widgets, drag-drop functionality, etc. The downside is that it costs $20.

In our next method, we will show you how you can accomplish all of this for free, but it does involve code.

WordPress Wiki & Knowledge Base Code Snippet

Another way to add a wiki knowledge base to your existing WordPress site or even create a dedicated wiki site is to use the code snippet method.

The downside is that you have to copy/paste a little bit of code which can be scary for beginners. The upside is that it gives you more freedom, and it’s completely free unlike the first two options.

We will do our best to give step by step instructions.

Note: Before you start, please create a complete backup of your WordPress site.

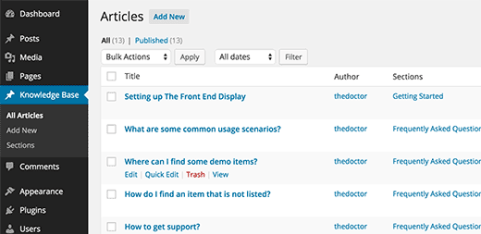
First thing you need to do is install and activate the Knowledgebase CPT plugin. This simple plugin creates a custom post type called knowledge_baseand a taxonomy called section.

This allows you to easily add your wiki articles and organize them into sections.

Adding knowledge base articles and sections

Once you have a few articles and sections, you would need to display them on your website. This is where you need to deal with a little bit of code.

Start by adding this code snippet into your theme’s functions.php file or a site-specific plugin.

function wpb_knowledgebase() {
// Get Knowledge Base Sections
$kb_sections = get_terms('section','orderby=name&hide_empty=0');
// For each knowledge base section
foreach ($kb_sections as $section) :
$return .= '


This code lists all the knowledge base articles under the section they were filed in.

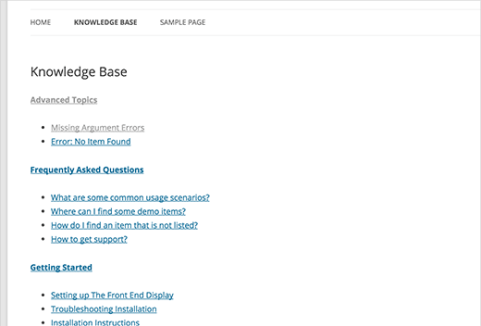
Next all you need to do is create a new WordPress page and add [knowledgebase] shortcode inside it. Save your page and preview it.

Plain knowledge base section with no CSS

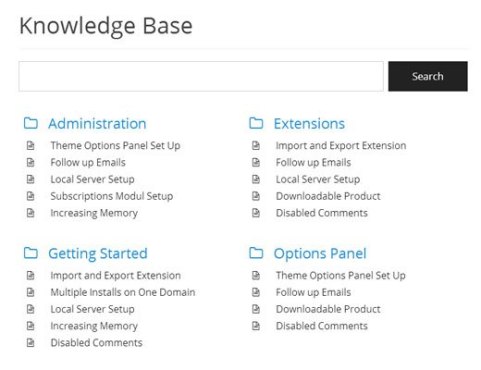
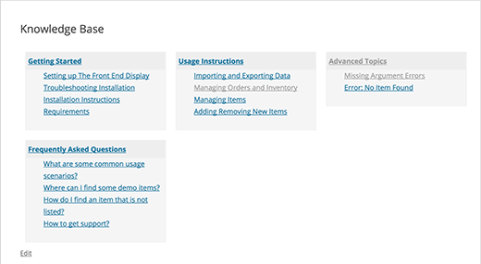
It looks very plain right now, but we can add some styling to it. You can use this CSS as starting point and then continue editing to match your own colors.

Paste the following code in your theme’s style.css file.

.kb_section {
float: left;
width: 280px;
max-width: 280px;
margin: 10px;
background-color: #f5f5f5;
border: 1px solid #eee;
}
h4.kb-section-name {
background-color: #eee;
margin: 0;
padding: 5px;
}
ul.kb-section-list {
list-style-type: none;
list-style: none;
display: inline;
}   
li.kb-section-name {
list-style-type: none;
display: inline;
}
ul.kb-article-list {
list-style-type: none;
list-style: none;
}   
li.kb-article-name {
list-style-type: none;
}
div.kb_section:nth-of-type(3n+1) {clear:left;}
div.kb_section:nth-of-type(3n+3) {}

This how it looked on our demo site where we are using Twenty Twelve theme.

Styled knowledge base page in WordPress

By default, your sections will be displayed in alphabetical order. However if you want to change the order of sections, then you can do that by installing Custom Taxonomy Order NE plugin. This will allow you to drag-drop your sections in the right order.

Easy Guide to Create Invoices for Clients Using WordPress

In this tutorial, we will learn how to create invoices for clients using WordPress.

Use WP-Invoice WordPress Plugin

Another way to handle invoices is by using the WP-Invoice plugin. This way your WordPress website becomes the hub of your invoices and payments.

First thing you need to do is install and activate the WP-Invoice plugin. Upon activation, the plugin will add a new ‘Invoice’ menu item in your WordPress admin. You need to visit Invoice » Settings to configure the plugin.

Configuring WP-Invoice settings

First you need to enter your business name as you want it to appear on the invoices. Next, you need to select a page to display invoices. We recommend you to create a new WordPress page titled Invoices and select that page here. This page will be used to display your invoices.

WP-Invoices comes with multiple payment options (see our list of 5 PayPal alternatives for freelancers to collect payments in WordPress. You need to choose a default payment system from Stripe, 2CheckOut, PayPal, Credit Card, or Interkassa payment gateways. You can selectively enable or disable payment gateways and allow your users to choose their preferred payment method.

When you choose a payment method, you will notice a new tab under the settings to configure that particular payment gateway. Each payment gateway has different settings which you will need to configure by logging into your account on that gateway and getting your API keys.

configuring payment gateways for your invoices

After configuring your payment gateways, click on Save All Settings button to store your changes.

Creating a New Invoice

To create and send a new invoice to a client, simply go to Invoices » Add New. You will be asked to provide client’s email address.

Enter the email address of your client

After entering the email address, the plugin will load the Invoice Editor screen. You will notice different meta boxes on the edit screen along with the familiar Title and Post Editor boxes. Just below the post editor box, you will notice a metabox to add the items you are including in this invoice.

Adding items to your invoice

Simply enter an item, quantity and price. The plugin will calculate the total amount and will display it as balance. You can click on the toggle description link to add description for an item in the list. You can also click on the ‘Add Discount’ button to deduct discounted amount based on percentage or a fixed amount.

Below the invoice items box, you will notice the payments gateway box. This will be showing your default payment and all the payment methods you have enabled on your site. You can change these settings for an invoice if you want, or you can leave it to use the default options you set in the plugin settings.

Setting payment options for a single invoice

On your right hand, you will see the user information metabox. It will be showing the client’s email address. You can fill in rest of the information. In case you don’t have all the information, you can leave it blank and the client can fill it in when making the payment.

In the publish metabox, there are options to publish this invoice as a quote, allow partial payments, or make it a recurring bill. Clicking on the Toggle Advance link will allow you to add a due date for the invoice and enter tax information.

Publishing your invoice

After publishing the invoice, your clients will receive an email notification with a link to the invoice page on your WordPress site. If your clients are not getting email notifications, then you should take a look at our guide on how to fix WordPress not sending email issue. The will see the invoice, with a link to print out the PDF version before making the payment. Clients can also change their personal information on the page.

Clients will be able to view the invoice on your site

Viewing Invoices and Reports

All the invoices you create can be accessed from Invoices » View All. You can sort and filter your invoices using the menu on your right hand side.

To get a bird’s eye view of your earnings and invoices, you need to visit Invoices » Reports. There you will be able to see graphs and charts for all invoices.

Fine Tuning Your Invoices  and Payments

The settings page for invoices will change after you save your initial settings. Now if you visit Invoices » Settings, you will be able to see many other options that you can configure. For example, you can tweak the email templates, create multiple templates, add line items which allows you to quickly add items into an invoice. You can even import/export your invoice data into XML file.

Advanced options for your WordPress Invoice system

Pros and Cons of WP-Invoice

Using WP-Invoice, you get a free plugin that fits right into your website. You don’t need to rely on a third party service to manage your clients and payments. You can setup automatic WordPress backups on a cloud storage to make sure that your data is safe.

That’s all, we hope this tutorial helped you create invoices for clients using WordPress.

Easy Guide to Clone a WordPress Site in 7 Easy Steps

In this tutorial, we will learn how to clone a WordPress site in 7 easy steps.

What Is Cloning, and Why Use It?

The idea behind cloning a WordPress site is simple: you make an exact copy or duplicate of one WordPress site and apply it to another site.

One practical scenario is when you are moving a WordPress site to a new web host or a new domain name. Cloning a site will save you hours of work.

Another possible use is when you are developing a site for a client. Once the project is done you can clone the WordPress site to the client site.

Lastly, you can clone a live WordPress site to your local server for testing and development purposes.

Cloning a WordPress site is not that difficult at all, here is how you can do it with these simple steps.

Using BackupBuddy To Clone A WordPress Website

BackupBuddy

For this article, we will be using BackupBuddy plugin. BackupBuddy is a WordPress backup plugin which allows you to not only just backup your WordPress site, it also allows you to easily restore your site from a backup. We will show you how to use this site restoration tool to easily clone any WordPress site.

1. Installing and Setting up BackupBuddy

First thing you need to install and activate the BackupBuddy plugin. Upon activation, the plugin will add a new menu item labeled ‘BackupBuddy’ in your WordPress admin bar. Clicking on it will take you to BackupBuddy setup wizard.

BackupBuddy Setup Wizard

The setup wizard is very straight forward. First you need to provide an email address. After that you need to enter a password.

This password will be used when you restore your site. The next option is to choose a location where you want to store your WordPress backups. The last option allows you to set up automatic backups.

BackupBuddy allows you to store your backups on cloud services like Stash, Amazon, Rackspace, and Dropbox. You can also store your backups on your own server or email them to yourself.

Once you are done with the setup wizard, click on save settings button to continue.

2. Backup Your WordPress Site

BackupBuddy will automatically initiate the backup process when you finish the setup wizard. Upon completion it will show you the option to download your backup or send the backup to a remote destination.

Backup process initiated and completed

You can always create a fresh backup by visiting the BackupBuddy » Backup page.

Creating new backups in BackupBuddy

3. Preparing To Clone Your WordPress Site

BackupBuddy provides a very easy site cloning / migration tool. Simply visit the BackupBuddy » Restore/Migrate page to begin the cloning process.

First you need to download the importbuddy.php file to your computer.

Download importbuddy.php file to your computer

After that, you need to download the backup zip file from your existing backups shown on the same page.

Download the backup zip file to your computer

4. Upload Backup and Importbuddy to New Location

Now that you have a complete backup of your site in a zip format and your importbuddy.php file, the next step is to upload them to the new location.

This new location can be a live website, or a site on your local server. If it is a site on your local server, then you just need to copy and paste the files into a subfolder inside your htdocs or www folder, like this:

C:\wamp\www\mynewsite\

If it is a live site, then you need to upload these files to the root directory using an FTP client.

No matter where you are copying the files, you need to make sure that the folder is completely empty and has no other files or folders inside it except importbuddy.php file and your backup zip file.

5. Running The Import Script

After uploading both files, you need to visit the importbuddy.php file in a web browser. It will be located at a URL like this:

http://www.example.com/importbuddy.php

Replace example.com with your own domain name.

Importbuddy password

You will be asked to enter your importbuddy password. This the password you created during step 1 or the password you entered when downloading importbuddy file during step 3.

After entering your password, you will notice that importbuddy has already found your backup zip file. Simply click on the Next Step button to continue.

Backup found and selected

Importbuddy will now extract your backup file when it is done, you need to click on the next button.

You will now reach the URL and database settings section.

Database and URL settings section

Importbuddy will automatically guess your new URL. It will also show your previous URL. Below that, you need to enter the new database settings. Enter the new database name, database username and password.

If you have not created a new database yet, then you can always login to your hosting account and create a database using cPanel. If you are moving the site to local server then you can create a new database using phpmyAdmin.

After entering your database information, click on the test database settings button. If you entered all information correctly, then you will see test results like this:

Test database settings

Click on the next step button to continue. Importbuddy will now import your WordPress database and show you the success message. After that you can click on the next step button.

Importbuddy will run some tests and show your new cloned site’s URL to verify that everything is working fine.

6. Test Your Cloned Site

Test your new site by visiting the link shown on the last step of importbuddy process. Check that your single posts links are working fine. Visit the WordPress admin area to see if you can perform all administration tasks.

If you run into any issues check out our guide on how to fix common WordPress errors.

7. Delete Temporary Files

On the import buddy screen, click on the cleanup and remove temporary files button. This will delete import buddy and all temporary files it created during the cloning process.

That’s all, you have successfully cloned your WordPress site.