In this beginner’s guide, we will show you how to easily blog anonymously using WordPress while keeping your personal information safe.
Note: This guide is not for journalists or whistle-blowers doing high-risk work. They should use something like TOR or other tools. This is for an average blogger who wants to blog anonymously.
Anonymous Blogging Pros & Cons
There are many users who simply want to blog anonymously to express their opinions. Most of them want to remain anonymous because they fear it may affect how people see them in real lives. Some want to do it just to be more creative.
There are pros and cons to blogging anonymously, and it’s important that you understand them before you start blogging.
Pros of Anonymous Blogging using WordPress
- Freedom to express your opinions without being judged
- Protect your personal identity and information
- Creative and artistic freedom
Cons of Anonymous Blogging Using WordPress
- Not able to meet with people who follow your blog
- Limited monetization options, you can still use Google AdSense, but you will have to share your personal information with Google.
- If someone is really determined, then they can still trace your blog back to you.
That being said, let’s see how to blog anonymously using WordPress.
How to Start an Anonymous Blog using WordPress
There are two types of WordPress websites. First, there is WordPress.com which is a hosted blogging service, and then you have WordPress.org also known as self-hosted WordPress. For comparison, see our guide on the difference between WordPress.com vs WordPress.org.
There are other blogging platforms as well. However, we recommend using self-hosted WordPress.org to have complete control on the privacy and ownership of your website.
You will need a domain name and a website hosting account to start your self-hosted WordPress blog.
We recommend using Bluehost. They are one of the largest hosting companies in the world and an officially recommended WordPress hosting provider. They’re offering our users a free domain and 60% off their web hosting.
For details, see our article on how to start a WordPress blog with complete step by step instructions.
After you have installed WordPress, let’s make it anonymous.
Using Whois Privacy
When you purchase a domain name, you are required to provide contact information, like name, address, phone number, and email address. This information is publicly accessible and anyone can look up for it.
To protect customer’s privacy, many domain name providers offer a service called Whois privacy. For a small fee, this service displays their contact information instead of yours. If someone sends an email to the address displayed on WHOIS privacy page it will be forwarded to you.
You can purchase domain privacy during the set up on most hosting companies. For example, Bluehost provides you an option to do so during the sign up. We normally don’t recommend it due to the additional cost, but since you want to create an anonymous blog, you would want to check this option.
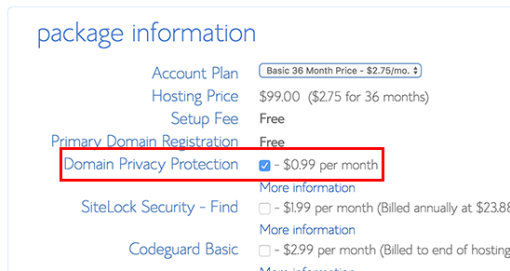
If you didn’t purchase it during set up, then you can always enable it from your hosting account’s dashboard under the domains section.
Using a Blogging Email Address
Next step is to create a new email account to use for your WordPress website, and your author profile in WordPress. You can use a free email service provider like Gmail or use a more private email service like Proton Mail.
After you have created an email account, you need to add it as a WordPress administrative email address. This email address is used to send WordPress notification emails.
You can do this by going to Settings » General page in the WordPress admin area and add your new email address there.
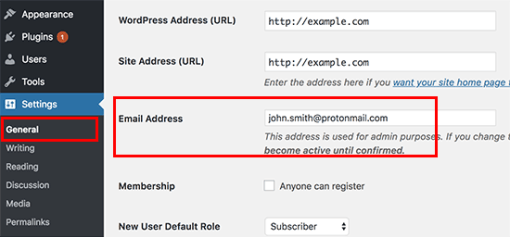
Don’t forget to click on the save changes button to store your settings.
Next, you need to add the same email address to your author profile page. Simply go to the Users » Your Profile page and add the email address under your contact info.
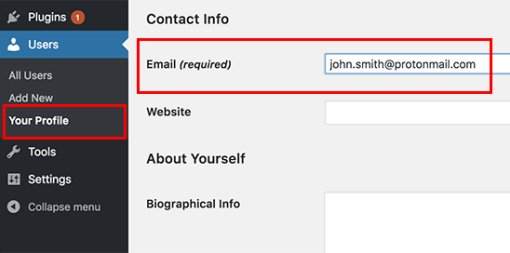
Don’t forget to click on the Update Profile button to save your changes.
You can also use gravatar to display an anonymous profile picture next to your author bio under your blog posts.
Tip: If you are not receiving WordPress emails, then see our guide on how to fix WordPress not sending emails issue.
Using a Psuedonym for Anonymous Blogging
You will need to choose and use a pseudonym on your blog. For better WordPress security, you cannot just use admin as your username or author name. You will need to think of a different nickname that you can use to sign your posts.
To add your pseudonym, you need to visit Users » Your Profile page and add the name next to the Nickname field. After entering your nickname, click on the drop-down menu next to ‘Display name publicly as’ option and select your nickname.
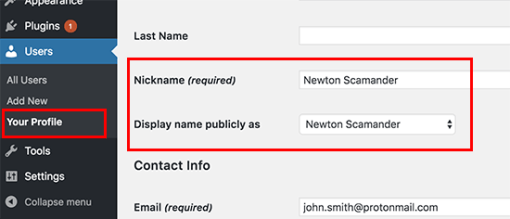
It’s important that you don’t add your real first and last name in this user profile.
Don’t forget to click on the Update Profile button to save your changes.
Using a VPN
VPN is a Virtual Private Network that helps you secure your internet connection and protect your identity.
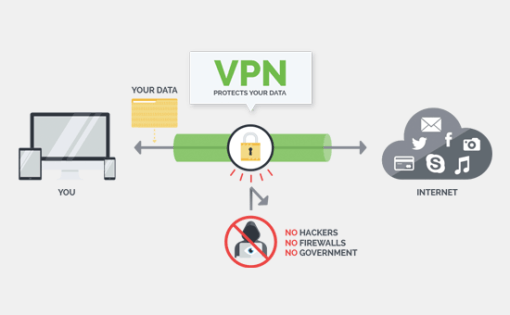
Normally, all your internet traffic travels through different servers spread across the world. Hackers and governments can spy on this traffic and see what you are doing online.
VPN acts as a network between your computer and outside world. All your internet traffic goes to a VPN service where it is encrypted and sent to the destination using a random server in a different geographic location.
Here is a list of the best VPN service providers. We recommend using IPVanish. They offer military grade encryption with hundreds of servers. They also have the easiest software to turn on VPN with the click of a button on any device including laptops, tablets, and mobile phones.
We hope this article helped you learn how to blog anonymously using WordPress.
