How To Install Drupal on Ubuntu 18.04 LTS

Install Drupal on Ubuntu 18

Drupal is an open-source and one of the most popular PHP based content Management System (CMS) platform for building personal blogs or big corporate websites. It has thousands of templates and plugins that are mostly free to download and install. Due to the stability of the base, the adaptability of the platform, and its active community, Drupal remains a popular choice after more than a decade on the scene.

This article assumes you have at least basic knowledge of linux, know how to use the shell, and most importantly, you host your site on your own VPS. The installation is quite simple and assumes you are running in the root account, if not you may need to add ‘sudo’ to the commands to get root privileges. I will show you through the step by step installation Drupal content management system on a Ubuntu 18.04 LTS (Bionic Beaver) server.

Install Drupal on Ubuntu 18.04 LTS Bionic Beaver

Step 1. First make sure that all your system packages are up-to-date

sudo apt-get update
sudo apt-get upgrade
[php]


<strong>Step 2. Install LAMP (Linux, Apache, MariaDB, PHP) server.</strong>

A Ubuntu 18.04 LAMP server is required. If you do not have LAMP installed, you can follow our guide here. Also install all required PHP modules:
[php]
apt-get install php7.1-cli php7.1-gd php7.1-opcache php7.1-mysql php7.1-json php7.1-mcrypt php7.1-xml php7.1-curl

Step 3. Installing Drupal on Ubuntu 18.04 LTS.

First thing to do is to go to Drupal’s download page and download the latest stable version of Drupal, At the moment of writing this article it is version 8.5.3:

wget https://ftp.drupal.org/files/projects/drupal-8.5.3.zip

Unpack the Drupal archive to the document root directory in your server:

unzip drupal*.zip
cp -rf drupal*/* /var/www/html/

/

We will need to change some folders permissions:

chown www-data:www-data -R /var/www/html/
chmod -R 755 /var/www/html/

Step 4. Configuring MariaDB for Drupal.

By default, MariaDB is not hardened. You can secure MariaDB using the mysql_secure_installation script. you should read and below each steps carefully which will set root password, remove anonymous users, disallow remote root login, and remove the test database and access to secure MariaDB:

mysql_secure_installation

Configure it like this:

- Set root password? [Y/n] y
- Remove anonymous users? [Y/n] y
- Disallow root login remotely? [Y/n] y
- Remove test database and access to it? [Y/n] y
- Reload privilege tables now? [Y/n] y

Next we will need to log in to the MariaDB console and create a database for the Drupal. Run the following command:

mysql -u root -p

This will prompt you for a password, so enter your MariaDB root password and hit Enter. Once you are logged in to your database server you need to create a database for Drupal installation:

create database drupal;
grant all privileges on drupal.* to drupaluser@localhost identified by 'your_password';
flush privileges;
exit

Step 5. Configuring Apache web server for Drupal.

Create a new virtual host directive in Apache. For example, create a new Apache configuration file named ‘drupal.conf’ on your virtual server:

sudo a2enmod rewrite
touch /etc/apache2/sites-available/drupal.conf
ln -s /etc/apache2/sites-available/drupal.conf /etc/apache2/sites-enabled/drupal.conf
nano /etc/apache2/sites-available/drupal.conf

Add the following lines:

<VirtualHost *:80>
ServerAdmin [email protected]
DocumentRoot /var/www/html/
ServerName your-domain.com
ServerAlias www.your-domain.com
<Directory /var/www/html/>
Options FollowSymLinks
AllowOverride All
Order allow,deny
allow from all
</Directory>
ErrorLog /var/log/apache2/your-domain.com-error_log
CustomLog /var/log/apache2/your-domain.com-access_log common
</VirtualHost>

Now, we can restart Apache web server so that the changes take place:

systemctl restart apache2.service

Step 6. Accessing Drupal CMS.

Drupal will be available on HTTP port 80 by default. Open your favorite browser and navigate to http://yourdomain.com or http://server-ip and complete the required the steps to finish the installation. Remember that you’ll need the database name, username and password you created earlier to connect. If you are using a firewall, please open port 80 to enable access to the control panel.
install-drupal
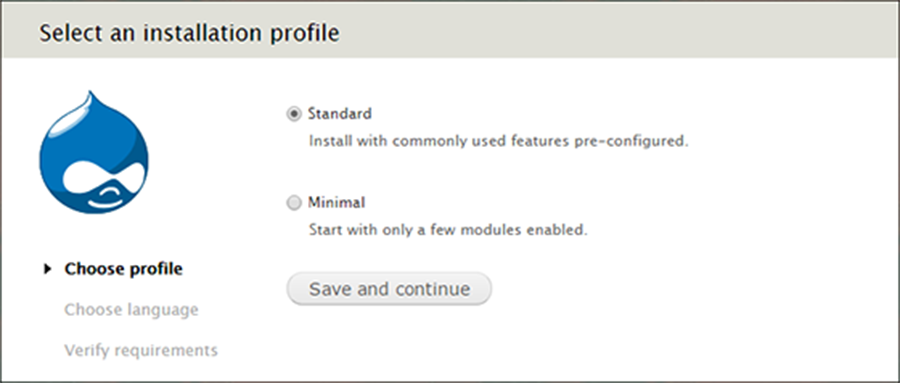
Drupal start up installation page

Congratulation’s! You have successfully installed Drupal. Thanks for using this tutorial for installing Drupal content management system (CMS) on Ubuntu 18.04 LTS (Bionic Beaver) system. For additional help or useful information, we recommend you to check the official Drupal web site.

How To Install Lighttpd With MariaDB and PHP on Ubuntu 18.04 LTS

Install Lighttpd With MariaDB and PHP on Ubuntu

Lighttpd is a fast and secure web-server which has been optimized for high-performance environments. With a small memory footprint compared to other web-servers, effective management of the cpu-load, and advanced feature set (FastCGI, SCGI, Auth, Output-Compression, URL-Rewriting and many more) lighttpd is the perfect solution for every server that is suffering load problems.

This article assumes you have at least basic knowledge of Linux, know how to use the shell, and most importantly, you host your site on your own VPS. The installation is quite simple and assumes you are running in the root account, if not you may need to add ‘sudo’ to the commands to get root privileges. I will show you through the step by step installation Lighttpd With MariaDB and PHP FastCGI on Ubuntu 18.04 Bionic Beaver server.

Install Lighttpd With MariaDB and PHP on Ubuntu 18.04 LTS Bionic Beaver


Step 1. First make sure that all your system packages are up-to-date

apt-get update
apt-get upgrade

Step 2. Installing Lighttpd on Ubuntu 18.04 LTS.

Lighttpd is available to install from the official Ubuntu repositories, So if you want to install Lighttpd, you only have to run this command:

sudo apt install lighttpd

To start up Lighttpd webserver, run the commands below and You can test the status of the server by accessing the IP address of your VPS in a web browser. Upon success, you will see the Lighttp welcome page:

systemctl start lighttpd.service

Step 3. Installing MariaDB on Ubuntu 18.04 LTS.

To install MariaDB in Ubuntu run the following command:

sudo apt install mariadb-server mariadb-client

By default, MariaDB is not hardened. You can secure MariaDB using the mysql_secure_installation script. you should read and below each steps carefully which will set root password, remove anonymous users, disallow remote root login, and remove the test database and access to secure MariaDB:

mysql_secure_installation

To log into MariaDB, use the following command (note that it’s the same command you would use to log into a MySQL database):

mysql -u root -p

To start the database, run the commands below:

systemctl start mariadb.service

Step 4. Installing PHP 7 FastCGI and other PHP7 modules.

First, add the below third party repository to upgrade to PHP 7.1:

sudo apt-get install software-properties-common
sudo add-apt-repository ppa:ondrej/php

Then, install and upgrade to PHP 7.1:

sudo apt update
sudo apt install php7.1-cgi php7.1-mcrypt php7.1-cli php7.1-mysql php7.1-gd php7.1-imagick php7.1-recode php7.1-tidy php7.1-xmlrpc

Enable PHP CGI modules in Lighttpd with the following commands:

sudo sudo lighttpd-enable-mod fastcgi 
sudo lighttpd-enable-mod fastcgi-php

After enabling the modules, you need to restart the Lighttpd service by running the following command:

systemctl restart lighttpd

Testing if PHP is working:

nano /srv/www/htdocs/info.php

Then, we’ll simply add the following line into the file:

<?php phpinfo(); ?>

Step 5. Configure firewall for LLMP.

Run following commands to allow HTTP (80) and HTPPS (443) request through the firewall.

ufw allow 80/tcp
ufw allow 443/tcp
ufw reload

Congratulations! You have successfully installed LLMP. Thanks for using this tutorial for installing Lighttpd With PHP FPM and MariaDB in Ubuntu 18.04 LTS Bionic Beaver systems. For additional help or useful information, we recommend you to check the official Lighttpd web site.

How To Install Red5 Media Server on Ubuntu 16.04 LTS

Install Red5 Media Server on Ubuntu 16

Red5 is an open source media server for live streaming solutions of all kinds. It is designed to be flexible with a simple plugin architecture that allows for customization of virtually any VOD and live streaming scenario.

This article assumes you have at least basic knowledge of linux, know how to use the shell, and most importantly, you host your site on your own VPS. The installation is quite simple and assumes you are running in the root account, if not you may need to add ‘sudo’ to the commands to get root privileges. I will show you through the step by step installation Red5 media server on a Ubuntu 16.04 (Xenial Xerus) server.

Install Red5 Media Server on Ubuntu 16.04 LTS

Step 1. First make sure that all your system packages are up-to-date

sudo apt-get update
sudo apt-get upgrade

Step 2. Installing Java.

You may skip this steps if you have already installed java on your system else use below link to install latest java version:

Install Java JDK on Ubuntu

Step 3. Installing Red5 Media Server.

Use following commands to install red5:

wget https://github.com/Red5/red5-server/releases/download/v1.0.10-M4/red5-server-1.0.10-M4.tar.gz
tar -xvzf red5-server-1.0.10-M4.tar.gz
cd red5-server

After extracting downloaded archive, lets start Red5 using shell script red5.sh:

./red5.sh &

Step 4. Accessing Red 5 installation.

Red5 demo pages and application can be accessed on port 5080 like http://your-server-ip:5080/

Congratulation’s! You have successfully installed Red5. Thanks for using this tutorial for installing latest stable version of Red5 media server on Ubuntu 16.04 LTS (Xenial Xerus) system. For additional help or useful information, we recommend you to check the official Red5 Media Server web site.

How To Install TYPO3 on Ubuntu 16.04 LTS

Install TYPO3 on Ubuntu 16

TYPO3 is an enterprise open source content management system based on PHP. It’s intended for ease of use to allow owners and enterprises to create powerful and dynamic content websites.

If you’re looking for a functional, higher performance content management system to manage your websites or blogs and 100% free, then you’ll find TYPO3 to be helpful.

This article assumes you have at least basic knowledge of Linux, know how to use the shell, and most importantly, you host your site on your own VPS. The installation is quite simple and assumes you are running in the root account, if not you may need to add ‘sudo’ to the commands to get root privileges. I will show you through the step by step installation TYPO3 cms on an Ubuntu 16.04 Xenial Xerus server.

Install TYPO3 on Ubuntu 16.04 LTS

Step 1. First make sure that all your system packages are up-to-date

sudo apt-get update
sudo apt-get upgrade

Step 2. Install LAMP (Linux, Apache, MariaDB, PHP) server.

A Ubuntu 16.04 LAMP server is required. If you do not have LAMP installed, you can follow our guide here. Also install all required PHP modules:

apt-get install php7.0-mysql php7.0-curl php7.0-json php7.0-cgi php7.0 libapache2-mod-php7.0 php7.0-mcrypt php7.0-xmlrpc php7.0-gd

Step 3. Installing TYPO3.

First thing to do is to go to TYPO3’s download page and download the latest stable version of TYPO3, At the moment of writing this article it is version 9:

wget https://typo3.azureedge.net/typo3/9.0.0/typo3_src-9.0.0.tar.gz

Unpack the TYPO3 archive to the document root directory on your server:

tar xzvf typo3_src-9.0.0.tar.gz
cd typo3_src-9.0.0/
cp -r . /var/www/html/

We will need to change some folders permissions:

chown www-data:www-data -R /var/www/html/

Step 4. Configuring MariaDB for TYPO3.

By default, MariaDB is not hardened. You can secure MariaDB using the mysql_secure_installation script. you should read and below each steps carefully which will set root password, remove anonymous users, disallow remote root login, and remove the test database and access to secure MariaDB:

mysql_secure_installation

Configure it like this:

- Set root password? [Y/n] y
- Remove anonymous users? [Y/n] y
- Disallow root login remotely? [Y/n] y
- Remove test database and access to it? [Y/n] y
- Reload privilege tables now? [Y/n] y

Next we will need to log in to the MariaDB console and create a database for the TYPO3. Run the following command:

mysql -u root -p

This will prompt you for a password, so enter your MariaDB root password and hit Enter. Once you are logged in to your database server you need to create a database for TYPO3 installation:

CREATE DATABASE typo3;
CREATE USER typo_db_user@localhost IDENTIFIED BY ‚secretpassword‘;
GRANT ALL PRIVILEGES ON typo3.* TO typo_db_user@localhost;
FLUSH PRIVILEGES;
exit

Step 5. Configuring Apache web server for TYPO3.

Create a new virtual host directive in Apache. For example, create a new Apache configuration file named ‘typo.conf’ on your virtual server:

sudo a2enmod rewrite
touch /etc/apache2/sites-available/typo.conf
ln -s /etc/apache2/sites-available/typo.conf /etc/apache2/sites-enabled/typo.conf
nano /etc/apache2/sites-available/typo.conf

Add the following lines:

<VirtualHost *:80>
ServerAdmin [email protected]
DocumentRoot /var/www/html/
ServerName your-domain.com
ServerAlias www.your-domain.com
<Directory /var/www/html/>
Options FollowSymLinks
AllowOverride All
Order allow,deny
allow from all
</Directory>
ErrorLog /var/log/apache2/your-domain.com-error_log
CustomLog /var/log/apache2/your-domain.com-access_log common
</VirtualHost>

Now, we can restart Apache web server so that the changes take place:

systemctl restart apache2.service

Next we have to make some PHP settings. For this we go into the php.ini and adjust a few settings:

nano /etc/php/7.0/apache2/php.ini

Then make the change the following lines below in the file and save:

file_uploads = On
allow_url_fopen = On
memory_limit = 256M
upload_max_file_size = 64M
max_execution_time = 240
max_input_vars = 1500

Step 6. Accessing TYPO3 CMS.

TYPO3 will be available on HTTP port 80 by default. Open your favorite browser and navigate to http://yourdomain.com/ or http://server-ip/ and complete the required the steps to finish the installation. If you are using a firewall, please open port 80 to enable access to the control panel.
Congratulation’s! You have successfully installed TYPO3. Thanks for using this tutorial for installing TYPO3 cms on your Ubuntu 16.04. For additional help or useful information, we recommend you to check the official TYPO3 web site.

How To Install Concrete5 on Ubuntu 16.04 LTS

Install Concrete5 on Ubuntu 16

Concrete5 is one of the most popular content management systems available on thhe Internet. It is written in PHP and uses MySQL or MariaDB to store its data. It comes with an easy to use website builder through which you can easily create pages and content. Concrete5 is flexible, secure and mobile ready.

This article assumes you have at least basic knowledge of Linux, know how to use the shell, and most importantly, you host your site on your own VPS. The installation is quite simple and assumes you are running in the root account, if not you may need to add ‘sudo’ to the commands to get root privileges. I will show you through the step by step installation Concrete5 open source content management system on an Ubuntu 16.04 Xenial Xerus server.

Install Concrete5 on Ubuntu 16.04 LTS

Step 1. First make sure that all your system packages are up-to-date

sudo apt-get update
sudo apt-get upgrade

Step 2. Install LAMP (Linux, Apache, MariaDB, PHP) server.

A Ubuntu 16.04 LAMP server is required. If you do not have LAMP installed, you can follow our guide here. Also install all required PHP modules:

apt-get install php7.0-mysql php7.0-curl php7.0-json php7.0-cgi php7.0 libapache2-mod-php7.0 php7.0-mcrypt php7.0-xmlrpc php7.0-gd

Step 3. Installing Concrete5.

First thing to do is to go to Concrete5’s download page and download the latest stable version of Concrete5:

wget https://www.concrete5.org/download_file/-/view/99963/ -O concrete5.zip

After downloading Concrete5 you will need to unzip master.zip. To do this, run:

unzip concrete5.zip
mv concrete5-8.3.1 /var/www/html/concrete5

We will need to change some folders permissions:

chown -R www-data:www-data /var/www/html/concrete5

Step 4. Configuring MariaDB for Concrete5.

By default, MariaDB is not hardened. You can secure MariaDB using the mysql_secure_installation script. you should read and below each steps carefully which will set root password, remove anonymous users, disallow remote root login, and remove the test database and access to secure MariaDB:

mysql_secure_installation
[php]


Configure it like this:
[php]
- Set root password? [Y/n] y
- Remove anonymous users? [Y/n] y
- Disallow root login remotely? [Y/n] y
- Remove test database and access to it? [Y/n] y
- Reload privilege tables now? [Y/n] y

Next we will need to log in to the MariaDB console and create a database for the Concrete5. Run the following command:

mysql -u root -p

This will prompt you for a password, so enter your MariaDB root password and hit Enter. Once you are logged in to your database server you need to create a database for Concrete5 installation:

MariaDB [(none)]>CREATE USER 'concrete_user'@'localhost' IDENTIFIED BY 'password';
MariaDB [(none)]>GRANT ALL PRIVILEGES ON concretedb.* TO 'concrete_user'@'localhost' IDENTIFIED BY 'password' WITH GRANT OPTION;
MariaDB [(none)]>FLUSH PRIVILEGES;
MariaDB [(none)]>exit;

Step 5. Configuring Apache web server for Concrete5.

Create a new virtual host directive in Apache. For example, create a new Apache configuration file named ‘concrete.conf’ on your virtual server:

sudo a2enmod rewrite
touch /etc/apache2/sites-available/concrete.conf
ln -s /etc/apache2/sites-available/concrete.conf /etc/apache2/sites-enabled/concrete.conf
nano /etc/apache2/sites-available/concrete.conf

Add the following lines:

<VirtualHost *:80>
ServerAdmin [email protected]
DocumentRoot /var/www/html/concrete5
ServerName your-domain.com
ServerAlias www.your-domain.com
<Directory /var/www/html/concrete5>
Options FollowSymLinks
AllowOverride All
Order allow,deny
allow from all
</Directory>
ErrorLog /var/log/apache2/your-domain.com-error_log
CustomLog /var/log/apache2/your-domain.com-access_log common
</VirtualHost>

Now, we can restart Apache web server so that the changes take place:

systemctl restart apache2.service

Step 6. Accessing Concrete5.

Concrete5 will be available on HTTP port 80 by default. Open your favorite browser and navigate to http://yourdomain.com or http://server-ip and complete the required the steps to finish the installation.

Congratulation’s! You have successfully installed Concrete5. Thanks for using this tutorial for installing Concrete5 open source content management system on your Ubuntu 16.04 LTS. For additional help or useful information, we recommend you to check the official Concrete5 web site.

How To Install PowerShell on Ubuntu 16.04 LTS

Install PowerShell on Ubuntu 16

PowerShell Core is a cross-platform (Windows, Linux, and macOS) automation and configuration tool/framework that works well with your existing tools and is optimized for dealing with structured data (e.g. JSON, CSV, XML, etc.), REST APIs, and object models. It includes a command-line shell, an associated scripting language and a framework for processing cmdlets.

This article assumes you have at least basic knowledge of linux, know how to use the shell, and most importantly, you host your site on your own VPS. The installation is quite simple and assumes you are running in the root account, if not you may need to add ‘sudo’ to the commands to get root privileges. I will show you through the step by step installation Microsoft PowerShell on a Ubuntu 16.04 (Xenial Xerus) server.

Install PowerShell on Ubuntu 16.04 LTS

Step 1. First make sure that all your system packages are up-to-date

sudo apt-get update
sudo apt-get upgrade

Step 2. Installing PowerShell on Ubuntu 16.04.

Method 1.

First, download the Debian package to your Ubuntu server:

wget https://github.com/PowerShell/PowerShell/releases/download/v6.0.0/powershell_6.0.0-1.ubuntu.17.04_amd64.deb
dpkg -i powershell_6.0.0-1.ubuntu.17.04_amd64.deb

Install PowerShell using following command:

apt-get install -f

Method 2.

Install PowerShell using official Ubuntu Microsoft Repository:

curl https://packages.microsoft.com/config/ubuntu/16.04/prod.list | sudo tee /etc/apt/sources.list.d/microsoft.list

Then execute the following in the terminal:

apt-get update
apt-get install -y powershell

After installation, you can run the powershell, by just issuing this command “pwsh” in the prompt:

pwsh

Congratulation’s! You have successfully installed PowerShell. Thanks for using this tutorial for installing latest stable version of Microsoft PowerShell on Ubuntu 16.04 LTS (Xenial Xerus) system. For additional help or useful information, we recommend you to check the official PowerShell web site.

How To Install LibreNMS on Ubuntu 16.04 LTS

Install LibreNMS on Ubuntu 16

LibreNMS is an open source auto-discovering network monitoring tool for servers and network hardware. It supports a wide range of network hardware like Cisco, Juniper, Brocade, Foundry, HP and operating systems including Linux and Windows. LibraNMS is a community-based fork of Network monitoring tool “Observium“, released under GPLv3.

This article assumes you have at least basic knowledge of Linux, know how to use the shell, and most importantly, you host your site on your own VPS. The installation is quite simple and assumes you are running in the root account, if not you may need to add ‘sudo’ to the commands to get root privileges. I will show you through the step by step installation LibreNMS network monitoring tool on an Ubuntu 16.04 Xenial Xerus server.

LibreNMS Features

Automatic discovery
Customisable alerting
API Access
Billing system
Automatic Updates
Distributed Polling
iOS and Android App
Unix Agent
And many more

Install LibreNMS on Ubuntu 16.04 LTS

Step 1. First make sure that all your system packages are up-to-date

sudo apt-get update
sudo apt-get upgrade

Step 2. Install LAMP (Linux, Apache, MariaDB, PHP) server.

A Ubuntu 16.04 LAMP server is required. If you do not have LAMP installed, you can follow our guide here. Also install all required PHP modules:

apt-get install php7.0-mysql php7.0-curl php7.0-json php7.0-cgi php7.0 libapache2-mod-php7.0 php7.0-mcrypt php7.0-xmlrpc php7.0-gd

Step 3. Installing LibreNMS.

First, install required packages by LibreNMS:

apt-get install composer fping git graphviz imagemagick mtr-tiny nmap python-memcache python-mysqldb rrdtool snmp whois

Next, Add LibreNMS user:

useradd librenms -d /opt/librenms -M -r
usermod -a -G librenms www-data

Then, clone the LibreNMS source code through Git:

cd /opt/
git clone https://github.com/librenms/librenms.git librenms

Set the permission:

chown -R librenms:librenms /opt/librenms

Step 4. Configuring MariaDB for LibreNMS.

By default, MariaDB is not hardened. You can secure MariaDB using the mysql_secure_installation script. you should read and below each steps carefully which will set root password, remove anonymous users, disallow remote root login, and remove the test database and access to secure MariaDB:

mysql_secure_installation

Configure it like this:

- Set root password? [Y/n] y
- Remove anonymous users? [Y/n] y
- Disallow root login remotely? [Y/n] y
- Remove test database and access to it? [Y/n] y
- Reload privilege tables now? [Y/n] y

Next we will need to log in to the MariaDB console and create a database for the LibreNMS. Run the following command:

mysql -u root -p

This will prompt you for a password, so enter your MariaDB root password and hit Enter. Once you are logged in to your database server you need to create a database for LibreNMS installation:

MariaDB [(none)]> CREATE DATABASE librenms CHARACTER SET utf8 COLLATE utf8_unicode_ci;
MariaDB [(none)]> CREATE USER 'librenms'@'localhost' IDENTIFIED BY 'PASSWORD';
MariaDB [(none)]> GRANT ALL PRIVILEGES ON librenms.* TO 'librenms'@'localhost';
MariaDB [(none)]> FLUSH PRIVILEGES;
MariaDB [(none)]> exit

Next, open the MariaDB configuration file and add the following lines under [mysqld] section:

### nano /etc/mysql/mariadb.conf.d/50-server.cnf

innodb_file_per_table=1
sql-mode=""
lower_case_table_names=0

Restart MariaDB for the changes to take effect:

systemctl restart mariadb

Step 5. Configuring Apache web server for LibreNMS.

Create a new virtual host directive in Apache. For example, create a new Apache configuration file named ‘librenms.conf’ on your virtual server:

sudo a2enmod rewrite
touch /etc/apache2/sites-available/librenms.conf
ln -s /etc/apache2/sites-available/librenms.conf /etc/apache2/sites-enabled/librenms.conf
nano /etc/apache2/sites-available/librenms.conf

Add the following lines:

<VirtualHost *:80>
ServerAdmin [email protected]
DocumentRoot /opt/librenms/html/
ServerName your-domain.com
ServerAlias www.your-domain.com
AllowEncodedSlashes NoDecode
<Directory "/opt/librenms/html/">
Options FollowSymLinks
AllowOverride All
Order allow,deny
allow from all
</Directory>
ErrorLog /var/log/apache2/your-domain.com-error_log
CustomLog /var/log/apache2/your-domain.com-access_log common
</VirtualHost>

Now, we can restart Apache web server so that the changes take place:

a2ensite librenms.conf
a2enmod rewrite
systemctl restart apache2.service

Step 6. Configure Firewall.

Allow apache through the firewall so that user can able to access LibreNMS portal from an external machine:

ufw allow 80/tcp
ufw reload

Step 7. Accessing LibreNMS.

LibreNMS will be available on HTTP port 80 by default. Open your favorite browser and navigate to http://yourdomain.com/ or http://server-ip/ and complete the required the steps to finish the installation. If you are using a firewall, please open port 80 to enable access to the control panel.

Congratulation’s! You have successfully installed LibreNMS. Thanks for using this tutorial for installing LibreNMS network monitoring tool on your Ubuntu 16.04 LTS. For additional help or useful information, we recommend you to check the official LibreNMS web site.