Easy Guide to Disable Visual Editor Formatting Shortcuts in WordPress

In this tutorial, we will learn how to disable visual editor formatting shortcuts in WordPress.

What are Formatting Shortcuts and How to Use Them?

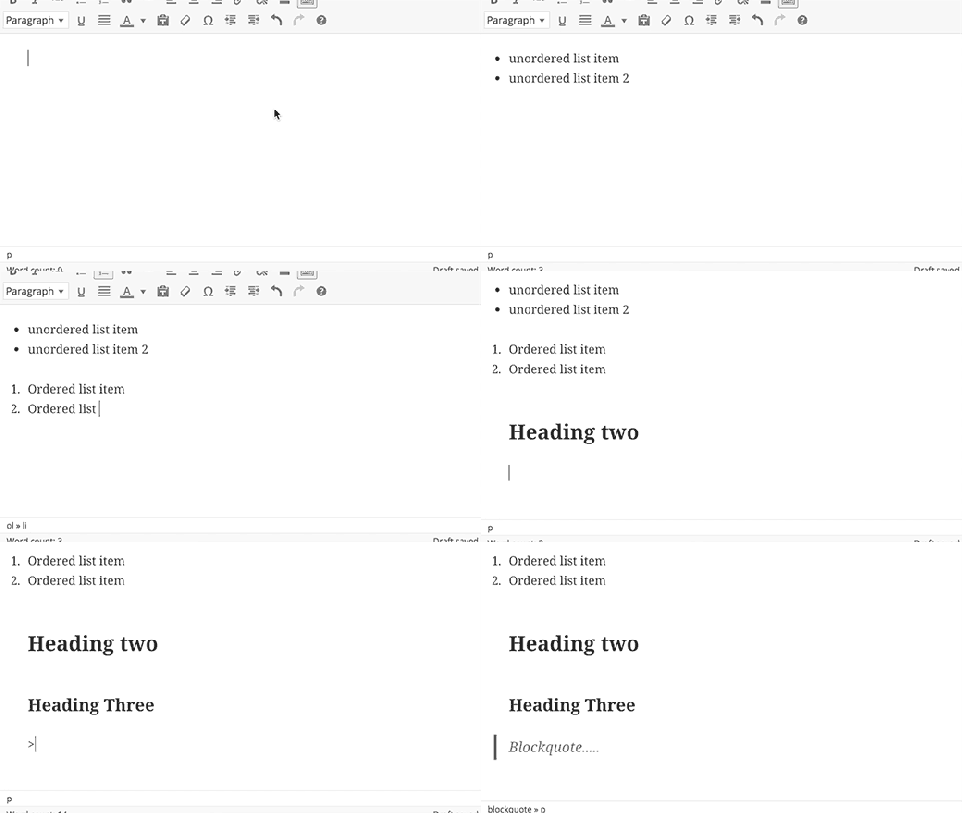
WordPress 4.3 came with a new feature called formatting shortcuts. It allows users to quickly add common text formatting without removing their hands from the keyboard and without writing any HTML.

  • Using * or  will start an unordered list.
  • Using 1. or 1) will start an ordered list.
  • Using # will transform into h1. ## for h2, ### for h3 and so on.
  • Using > will transform into blockquote.

Editor shortcuts

Disabling Visual Editor Formatting Shortcuts

While we think that formatting shortcuts are awesome, some users are finding this feature a bit confusing and distracting.

If you want to disable the formatting shortcuts in WordPress, then follow the instructions below:

Copy and paste this code in your theme’s functions.php file or in a site-specific plugin.

function disable_mce_wptextpattern( $opt ) {
 
    if ( isset( $opt['plugins'] ) && $opt['plugins'] ) {
        $opt['plugins'] = explode( ',', $opt['plugins'] );
        $opt['plugins'] = array_diff( $opt['plugins'] , array( 'wptextpattern' ) );
        $opt['plugins'] = implode( ',', $opt['plugins'] );
    }
 
    return $opt;
}
 
add_filter( 'tiny_mce_before_init', 'disable_mce_wptextpattern' );

This code simply removes text formatting shortcuts from your WordPress visual editor. Your other WordPress keyboard shortcuts will work as usual.

We hope this tutorial helped you disable visual editor formatting shortcuts in WordPress 4.3 and later versions.

Easy Guide to Fix “Site contains harmful programs” Error in WordPress

In this tutorial, we will learn how to fix this site ahead contains harmful programs error in WordPress.

Reasons for This Site Contains Harmful Programs Error

The number one reason for this error is that your website is hacked and is believed to be distributing a malware. This code spreads itself from the infected website to website visitors and can even spread to other websites.

Google marks a website with this warning if they find any suspicious code that could be a malware or trojan. This warns users to be careful when visiting these sites.

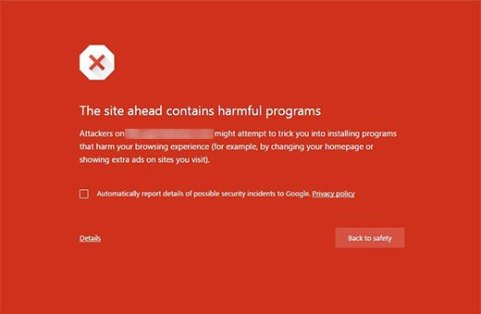
This site contains harmful programs error in Google Chrome

Another common reason for this error is showing ads from low quality advertising networks. These networks may sometime display ads linking to websites distributing malicious code.

To find this malicious code on your site, take a look at our tutorial on how to scan your WordPress site for potentially malicious code.

You can also check your site using Google’s safe browsing analysis tool.

All you need to do is add your site’s domain name as the query parameter to the URL like this:

https://www.google.com/safebrowsing/diagnostic?site=YourDomain.com

Now that you know why the error happens, let’s take a look at how to fix it.

Fix This Site Contains Harmful Program Error

Before we start, please make a complete backup of your WordPress site. If you already had a backup system in place, then keep it handy as you may need it.

Removing malware and recovering a website can become a very complicated task. Sometimes even when you clean your site thoroughly, the malicious code can keep coming back until you find and remove the backdoor placed on your site.

Backdoor is referred to a method of bypassing normal authentication and gaining the ability to remotely access the server while remaining undetected. Finding the backdoor is not an easy task either. It could be a compromised password, unsafe file permissions, or a cleverly disguised file. We have a detailed guide on how to find a backdoor in a hacked WordPress site and fix it.

Once you have successfully removed the backdoor, you will still need to thoroughly check all your files and database for any malicious code.

As you can see that cleaning up and infected WordPress site can be a very tedious task. This is why we use Sucuri on all our websites.

Sucuri

Sucuri is a website monitoring and security service for WordPress users. It monitors your site 24/7 for suspicious activity, blocks any hacking attempts on your site, and clean up your site of any malware.

Getting The Warning Removed by Google

Once you are absolutely certain that your website is clean, then you can ask Google to remove this warning from search results.

You will need to use Google’s Webmaster tools for that. If you have not already added your site to webmaster tools, then follow our tutorial on how to add your WordPress site to Google webmaster tools.

Once there, you need to click on the security issues section in webmaster tools. This page will list any security issues Google may have found on your website. You will also see the links to resources on clean up on your site.

Once you have fixed the issues, click on the checkbox and request a review.

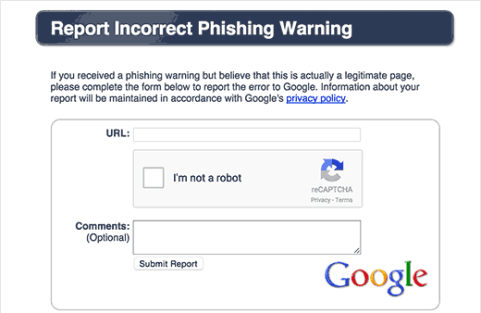
In case you do not see any security issues in Google Webmaster tools, then you should the following form to report incorrect phishing warning.

Incorrect phishing warning report

We hope this tutorial helped you fix this site ahead contains harmful programs error.

Easy Guide to Disable Self Pingbacks in WordPress

In this tutorial, we will learn how to disable self pingbacks in WordPress.

What is a Pingback?

Pingbacks give softwares the ability to communicate between websites. Its almost like remote comments. Think of it like this:

  • We write a post on WPCademy blog.
  • Then you write a post on your blog mentioning/linking to our article.
  • Your blogging software (WordPress) will automatically send us a pingback.
  • Our blogging software (WordPresS) will receive the ping. It will then automatically go to your blog to confirm that the pingback originates there (check if the link is present).
  • Then we will have the ability to display your pingback as a comment on our post. This will solely be a link to your site.

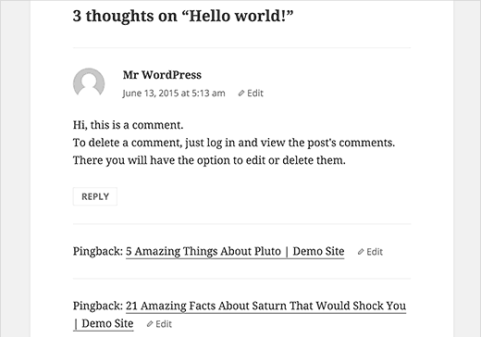
Pingbacks also work within your site. So if one of your posts link to another post, then your WordPress will send a self-ping. This can get really annoying.

Self Pingbacks on a WordPress site

Fore more details, take a look at our guide about trackbacks and pingbacks.

Now that you know what is a pingback, let’s take a look at how to disable self pingbacks.

There are multiple ways you can disable self pingbacks on your WordPress site. We will show you both plugin method and manual code method.

Disable Self Pingbacks in WordPress Using Plugins

There are two plugins that you can use to turn off self pings.

1. Using No Self Pings Plugin

First thing you need to do is install and activate the No Self Pings plugin. The plugin works out of the box, and there are no settings for you to configure. Simply activating the plugin will turn off self pingbacks.

You will notice that No Self Pings plugin hasn’t been updated for more than two years. Usually we do not recommend installing plugins that haven’t been updated this long. Simply because in most cases those plugins do not work. However, No Self Pings is very simple plugin, and it works even with the latest version of WordPress (4.2.3 At the time of writing this article).

We recommend you to read our guide on the issue of installing plugins not tested with your WordPress version.

2. Using Disabler Plugin

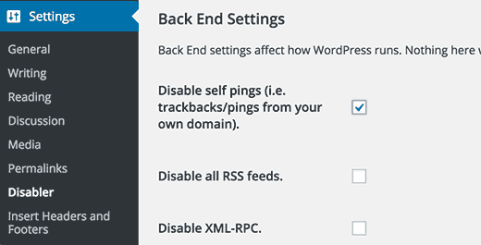
Simply install and activate the Disabler plugin. Upon activation, visit Settings » Disabler page to configure the plugin.

Disabler plugin settings page

You will notice that the plugin allows you to turn off several WordPress features. You need to scroll down to Back End Settings section and check the box next to Disable self pings option.

Click on the save changes button to store your settings.

Turn Off Self Pings Without Using a Plugin

If you do not want to use a plugin, then you can use these two methods to turn off self pings on your site.

1. Turn off Pingbacks Globally

WordPress allows you to turn off pingbacks on your site. By using this option will disable pingback feature completely on your site.

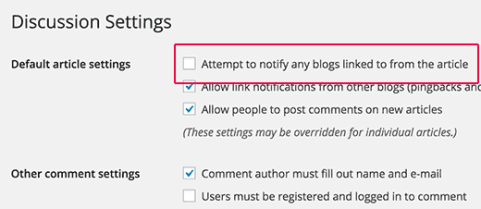
Simply go to Settings » Discussion page. Under the Default article settingssection, uncheck the box next to ‘Attempt to notify any blogs linked to from the article’ option. Click on the save changes button to store your settings.

Disable all outgoing pinbacks from your site

2. Manually Insert Code to Disable Self Pingbacks

If you are comfortable with adding code snippets to your WordPress theme files, then you can use this method to switch off self pings.

Simply copy and paste this code in your theme’s functions.php file or a site-specific plugin.

function no_self_ping( &$links ) {
    $home = get_option( 'home' );
    foreach ( $links as $l => $link )
        if ( 0 === strpos( $link, $home ) )
            unset($links[$l]);
}
 
add_action( 'pre_ping', 'no_self_ping' );

That’s all, we hope this tutorial helped you disable self pings on your WordPress site.

Easy Guide to Style Contact Form 7 Forms in WordPress

In this tutorial, we will learn how to style contact form 7 forms in WordPress.

We have a step by step guide on how to create contact form in WordPress.

Getting Started

We are assuming that you have already installed Contact Form 7 plugin and have created your first contact form. The next step is to copy the shortcode for your contact form and paste it in a WordPress post or a page where you would like your form to appear.

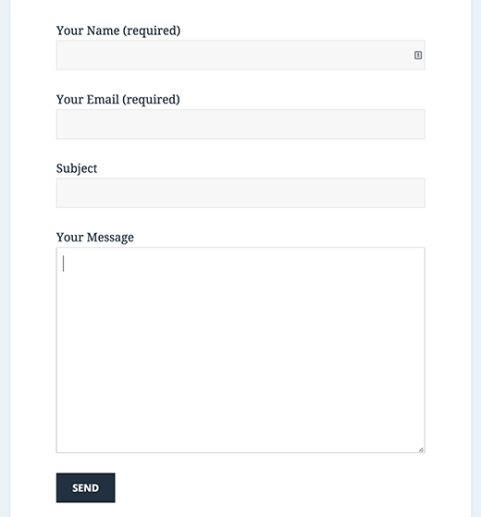
For the sake of this article, we have used the default contact form and added it into a WordPress page. This is how the contact form looked on our test site.

Default Contact Form 7 form on a WordPress site using default WordPress theme

As you can see that the contact form inherits some form styles from your WordPress theme. Apart from that it’s very basic.

We will be styling Contact Form 7 forms using CSS. All the CSS goes into your theme or child theme‘s stylesheet.

Styling Contact Form 7 Forms in WordPress

Contact Form 7 generates a very useful and standard compliant code for the forms. Each element in the form has a proper ID and CSS class associated with it.

Each contact form uses the CSS class .wpcf7 which you can use to style your form.

In this example we are using a Google font Lora in our input fields. See how to add Google Fonts in WordPress.

div.wpcf7 { 
background-color: #fbefde;
border: 1px solid #f28f27;
padding:20px;
}
.wpcf7 input[type="text"],
.wpcf7 input[type="email"],
.wpcf7 textarea {
background:#725f4c;
color:#FFF;
font-family:lora, sans-serif; 
font-style:italic;    
}
.wpcf7 input[type="submit"],
.wpcf7 input[type="button"] { 
background-color:#725f4c;
width:100%;
text-align:center;
text-transform:uppercase;
}

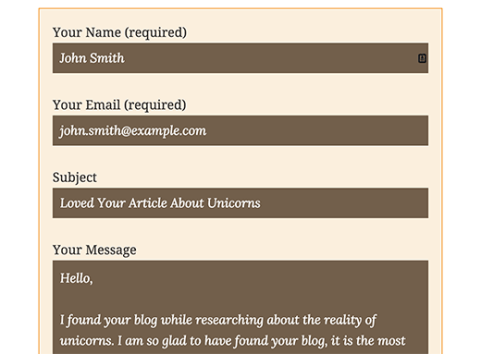
This is how our contact form looked after applying this CSS.

Styling Contact Form 7 forms with CSS in WordPress

Styling Multiple Contact Form 7 Forms

The problem with the CSS we used above is that it will be applied to all Contact Form 7 forms on your website. If you are using multiple contact forms and want to style them differently, then you will need to use the ID generated by contact form 7 for each form.

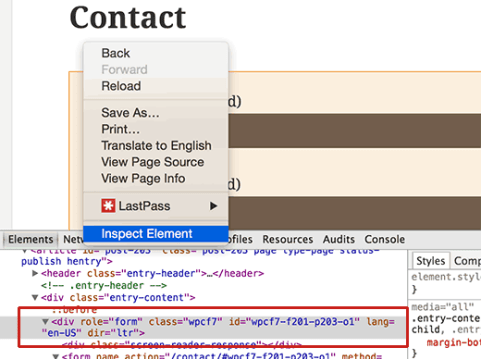
Simply open a page containing the form you want to modify. Take your mouse to the first field in the form, right click and select Inspect Element. The browser screen will split, and you will see the source code of the page. In the source code, you need to locate the starting line of the form code.

Finding the element ID for your contact form

As you can see in the screenshot above, our contact form code starts with the line:

<div role="form" class="wpcf7" id="wpcf7-f201-p203-o1" lang="en-US" dir="ltr">

The id attribute is a unique identifier generated by Contact Form 7 for this particular form. It is a combination of form id and the post id where this form is added.

We will use this ID in our CSS to style our contact form. We will replace .wpcf7 in our first CSS snippet with #wpcf7-f201-p203-o1.

div#wpcf7-f201-p203-o1{ 
background-color: #fbefde;
border: 1px solid #f28f27;
padding:20px;
}
#wpcf7-f201-p203-o1 input[type="text"],
#wpcf7-f201-p203-o1 input[type="email"],
#wpcf7-f201-p203-o1 textarea {
background:#725f4c;
color:#FFF;
font-family:lora, "Open Sans", sans-serif; 
font-style:italic;    
}
#wpcf7-f201-p203-o1 input[type="submit"],
#wpcf7-f201-p203-o1 input[type="button"] { 
background-color:#725f4c;
width:100%;
text-align:center;
text-transform:uppercase;
}

Styling Contact Form 7 Forms with CSS Hero

Many WordPress beginners don’t have any experience of writing CSS, and they don’t want to spend time learning it. Luckily, there is a wonderful solution for beginners that will allow you to not just style your contact form but almost every aspect of your WordPress site.

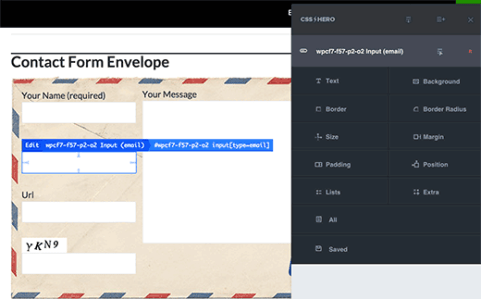
Simply install and activate the CSS Hero plugin and go to the page containing your form. Click on the CSS Hero toolbar and then click on the element you want to style. CSS Hero will provide you an easy user interface to edit the CSS without ever writing any code.

Styling Contact Form 7 Form Using CSS Hero

That’s all we hope this tutorial helped you learn how to style Contact Form 7 forms in WordPress.

Easy Guide to Add Email Subscriptions to Your WordPress Blog

In this tutorial, we will learn how to add email subscriptions to your WordPress blog and start building your email list.

Why You Should Add Subscribe via Email Option to Your Site?

While social media is a great way to interact with your readers, email is the most reliable and direct way of communication. By offering email subscription on your blog, you can build a steady stream of regular visitors for your site.

Email subscription also gives your users yet another way to consume your content as some folks may not be on social media. See our complete guide on why you should start building your email list right away.

Often beginners think that adding email subscription is some complicated process. That’s not true at all.

The WordPress RSS to email subscription setup is quite straight forward, and it will take you less than 30 minutes. Once you set it up, your readers will automatically get daily or weekly emails containing your new content.

Now since there are multiple services and plugins that allow you to setup email subscriptions in WordPress, we will only cover the top 3 email subscription plugins and services.

MailChimp RSS to Email

MailChimp is one of the most popular email marketing service providers. It is a paid service, but they do offer a free option for those with less than 2000 subscribers.

To quickly get started with MailChimp see our guide on using MailChimp and WordPress.

For the sake of this article, we are assuming that you have signed up for MailChimp and created your first email list. The next step is to setup an RSS to Email campaign.

Simply visit Campaigns » Create Campaign to create a new campaign.
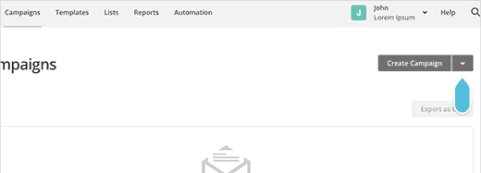
Creating a new MailChimp Campaign

MailChimp will now show you different types of campaigns that you can create. You need to click on the RSS Driven Campaign option.
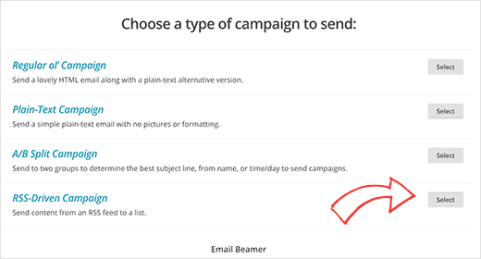
Creating RSS to email campaign in MailChimp

This will bring you to the campaign settings page where you need to provide your WordPress site’s RSS feed link. Your feed URL is yoursite.com/feed/

You will also need to choose the time and frequency of emails. You can choose to send daily, weekly, or monthly emails.
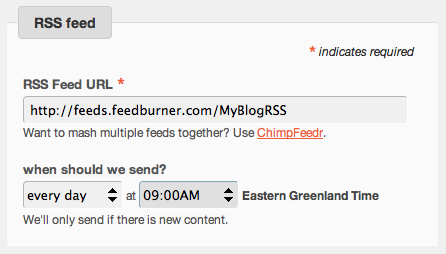
rss feed send time details

On the next page, you will have to provide campaign info. You will notice that MailChimp has already pre-filled most fields on the page. These settings should work for most blogs, but feel free to change them as needed.
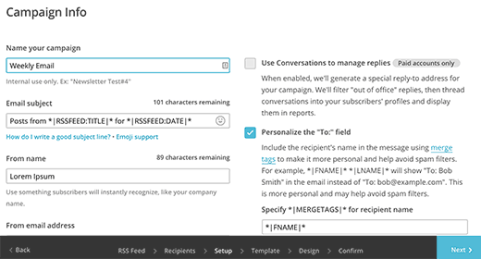
Changing RSS to email campaign info

Now you need to click on the next button to select a template for your emails. MailChimp allows you to customize the template by adding your own logo, by-line, and any other elements that you may want to add.
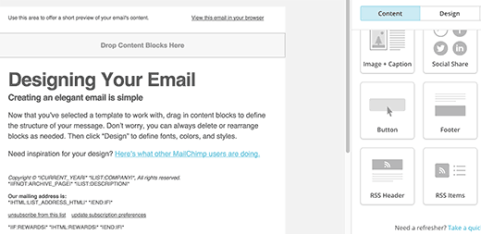
Design your RSS to email template

When you are finished customizing, click on the next button and then click on Save and Exit.

That’s all, you have successfully created your WordPress RSS to Email newsletter using MailChimp.

To add the email subscription form to your website, simply visit the Lists page on your MailChimp account and click on the downward arrow icon next to your email list. After that select signup forms from the menu.
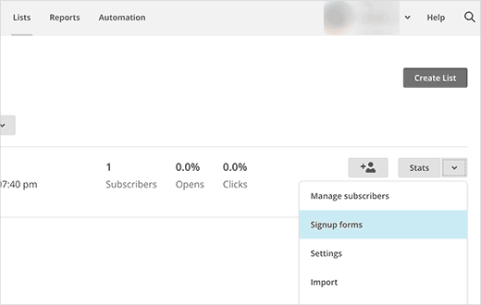
Creating MailChimp email signup form

MailChimp will then ask you, what kind of signup form you want to create. Select Embedded Forms.

On the next screen, you can customize your email sign up form and generate the embed code. You can then copy and paste this code in a text widget on your WordPress website.

Alternatively, you can use OptinMonster a plugin created by the WPCademy team that will make this process a lot easier and offer you pretty signup forms, floating bars, slide-ins, exit-intent popups, and more.

Aweber RSS to Email

Aweber is another popular email marketing service provider. It’s a paid service, but they offer a 30 day free trial. A lot of bloggers and internet marketers prefer to use AWeber.

If you are just joining Aweber, then you will be directed to create your first email list when you login for the first time.

Once you are logged into your Aweber dashboard, simply visit Messages » Blog Broadcasts.
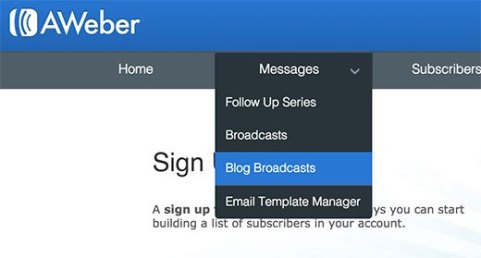
Creating blog broadcasts - RSS to email subscription in Aweber for WordPress

On the next screen, click on the green button labeled ‘Create a Blog Broadcast’.

Create a blog broadcast

This will bring you to the new page where you can setup your RSS to email campaign. First you need to enter the URL of your blog’s RSS feed. After that you need to provide a subject line for the emails.
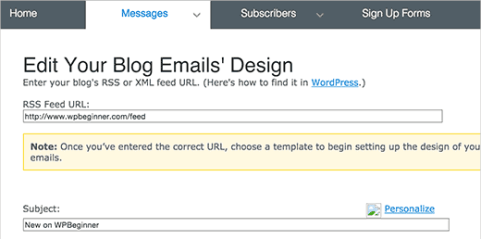
Aweber RSS to email settings

Scroll down a little, and you can choose a template for your email. Select the one you like and then click on load template.
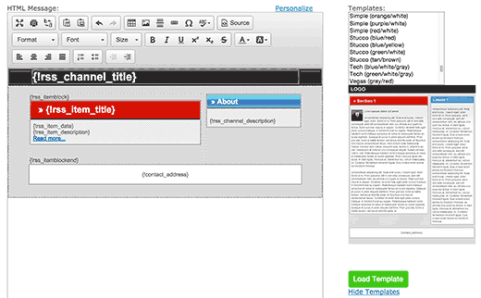
Choosing a template for your email

After choosing your template, scroll further down to configure time and frequency of emails. You can setup to send an email as soon as new item appears in your RSS feed. You can also send daily, weekly, or even monthly email digests.
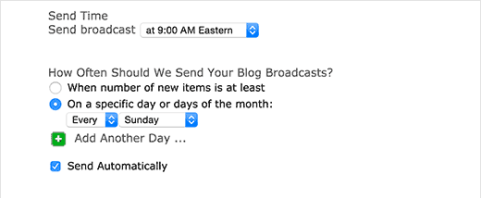
Set email timings and frequency in Aweber

Once you are done setting up these options, you need to click on Save Blog Broadcast button.

That’s all, you have successfully set up Aweber RSS to email subscription.

If you have not already added the email signup form to your WordPress site, then the next step is to add a signup form to your WordPress sidebar. Simply click on the ‘Signup Forms’ in the Aweber dashboard to design your email signup form.
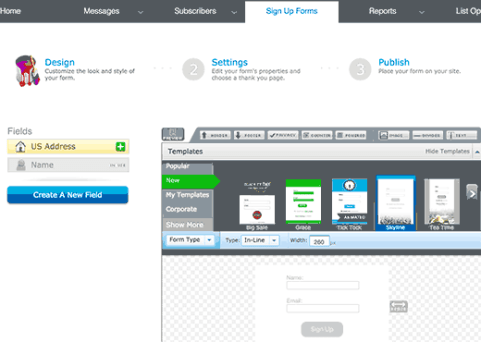
Creating Aweber Email Signup form

Follow the on screen instructions and save your form. Finally you will reach the publish section. There you need to click on the ‘I will install my form’ button and copy the form embed code.
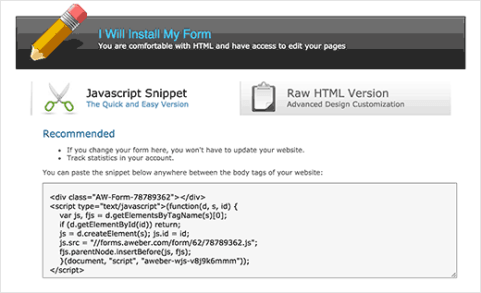
Copy the email signup form code for your WordPress site

Now go to Appearance » Widgets on your WordPress site and paste this code in a text widget.

Alternatively, you can use OptinMonster a plugin created by the WPCademy team that will make this process a lot easier and offer you pretty signup forms, floating bars, slide-ins, exit-intent popups, and more.

Using Jetpack Subscriptions

Jetpack is another option for users who want to add email subscriptions to their WordPress site. It is completely free, but the downside is that you don’t control your list.

Jetpack Subscriptions is not a full newsletter. For example, if you wanted to send an email apart from your daily blog posts, then you will not be able to do that using Jetpack Subscriptions. Also, if later you decide to move to a proper email marketing service which most bloggers do, then your users will have to opt-in to the email list again.

Having said that, here is how to add Jetpack email subscriptions to your self hosted WordPress site. First thing you need to do is install and activate the Jetpack plugin. Upon activation, the plugin will add a new menu item labeled Jetpack to your WordPress admin bar. Clicking on it will take you to the plugin’s settings page.

Jetpack requires you to link your site to WordPress.com

Jetpack plugin requires you to create a WordPress.com account and link your site with it (See our guide on the difference between WordPress.com and self-hosted WordPress.org sites). If you have a WordPress.com account, then you can use that or you can create a free account.

Once you have connected Jetpack to WordPress.com, you need to visit Appearance » Widgets. Drag and drop Blog Subscriptions (Jetpack) widget to a sidebar and then click on Save button store your widget settings.

You can also enable subscription option below your comment form. Visit Settings » Discussion page and scroll down to the Jetpack subscription section. Check the box next to blog subspcription and comment subscription options. Click on the save changes button to store your settings.
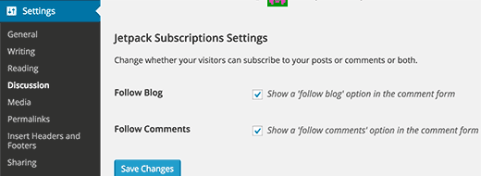
Adding subscription options in comment form

That’s all you have successfully set up Jetpack email subscriptions on your WordPress site.

We hope this article helped you add email subscription to your WordPress blog.
Easy Guide to Fix Category and Comment Count in WordPress

In this tutorial, we will learn how to fix category and comments count after importing WordPress.

As you noticed in the screenshot above, after the import our comment count and category count is showing 0 instead of the actual number. Let’s take a look at how to fix it.

Lets get started

First you need to create a complete WordPress backup of your site. You should do this every time you are going to perform a major change on your site. We recommend using BackupBuddy, it is the most comprehensive WordPress backup plugin on the market.

Once you have made the backup, let’s move on to the next step.

Open a plain text editor like Notepad and simply copy and paste the following code:

<?php
include("wp-config.php");
if (!mysql_connect(DB_HOST, DB_USER, DB_PASSWORD)) {  die('Could not connect: ' . mysql_error());  }
if (!mysql_select_db(DB_NAME)) {  die('Could not connect: ' . mysql_error());  }
 
$result = mysql_query("SELECT term_taxonomy_id FROM ".$table_prefix."term_taxonomy");
while ($row = mysql_fetch_array($result)) {
  $term_taxonomy_id = $row['term_taxonomy_id'];
  echo "term_taxonomy_id: ".$term_taxonomy_id." count = ";
  $countresult = mysql_query("SELECT count(*) FROM ".$table_prefix."term_relationships WHERE term_taxonomy_id = '$term_taxonomy_id'");
  $countarray = mysql_fetch_array($countresult);
  $count = $countarray[0];
  echo $count."
";
 mysql_query("UPDATE ".$table_prefix."term_taxonomy SET count = '$count' WHERE term_taxonomy_id = '$term_taxonomy_id'");
        }
 
$result = mysql_query("SELECT ID FROM ".$table_prefix."posts");
while ($row = mysql_fetch_array($result)) {
  $post_id = $row['ID'];
  echo "post_id: ".$post_id." count = ";
  $countresult = mysql_query("SELECT count(*) FROM ".$table_prefix."comments WHERE comment_post_ID = '$post_id' AND comment_approved = 1");
  $countarray = mysql_fetch_array($countresult);
  $count = $countarray[0];
  echo $count."
";
  mysql_query("UPDATE ".$table_prefix."posts SET comment_count = '$count' WHERE ID = '$post_id'");
        }
?>

You need to replace DB_HOST, DB_USER, DB_PASSWORD with your WordPress database host (usually localhost), database username, and password.

You can find all this information by logging into your WordPress hosting cPanel or by looking at your wp-config.php file using a file manager.

Once you have replaced the information, save this file as comments-fix.phpon your desktop.

Now you will need to upload this file to your site’s root directory. You can do that by using an FTP client or by using the file manager in your web hosting control panel.

After uploading the file to your website, you need to open your web browser and go to this file:

http://example.com/comments-fix.php

Replace example.com with your site’s address.

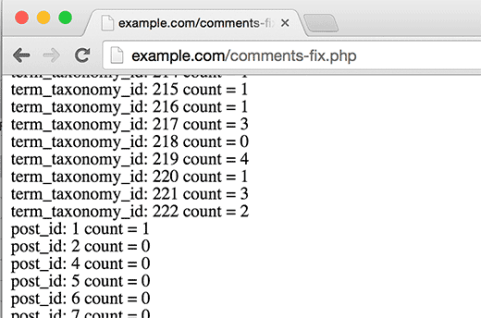
Visiting this file in your browser will run the script which simply loops through your posts, category, tags, comments, etc and update the count.

Fixing taxonomy terms and comment count numbers

Important: Once you’re done fixing your WordPress comment count, you need to delete comments-fix.php file from your server.

That’s all, we hope this tutorial helped you update comments count after importing WordPress.

Easy Guide to Add Facebook Author Tag in WordPress

In this tutorial, we will learn how add the Facebook author meta tag in WordPress.

How Does Facebook Author Tag Work?

Once you add the Facebook author tag on your site, it will display your name with a link back to your profile any time your article is shared.

This is great for both single author blogs and multi-author blogs because it bring more exposure to your personal brand.

There are several ways to add the Facebook Author tag on your site. We will show you both the plugin method as well as the code method to add Facebook Author meta tag on your WordPress site.

Add Facebook Author Tag Using Yost WordPress SEO Plugin

If you are using Yoast WordPress SEO plugin, then you are in luck because it has Facebook open graph meta data support.

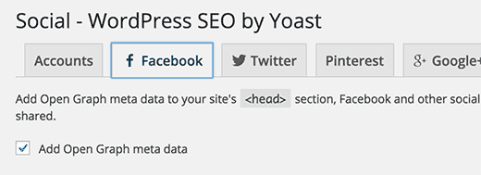
You just need to visit SEO » Social page in your WordPress admin and make sure that the box next to ‘Add Open Graph meta data’ option is checked.

Enable Facebook open graph meta data in WordPress

The next step is to add your Facebook ID in your WordPress account. Simply visit Users » Your Profile page and enter your Facebook profile URL and click on the save changes button to store your settings.

facebook author settings in wordpress

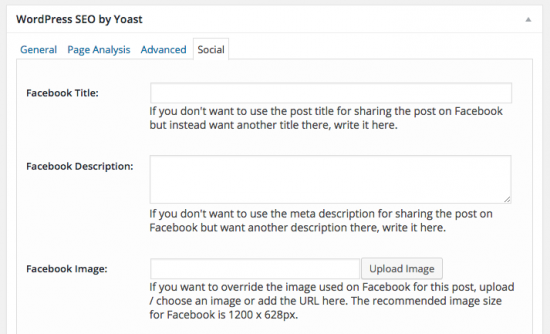
That’s all, WordPress SEO will now automatically insert Facebook author tag or published by tag when you publish an article. WordPress SEO also allows you to easily add a page title and description for Facebook, and you can even explicitly set Facebook thumbnail for your posts.

Add Facebook Author Tag in WordPress using Code

Since we already use Yoast SEO plugin on our site, it made sense for us to use the above method. However if you want to add Facebook author meta tag on your site without a plugin, then simply add the following code in your site’s <head> section.

Make sure to replace the links above with your site’s Facebook page link and your personal profile link.

We hope this tutorial helped you add Facebook author tag in your WordPress site.