Objective of this tutorial is to fix WordPress login issue.
If you are having trouble logging in to your WordPress Administration Panels, here are some possible solutions for wordpress admin login.
Do not forget to Enable Cookies
In order to make sure that cookies are enabled for your browser, you need to:
- Clear your browser cookies.
- Clear your browser cache.
To see how to clear cookies and caches on various browsers, visit Clearing Cache and Cookies.
Disable Plugins
Some WordPress Plugins may interfere with the login process. Disable all of your WordPress Plugins, either through the admin panel or by removing them from the /wp-content/plugins/ folder, so they will not be recognized by the program. Try to disable one plugin and check the issue fixed, this way you can find the plugin cause the trouble.
Alternatively, you can rename the plugins folder to something else temporarily to something like /wp-content/pluginsXX/ and they will not be recognized. Rename the folder back to /wp-content/plugins/ once the base WordPress installation has been recovered.
Check the WordPress Login File
Follow the steps:
Step-01: Sometimes the wp-login.php file may have been corrupted or uploaded incorrectly.
Step-02: Delete wp-login.php off of your server and upload a new copy from a fresh WordPress download. Remember, overwriting file via FTP can lead to incomplete transfers.
Step-03: Edit wp-login.php as follows:
Go to the case retrievepassword section, found under this comment:
// redefining user_login ensures we return the right case in the email
Replace:
$user_login = $user_data["user_login"];
With:
$user_login = $user_data->user_login;
Password Problems
For information on problems logging in due to a wrong or lost password, see Resetting Your Password. Remember: the Username and Password fields are case sensitive.
Site URL Redirecting
In certain cases your WordPress address URI may have been reset.
-
-
- Check the siteurl value in the wp-options table of your WordPress database. A guide to doing this is available here.
- Is it set as http:/?
- If it is, change siteurl to the correct value.
- Open wp-login.php in a text-editor and comment or delete the following lines:
// If someone has moved WordPress let's try to detect it
// if ( dirname('http://' . $_SERVER['HTTP_HOST'] . $_SERVER['PHP_SELF']) != get_settings('siteurl') )
// update_option('siteurl', dirname('http://' . $_SERVER['HTTP_HOST'] . $_SERVER['PHP_SELF']) );
Changed your WordPress address URI and cannot login nor access the database (but still can access the login page) ?
wp-login.php can be used to reset the address:
//FIXME: do comment/remove these hack lines. (once the database is updated)
update_option('siteurl', 'http://your.domain.name/the/path' );
update_option('home', 'http://your.domain.name/the/path' );
Subdomains or Subdirectories Problem
In your wp-config.php try changing from:
define( 'SUBDOMAIN_INSTALL', true);
To:
define( 'SUBDOMAIN_INSTALL', false);
Check Your URL Options from wp-options
In some situations, your blog can be seen from inside your domain, but not outside. Following the instruction above about changing the wp-options MySQL table might still result in login failure.
In this event, double-check your wp-options table siteurl (WordPress address URL) and home (Blog Address URL) values to make sure they reference the same base externally available address; i.e., http://blog.yourdomain.com. The standard install may set them to your local (internal) host name, such as http://servername
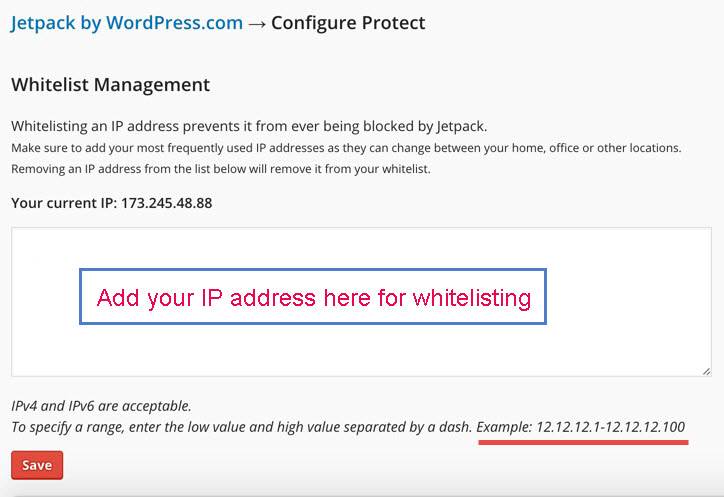
Check and configure your Firewall or whitelist your IP
Some firewalls (e.g., eTrust Personal Firewall) block you from logging in to WordPress. Disable your firewall and try to log in again or whitelist your IP address. If you are using Jetpack by wordpress, add your IP in whitelist. Follow the image as guideline to whitelist your IP in jetpack by wordpress.
Ask for help
Step-01 : If these steps didn’t work, please indicate that you have tried all these possible solutions when posting at the WordPress Support Forum or any other forum like Stack Exchange. Be sure to give details of your server setup, if you know it, including mySQL and PHP versions, as well as your operating system (OS), browser, and the WordPress version that is causing these problems.
Step-02 : sometimes your hosting company supports to fix any issue. You can contact via chat or open a support ticket or email , if possible, ad screenshot of your wordpress login issue.
Check out more Login issues from WordPress Codex