How To Install Suhosin PHP 5 Protection Security Patch on CentOS

Install Suhosin PHP 5

Suhosin (pronounced ‘su-ho-shin’) is an advanced protection system for PHP 5 installations. It is designed to protect servers and users from known and unknown flaws in PHP applications and the PHP core. Suhosin comes in two independent parts, that can be used separately or in combination. The first part is a small patch against the PHP core, that implements a few low-level protections against buffer overflows or format string vulnerabilities and the second part is a powerful PHP extension that implements numerous other protections.

In this tutorial we will show you how to install Suhosin PHP 5 protection security patch on CentOS.

Install Suhosin PHP 5 Protection Security Patch on CentOS

Step 1. First let’s start by ensuring your system is up-to-date.

yum clean all
yum -y update

Step 2. Download latest version of Suhosin:

#yum install php-devel
#http://download.suhosin.org/suhosin-0.9.35.tgz
#tar -xvf suhosin-0.9.35.tgz

 Next, run the following commands to compile Suhosin under PHP 5:

#cd suhosin-0.9.33
#phpize
#./configure
#make
#make install

Create the suhosin configuration, type the following command:

 #echo 'extension=suhosin.so' > /etc/php.d/suhosin.ini

Restart web server Nginx, Lighttpd or Apache:

#service nginx restart
#service lighttpd restart
#service httpd restart

Step 3. Verify Suhosin installation

 #php -v

Suhosin should now be installed. You can check by creating a file called info.php in /var/www/html/ with the following content:

<?php
phpinfo();
?>
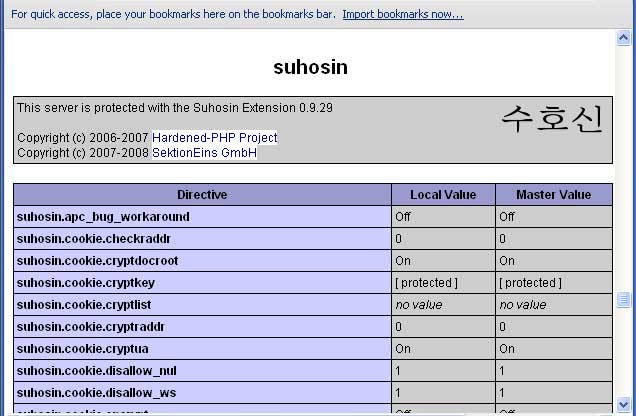
installed php-suhosin successfully

The features of the Suhosin patch are listed under Engine Protection (only with patch); all the other features come with the Suhosin extension. But if you would like configure it according to your setup, then visit the suhosin configuration page for more information.

How To Backup and Restore MySQL Database Using Command Line

Backup and Restore MySQL Database

Many of the world’s largest and fastest-growing organizations including Facebook, Google, Adobe, Alcatel Lucent and Zappos rely on MySQL to save time and money powering their high-volume Web sites, business-critical systems and packaged software.

In this tutorial we will guide you through two easy ways to backup and restore the data in your MySQL database using mysqldump. You can also use this process to move your data to a new web server. We assume that you already have MySQL installed on Linux system with administrative privileges and we assume that you already have badic knowledge on MySQL and command line or terminal.

The parameters of the said command as follows.

  • [uname] Your database username.
  • [passwd] The password for your database (note there is no space between -p and the password).
  • [dbname] The name of your database.
  • [backupdb.sql] The filename for your database backup.

Backup and Restore MySQL Database Using Command Line

Backup MySQL database

First, you can check MySQL databases from your server:

#mysql -h localhost -u root -p
#mysql> show databases;

The following command will dump all databases to an sql file. Replace pass with your root database password and filename with the name of the file you wish to create such as backupdb.sql

Back up multiple databases in MySQL

 #mysqldump –u[uname] –p[passwd] [database name 1] [database name 2] > backup.sql

Example:

 #mysqldump –u root –pidroidus chedelics radiks > backup.sql

Backup all databases in MySQL

 #mysqldump –u [uname] –p[passwd] –all-databases > backup.sql

Example:

 #mysqldump –u root –pidroidus –all-databases > backup.sql

Back up your MySQL Database with Compress

 #mysqldump -u root -p[passwd] --databases [dbname] | gzip > backup.sql.gz

Example:

 #mysqldump -u root -pidroidus --databases  | gzip > backup.sql.gz

Restore MySQL database from a backup file

Above we backup the Tutorials database into backupdb.sql file. To re-create the Tutorials database you should follow two steps:

  • Create an appropriately named database on the target machine
  • Load the file using the mysql command:
 #mysqladmin -u root -p create [dbname]
 #gzip -d backupdb.sql.gz #mysql -uroot -p[passwd] [dbname] < backupdb.sql

Example:

#mysqladmin -u root -p create chedelics
#gzip -d backupdb.sql.gz
#backupdb.sql
#mysql -uroot -pidroidus chedelics < backupdb.sql

You Might Also Like: How To Reset Root Password on MySQL Server

How To Install and Configure Squid 3 on CentOS

Install and Configure Squid 3 on CentOS

Squid is a caching proxy for the Web supporting HTTP, HTTPS, FTP, and more. It reduces bandwidth and improves response times by caching and reusing frequently-requested web pages. Squid has extensive access controls and makes a great server accelerator. It runs on most available operating systems, including Windows and is licensed under the GNU GPL.

This article assumes you have at least basic knowledge of linux, know how to use the shell, and most importantly, you host your site on your own VPS. The installation is quite simple and assumes you are running in the root account, if not you may need to add ‘sudo’ to the commands to get root privileges.

In this tutorial we are going to learn how to install and configuration of Squid on your CentOS server.

Install and Configure Squid 3 on CentOS

Step 1. To install, first you must update yum repository and packages by typing the below command:

 #yum -y update

Step 2. Installing Squid 3.

Install squid package and dependencies using the below command :

 #yum -y install squid

Step 3. Configuration Squid.

Edit squid configuration file ‘/etc/squid/squid.conf’

 #nano /etc/squid/squid.conf
# Recommended minimum configuration:
auth_param basic program /usr/lib/squid/ncsa_auth /etc/squid/squid_passwd
acl ncsa_users proxy_auth REQUIRED
http_access allow ncsa_users

acl manager proto cache_object
acl localhost src 127.0.0.1/32
acl to_localhost dst 127.0.0.0/8 0.0.0.0/32
acl SSL_ports port 443
acl Safe_ports port 80        # http
acl Safe_ports port 21        # ftp
acl Safe_ports port 443        # https
acl Safe_ports port 1025-65535    # unregistered ports
acl Safe_ports port 280        # http-mgmt
acl Safe_ports port 488        # gss-http
acl Safe_ports port 591        # filemaker
acl Safe_ports port 777        # multiling http
acl CONNECT method CONNECT

http_access allow manager localhost
http_access deny manager
http_access deny !Safe_ports
http_access deny CONNECT !SSL_ports
http_access deny all
http_port 3128

hierarchy_stoplist cgi-bin ?
coredump_dir /var/spool/squid
cache deny all

refresh_pattern ^ftp:        1440    20%    10080
refresh_pattern ^gopher:    1440    0%    1440
refresh_pattern -i (/cgi-bin/|\?) 0    0%    0
refresh_pattern .        0    20%    4320

icp_port 3130

forwarded_for off

request_header_access Allow allow all
request_header_access Authorization allow all
request_header_access Proxy-Authorization allow all
request_header_access Proxy-Authenticate allow all
request_header_access Cache-Control allow all
request_header_access Content-Encoding allow all
request_header_access Content-Length allow all
request_header_access Content-Type allow all
request_header_access Date allow all
request_header_access Expires allow all
request_header_access Host allow all
request_header_access If-Modified-Since allow all
request_header_access Last-Modified allow all
request_header_access Location allow all
request_header_access Pragma allow all
request_header_access Accept allow all
request_header_access Accept-Charset allow all
request_header_access Accept-Encoding allow all
request_header_access Accept-Language allow all
request_header_access Content-Language allow all
request_header_access Mime-Version allow all
request_header_access Retry-After allow all
request_header_access Title allow all
request_header_access Connection allow all
request_header_access Proxy-Connection allow all
request_header_access User-Agent allow all
request_header_access Cookie allow all
request_header_access All deny all
visible_hostname wpcademy.com

Step 4. Create our authentication file which Squid can use to verify for user authentications:

 #htpasswd -b /etc/squid/squid_passwd username password

Example:

 #htpasswd -b -c /etc/squid/squid_passwd ranty ratna

Congratulation’s! You have successfully installed squid. Thanks for using this tutorial for installing squid proxy on CentOS system. For additional help or useful information, we recommend you to check the official squid web site.

You Might Also Like: How To Install Redis on Ubuntu 16.04 LTS

How To Reset Root Password on MySQL Server

Reset Root Password on MySQL Server

By default, MySQL server will be installed with root account and password is blank. Have you ever forgotten the root password on one of your MySQL servers? If you have set the password for root and forget it, then you will need to reset the root password for MySQL. To reset your mysql password just follow these instructions and we assume that you already have a small amount of knowledge on MySQL.

This article assumes you have at least basic knowledge of linux, know how to use the shell, and most importantly, you host your site on your own VPS. The reset password MySQL is quite simple. I will show you through the step by step reset root password MySQL server.

Reset Root Password MySQL Server

Step 1. First thing to do is stop MySQL.

### CentOS 6 ###
service mysqld stop

### CentOS 7 ###
systemctl stop mysqld

Step 2. Next we need to start MySQL in safe mode with the –skip-grant-tables option so that it will not prompt for password.

 mysqld_safe --skip-grant-tables &

Step 3. Start the mysql client process using this command with root account and blank password.

 mysql -u root

Step 4. Change password for root account.

mysql> use mysql;
mysql> update user set password=PASSWORD("NEW-ROOT-PASSWORD") where #User='root';
mysql> flush privileges;
mysql> quit

Step 5. Restart MySQL.

Once complete, you can restart MySQL is installed by running the below command:

### CentOS 6 ###
service mysqld restart

### CentOS 7 ###
systemctl restart mysqld

Congratulation’s! You have successfully reset password MySQL. Thanks for using this tutorial for reset root password MySQL on Linux system. For additional help or useful information, we recommend you to check the official MySQL web site

You Might Also Like: How To Backup and Restore MySQL Database Using Command Line

How To Remove MySQL Server from CentOS

Remove MySQL Server from CentOS

MySQL is a relational database management system (RDBMS) that runs as a server providing multi-user access to a number of databases. The MySQL source code is freely available because it was originally developed as freeware. MySQL is written in C and C++ and is compatible with all major operating systems. MySQL can be used for a variety of applications, but is most commonly found on Web servers.

This article assumes you have at least basic knowledge of linux, know how to use the shell, and most importantly, you host your site on your own VPS. The uninstall or removing is quite simple. I will show you through the step by step removing MySQL on CentOS server. May be it’s good idea to backup databases before doing this.

In this tutorial we will guide you how to completely remove of MySQL from your CentOS server.

Completely Removing MySQL Server in CentOS

Step 1: Check list the mysql rpm which is installed on server

#rpm -qa | grep mysql
or
#yum list installed | grep mysql

Step 2 : Removing all mysql-related packages (with “yum remove”)

 #yum remove mysql-client mysql-server mysql-common mysql-devel

Step 3: Delete the databases folder

#rm -rf /var/lib/mysql/
#rm -rf /etc/my.cnf

If you need to reinstall mysql database server, check out our tutorial, click here.

Congratulation’s! You have successfully removes MySQL. Thanks for using this tutorial for removing MySQL server on CentOS system. For additional help or useful information, we recommend you to check the official MySQL web site

You Might Also Like: How To Install MySQL Database Server on CentOS

How To Install MySQL Database Server on CentOS

Install MySQL Database Server on CentOS

MySQL is a relational database management system (RDBMS) that runs as a server providing multi-user access to a number of databases. The MySQL source code is freely available because it was originally developed as freeware. MySQL is written in C and C++ and is compatible with all major operating systems. MySQL can be used for a variety of applications, but is most commonly found on Web servers.

This article assumes you have at least basic knowledge of linux, know how to use the shell, and most importantly, you host your site on your own VPS. The installation is quite simple.

In this tutorial we will guide you through the step by step installation MySQL in CentOS server.

Install MySQL Database Server on CentOS

To install, first you must add the Remi yum repository information corresponding to your CentOS/RHEL version to yum:

For CentOS 6.x use:

#rpm -Uvh http://download.fedoraproject.org/pub/epel/6/i386/epel-release-6-8.noarch.rpm
#rpm -Uvh http://rpms.famillecollet.com/enterprise/remi-release-6.rpm

 For CentOS 5.x use:

#rpm -Uvh http://dl.fedoraproject.org/pub/epel/5/i386/epel-release-5-4.noarch.rpm
#rpm -Uvh http://rpms.famillecollet.com/enterprise/remi-release-5.rpm

After installing Remi repository on your system, then look for MySQL latest version using –enablerepo=remi switch option.

 #yum --enablerepo=remi list mysql mysql-server

Sample output:

Installing MySQL 5.5.37:

 #yum --enablerepo=remi install mysql mysql-server

Starting / Stopping MySQL Server on CentOS

#service mysqld start
#service mysqld restart
#service mysqld stop

Hardening MySQL with mysql_secure_installation:

 #mysql_secure_installation

Connecting to MySQL Server:

Connecting to newly installed MySQL server by providing username and password.

 #mysql -u root -p

Congratulation’s! You have successfully installed MySQL. Thanks for using this tutorial for installing MySQL server in CentOS system. For additional help or useful information, we recommend you to check the official MySQL web site.

You Might Also Like: How To Install MariaDB On CentOS 6

How To Install IonCube Loader on CentOS

Install IonCube Loader on CentOS

IonCube Loaders is basically an encryption/decryption utility for PHP applications which also assists in speeding up the pages that are served. It is often required for a lot of PHP-based applications.

This article assumes you have basic knowledge of linux, know how to use the shell, and most importantly, you host your site on your own VPS. The installation is quite simple and assumes you are running in the root account, if not you may need to add ‘sudo’ to the commands to get root privileges.

In this tutorial we will guide you through the step by step installation IonCube Loader in CentOS server.

Install IonCube Loader on CentOS

Method 1:

For CentOS 32-bit use:

#wget http://downloads3.ioncube.com/loader_downloads/ioncube_loaders_lin_x86.tar.gz
#tar xvfz ioncube_loaders_lin_x86.tar.gz

For CentOS x86_64 (64-bit):

#wget http://downloads3.ioncube.com/loader_downloads/ioncube_loaders_lin_x86-64.tar.gz
#tar xvfz ioncube_loaders_lin_x86-64.tar.gz

If the links are not working anymore, please check the latest version download links in here.

#cd ioncube
#mkdir /usr/local/ioncube
#cp ioncube_loader_lin_5.3.so /usr/local/ioncube

Copy ioncube_loader_lin_5.3.so as PHP version installed on the server was PHP 5.3

Now edit php.ini file. To find location of php.ini, run

#php -i| grep php.ini
#nano /etc/php.ini

Add following line to end on php.ini

 zend_extension = /usr/local/ioncube/ioncube_loader_lin_5.3.so

Restart apache after IonCube Loaders installation

#service httpd restart
#php -v

Method 2:

Install IonCube Loaders via atomic yum repository:

#wget -q -O - http://www.atomicorp.com/installers/atomic |sh
#yum install php-ioncube-loader -y

IonCube Loader should now be installed. You can check by creating a file called info.php in /var/www/html/ with the following content:

 <? phpinfo(); ?>

Congratulation’s! You have successfully installed IonCube Loader. Thanks for using this tutorial for installing IonCube Loader in CentOS  system. For additional help or useful information, we recommend you to check the official IonCube Loader web site.

You Might Also Like: How To Install IonCube Loader on Ubuntu 16.04 LTS