How To Install Opera Web Browser on CentOS 7

Opera Web Browser on CentOS 7

Opera is a fast, secure and easy-to-use internet browser which works well on most of the Linux distributions. It’s now designed with an integrated ad blocker, battery saver and free VPN, so it saves time and resources for its own users. Also, Opera browser is stuffed with several other innovative features such as speed dialup, pop-up blocking, personal browsing and tabbed browsing.

This article assumes you have at least basic knowledge of Linux, know how to use the shell, and most importantly, you host your site on your own VPS. The installation is quite simple and assumes you are running in the root account, if not you may need to add ‘sudo’ to the commands to get root privileges. I will show you through the step by step install Opera Web Browser on CentOS 7 server.
Install Opera Web Browser on CentOS 7

Step 1. First let’s start by ensuring your system is up-to-date.

yum clean all
yum -y update

Step 2. Installing Opera Web Browser on CentOS 7.

First, download latest opera version for your Linux distribution go to Opera download page:

wget http://get.geo.opera.com/ftp/pub/opera/desktop/53.0.2907.68/linux/opera-stable_53.0.2907.68_amd64.rpm

After downloading Opera rpm packages, lets install it using rpm command line utility:

rpm -ivh opera-stable_53.0.2907.68_amd64.rpm

Step 3. Accessing Opera Web Browser.

Once the Opera installation is complete, use following command to open browser from GUI interface or use GUI menu to start it.

opera

Congratulation’s! You have successfully installed Opera Browser. Thanks for using this tutorial for installing Opera Web Browser on CentOS 7 systems. For additional help or useful information, we recommend you to check the official Opera web site.

How To Install Ionic Framework on CentOS 7

Ionic Framework on CentOS 7

Ionic Framework is helpful for building Android and iOS programs faster. You must install those applications to create a hybrid mobile application.

This article assumes you have at least basic knowledge of Linux, know how to use the shell, and most importantly, you host your site on your own VPS. The installation is quite simple and assumes you are running in the root account, if not you may need to add ‘sudo’ to the commands to get root privileges. I will show you through the step by step install Ionic Framework on CentOS 7 server.
Install Ionic Framework on CentOS 7

Step 1. First let’s start by ensuring your system is up-to-date.

yum clean all
yum -y update

Step 2. Installing Node.js.

Use the below command to install Node.js:

curl -sL https://rpm.nodesource.com/setup_8.x | sudo -E bash -
sudo yum install nodejs 5.

Step 3. Installing Cordova.

Run the following command to install Cordova on your system using npm command:

sudo npm install -g cordova

Step 4. Installing Ionic Framework on CentOS 7.

After installing Cordova, use the below command to install Ionic Framework:

sudo npm install -g ionic

To verify the ionic installation:

ionic -v

Step 5. Create Ionic Application.

First, create a new Cordova project on your computer using the following command:

ionic start Helloidr00t blank

Now use one of the following commands to enable iOS or Android platform:

ionic platform add ios
ionic platform add android

Congratulation’s! You have successfully installed Install Ionic Framework. Thanks for using this tutorial for installing Install Ionic Framework on CentOS 7 systems. For additional help or useful information, we recommend you to check the official Install Ionic Framework web site.

How To Install Matomo on CentOS 7

Matomo on CentOS 7

Matomo or formerly known as Piwik, is an open source web analytics application. It rivals Google Analytics and includes even more features and allows you to brand your brand and send out custom daily, weekly, and monthly reports to your clients.

This article assumes you have at least basic knowledge of Linux, know how to use the shell, and most importantly, you host your site on your own VPS. The installation is quite simple and assumes you are running in the root accge of Linount, if not you may need to add ‘sudo’ to the commands to get root privileges. I will show you through the step by step installation Matomo on a CentOS 7 server.
Install Matomo on CentOS 7

Step 1. First let’s start by ensuring your system is up-to-date.

yum clean all
yum -y update

Step 2. Install LAMP server.

A CentOS 7 LAMP stack server is required. If you do not have LAMP installed, you can follow our guide here. Also install required PHP modules:

yum -y install php-gd php-imap php-ldap php-odbc php-pear php-xml php-xmlrpc php-mbstring php-mcrypt php-mssql php-snmp php-soap php-tidy curl curl-devel

Step 3. Installing Matomo on CentOS 7.

First thing to do is to go to Matomo’s download page and download the latest stable version of Piwik:

cd /var/www/html/
wget https://builds.matomo.org/piwik.zip

Unpack the Matomo archive to the document root directory on your server:

unzip matomo.zip -d /var/www/html/
mv /var/www/html/piwik/ /var/www/html/matomo/

We will need to change some folders permissions:

chown -R apache:apache /var/www/html/matomo

Step 4. Configuring MariaDB for Matomo.

By default, MariaDB is not hardened. You can secure MariaDB using the mysql_secure_installation script. you should read and below each steps carefully which will set root password, remove anonymous users, disallow remote root login, and remove the test database and access to secure MariaDB:

mysql_secure_installation

Configure it like this:

- Set root password? [Y/n] y
- Remove anonymous users? [Y/n] y
- Disallow root login remotely? [Y/n] y
- Remove test database and access to it? [Y/n] y
- Reload privilege tables now? [Y/n] y

Next we will need to log in to the MariaDB console and create a database for the Matomo. Run the following command:

mysql -u root -p

This will prompt you for a password, so enter your MariaDB root password and hit Enter. Once you are logged in to your database server you need to create a database for Matomo installation:

MariaDB [(none)]> CREATE DATABASE matomo;
MariaDB [(none)]> GRANT ALL PRIVILEGES ON matomo.* TO 'matomo'@'localhost' IDENTIFIED BY 'PASSWORD';
MariaDB [(none)]> FLUSH PRIVILEGES;
MariaDB [(none)]> \q

Step 5. Configuring Apache web server for Matomo.

We will create Apache virtual host for your Matomo website. First create ‘/etc/httpd/conf.d/vhosts.conf’ file with using a text editor of your choice:

nano /etc/httpd/conf.d/vhosts.conf
IncludeOptional vhosts.d/*.conf

Next, create the virtual host:

mkdir /etc/httpd/vhosts.d/
nano /etc/httpd/vhosts.d/yourdomain.com.conf

Add the following lines:

ServerAdmin [email protected]
DocumentRoot /var/www/html/matomo
ServerName yourdomain.com
ServerAlias www.yourdomain.com
ErrorLog "/var/log/httpd/yourdomain.com-error_log"
CustomLog "/var/log/httpd/yourdomain.com-access_log" combined

<Directory "/var/www/html/matomo/">
DirectoryIndex index.html index.php
Options FollowSymLinks
AllowOverride All
Require all granted


Save and close the file. Restart the Apache service for the changes to take effects:

systemctl restart httpd.service

Step 6. Accessing Matomo web analytics application.

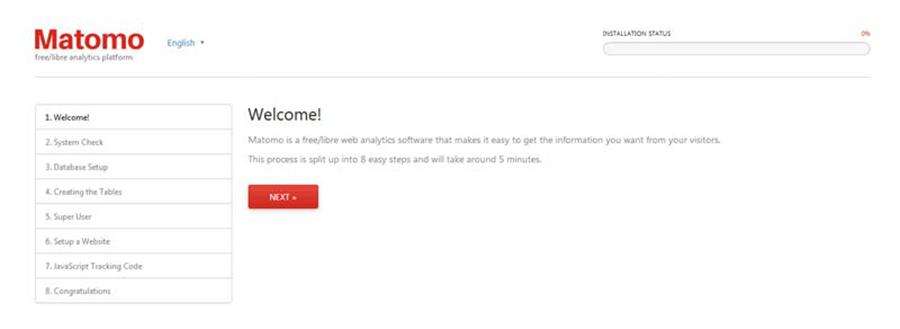
Matomo will be available on HTTP port 80 by default. Open your favorite browser and navigate to http://yourdomain.com/piwik or http://server-ip/piwik and complete the required the steps to finish the installation. If you are using a firewall, please open port 80 to enable access to the control panel.
install-matomo
Congratulation’s! You have successfully installed Matomo. Thanks for using this tutorial for installing Install Matomo open source web analytics application on CentOS 7 system. For additional help or useful information, we recommend you to check the official Matomo on web site.

How To Install Iftop Network Bandwidth Monitoring on Linux

Iftop Network Bandwidth Monitoring on Linux

iftop is a command line tool that shows a list of active network connections between local host and any remote host, sorted by their bandwidth usage. The list of top-ranking network connections (in terms of bandwidth usage) is periodically refreshed in a ncurses-based user interface.

This article assumes you have at least basic knowledge of Linux, know how to use the shell, and most importantly, you host your site on your own VPS. The installation is quite simple and assumes you are running in the root account, if not you may need to add ‘sudo’ to the commands to get root privileges. I will show you through the step by step installation Iftop Network Bandwidth Monitoring on a Linux server.
Install Iftop Network Bandwidth Monitoring on Linux

Step 1. First make sure that all your system packages are up-to-date by running these following apt-get commands in the terminal.

### CentOS ###
sudo yum clean all
sudo yum -y update

### Ubuntu ###
sudo apt-get update
sudo apt-get upgrade

Step 2. Installing Interface TOP (IFTOP) on Linux.

To install iftop on Ubuntu, Mint or Debian:

sudo apt-get install iftop

To install iftop on CentOS:

sudo yum install epel-release
sudo yum install iftop

Step 3. Using IFTOP.

iftop is very simple to use. Just type the iftop command on terminal with root privileges to display the bandwidth usage of the first network interface. Press Q to exit from the iftop command output:
iftop

Congratulation’s! You have successfully installed Interface TOP (IFTOP). Thanks for using this tutorial for installing Iftop Network Bandwidth Monitoring on Ubuntu 18.04 LTS (Bionic Beaver) system. For additional help or useful information, we recommend you to check the official iftop web site.

How To Install Oracle JDK 9 on CentOS 7

Install Oracle JDK 9 on CentOS 7

There are many programs and scripts that require java to run it, but usually Java is not installed by default on VPS or Dedicated Server. This article assumes you have at least basic knowledge of linux, know how to use the shell, and most importantly, you host your site on your own VPS. The installation is quite simple. In this tutorial we will learn how to Install Oracle JDK 9 on CentOS 7.

Install Oracle JDK 9 on CentOS 7

Step 1. First, remove the Java 1.6 or 1.7 have been installed already, you can uninstall them using the following commands.

yum remove java-1.6.0-openjdk
yum remove java-1.7.0-openjdk

Step 2. Downloading and Installing Oracle JDK 9 on CentOS 7.

First, go to Java 9 official website of Oracle, select the appropriate version and then download:

wget --no-cookies --no-check-certificate --header "Cookie: oraclelicense=accept-securebackup-cookie" \
http://download.oracle.com/otn-pub/java/jdk/9.0.4+11/c2514751926b4512b076cc82f959763f/jdk-9.0.4_linux-x64_bin.tar.gz

Next, change the directory to the location where you want to install the JDK, then move the .tar.gz archive binary to the current directory:

tar zxf jdk-9.0.4_linux-x64_bin.tar.gz -C /usr/local

Step 3. Install JAVA using alternatives.

After extracting archive file use alternatives command to install it. alternatives command is available in chkconfig package:

cd /usr/local/jdk-9.0.4/
alternatives --install /usr/bin/java java /usr/local/jdk-9.0.4/bin/java 2
alternatives --config java


There is 1 program that provides 'java'.

Selection Command
-----------------------------------------------
*+ 1 /usr/local/jdk-9.0.4/bin/java

Enter to keep the current selection[+], or type selection number: 1

At this point JAVA 9 has been successfully installed on your system. We also recommend to setup javac and jar commands path using alternatives:

alternatives --install /usr/bin/jar jar /usr/local/jdk-9.0.4/bin/jar 2
alternatives --install /usr/bin/javac javac /usr/local/jdk-9.0.4/bin/javac 2
alternatives --set jar /usr/local/jdk-9.0.4/bin/jar
alternatives --set javac /usr/local/jdk-9.0.4/bin/javac

Step 4. Checking Installed java version.

[email protected] ~# java -version
java version "9.0.4"
Java(TM) SE Runtime Environment (build 9+181)
Java HotSpot(TM) 64-Bit Server VM (build 9+181, mixed mode)

Step 5. Setup global environment variables.

We can easily set the environment variables using the export command as shown below:

Setup JAVA_HOME Variable:

export JAVA_HOME=/usr/local/jdk-9.0.4

Setup JRE_HOME Variable:

export PATH=$PATH:/usr/local/jdk-9.0.4/bin

Congratulation’s! You have successfully installed Oracle JDK 9. Thanks for using this tutorial for installing Oracle JDK 9 on CentOS 7 systems. For additional help or useful information, we recommend you to check the official Oracle web site.

How To Install Percona Server on CentOS 7 Step by Step

Install Percona Server on CentOS 7

Percona Server is a drop-in replacement for the MySQL database which use an enhanced version of InnoDB Database engine called xtradb. According to the Percona Website Percona xtradb is designed to provide superior performance, scalability and instrumentation. In this tutorial we will learn how to Install Percona Server on CentOS 7 Step by Step.

Prerequisites

This tutorial assumes you have at least basic knowledge of Linux, know how to use the shell, and most importantly, you host your site on your own VPS. The installation is quite simple and assumes you are running in the root account, if not you may need to add ‘sudo’ to the commands to get root privileges.

Install Percona Server on CentOS 7

Step 1. First let’s start by ensuring your system is up-to-date.

yum clean all
yum -y update

Step 2. Installing Percona Server on CentOS 7.

First we will add repository package from Persona:

yum install https://www.percona.com/redir/downloads/percona-release/redhat/0.1-6/percona-release-0.1-6.noarch.rpm

Then run the yum repolist command to make sure that the repository is active:

yum repolist
yum search percona | grep server

Next, Install Percona Server using yum install command:

yum install Percona-Server-server-57

After the installation is finished, start the Percona Server:

systemctl start mysqld
systemctl enable mysqld

Note: During the installation, a temporary password is generated for the root user and you can find it in /var/log/mysqld.log file.

grep -i password /var/log/mysqld.log

Step 3. Securing Percona server after installation.

By default, Percona is not hardened. You can secure Percona using the mysql_secure_installation script. you should read and below each steps carefully which will set root password, remove anonymous users, disallow remote root login, and remove the test database and access to secure Percona:

mysql_secure_installation

Congratulation’s! You have successfully installed Install Percona. Thanks for using this tutorial for installing Install Percona Server on CentOS 7 systems. For additional help or useful information, we recommend you to check the official Install Percona web site.

How To Install Akaunting on CentOS 7 Step by Step

Install Akaunting on CentOS 7

Akaunting is a free and online accounting software designed for small businesses to manage their finances and stay on top of their cash flow. Invoicing, accepting online payments and keeping track of expenses couldn’t be simpler. Akaunting is built with modern technologies such as Laravel, Bootstrap, jQuery, Swift Mailer, API etc. In this tutorial we will learn how to Install Akaunting on CentOS 7 step by step.

Prerequisites

This tutorial assumes you have at least basic knowledge of Linux, know how to use the shell, and most importantly, you host your site on your own VPS. The installation is quite simple and assumes you are running in the root accge of Linount, if not you may need to add ‘sudo’ to the commands to get root privileges. I will show you through the step by step installation Akaunting online accounting software on a CentOS 7 server.

Install Akaunting on CentOS 7

Step 1. First let’s start by ensuring your system is up-to-date.

yum clean all
yum -y update

Step 2. Install LAMP server.

A CentOS 7 LAMP stack server is required. If you do not have LAMP installed, you can follow our guide here. Also install required PHP modules:

yum -y install php-gd php-imap php-ldap php-odbc php-pear php-xml php-xmlrpc php-mbstring php-mcrypt php-mssql php-snmp php-soap php-tidy curl curl-devel

Step 3. Installing Akaunting on CentOS 7.

First thing to do is to go to Akaunting’s download page and download the latest stable version of Akaunting,:

cd /var/www/akaunting
curl -O -J -L https://akaunting.com/download.php?version=latest
unzip Akaunting_1.1.15-Stable.zip

We will need to change some folders permissions:

chown -R chown apache:apache -R /var/www/akaunting

Step 4. Configuring MariaDB for Akaunting.

By default, MariaDB is not hardened. You can secure MariaDB using the mysql_secure_installation script. you should read and below each steps carefully which will set root password, remove anonymous users, disallow remote root login, and remove the test database and access to secure MariaDB:

mysql_secure_installation

Configure it like this:

- Set root password? [Y/n] y
- Remove anonymous users? [Y/n] y
- Disallow root login remotely? [Y/n] y
- Remove test database and access to it? [Y/n] y
- Reload privilege tables now? [Y/n] y

Next we will need to log in to the MariaDB console and create a database for the Akaunting. Run the following command:

mysql -u root -p

This will prompt you for a password, so enter your MariaDB root password and hit Enter. Once you are logged in to your database server you need to create a database for Akaunting installation:

MariaDB [(none)]> CREATE DATABASE dbname;
MariaDB [(none)]> GRANT ALL ON dbname.* TO 'username' IDENTIFIED BY 'password';
MariaDB [(none)]> FLUSH PRIVILEGES;
MariaDB [(none)]> EXIT;

Step 5. Configure Apache web server for Akaunting.

We will create Apache virtual host for your Akaunting website. First create ‘/etc/httpd/conf.d/vhosts.conf’ file with using a text editor of your choice:

nano /etc/httpd/conf.d/vhosts.conf
IncludeOptional vhosts.d/*.conf

Next, create the virtual host:

mkdir /etc/httpd/vhosts.d/
nano /etc/httpd/vhosts.d/yourdomain.com.conf

Add the following lines:

ServerAdmin [email protected]
DocumentRoot "/var/www/akaunting"
ServerName yourdomain.com
ServerAlias www.yourdomain.com
ErrorLog "/var/log/httpd/yourdomain.com-error_log"
CustomLog "/var/log/httpd/yourdomain.com-access_log" combined

<Directory "/var/www/akaunting/">
DirectoryIndex index.html index.php
Options FollowSymLinks
AllowOverride All
Require all granted


Save and close the file. Restart the apache service for the changes to take effects:

systemctl restart httpd.service

Step 6. Accessing Akaunting.

Akaunting will be available on HTTP port 80 by default. Open your favorite browser and navigate to http://yourdomain.com/ or http://server-ip and complete the required the steps to finish the installation. If you are using a firewall, please open port 80 to enable access to the control panel.

Congratulation’s! You have successfully installed Akaunting. Thanks for using this tutorial for installing Akaunting online accounting software on CentOS 7 systems. For additional help or useful information, we recommend you to check the official Akaunting web site.