How To Install Piwik on Ubuntu 16.04 LTS

Install Piwik on Ubuntu 16

Piwik is an open source web analytics application. It rivals Google Analytics and includes even more features and allows you to brand your brand and send out custom daily, weekly, and monthly reports to your clients.

Install Piwik on Ubuntu 16.04 LTS

This article assumes you have at least basic knowledge of linux, know how to use the shell, and most importantly, you host your site on your own VPS. The installation is quite simple and assumes you are running in the root account, if not you may need to add ‘sudo’ to the commands to get root privileges. I will show you through the step by step installation Piwik web analytics on a Ubuntu 16.04 (Xenial Xerus) server.

Step 1. First make sure that all your system packages are up-to-date by running these following apt-get commands in the terminal.

sudo apt-get update
sudo apt-get upgrade

Step 2. Install LAMP (Linux, Apache, MariaDB, PHP) server.

A Ubuntu 16.04 LAMP server is required. If you do not have LAMP installed, you can follow our guide here. Also install all required PHP modules:

sudo apt-get install php7.0-curl php7.0-gd php7.0-mbstring php7.0-mysql libapache2-mod-php7.0 php7.0-mcrypt php7.0-geoip php7.0-zip

Step 3. Installing Piwik.

First thing to do is to go to Piwik’s download page and download the latest stable version of Piwik:

cd /var/www/html/
wget http://builds.piwik.org/latest.zip

Unpack the Piwik archive to the document root directory on your server:

unzip latest.zip

We will need to change some folders permissions:

chown -R www-data:www-data /var/www/html/piwik
chmod -R 0755 /var/www/html/piwik/tmp

Step 4. Configuring MariaDB for Piwik.

By default, MariaDB is not hardened. You can secure MariaDB using the mysql_secure_installation script. you should read and below each steps carefully which will set root password, remove anonymous users, disallow remote root login, and remove the test database and access to secure MariaDB:

mysql_secure_installation

Configure it like this:

- Set root password? [Y/n] y
- Remove anonymous users? [Y/n] y
- Disallow root login remotely? [Y/n] y
- Remove test database and access to it? [Y/n] y
- Reload privilege tables now? [Y/n] y

Next we will need to log in to the MariaDB console and create a database for the Piwik. Run the following command:

mysql -u root -p

This will prompt you for a password, so enter your MariaDB root password and hit Enter. Once you are logged in to your database server you need to create a database for Piwik installation:

CREATE DATABASE piwikdb;
CREATE USER piwikadmin@localhost IDENTIFIED BY 'mySecurepassword';
GRANT ALL PRIVILEGES ON piwik.* TO piwikadmin@localhost;
FLUSH PRIVILEGES;
exit

Step 5. Accessing Piwik.

Piwik will be available on HTTP port 80 by default. Open your favorite browser and navigate to http://yourdomain.com/piwik or http://server-ip/piwik and complete the required the steps to finish the installation. If you are using a firewall, please open port 80 to enable access to the control panel.
install-piwik

Congratulation’s! You have successfully installed Piwik. Thanks for using this tutorial for installing Piwik web analytics on Ubuntu 16.04 LTS (Xenial Xerus) system. For additional help or useful information, we recommend you to check the official Piwik web site.

How To Install Logrotate on Ubuntu 16.04 LTS

Install Logrotate on Ubuntu 16

logrotate is designed to ease administration of systems that generate large numbers of log files. It allows automatic rotation, compression, removal, and mailing of log files. Each log file may be handled daily, weekly, monthly, or when it grows too large.

Normally, logrotate is run as a daily cron job. It will not modify a log multiple times in one day unless the criterion for that log is based on the log’s size and logrotate is being run multiple times each day, or unless the -f or –force option is used.

Any number of config files may be given on the command line. Later config files may override the options given in earlier files, so the order in which the logrotate config files are listed is important. Normally, a single config file which includes any other config files which are needed should be used. See below for more information on how to use the include directive to accomplish this. If a directory is given on the command line, every file in that directory is used as a config file.

If no command line arguments are given, logrotate will print version and copyright information, along with a short usage summary. If any errors occur while rotating logs, logrotate will exit with non-zero status.

Install Logrotate on Ubuntu 16.04 LTS

This article assumes you have at least basic knowledge of linux, know how to use the shell, and most importantly, you host your site on your own VPS. The installation is quite simple and assumes you are running in the root account, if not you may need to add ‘sudo’ to the commands to get root privileges. I will show you through the step by step installation Logrotate on a Ubuntu 16.04 (Xenial Xerus) server.

Step 1. First make sure that all your system packages are up-to-date by running these following apt-get commands in the terminal.

sudo apt-get update
sudo apt-get upgrade

Step 2. Installing Logrotate.

To install logrotate, just use your package manager:

sudo apt-get install logrotate

Verify that the installation was successful:

sudo logrotate

Step 3. Configure Logrotate.

The main configuration file for logrotate is /etc/logrotate.conf while application specific configuration files are stored in the /etc/logrotate.d directory. In stock Ubuntu, any config file you put into /etc/logrotate.d is going to run once per day. Logs are typically rotated once per day or less (Apache default in Ubuntu is in fact weekly). Let’s look over Apache’s default in Ubuntu – /etc/logrotate.d/apache2:

/var/log/apache2/*.log {
weekly
missingok
rotate 52
compress
delaycompress
notifempty
create 640 root adm
sharedscripts
postrotate
/etc/init.d/apache2 reload > /dev/null
endscript
prerotate
if [ -d /etc/logrotate.d/httpd-prerotate ]; then \
run-parts /etc/logrotate.d/httpd-prerotate; \
fi; \
endscript
}

This will rotate any files in /var/log/apache2 that end in “.log”. This is why, when we create a new Apache virtual host, we typically put the logs in /var/log/apache2. Logrotate will automatically manage the log files! Let’s go through the options:

weekly: Rotate logs once per week. Available options are daily, weekly, monthly, and yearly.
missingok: If no *.log files are found, don’t freak out
rotate 52: Keep 52 files before deleting old log files (Thats a default of 52 weeks, or one years worth of logs!)
compress: Compress (gzip) log files
delaycompress: Delays compression until 2nd time around rotating. As a result, you’ll have one current log, one older log which remains uncompressed, and then a series of compressed logs. More info on its specifics.
compresscmd: Set which command to used to compress. Defaults to gzip.
uncompresscmd: Set the command to use to uncompress. Defaults to gunzip.
notifempty: Don’t rotate empty files
create 640 root adm: Create new log files with set permissions/owner/group, This example creates file with user root and group adm. In many systems, it will be root for owner and group.
sharedscripts: Run postrotate script after all logs are rotated. If this is not set, it will run postrotate after each matching file is rotated.
postrotate: Scripts to run after rotating is done. In this case, Apache is reloaded so it writes to the newly created log files. Reloading Apache (gracefully) lets any current connection finish before reloading and setting the new log file to be written to.
prerotate: Run before log rotating begins.

For more datails and configuration options you can check the logrotate man page:

man logrotate

Congratulation’s! You have successfully installed Logrotate. Thanks for using this tutorial for installing Logrotate to manage logs on Ubuntu 16.04 LTS (Xenial Xerus) system. For additional help or useful information, we recommend you to check the official Logrotate web site.

Options

-d, –debug

Turns on debug mode and implies -v. In debug mode, no changes will be made to the logs or to the logrotate state file.
-f, –force
Tells logrotate to force the rotation, even if it doesn’t think this is necessary. Sometimes this is useful after adding new entries to a logrotate config file, or if old log files have been removed by hand, as the new files will be created, and logging will continue correctly.
-m, –mail <command>
Tells logrotate which command to use when mailing logs. This command should accept two arguments: 1) the subject of the message, and 2) the recipient. The command must then read a message on standard input and mail it to the recipient. The default mail command is /bin/mail -s.
-s, –state <statefile>
Tells logrotate to use an alternate state file. This is useful if logrotate is being run as a different user for various sets of log files. The default state file is /var/lib/logrotate.status.
–usage
Prints a short usage message.
-?, –help
-Prints help message.
-v, –verbose
Turns on verbose mode.

How To Install Htop on Ubuntu 16.04 LTS

Install Htop on Ubuntu 16

Htop or Hisham’s top is an interactive and real-time system-monitor process-viewer written for Linux. It is designed to replace the Unix program top. It shows a frequently updated list of the processes running on a computer, normally ordered by the amount of CPU usage. Unlike top, htop provides a full list of processes running, instead of the top resource-consuming processes. Htop uses color and gives visual information about processor, swap and memory status. It is a must have when you want to monitor the resources of your linux server over an ssh connection for example.

Install Htop on Ubuntu 16.04 LTS

This article assumes you have at least basic knowledge of linux, know how to use the shell, and most importantly, you host your site on your own VPS. The installation is quite simple and assumes you are running in the root account, if not you may need to add ‘sudo’ to the commands to get root privileges. I will show you through the step by step installation Htop monitoring tool on a Ubuntu 16.04 (Xenial Xerus) server.

Step 1. First make sure that all your system packages are up-to-date by running these following apt-get commands in the terminal.

sudo apt-get update
sudo apt-get upgrade

Step 2. Installing Htop.

Install htop process monitoring tool using apt-get command:

sudo apt-get install htop

Now that htop is installed on your server you’ll want to start the program by running the following in a command prompt:

htop

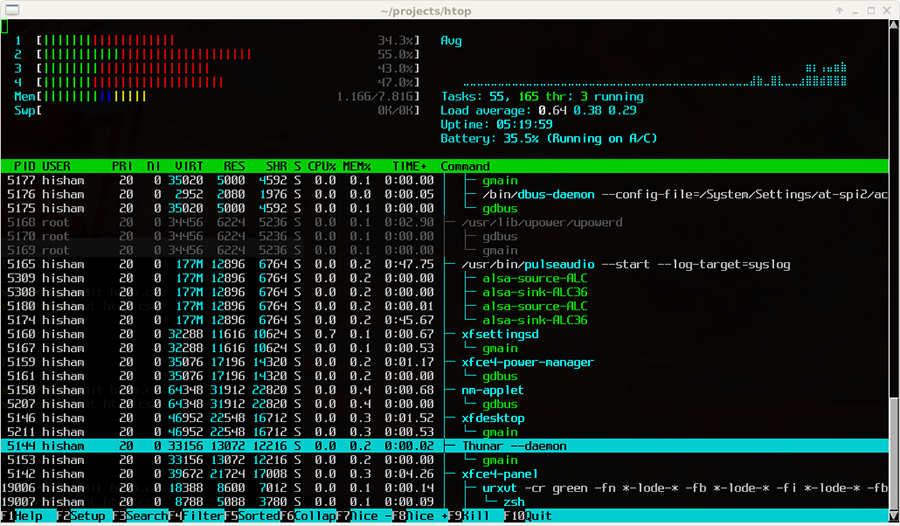
This will open the program and you’ll see something similar to the following:
htop-2.0
Congratulation’s! You have successfully installed htop. Thanks for using this tutorial for installing htop process monitoring tool on Ubuntu 16.04 LTS (Xenial Xerus) system. For additional help or useful information, we recommend you to check the official htop web site.

How To Install Mytop on Ubuntu 16.04 LTS

Install Mytop on Ubuntu 16

Mytop is an open source and free monitoring program for MySQL databases, using Perl language and it provides a command-line shell interface to monitor real time MySQL threads, queries per second, process list and performance of databases and gives an idea for the database administrator to optimize the server to handle heavy load.

mytop is a console-based (non-gui) tool for monitoring the threads and overall performance of a MySQL 3.22.x, 3.23.x, and 4.x server. It runs on most Unix systems (including Mac OS X) which have Perl, DBI, and Term::ReadKey installed. And with Term::ANSIColor installed you even get color. If you install Time::HiRes, you’ll get good real-time queries/second stats. As of version 0.7, it even runs on Windows (somewhat).

Install Mytop on Ubuntu 16.04 LTS

This article assumes you have at least basic knowledge of linux, know how to use the shell, and most importantly, you host your site on your own VPS. The installation is quite simple and assumes you are running in the root account, if not you may need to add ‘sudo’ to the commands to get root privileges. I will show you through the step by step installation Mytop database performance monitoring on a Ubuntu 16.04 (Xenial Xerus) server.
install mytop on ubuntu 16

Step 1. First make sure that all your system packages are up-to-date by running these following apt-get commands in the terminal.

sudo apt-get update
sudo apt-get upgrade

Step 2. Installing Mytop.

After system update use the following command to install mytop:

apt-get install mytop

Step 3. Configuring Mytop.

Create a .mytop file in your root directory. This file will configure Mytop with default settings for the root user. The password line should contain your MySQL root password:

cd /root
nano .mytop

Add the following content in the file and save and exit:

user=root
pass=PASSWORD
host=localhost
db=mysql
delay=1
port=3306
socket=
batchmode=0
header=1
color=1
idle=1

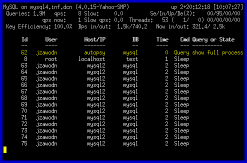
You can now run the “mytop” command to connect to your MySQL database and examine its performance:

MySQL on localhost (5.5.47-MariaDB) up 0+00:47:45 [06:36:47]
Queries: 1.4k qps: 0 Slow: 0.0 Se/In/Up/De(%): 56/06/13/01
qps now: 4 Slow qps: 0.0 Threads: 1 ( 1/ 0) 00/00/00/00
Key Efficiency: 76.9% Bps in/out: 260.6/400.4 Now in/out: 48.1/11.2k
Id User Host/IP DB Time Cmd Query or State
-- ---- ------- -- ---- --- ----------
46 root localhost mysql 0 Query show full processlist

Congratulation’s! You have successfully installed Mytop. Thanks for using this tutorial for installing Mytop database performance monitoring on Ubuntu 16.04 LTS (Xenial Xerus) system. For additional help or useful information, we recommend you to check the official Mytop web site.

You Might Also Like: How To Install Mtop (MySQL Database Server Monitoring) on CentOS 6

How To Install Kodi on Ubuntu 16.04 LTS

Install Kodi on Ubuntu 16

Kodi (formerly XBMC Media Center) is an open source and very powerful project that provides all the necessary tools for transforming your regular PC into a bona fide HTPC, which if used in conjunction a big screen TV and a Hi-Fi audio system, will transform your living room into a veritable home theater. Currently Kodi can be used to play almost all popular audio and video formats around. It was designed for network playback, so you can stream your multimedia from anywhere in the house or directly from the internet using practically any protocol available. Use your media as-is: Kodi can play CDs and DVDs directly from the disk or image file, almost all popular archive formats from your hard drive, and even files inside ZIP and RAR archives.

Install Kodi on Ubuntu 16.04 LTS

This article assumes you have at least basic knowledge of linux, know how to use the shell, and most importantly, you host your site on your own VPS. The installation is quite simple and assumes you are running in the root account, if not you may need to add ‘sudo’ to the commands to get root privileges. I will show you through the step by step installation Kodi in Ubuntu 16.04 (Xenial Xerus) server.

Step 1. First, you can add the PPA to your system, update the local repository index and install the xbmc package.

sudo add-apt-repository ppa:team-xbmc/xbmc-nightly
sudo add-apt-repository ppa:team-xbmc/ppa

Step 2. Next, make sure that all your system packages are up-to-date by running these following apt-get commands in the terminal.

sudo apt-get update
sudo apt-get upgrade

Step 3. Installing Kodi.

Run the following commands to install Kodi:

sudo apt-get install kodi

Add –install-suggests option if you want to install audio codecs and other addons, so the last command will be:

sudo apt-get install --install-suggests kodi

Once installed, log out and select log in with Kodi session. Or launch the media center from the Dash (may need restart).

Congratulation’s! You have successfully installed kodi. Thanks for using this tutorial for installing kodi media center on 16.04 LTS (Xenial Xerus) system. For additional help or useful information, we recommend you to check the official Kodi web site.

How To Install Unison on Ubuntu 16.04 LTS

Install Unison on Ubuntu 16

Unison is a GUI and terminal-based tool which allows files and directories to be kept in sync with each other, between different local directories and drives or on a network, which could be on different operating systems. The application is available for Unix operating systems (Linux and Mac OS X) and Windows. Changes can be made on the different places, and Unison will update the machines with the correct versions of files and folders, copying, deleting, renaming or deleting files and directories as necessary.

Unison doesn’t currently work well with USB sticks that are formatted as VFAT (FAT32 FAT16 etc) due to file permissions. You might like to try usbsync for this instead. Or, as a workaround, you may try adding a line like ‘perms = 0’ to your ~/.unison/*.prf file, or running with ‘-perms 0’ option.

Examples of uses

Heres a few scenarios on which Unison would be useful:

  • Justine has a lot of music and would want to back it up to another drive in case her main drive fails. Unison can synchronize any new music she has added on her main hard drive, and will delete any music she has deleted from her main drive.
  • Ryan has a laptop and a desktop computer. He works on both regularly and wants to be able to have his latest work available on the computer he wants to use. Unison will be able to syncronise both computers over the network using SSH so that work he has done on his desktop will appear on his laptop, and when he wants to use his desktop again, he can sync the files so they are updated there.


Install Unison on Ubuntu 16.04 LTS

This article assumes you have at least basic knowledge of linux, know how to use the shell, and most importantly, you host your site on your own VPS. The installation is quite simple and assumes you are running in the root account, if not you may need to add ‘sudo’ to the commands to get root privileges. I will show you through the step by step installation Unison on a Ubuntu 16.04 (Xenial Xerus) server.

Step 1. First make sure that all your system packages are up-to-date by running these following apt-get commands in the terminal.

sudo apt-get update
sudo apt-get upgrade

Step 2. Installing Unison.

Add the PPA repository to your system, update the local repository index and install the unison package:

sudo add-apt-repository ppa:eugenesan/ppa
sudo apt-get update

After updating the apt sources-list, run the following command to install the package:

sudo apt-get install unison

Once it is done, use the following command to view the Basic and Advanced options:

root@:wpcademy.com~# unison -help
Usage: unison [options]
or unison root1 root2 [options]
or unison profilename [options]

Basic options:
-auto automatically accept default (nonconflicting) actions
-batch batch mode: ask no questions at all
-doc xxx show documentation ('-doc topics' lists topics)
-fat use appropriate options for FAT filesystems
-group synchronize group attributes
-ignore xxx add a pattern to the ignore list
-ignorenot xxx add a pattern to the ignorenot list
.
.
watch when set, use a file watcher process to detect changes (default true)
-xferbycopying optimize transfers using local copies (default true)

Check the version of Unison:

unison --version

Further Help

man unison

Or

unison --help

Congratulation’s! You have successfully installed Unison. Thanks for using this tutorial for installing Unison on Ubuntu 16.04 LTS (Xenial Xerus) system. For additional help or useful information, we recommend you to check the official Unison web site.

How To Install OTRS on Ubuntu 16.04 LTS

Install OTRS on Ubuntu 16

OTRS (Open-Source Ticket Request System) is a web-based ticketing system, widely used by businesses for services like customer support, help desks and call centres. The software is separated into several parts, the main section being the OTRS framework, which contains all central functions for the application and the ticket system.

Install OTRS on Ubuntu 16.04 LTS

This article assumes you have at least basic knowledge of linux, know how to use the shell, and most importantly, you host your site on your own VPS. The installation is quite simple and assumes you are running in the root account, if not you may need to add ‘sudo’ to the commands to get root privileges. I will show you through the step by step installation OTRS on a Ubuntu 16.04 (Xenial Xerus) server.

Step 1. First make sure that all your system packages are up-to-date by running these following apt-get commands in the terminal.

sudo apt-get update
sudo apt-get upgrade

Step 2. Installing MariaDB.

Install MariaDB on the server using apt-get command:

sudo apt-get install mariadb-server

By default, MariaDB is not hardened. You can secure MariaDB using the mysql_secure_installation script. you should read and below each steps carefully which will set root password, remove anonymous users, disallow remote root login, and remove the test database and access to secure MariaDB:

mysql_secure_installation

Configure it like this:

- Set root password? [Y/n] y
- Remove anonymous users? [Y/n] y
- Disallow root login remotely? [Y/n] y
- Remove test database and access to it? [Y/n] y
- Reload privilege tables now? [Y/n] y

Once installed, OTRS require that you change the following settings:

nano /etc/mysql/my.cnf

Under the [mysqld] section, paste:

max_allowed_packet = 20M
query_cache_size = 32M
innodb_log_file_size = 256M

Start MariaDB with system:

systemctl start mysql
systemctl enable mysql

Step 3. Installing OTRS (OpenSource Trouble Ticket System).

First thing to do is to go to OTRS’s download page and download the latest stable version of OTRS:

wget https://www.otrs.com/thank-you-for-downloading-the-otrs-software/?download=otrs-5.0.16.tar.bz2

Unpack the OTRS archive to the document root directory on your server:

tar xpf otrs-5.0.16.tar.bz2
mv otrs-5.0.16 /opt/otrs

Check if the system contains all required PERL modules and install required modules with apt (as suggested by the script), executing the command:

perl /opt/otrs/bin/otrs.CheckModules.pl

Create a OTRS user:

useradd -d /opt/otrs -c 'OTRS user' otrs
usermod -G www-data otrs

Default config files In /opt/otrs, execute the following command:

cp Kernel/Config.pm.dist Kernel/Config.pm

Step 4. Configure Apache web server.

Check installed modules and configure Apache:

perl -cw /opt/otrs/bin/cgi-bin/index.pl
perl -cw /opt/otrs/bin/cgi-bin/customer.pl
perl -cw /opt/otrs/bin/otrs.Console.pl

If the response is “syntax OK” for all, it means that the Perl modules have been installed successfully.

Next, install the Apache web server and mod_perl, using apt-get command:

apt-get install apache2 libapache2-mod-perl2

In /opt/otrs there is a configuration file for Apache. Link it to the webserver configuration directory:

ln -s /opt/otrs/scripts/apache2-httpd.include.conf /etc/apache2/conf-enabled/zzz_otrs.conf

OTRS requires a few Apache modules to be active for optimal operation:

a2enmod perl
a2enmod headers
a2enmod version
a2enmod deflate
a2enmod filter

Finally, Restart the webserver so it will load new configurations:

systemctl restart apache2

We will need to change some folders permissions:

bin/otrs.SetPermissions.pl --web-group=www-data

Step 5. Accessing OTRS.

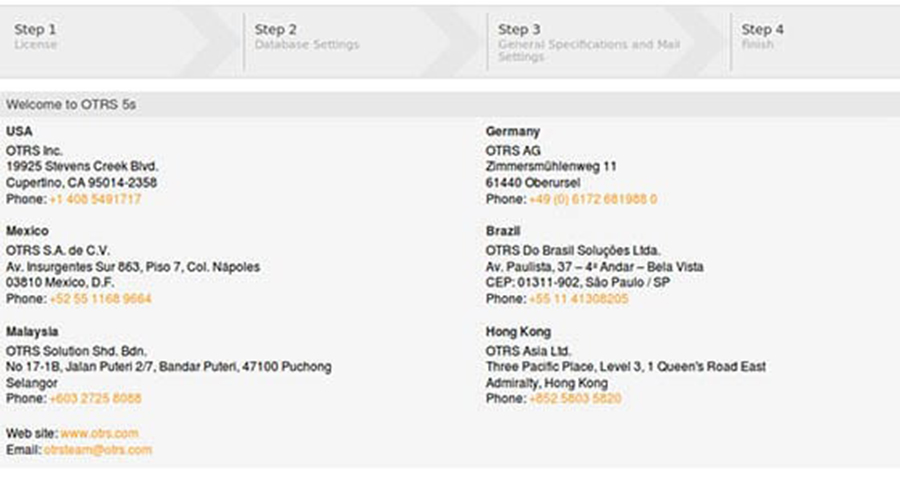
OTRS will be available on HTTP port 80 by default. Open your favorite browser and navigate to http://yourdomain.com/otrs/installer.pl or http://server-ip/otrs/installer.pl and complete the required the steps to finish the installation. If you are using a firewall, please open port 80 to enable access to the control panel.
OTRS
Congratulation’s! You have successfully installed OTRS. Thanks for using this tutorial for installing OTRS (OpenSource Trouble Ticket System) on Ubuntu 16.04 Xenial Xerus server. For additional help or useful information, we recommend you to check the official OTRS web site.