How To Reset Root Password on MySQL Server

Reset Root Password on MySQL Server

By default, MySQL server will be installed with root account and password is blank. Have you ever forgotten the root password on one of your MySQL servers? If you have set the password for root and forget it, then you will need to reset the root password for MySQL. To reset your mysql password just follow these instructions and we assume that you already have a small amount of knowledge on MySQL.

This article assumes you have at least basic knowledge of linux, know how to use the shell, and most importantly, you host your site on your own VPS. The reset password MySQL is quite simple. I will show you through the step by step reset root password MySQL server.

Reset Root Password MySQL Server

Step 1. First thing to do is stop MySQL.

### CentOS 6 ###
service mysqld stop

### CentOS 7 ###
systemctl stop mysqld

Step 2. Next we need to start MySQL in safe mode with the –skip-grant-tables option so that it will not prompt for password.

 mysqld_safe --skip-grant-tables &

Step 3. Start the mysql client process using this command with root account and blank password.

 mysql -u root

Step 4. Change password for root account.

mysql> use mysql;
mysql> update user set password=PASSWORD("NEW-ROOT-PASSWORD") where #User='root';
mysql> flush privileges;
mysql> quit

Step 5. Restart MySQL.

Once complete, you can restart MySQL is installed by running the below command:

### CentOS 6 ###
service mysqld restart

### CentOS 7 ###
systemctl restart mysqld

Congratulation’s! You have successfully reset password MySQL. Thanks for using this tutorial for reset root password MySQL on Linux system. For additional help or useful information, we recommend you to check the official MySQL web site

You Might Also Like: How To Backup and Restore MySQL Database Using Command Line
How To Enable Slow Query Log for MySQL

Enable Slow Query Log for MySQL

MySQL has built-in functionality that allows you to log SQL queries to a file, You can enable the full SQL queries logs to a file or only slow running queries log. It is easy for us to troubleshoot/ debug the sql statement if SQL queries log enable, The slow query log is used to find queries that take a long time to execute and are therefore candidates for optimization. We assume that you already have MySQL installed on Linux system with administrative privileges and we assume that you already have know how on MySQL.

In order to enable slow query logs for MySQL on your system you would need to do the following.

Enable Slow Query Log for MySQL

Step 1. Edit the /etc/my.cnf file with your favorite text editor.

 #nano /etc/my.cnf

 Step 2. Once you have your my.cnf file open, add the following line under the “[mysqld]” section.

[mysqld]
log-slow-queries
log-slow-queries= /var/log/mysql/slow-queries.log
long_query_time=1

 Step 3. Then create the file slow-queries.log. You can have the file in any spot you wish, as long as you define the path in your my.cnf.

#touch /var/log/mysql/slow-queries.log
#chown mysql.mysql /var/log/mysql/slow-queries.log

Step 4. After that, restart mysql service. Enter the following command:

 #service mysqld restart

Congratulation’s! You have successfully enable slow query log on MySQL. Thanks for using this tutorial for enable slow query log on MySQL in Linux system. For additional help or useful information, we recommend you to check the official MySQL web site.

You Might Also Like: How To Install Mtop (MySQL Database Server Monitoring) on CentOS 6

How To Increase PHP Memory Limit

Increase PHP Memory Limit

If you have seen an error like ”Fatal Error: PHP Allowed Memory Size Exhausted” in webserver logs or your browser, this means that PHP has exhausted the maximum memory limit. This tutorial we will show two different ways on how you can increase the php memory limit in your server.

Check PHP Memory Limit

You can check by creating a file called info.php in /var/www/html/ with the following content:

<?php phpinfo(); ?>

php-memory-limit

Increase PHP Memory Limit

Method 1. Changing memory limit from php.ini

First find locate the php.ini file used by your web server.

 #nano /etc/php.ini

Search “memory_limit” in your php.ini, and change it. If no “memory_limit” found, add the following line at the end of php.ini

 #memory_limit = 64M ;Maximum amount of memory a script may consume (64MB)

Restart webserver

#service httpd restart
or
#service nginx restart

Method 2. Changing memory limit using .htaccess

Find the “.htaccess” in your root directory of the specified domain, edit the .htaccess file in the web root directory. Look for the section:

 #php_value memory_limit 64M; Maximum amount of memory a script may consume (64MB)

Edit your wp-config.php file, if you are using WordPress

define('WP_MEMORY_LIMIT', '256M');

Congratulation’s! You have successfully increase PHP memory limit. Thanks for using this tutorial for increase PHP memory limit linux system. For additional help or useful information, we recommend you to check the official PHP web site

You Might Also Like: How To Install PHP 5.5 on CentOS

How To Remove MySQL Server from CentOS

Remove MySQL Server from CentOS

MySQL is a relational database management system (RDBMS) that runs as a server providing multi-user access to a number of databases. The MySQL source code is freely available because it was originally developed as freeware. MySQL is written in C and C++ and is compatible with all major operating systems. MySQL can be used for a variety of applications, but is most commonly found on Web servers.

This article assumes you have at least basic knowledge of linux, know how to use the shell, and most importantly, you host your site on your own VPS. The uninstall or removing is quite simple. I will show you through the step by step removing MySQL on CentOS server. May be it’s good idea to backup databases before doing this.

In this tutorial we will guide you how to completely remove of MySQL from your CentOS server.

Completely Removing MySQL Server in CentOS

Step 1: Check list the mysql rpm which is installed on server

#rpm -qa | grep mysql
or
#yum list installed | grep mysql

Step 2 : Removing all mysql-related packages (with “yum remove”)

 #yum remove mysql-client mysql-server mysql-common mysql-devel

Step 3: Delete the databases folder

#rm -rf /var/lib/mysql/
#rm -rf /etc/my.cnf

If you need to reinstall mysql database server, check out our tutorial, click here.

Congratulation’s! You have successfully removes MySQL. Thanks for using this tutorial for removing MySQL server on CentOS system. For additional help or useful information, we recommend you to check the official MySQL web site

You Might Also Like: How To Install MySQL Database Server on CentOS

How To Install MySQL Database Server on CentOS

Install MySQL Database Server on CentOS

MySQL is a relational database management system (RDBMS) that runs as a server providing multi-user access to a number of databases. The MySQL source code is freely available because it was originally developed as freeware. MySQL is written in C and C++ and is compatible with all major operating systems. MySQL can be used for a variety of applications, but is most commonly found on Web servers.

This article assumes you have at least basic knowledge of linux, know how to use the shell, and most importantly, you host your site on your own VPS. The installation is quite simple.

In this tutorial we will guide you through the step by step installation MySQL in CentOS server.

Install MySQL Database Server on CentOS

To install, first you must add the Remi yum repository information corresponding to your CentOS/RHEL version to yum:

For CentOS 6.x use:

#rpm -Uvh http://download.fedoraproject.org/pub/epel/6/i386/epel-release-6-8.noarch.rpm
#rpm -Uvh http://rpms.famillecollet.com/enterprise/remi-release-6.rpm

 For CentOS 5.x use:

#rpm -Uvh http://dl.fedoraproject.org/pub/epel/5/i386/epel-release-5-4.noarch.rpm
#rpm -Uvh http://rpms.famillecollet.com/enterprise/remi-release-5.rpm

After installing Remi repository on your system, then look for MySQL latest version using –enablerepo=remi switch option.

 #yum --enablerepo=remi list mysql mysql-server

Sample output:

Installing MySQL 5.5.37:

 #yum --enablerepo=remi install mysql mysql-server

Starting / Stopping MySQL Server on CentOS

#service mysqld start
#service mysqld restart
#service mysqld stop

Hardening MySQL with mysql_secure_installation:

 #mysql_secure_installation

Connecting to MySQL Server:

Connecting to newly installed MySQL server by providing username and password.

 #mysql -u root -p

Congratulation’s! You have successfully installed MySQL. Thanks for using this tutorial for installing MySQL server in CentOS system. For additional help or useful information, we recommend you to check the official MySQL web site.

You Might Also Like: How To Install MariaDB On CentOS 6

How To Install IonCube Loader on CentOS

Install IonCube Loader on CentOS

IonCube Loaders is basically an encryption/decryption utility for PHP applications which also assists in speeding up the pages that are served. It is often required for a lot of PHP-based applications.

This article assumes you have basic knowledge of linux, know how to use the shell, and most importantly, you host your site on your own VPS. The installation is quite simple and assumes you are running in the root account, if not you may need to add ‘sudo’ to the commands to get root privileges.

In this tutorial we will guide you through the step by step installation IonCube Loader in CentOS server.

Install IonCube Loader on CentOS

Method 1:

For CentOS 32-bit use:

#wget http://downloads3.ioncube.com/loader_downloads/ioncube_loaders_lin_x86.tar.gz
#tar xvfz ioncube_loaders_lin_x86.tar.gz

For CentOS x86_64 (64-bit):

#wget http://downloads3.ioncube.com/loader_downloads/ioncube_loaders_lin_x86-64.tar.gz
#tar xvfz ioncube_loaders_lin_x86-64.tar.gz

If the links are not working anymore, please check the latest version download links in here.

#cd ioncube
#mkdir /usr/local/ioncube
#cp ioncube_loader_lin_5.3.so /usr/local/ioncube

Copy ioncube_loader_lin_5.3.so as PHP version installed on the server was PHP 5.3

Now edit php.ini file. To find location of php.ini, run

#php -i| grep php.ini
#nano /etc/php.ini

Add following line to end on php.ini

 zend_extension = /usr/local/ioncube/ioncube_loader_lin_5.3.so

Restart apache after IonCube Loaders installation

#service httpd restart
#php -v

Method 2:

Install IonCube Loaders via atomic yum repository:

#wget -q -O - http://www.atomicorp.com/installers/atomic |sh
#yum install php-ioncube-loader -y

IonCube Loader should now be installed. You can check by creating a file called info.php in /var/www/html/ with the following content:

 <? phpinfo(); ?>

Congratulation’s! You have successfully installed IonCube Loader. Thanks for using this tutorial for installing IonCube Loader in CentOS  system. For additional help or useful information, we recommend you to check the official IonCube Loader web site.

You Might Also Like: How To Install IonCube Loader on Ubuntu 16.04 LTS

How To Configuration Iptables Firewall on CentOS

Configuration Iptables Firewall on CentOS

Iptables is a user space application program that allows a system administrator to configure the tables provided by the Linux kernel firewall (implemented as different Netfilter modules) and the chains and rules it stores. Different kernel modules and programs are currently used for different protocols; iptables applies to IPv4, ip6tables to IPv6, arptables to ARP, and ebtables for Ethernet frames. (Read more on: wikipedia)

Configuration Iptables Firewall on CentOS

Setting up iptables

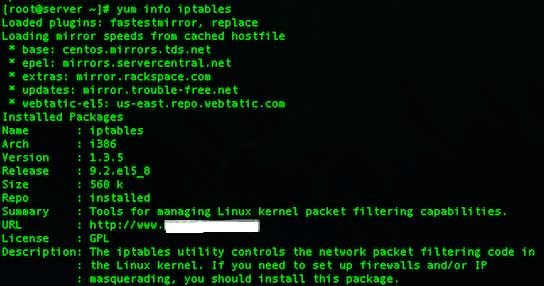
You can use the following procedure to verify that iptables has been installed and view the status of iptables. Open terminal and type the following command:

# iptables -V
# yum info iptables

iptables-centos

If the above message does not appear, you can type the following command to install iptables:

 # yum -y install iptables

Understanding Firewall, At present here are total four chains:

  • INPUT : The default chain is used for packets addressed to the system.
  • OUTPUT : The default chain generating from system.
  • FORWARD : The default chains is used when packets send through another interface.
  • RH-Firewall-1-INPUT : The user-defined custom chain.

Target Meanings

  • The target ACCEPT means allow packet.
  • The target REJECT means to drop the packet and send an error message to remote host.
  • The target DROP means drop the packet and do not send an error message to remote host or sending host.

The default iptables configuration on CentOS does not allow access to the HTTP (TCP PORT # 80) and HTTPS (TCP PORT # 443) ports used by Nginx web server. You can do step by step to configure:

Step 1: Flush all iptables rules

# iptables -F
# iptables -X
# iptables -t nat -F
# iptables -t nat -X
# iptables -t mangle -F
# iptables -t mangle -X

Step 2: Set default rules

# iptables -P INPUT DROP
# iptables -P FORWARD ACCEPT
# iptables -P OUTPUT ACCEPT

Step 3: Allow access to HTTP (port 80) and HTTPS (port 443)

# iptables -A INPUT -i lo -j ACCEPT 
# iptables -A INPUT -m state --state ESTABLISHED -j ACCEPT 
# iptables -A INPUT -m state --state RELATED,ESTABLISHED -j ACCEPT 
# iptables -A INPUT -p icmp -j ACCEPT
# iptables -A INPUT -m state --state NEW -m tcp -p tcp --dport 80 -j ACCEPT
# iptables -A INPUT -m state --state NEW -m tcp -p tcp --dport 443 -j ACCEPT

 Turn on and save iptables

Type the following two commands to turn on firewall:

# chkconfig iptables on
# service iptables save