Easy Guide to Disable Automatic Updates in WordPress

disable Automatic Updates in WordPress

In this tutorial, we will learn how to disable automatic background updates in WordPress.

Configuring and Disabling Automatic WordPress Updates

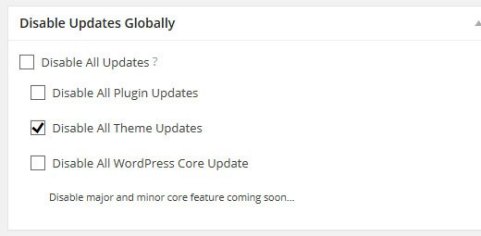
The easiest way to do this is by installing and activating Disable Updates Manager plugin.

Go to Settings » Disable Updates Manager to configure your settings.

Disable Updates Manager

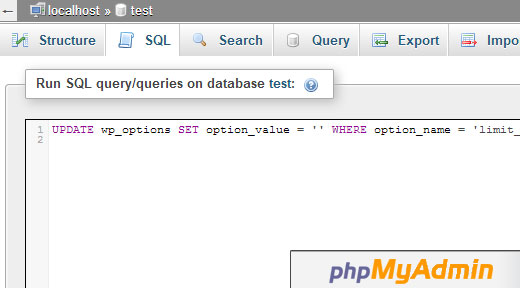
Alternatively, you can disable automatic updates in WordPress by adding this line of code in your wp-config.php file:

 define( 'WP_AUTO_UPDATE_CORE', false );

This will disable all automatic WordPress updates.

However if you want to receive minor core updates, but disable theme and plugin updates, then you can do so by adding the following filters in your theme’s functions.php file or in a site-specific plugin.

Disable automatic WordPress plugin updates:

 add_filter( 'auto_update_plugin', '__return_false' );

Disable automatic WordPress theme updates:

add_filter( 'auto_update_theme', '__return_false' );

Now that you know how to disable automatic updates in WordPress, the question is should you disable it?

On our sites, we have disabled automatic plugin and theme updates while keeping the minor core updates enabled.

We are listing the pros and cons of automatic updates below to help you make the decision that’s best for you.

Pros

You don’t have to worry about updating minor WordPress releases which are pushed out for maintenance and security purposes.

This is something that you only got if you paid for managed WordPress hosting, but now it’s available for everyone (at least for minor releases).

You also have the benefit of knowing that if there was a crucial security issue with WordPress or a popular plugin, then WordPress will automatically update even if you are on a vacation, so your site is secure.

Cons

There is a slight chance that automatic updates can break your site. In our experience, the minor releases haven’t broken any of our sites yet.

But that’s because we are following the best practices and not modifying any core files. If you modify WordPress core files, then these automatic updates can override them.

Although it hasn’t happened yet, but if WordPress ever felt necessary to push a security update for a theme you are using, then there is a chance that it will break your website specially if you have modified your theme files.

Similar to that, automatic plugin updates can break your site as well because there are just too many variables (different server environments, plugin combinations, etc).

Now it’s important to know that these updates will not break majority of websites, but considering WordPress powers millions of websites, a small percentage can still be a lot of sites.

The worst part about this update was that the core team did not communicate with site-owners. So there is a very good chance that some people haven’t even realized that their SEO is at risk because of a security update that possibly deactivated their main SEO plugin.

Conclusion

Normally when WordPress core updates, there is an announcement that follows with it.

However with the past two automatic plugin updates, we haven’t seen a blog post or an email from WordPress.

It would be nice to have the WordPress team send an email when they push out security updates to a plugin. Also there should be a way to notify the site owner if the update wasn’t successful, so they can fix the issues as soon as possible.

Easy Guide to Create a Wiki Knowledge Base Using WordPress

In this tutorial, we will learn how to create a wiki knowledge base in WordPress.

WordPress Wiki & Knowledge Base Plugin

Knowledge Base Plugin

If you want to add a wiki knowledge base to your existing WordPress site, then the easiest way to do it is by using a WordPress wiki knowledge base plugin. There are several plugins available, but we recommend Knowledge Base by PressApps.

All you have to do is install and activate the plugin. Once activated, it adds a Knowledge Base tab in your WordPress admin area.

Knowledge Base Admin

Knowledge Base is it’s own custom post type with categories and tags which allows you to organize your documentation.

The best part about this is that you can add it on your main site, and it will match your brand style / formatting for the most part. It also comes with public / member only voting system, custom widgets, drag-drop functionality, etc. The downside is that it costs $20.

In our next method, we will show you how you can accomplish all of this for free, but it does involve code.

WordPress Wiki & Knowledge Base Code Snippet

Another way to add a wiki knowledge base to your existing WordPress site or even create a dedicated wiki site is to use the code snippet method.

The downside is that you have to copy/paste a little bit of code which can be scary for beginners. The upside is that it gives you more freedom, and it’s completely free unlike the first two options.

We will do our best to give step by step instructions.

Note: Before you start, please create a complete backup of your WordPress site.

First thing you need to do is install and activate the Knowledgebase CPT plugin. This simple plugin creates a custom post type called knowledge_baseand a taxonomy called section.

This allows you to easily add your wiki articles and organize them into sections.

Adding knowledge base articles and sections

Once you have a few articles and sections, you would need to display them on your website. This is where you need to deal with a little bit of code.

Start by adding this code snippet into your theme’s functions.php file or a site-specific plugin.

function wpb_knowledgebase() {
// Get Knowledge Base Sections
$kb_sections = get_terms('section','orderby=name&hide_empty=0');
// For each knowledge base section
foreach ($kb_sections as $section) :
$return .= '


This code lists all the knowledge base articles under the section they were filed in.

Next all you need to do is create a new WordPress page and add [knowledgebase] shortcode inside it. Save your page and preview it.

Plain knowledge base section with no CSS

It looks very plain right now, but we can add some styling to it. You can use this CSS as starting point and then continue editing to match your own colors.

Paste the following code in your theme’s style.css file.

.kb_section {
float: left;
width: 280px;
max-width: 280px;
margin: 10px;
background-color: #f5f5f5;
border: 1px solid #eee;
}
h4.kb-section-name {
background-color: #eee;
margin: 0;
padding: 5px;
}
ul.kb-section-list {
list-style-type: none;
list-style: none;
display: inline;
}   
li.kb-section-name {
list-style-type: none;
display: inline;
}
ul.kb-article-list {
list-style-type: none;
list-style: none;
}   
li.kb-article-name {
list-style-type: none;
}
div.kb_section:nth-of-type(3n+1) {clear:left;}
div.kb_section:nth-of-type(3n+3) {}

This how it looked on our demo site where we are using Twenty Twelve theme.

Styled knowledge base page in WordPress

By default, your sections will be displayed in alphabetical order. However if you want to change the order of sections, then you can do that by installing Custom Taxonomy Order NE plugin. This will allow you to drag-drop your sections in the right order.