How To Install LimeSurvey on Ubuntu 16.04 LTS

Install LimeSurvey on Ubuntu 16

LimeSurvey (formerly PHPSurveyor) is an open source online survey application. It has been widely used by many big industries to create the survey tasks. It has many powerful features like creating dynamic fields for survey. Supports multilingual, defines userroles, user groups and the more it has been integrated into various CMS. The limesurvey team provides the commercial for those who are seeking.As well as community support for its users.

This article assumes you have at least basic knowledge of linux, know how to use the shell, and most importantly, you host your site on your own VPS. The installation is quite simple and assumes you are running in the root account, if not you may need to add ‘sudo’ to the commands to get root privileges. I will show you through the step by step installation LimeSurvey on a Ubuntu 16.04 (Xenial Xerus) server.
Install LimeSurvey on Ubuntu 16.04 LTS

Step 1. First make sure that all your system packages are up-to-date by running these following apt-get commands in the terminal.

sudo apt-get update
sudo apt-get upgrade

Step 2. Install LAMP (Linux, Apache, MariaDB, PHP) server.

A Ubuntu 16.04 LAMP server is required. If you do not have LAMP installed, you can follow our guide here. Also install all required PHP modules:

apt-get install php7.0-curl php7.0-gd php7.0-mbstring php7.0-mysql libapache2-mod-php7.0 php7.0-mcrypt php7.0-zip

Step 3. Installing LimeSurvey.

Download the latest stable version of LimeSurvey, At the moment of writing this article it is version 2.64.1:

wget https://www.limesurvey.org/stable-release?download=2015:limesurvey2641%20170310zip
unzip "stable-release?download=2015:limesurvey2641 170310zip"
mv limesurvey/ /var/www/html/limesurvey/

We will need to change some folders permissions:

chown www-data:www-data -R /var/www/html/limesurvey

Step 4. Configuring MariaDB.

By default, MariaDB is not hardened. You can secure MariaDB using the mysql_secure_installation script. You should read and below each steps carefully which will set root password, remove anonymous users, disallow remote root login, and remove the test database and access to secure MariaDB.

mysql_secure_installation

Configure it like this:

- Set root password? [Y/n] y
- Remove anonymous users? [Y/n] y
- Disallow root login remotely? [Y/n] y
- Remove test database and access to it? [Y/n] y
- Reload privilege tables now? [Y/n] y

Next we will need to log in to the MariaDB console and create a database for the LimeSurvey. Run the following command:

mysql -u root -p

This will prompt you for a password, so enter your MariaDB root password and hit Enter. Once you are logged in to your database server you need to create a database for LimeSurvey installation:

CREATE DATABASE limesurvey;
GRANT ALL PRIVILEGES ON limesurvey.* TO 'limeuser'@'localhost' IDENTIFIED BY 'your-password';
FLUSH PRIVILEGES;
\q

Step 5. Configuring Apache web server for LimeSurvey.

Create a new virtual host directive in Apache. For example, create a new Apache configuration file named ‘limesurvey.conf’ on your virtual server:

touch /etc/apache2/sites-available/limesurvey.conf
ln -s /etc/apache2/sites-available/limesurvey.conf /etc/apache2/sites-enabled/limesurvey.conf
nano /etc/apache2/sites-available/limesurvey.conf

Add the following lines:


ServerAdmin [email protected]
DocumentRoot /var/www/html/limesurvey/
ServerName your-domain.com
ServerAlias www.your-domain.com

Options FollowSymLinks
AllowOverride All

ErrorLog /var/log/apache2/your-domain.com-error_log
CustomLog /var/log/apache2/your-domain.com-access_log common

Now, we can restart Apache web server so that the changes take place:

systemctl restart apache2.service

Step 6. Accessing LimeSurvey.

LimeSurvey will be available on HTTP port 80 by default. Open your favorite browser and navigate to http://yourdomain.com/admin or http://server-ip/admin and complete the required the steps to finish the installation. If you are using a firewall, please open port 80 to enable access to the control panel.

Congratulation’s! You have successfully installed LimeSurvey. Thanks for using this tutorial for installing LimeSurvey leading free online survey app on Ubuntu 16.04 LTS (Xenial Xerus) system. For additional help or useful information, we recommend you to check the official LimeSurvey web site.

How To Install Python 3 on Ubuntu 16.04 LTS

Install Python 3 on Ubuntu 16

Python is an open-source and beginner-friendly programming language. Ubuntu 16.04 and Ubuntu 16.10 come with two versions of Python, Python 2.7 and Python 3.5. At the time of this writing, the latest stable version of Python is 3.6, released on December 23rd, 2016. If you need to use python3 as part of Python application dependency, there are several ways to install python3 on Ubuntu 16.04 LTS.

This article assumes you have at least basic knowledge of linux, know how to use the shell, and most importantly, you host your site on your own VPS. The installation is quite simple and assumes you are running in the root account, if not you may need to add ‘sudo’ to the commands to get root privileges. I will show you through the step by step installation Python 3 on a Ubuntu 16.04 (Xenial Xerus) server.
Install Python 3 on Ubuntu 16.04 LTS

Step 1. First make sure that all your system packages are up-to-date by running these following apt-get commands in the terminal.

sudo apt-get update
sudo apt-get upgrade

Step 2. Installing Python 3.

Method 1. Install Python 3.6 on Ubuntu 16.04 from PPA.

You can install Python 3.6 on Ubuntu 16.04 using this PPA:

sudo add-apt-repository ppa:jonathonf/python-3.6
sudo apt update
sudo apt install python3.6

You can check python version on Ubuntu from command line:

python --version

Method 2. Installing Python 3.6 on Ubuntu 16.10 from Repository

Use the following command to install Python 3:

sudo apt update
sudo apt install python3.6

Then check the Python version:

python3.6 -V

Method 3. Compile and Install Python 3.6 on Ubuntu 16.04

First, we need to install some build dependencies using the commands below:

sudo apt install build-essential checkinstall
sudo apt install libreadline-gplv2-dev libncursesw5-dev libssl-dev libsqlite3-dev tk-dev libgdbm-dev libc6-dev libbz2-dev

Then, download Python 3.6 from source:

wget https://www.python.org/ftp/python/3.6.0/Python-3.6.0.tar.xz
tar xvf Python-3.6.0.tar.xz

Now cd into the source directory, configure the build environment and install:

cd Python-3.6.0/
./configure
sudo make altinstall

Once the process is complete, we can check the version of Python 3 that is installed in the system by typing:

python3.6

Congratulation’s! You have successfully installed Python. Thanks for using this tutorial for installing Python 3 on Ubuntu 16.04 LTS (Xenial Xerus) system. For additional help or useful information, we recommend you to check the official Python web site.

How To Install CachetHQ on Ubuntu 16.04 LTS

Install CachetHQ on Ubuntu 16

CachetHQ makes it simple to create a status page for your application, service or network and it’s based on Laravel framework.

This article assumes you have at least basic knowledge of linux, know how to use the shell, and most importantly, you host your site on your own VPS. The installation is quite simple and assumes you are running in the root account, if not you may need to add ‘sudo’ to the commands to get root privileges. I will show you through the step by step installation CachetHQ on a Ubuntu 16.04 (Xenial Xerus) server.
Install CachetHQ on Ubuntu 16.04 LTS

Step 1. First make sure that all your system packages are up-to-date by running these following apt-get commands in the terminal.

sudo apt-get update
sudo apt-get upgrade

Step 2. Install LAMP (Linux, Apache, MariaDB, PHP) server.

A Ubuntu 16.04 LAMP server is required. If you do not have LAMP installed, you can follow our guide here. Also install all required PHP modules:

sudo apt-get install php7.0 libapache2-mod-php7.0 php7.0-mbstring php7.0-curl php7.0-zip php7.0-gd php7.0-mysql php7.0-mcrypt curl

Step 3. Configuring MariaDB for CachetHQ.

By default, MariaDB is not hardened. You can secure MariaDB using the mysql_secure_installation script. you should read and below each steps carefully which will set root password, remove anonymous users, disallow remote root login, and remove the test database and access to secure MariaDB:

mysql_secure_installation

Configure it like this:

- Set root password? [Y/n] y
- Remove anonymous users? [Y/n] y
- Disallow root login remotely? [Y/n] y
- Remove test database and access to it? [Y/n] y
- Reload privilege tables now? [Y/n] y

Next we will need to log in to the MariaDB console and create a database for the CachetHQ. Run the following command:

mysql -u root -p

This will prompt you for a password, so enter your MariaDB root password and hit Enter. Once you are logged in to your database server you need to create a database for CachetHQ installation:

MariaDB [(none)]> CREATE DATABASE cachet;
MariaDB [(none)]> GRANT ALL PRIVILEGES ON cachet.* TO 'cachetuser'@'localhost' IDENTIFIED BY 'your-password';
MariaDB [(none)]> FLUSH PRIVILEGES;
MariaDB [(none)]> \q

Step 4. Installing CachetHQ.

First, download the source code with Git:

cd /var/www/html/
git clone https://github.com/cachethq/Cachet.git
cd Cachet
git checkout v2.3.9

We will need to change some folders permissions:

chown www-data:www-data -R /var/www/html/Cachet/

Configuring a database:

Rename the .env.example file to .env using the following command:


mv .env.example .env

Open the .env file and change the following lines:

### nano .env
APP_URL=http://localhost -> APP_URL=http://your-domain-name
DB_DATABASE=cachet -> DB_DATABASE=your-database-name
DB_USERNAME=homestead -> DB_USERNAME=your-database-username
DB_PASSWORD=secret -> DB_PASSWORD=your-database-password

Step 5. Installing Composer.

Composer is a dependency manager for PHP with which you can install packages. Composer will pull in all the required libraries and dependencies you need for your project:

curl -sS https://getcomposer.org/installer | sudo php -- --install-dir=/usr/local/bin --filename=composer
composer install --no-dev -o

Set the application key:
Before going any further, we need to set the APP_KEY config. This is used for all encryption used in Cachet:

php artisan key:generate

Cachet comes with an installation command that will:

Run migrations
Run seeders (of which there are none)


php artisan app:install

Step 6. Configuring Apache web server for CachetHQ.

Create a new virtual host directive in Apache. For example, create a new Apache configuration file named ‘cachet.conf’ on your virtual server:

touch /etc/apache2/sites-available/cachet.conf
ln -s /etc/apache2/sites-available/cachet.conf /etc/apache2/sites-enabled/cachet.conf
nano /etc/apache2/sites-available/cachet.conf
sudo a2enmod rewrite

Add the following lines:

<VirtualHost *:80>
ServerAdmin [email protected]
DocumentRoot /var/www/html/Cachet/public/
ServerName your-domain.com
ServerAlias www.your-domain.com
<Directory /var/www/html/Cachet/public/>
Options FollowSymLinks
AllowOverride All
</Directory>
ErrorLog /var/log/apache2/your-domain.com-error_log
CustomLog /var/log/apache2/your-domain.com-access_log common

Save and close the file. Restart the apache service for the changes to take effects:

systemctl restart apache2

Step 7. Accessing CachetHQ.

SugarCRM will be available on HTTP port 80 by default. Open your favorite browser and navigate to http://yourdomain.com/ or http://server-ip and complete the required the steps to finish the installation. If you are using a firewall, please open port 80 to enable access to the control panel.

Congratulation’s! You have successfully installed CachetHQ. Thanks for using this tutorial for installing CachetHQ on Ubuntu 16.04 LTS (Xenial Xerus) system. For additional help or useful information, we recommend you to check the official CachetHQ web site.

How To Install Tmux Terminal Multiplexer on Linux

Install Tmux Terminal Multiplexer on Linux

Tmux is a terminal multiplexer that lets you switch easily between several programs in one terminal, detach them (they keep running in the background) and reattach them to a different terminal.

This article assumes you have at least basic knowledge of linux, know how to use the shell, and most importantly, you host your site on your own VPS. The installation is quite simple and assumes you are running in the root account, if not you may need to add ‘sudo’ to the commands to get root privileges. I will show you through the step by step installation Tmux Terminal Multiplexer on a Linux server.
Install Tmux Terminal Multiplexer on Linux

Step 1. First make sure that all your system packages are up-to-date by running these following apt-get commands in the terminal.

sudo apt-get update
sudo apt-get upgrade

Step 2. Installing Tmux.

Installation is pretty straightforward if you have Ubuntu or CentOS distribution you can install tmux with:

### Debian / Ubuntu based ###
apt-get install tmux

### On RedHat / CentOS based ###
yum install tmux

After the installation is finish, then type tmux on your console to run tmux:

tmux

Step 3. Tmux Commands QuickStart.

Ctrl+b is the Tmux command prefix. Here below for the sake of Clarity the Ctrl+b will be repeated for every command:

To List the Available Commands:

Ctrl+b ?

To Create a New Pane:

Ctrl+b "

To Change Panes Layouts:

Ctrl+b Space

To Rotate Panes into Layout:

Ctrl+b Ctrl+o

To Switch into another Pane:

Ctrl+b ;

Congratulation’s! You have successfully installed Tmux. Thanks for using this tutorial for installing Tmux Terminal Multiplexer on Linux server. For additional help or useful information, we recommend you to check the official Tmux web site.

How To Install Ajenti Control Panel on Ubuntu 16.04 LTS

Install Ajenti Control Panel on Ubuntu 16

Ajenti is a hosting control panel that allows you to set up a website very easily. It comes with a clean and modern interface, so setting up application servers, databases and routing should not be difficult at all. Moreover, it comes with great language support. Using Ajenti, you can set up applications written in PHP (PHP-FPM), Python (WSGI), Ruby and Node.js in no time. Exim 4 and Courier IMAP are automatically configured so you can use virtual e-mails, DKIM, DMARC and SPF. This control panel is written in Python and runs on multiple Linux distributions.

This article assumes you have at least basic knowledge of linux, know how to use the shell, and most importantly, you host your site on your own VPS. The installation is quite simple and assumes you are running in the root account, if not you may need to add ‘sudo’ to the commands to get root privileges. I will show you through the step by step installation Ajenti Control Panel on a Ubuntu 16.04 (Xenial Xerus) server.
Install Ajenti Control Panel on Ubuntu 16.04 LTS

Step 1. First make sure that all your system packages are up-to-date by running these following apt-get commands in the terminal.

sudo apt-get update
sudo apt-get upgrade

Step 2. Installing Ajenti Control Panel.

Method 1

First way to install is quick automatic install:

wget -O- https://raw.github.com/ajenti/ajenti/1.x/scripts/install-ubuntu.sh | sudo sh

Method 2

Alternatively we can easily install Ajenti on Ubuntu systems using Ajenti repository package:

wget http://repo.ajenti.org/debian/key -O- | sudo apt-key add -
echo "deb http://repo.ajenti.org/ng/debian main main ubuntu" | sudo tee -a /etc/apt/sources.list

Install the package:

apt-get install ajenti

Start the service:

systemctl start ajenti

Step 3. Accessing Anjeti control panel.

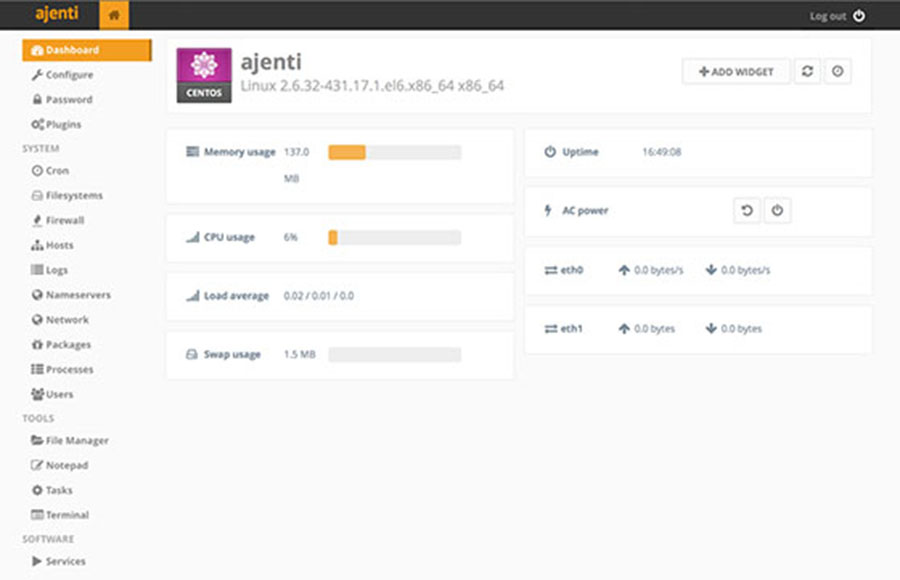
Anjeti will be available on HTTP port 8000 by default. Open your favorite browser and navigate to http://yourdomain.com:8000 or http://server-ip:8000 and enter default username “admin” or “root” and password is “admin“.

Ajenti-Control-PaneL

Congratulation’s! You have successfully installed Ajenti. Thanks for using this tutorial for installing Ajenti Control Panel Ubuntu 16.04 (Xenial Xerus) server. For additional help or useful information, we recommend you to check the official Ajenti web site.

How To Install Redis on Ubuntu 16.04 LTS

Install Redis on Ubuntu 16

Redis is an open source, BSD licensed, advanced key-value store. It is often referred to as a data structure server since keys can contain strings, hashes, lists, sets and sorted sets. Redis also supports datatypes such as Transitions, Publish and Subscribe. ‘Redis ’ is considered more powerful than ‘Memcache’ . It would be smart to bring ‘Redis’ into practice and put ‘Memcache’ down for a while.

This article assumes you have at least basic knowledge of linux, know how to use the shell, and most importantly, you host your site on your own VPS. The installation is quite simple and assumes you are running in the root account, if not you may need to add ‘sudo’ to the commands to get root privileges. I will show you through the step by step installation Redis on a Ubuntu 16.04 LTS (Xenial Xerus) server.
Install Redis on Ubuntu 16.04 LTS

Step 1. First make sure that all your system packages are up-to-date by running these following apt-get commands in the terminal.

sudo apt-get update
sudo apt-get upgrade

Step 2. Installing Redis.

Installing Redis on an Ubuntu is simple. Run the command below to install Redis on your machine:

apt-get install redis-server

Redis provide php extension to work with php. Here we will cover installation of Redis Extension of php from source compilation and using apt repository. Following command will install and setup redis extension with php:

apt-get install php-redis

Step 3. Configure Redis Cache on Ubuntu 16.04.

To configure Redis as a cache you need to edit the /etc/redis/redis.conf file:

nano /etc/redis/redis.conf

To configure the max memory for Redis as well as how Redis will select what to remove when the max memory is reached, add the following lines at the end of the file:

maxmemory 128mb
maxmemory-policy allkeys-lru

Save and close the file, then restart the Redis service:

systemctl restart redis-server.service
systemctl enable redis-server.service

Step 4. Starting and Testing the Redis.

We will start and check the status of the Redis with the below commands:

$ systemctl start redis-server.service
$ systemctl status redis-server.service
redis.service - Redis In-Memory Data Store
Loaded: loaded (/etc/systemd/system/redis.service; disabled; vendor preset: enabled)
Active: active (running) since Thu 2016-10-20 15:07:10 IST; 17s ago
Main PID: 7207 (redis-server)
Tasks: 3
Memory: 6.2M
CPU: 22ms
CGroup: /system.slice/redis.service
└─7207 /usr/local/bin/redis-server 127.0.0.1:6379
Oct 20 15:07:10 ubuntu-16 redis-server[7207]:  |    `-._`-._        _.-'_.-'    |
Oct 20 15:07:10 ubuntu-16 redis-server[7207]:   `-._    `-._`-.__.-'_.-'    _.-'
Oct 20 15:07:10 ubuntu-16 redis-server[7207]:       `-._    `-.__.-'    _.-'
Oct 20 15:07:10 ubuntu-16 redis-server[7207]:           `-._        _.-'
Oct 20 15:07:10 ubuntu-16 redis-server[7207]:               `-.__.-'
Oct 20 15:07:10 ubuntu-16 redis-server[7207]: 7207:M 20 Dec 16:07:10.853 # WARNING: The T
Oct 20 15:07:10 ubuntu-16 redis-server[7207]: 7207:M 20 Dec 16:07:10.853 # Server started
Oct 20 15:07:10 ubuntu-16 redis-server[7207]: 7207:M 20 Dec 16:07:10.853 # WARNING overco
Oct 20 15:07:10 ubuntu-16 redis-server[7207]: 7207:M 20 Dec 16:07:10.853 # WARNING you have.
...
...

We will now test the Redis instance with some commands:

$ redis-cli
127.0.0.1:6379> ping
PONG
127.0.0.1:6379> set test "Redis Working!"
OK
127.0.0.1:6379> get test
"Redis Working!"
127.0.0.1:6379> exit

Congratulation’s! You have successfully installed Redis. Thanks for using this tutorial for installing Redis on your Ubuntu 16.04 system. For additional help or useful information, we recommend you to check the official Redis web site.

How To Install Odoo on Ubuntu 16.04 LTS

Install Odoo on Ubuntu 16

Odoo is one of the most popular and most powerful Open Source ERP business software based on the Python programming language. It is an web based fully featured application, and comes with Open Source CRM, Point of Sales, Human Resource Management, Point of Sales, Billing and Accounting, Event Management, Email Marketing, Order Tracking etc. This application is helpful to maintain the ERP in any business.

This article assumes you have at least basic knowledge of linux, know how to use the shell, and most importantly, you host your site on your own VPS. The installation is quite simple and assumes you are running in the root account, if not you may need to add ‘sudo’ to the commands to get root privileges. I will show you through the step by step installation Odoo on a Ubuntu 16.04 (Xenial Xerus) server.
Odoo Features

Odoo comes with Website Builder, which supports WYSIWYG editor, version control, form builder and Multi Website with an option to add blogs, forum and slide shows.
Odoo comes with multiple themes and inbuilt e-commerce software.
Odoo has contract management as well as subscription management features.
Odoo comes with customizable project management and timesheets options, it has inbuilt Invoicing and Project management features.
Odoo comes with full featured Accounting software which includes VoIP integration including an option to send mass mailis and links tracking.
Odoo comes with inbuilt CRM which does accurate forecasting and shows real time overview.

Install Odoo on Ubuntu 16.04 LTS

Step 1. First make sure that all your system packages are up-to-date by running these following apt-get commands in the terminal.

sudo apt-get update
sudo apt-get upgrade

Step 2. Installing Odoo.

The first step is to download script from Github and to add the code in a new .sh file on your Ubuntu machine, wherever you’d like this:

wget https://raw.githubusercontent.com/Yenthe666/InstallScript/10.0/odoo_install.sh

Next, open up the file and edit the parameters to your liking:

nano odoo_install.sh

There are some things you can configure/change to your likings at the top of the script. You can choose if you wish to install Wkhtmltopdf or not, which version you’d like, where the location is and most importantly what the master admin password is.

After you configure the file, make it executable:

chmod +x odoo_install.sh

Run the odoo_install.sh script and wait until Odoo 10 is fully installed:

./odoo_install.sh

Edit the Odoo configuration file and set the master admin password:

### nano /etc/odoo-server.conf
admin_passwd = UseStr0ngPasswd

Finally, restart Odoo for the changes to take effect:

/etc/init.d/odoo-server restart

Step 3. Accessing Odoo.

Odoo will be available on HTTP port 8069 by default. Open your favorite browser and navigate to http://yourdomain.com:8069 or http://server-ip:8069.

Congratulation’s! You have successfully installed Odoo. Thanks for using this tutorial for installing Odoo Open Source ERP on Ubuntu 16.04 LTS (Xenial Xerus) system. For additional help or useful information, we recommend you to check the official Odoo web site.