How To Install IonCube Loader on CentOS

Install IonCube Loader on CentOS

IonCube Loaders is basically an encryption/decryption utility for PHP applications which also assists in speeding up the pages that are served. It is often required for a lot of PHP-based applications.

This article assumes you have basic knowledge of linux, know how to use the shell, and most importantly, you host your site on your own VPS. The installation is quite simple and assumes you are running in the root account, if not you may need to add ‘sudo’ to the commands to get root privileges.

In this tutorial we will guide you through the step by step installation IonCube Loader in CentOS server.

Install IonCube Loader on CentOS

Method 1:

For CentOS 32-bit use:

#wget http://downloads3.ioncube.com/loader_downloads/ioncube_loaders_lin_x86.tar.gz
#tar xvfz ioncube_loaders_lin_x86.tar.gz

For CentOS x86_64 (64-bit):

#wget http://downloads3.ioncube.com/loader_downloads/ioncube_loaders_lin_x86-64.tar.gz
#tar xvfz ioncube_loaders_lin_x86-64.tar.gz

If the links are not working anymore, please check the latest version download links in here.

#cd ioncube
#mkdir /usr/local/ioncube
#cp ioncube_loader_lin_5.3.so /usr/local/ioncube

Copy ioncube_loader_lin_5.3.so as PHP version installed on the server was PHP 5.3

Now edit php.ini file. To find location of php.ini, run

#php -i| grep php.ini
#nano /etc/php.ini

Add following line to end on php.ini

 zend_extension = /usr/local/ioncube/ioncube_loader_lin_5.3.so

Restart apache after IonCube Loaders installation

#service httpd restart
#php -v

Method 2:

Install IonCube Loaders via atomic yum repository:

#wget -q -O - http://www.atomicorp.com/installers/atomic |sh
#yum install php-ioncube-loader -y

IonCube Loader should now be installed. You can check by creating a file called info.php in /var/www/html/ with the following content:

 <? phpinfo(); ?>

Congratulation’s! You have successfully installed IonCube Loader. Thanks for using this tutorial for installing IonCube Loader in CentOS  system. For additional help or useful information, we recommend you to check the official IonCube Loader web site.

You Might Also Like: How To Install IonCube Loader on Ubuntu 16.04 LTS

How To Configuration Iptables Firewall on CentOS

Configuration Iptables Firewall on CentOS

Iptables is a user space application program that allows a system administrator to configure the tables provided by the Linux kernel firewall (implemented as different Netfilter modules) and the chains and rules it stores. Different kernel modules and programs are currently used for different protocols; iptables applies to IPv4, ip6tables to IPv6, arptables to ARP, and ebtables for Ethernet frames. (Read more on: wikipedia)

Configuration Iptables Firewall on CentOS

Setting up iptables

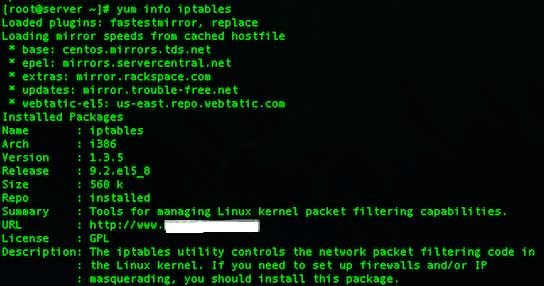
You can use the following procedure to verify that iptables has been installed and view the status of iptables. Open terminal and type the following command:

# iptables -V
# yum info iptables

iptables-centos

If the above message does not appear, you can type the following command to install iptables:

 # yum -y install iptables

Understanding Firewall, At present here are total four chains:

  • INPUT : The default chain is used for packets addressed to the system.
  • OUTPUT : The default chain generating from system.
  • FORWARD : The default chains is used when packets send through another interface.
  • RH-Firewall-1-INPUT : The user-defined custom chain.

Target Meanings

  • The target ACCEPT means allow packet.
  • The target REJECT means to drop the packet and send an error message to remote host.
  • The target DROP means drop the packet and do not send an error message to remote host or sending host.

The default iptables configuration on CentOS does not allow access to the HTTP (TCP PORT # 80) and HTTPS (TCP PORT # 443) ports used by Nginx web server. You can do step by step to configure:

Step 1: Flush all iptables rules

# iptables -F
# iptables -X
# iptables -t nat -F
# iptables -t nat -X
# iptables -t mangle -F
# iptables -t mangle -X

Step 2: Set default rules

# iptables -P INPUT DROP
# iptables -P FORWARD ACCEPT
# iptables -P OUTPUT ACCEPT

Step 3: Allow access to HTTP (port 80) and HTTPS (port 443)

# iptables -A INPUT -i lo -j ACCEPT 
# iptables -A INPUT -m state --state ESTABLISHED -j ACCEPT 
# iptables -A INPUT -m state --state RELATED,ESTABLISHED -j ACCEPT 
# iptables -A INPUT -p icmp -j ACCEPT
# iptables -A INPUT -m state --state NEW -m tcp -p tcp --dport 80 -j ACCEPT
# iptables -A INPUT -m state --state NEW -m tcp -p tcp --dport 443 -j ACCEPT

 Turn on and save iptables

Type the following two commands to turn on firewall:

# chkconfig iptables on
# service iptables save

How To Install PHP 5.5 on CentOS

Install PHP 5.5 on CentOS

PHP (PHP: Hypertext Preprocessor) is a server-side scripting language designed for web development but also used as a general-purpose programming language. PHP code is interpreted by a web server with a PHP processor module, which generates the resulting web page: PHP commands can be embedded directly into an HTML source document rather than calling an external file to process data.

This tutorial we will show you how to install PHP 5.5 on CentOS.

Install PHP 5.5 on CentOS

To install, first you must add the Webtatic yum repository information corresponding to your CentOS/RHEL version to yum:

For CentOS 6.x use:

 #rpm -Uvh http://mirror.webtatic.com/yum/el6/latest.rpm

For CentOS 5.x use:

 #rpm -Uvh http://mirror.webtatic.com/yum/el5/latest.rpm

Now you can install PHP 5.5:

 #yum install php55w --enablerepo=webtatic-archive[/#yum install php55w --enablerepo=webtatic-archive

Restart apache after PHP installation:

#service httpd restart
#php -v

PHP should now be installed. You can check by creating a file called info.php in /var/www/html/ with the following content:

<?php
 phpinfo();
 ?>

Congratulation’s! You have successfully installed PHP. Thanks for using this tutorial for installing PHP 5.5 in CentOS system. For additional help or useful information, we recommend you to check the official PHP web site.

You Might Also Like: How To Install and Enable Alternative PHP Cache (APC) on CentOS

How To Install Transmission on Ubuntu 14.04

Install Transmission on Ubuntu

Transmission BitTorrent Client features a simple interface on top of a cross-platform back-end. Transmission is licensed as a free software under the terms of the GNU General Public License (GPL), with parts under the MIT License. Transmission, like any other BitTorrent client allows users to download files from the Internet and upload their own files or torrents. By grabbing items and adding them to the interface, users can create queues of files to be downloaded and uploaded.

This article assumes you have at least basic knowledge of linux, know how to use the shell, and most importantly, you host your site on your own VPS. The installation is quite simple. I will show you through the step by step installation Transmission on Ubuntu 14.04.

In this tutorial we will show you how to will help you with your install and configuration of Transmission on your Ubuntu 14.04 server.

Install Transmission on Ubuntu 14.04

Step 1. First, add transmission into the repository.

 sudo add-apt-repository ppa:transmissionbt/ppa

Step 2. Install Transmission.

sudo apt-get update
sudo apt-get install transmission-cli transmission-common transmission-daemon

Step 3. Configure users and permissions for Transmission.

After the installation, create the directory where you want to put all your downloaded files.

cd /var/www/html/
mkdir transmission
cd transmission
mkdir completed incomplete torrents

Add the current user to debian-transmission group.

 sudo usermod -a -G debian-transmission wpcademy

Now, when Transmission downloads torrents, it automatically sets the rights of the files that it downloads to the Transmission user group. We need to make sure that our username is a part of that group, and we need to set the correct permissions on the downloads folders. Issue the following commands:

sudo chgrp -R debian-transmission /var/www/html/transmission
sudo chmod -R 775 /var/www/html/transmission

Configure Transmission

Step 4. Configure Transmission.

The configuration file is easy to understand. Here is my sample configuration:

#sudo nano /etc/transmission-daemon/settings.json

"download-dir": "/var/www/html/trasmission/completed",
...
"incomplete-dir": "/var/www/html/trasmission/incomplete",
"incomplete-dir-enabled": true,
...
"rpc-authentication-required": true,
"rpc-bind-address": "0.0.0.0",
"rpc-enabled": true,
"rpc-password": "password",
"rpc-port": 9091,
"rpc-username": "username",
"rpc-whitelist": "127.0.0.1,*.*.*.*",
"rpc-whitelist-enabled": true,
...
"umask": 2,
...
"watch-dir": "/media/datadrive/downloads",
"watch-dir-enabled": true

Step 5. Start Transmission daemon.

 sudo service transmission-daemon start

Once it has reloaded and if it starts back up, go ahead and go to your browser and navigate to: 0.0.0.0:9091 (where 0.0.0.0 is the IP address of your Ubuntu server). You should be greeted with the Transmission WebUI. After logging in, you will notice that the value for the rpc-password inside the settings.json file will be hashed.

Congratulation’s! You have successfully installed transmission. Thanks for using this tutorial for installing Transmission BitTorrent Client in Ubuntu 14.04 system. For additional help or useful information, we recommend you to check the official transmission web site

You Might Also Like: How To Install Transmission on CentOS 6

How To Install GNOME on Ubuntu 14.04

Install GNOME on Ubuntu

By default, Ubuntu 14.04 Trusty Tahr LTS server installed as minimal without any Graphical Desktop support. Installing GNOME desktop on Ubuntu is faily straightforward. Most Ubuntu servers are run on CLI (Command-Line Interface) mode. But in some cases, one may need to have a desktop to install some applications with GUI (Grapich User Interface) mode. In this case, we will use GNOME, the most popular user-friendly desktop for any UNIX based system.

This article assumes you have at least basic knowledge of linux, know how to use the shell, and most importantly, you host your site on your own VPS. The installation is quite simple. We will show you through the step by step installation GNOME on Ubuntu 14.04.

Install GNOME on Ubuntu 14.04

Step 1. First, You just need to install a couple of Gnome apps, add the gnome3-staging prepository and do a dist-upgrade:

sudo add-apt-repository ppa:gnome3-team/gnome3-staging
sudo apt-get update
sudo apt-get dist-upgrade

Step 2. Installing additional applications.

GNOME 3.12 has some new applications like: gnome-weather, gnome-maps, gnome-photos and gnome-music etc, which are not installed by default on Ubuntu GNOME 14.04. To install additional applications, run the following command:

sudo apt-get update
sudo apt-get install bijiben polari gnome-clocks gnome-weather gnome-maps gnome-music gnome-photos gnome-documents gnome-contacts epiphany-browser gnome-sushi gnome-boxes gnome-shell-extensions

Step 3. Reboot the system.

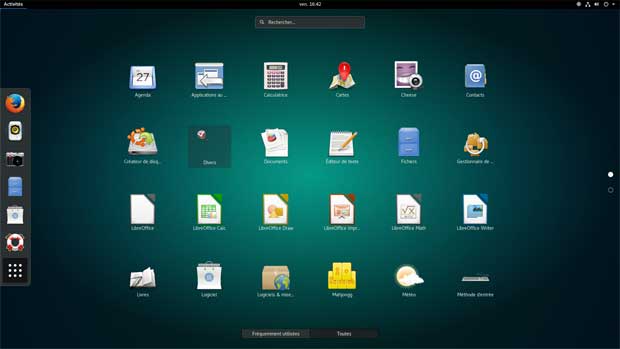
After you reboot the system, the system will enter into the Gnome GUI interface automatically.

ubuntu gnome interface

If you encounter issues of you simply don’t like GNOME 3.12, you can revert the changes by using PPA Purge. To purge the GNOME 3 PPAs and go back to GNOME 3.10 (which is default in Ubuntu 14.04), use the following commands:

sudo apt-get install ppa-purge
sudo ppa-purge ppa:gnome3-team/gnome3
sudo ppa-purge ppa:gnome3-team/gnome3-staging

Congratulation’s! You have successfully installed GNOME. Thanks for using this tutorial for installing GNOME in Ubuntu 14.04 system. For additional help or useful information, we recommend you to check the official GNOME web site.

You Might Also Like: How To Install Gnome GUI on CentOS 7

How To Install Apache SVN on Ubuntu 14.04

Install Apache SVN on Ubuntu

Apache Subversion which is commonly referred to in its abbreviated form as SVN, (named after the command name SVN) is a popular software versioning and revision control system which is distributed as a free software under the Apache License. Mainly used by developers to maintain present and historic file versions like documentation, source code, and web pages, it primarily aims to be a compatible successor to the extensively used CVS (Concurrent Versions System).

SVN supports several protocols for network access: SVN, SVN+SSH, HTTP, HTTPS. If you are behind a firewall, HTTP-based Subversion is advantageous since SVN traffic will go through the firewall without any additional firewall rule setting. This article assumes you have at least basic knowledge of linux, know how to use the shell, and most importantly, you host your site on your own VPS. The installation is quite simple. In this tutorial we will guide you through the step by step installation Apache SVN on Ubuntu 14.04 server.

Install Apache SVN on Ubuntu 14.04

Step 1. First, you need update the repositories using the following command.

 sudo apt-get update

Step 2. Install SVN and apache webserver.

 sudo apt-get install subversion apache2 libapache2-svn apache2-utils

Step 3. Create and configure SVN repository.

mkdir -p /svn/repos/
cd /svn/repos/
svnadmin create testrepo
chown -R www-data:www-data /testrepo

Step 4. Configure Subversion with Apache.

Once installing the package, you must open the subversion httpd config file.

#nano /etc/apache2/mods-enabled/dav_svn.conf

## Uncomment following lines ##

<Location /svn>
DAV svn
SVNParentPath /svn/repos/
AuthType Basic
AuthName "Subversion Repository"
AuthUserFile /etc/subversion/passwd
Require valid-user
</Location>

Step 5. Create account and password for SVN.

Following commands will add two users for svn. It will prompt for users password to be assigned.

htpasswd -cm /etc/svn-users wpcademy
htpasswd -m /etc/svn-users userwpcad

Step 6. Restart Apache2 Server.

 etc/init.d/apache2 restart

Step 7. Finally, You can visit the url http://your-ip-address/svn/testrepo to check out the content, you will be asked to enter the user name and password.

Congratulation’s! You have successfully installed Apache SVN. Thanks for using this tutorial for installing Apache Subversion server on Ubuntu 14.04 system. For additional help or useful information, we recommend you to check the official Apache Subversion web site.

You Might Also Like: How To Install Apache SVN on CentOS 7

How To Install MongoDB on Ubuntu 14.04

Install MongoDB on Ubuntu

MongoDB is a NoSQL document-oriented database. Refers to a database with a data model other than the tabular format used in relational databases such as MySQL, PostgreSQL, and Microsoft SQL. MongoDB features include: full index support, replication, high availability, and auto-sharding. It is a cross-platform and it makes the process of data integration faster and much easier. Since it is free and open-source, MongoDB is used by number of websites and organizations.

This article assumes you have at least basic knowledge of linux, know how to use the shell, and most importantly, you host your site on your own VPS. The installation is quite simple. We will show you through the step by step installation MongoDB on Ubuntu 14.04 in this tutorial.

Step 1. First, add the official MongoDB public key used by the package management system.

sudo apt-key adv --keyserver hkp://keyserver.ubuntu.com:80 --recv 7F0CEB10
echo 'deb http://downloads-distro.mongodb.org/repo/ubuntu-upstart dist 10gen' | sudo tee /etc/apt/sources.list.d/mongodb.list

Step 2. Install mongoDB packages.

sudo apt-get update
sudo apt-get install -y mongodb-org

If you want to install any specific version of MongoDB, define the version number like below:

 apt-get install mongodb-org=2.6.0 mongodb-org-server=2.6.0 mongodb-org-shell=2.6.0 mongodb-org-mongos=2.6.0 mongodb-org-tools=2.6.0

MongoDB daemon should be enabled to start on boot:

service mongod start
chkconfig mongod on

The main configuration file is located in the /etc directory on your Linux VPS as mongod.conf. To edit it, you can use your favorite text editor.

 nano /etc/mongod.conf

Step 3. Verifying mongoDB database.

Connect MongoDB using command line and execute some test commands for checking proper working.

#mongo

MongoDB shell version: 2.6.7
connecting to: test
Welcome to the MongoDB shell.

A good way to start using MongoDB on your CentOS 6 is to read the MongoDB manual on the official web site.

You Might Also Like: How To Install MongoDB on CentOS 6