How to fix Potential for Information Disclosure in CakePHP

fix Potential for Information Disclosure in CakePHP

The default application skeleton contained a beforeRender() method on the AppController that could potentially lead to unwanted information disclosure in your application. The unsafe default code was present between 3.1.0 and 3.5.0 of the application skeleton.

Risks

The default beforeRender hook would automatically serialize all view variables into JSON/XML if the _serialize view variable was not defined by the controller action. Controller methods that define the _serialize variable would behave correctly and only expose the named variables.

This behavior is triggered by the AppController and ErrorController loading RequestHandlerComponent, which configures the View class to be used based on the client’s Accept header. Then code in AppController::beforeRender() would enable all view variables to be serialized if no variables were explicitly listed.

The default controllers generated by bake set the _serialize view variable. This helps limit the impact, but could still lead to unwanted information exposure if entity classes are not correctly configured.

How to fix

You can fix the potential for information disclosure by modifying your application code. Unfortunately we cannot resolve this problem for you through a patch release of CakePHP or its appplication skeleton.

If you don’t have ErrorController in your src/Controller directory (CakePHP <= 3.3)

If you are using CakePHP 3.3.0 or greater and do not have an ErrorController in your application, you should download an ErrorController and put it into your src/Controller directory.

If you don’t use JSON/XML response based on client requests

  • Remove $this->loadComponent(‘RequestHandler’) from the initialize() method of your AppController and ErrorController.
  • Remove $this->set(‘_serialize’, true); from the beforeRender() of your AppController.

If you use JSON/XML response based on client requests

  • Remove $this->set(‘_serialize’, true); from the beforeRender() of your AppController.
  • Remove $this->set(‘_serialize’, [ (variable names) ]) from all controller actions, that should not return JSON/XML.
  • Add $this->set(‘_serialize’, [ (variable names) ]) explicitly to some actions of your controllers, which you want to return JSON/XML.

While we have no reports of information disclosure in the wild, this issue was found by Kurita Takashi and we felt this was important to disclose.

Read From Official CakePHP blog

How To Install Suhosin PHP 5 Protection Security Patch on CentOS

Install Suhosin PHP 5

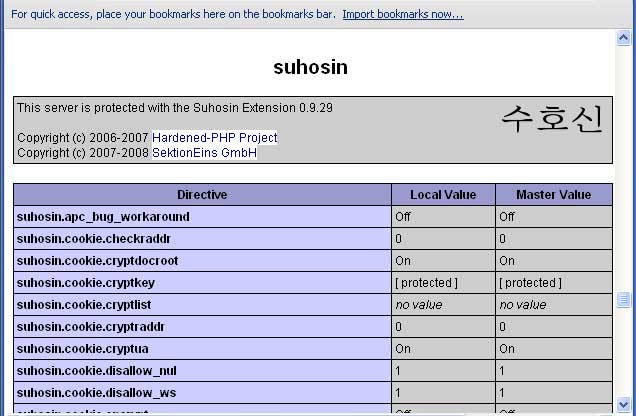
Suhosin (pronounced ‘su-ho-shin’) is an advanced protection system for PHP 5 installations. It is designed to protect servers and users from known and unknown flaws in PHP applications and the PHP core. Suhosin comes in two independent parts, that can be used separately or in combination. The first part is a small patch against the PHP core, that implements a few low-level protections against buffer overflows or format string vulnerabilities and the second part is a powerful PHP extension that implements numerous other protections.

In this tutorial we will show you how to install Suhosin PHP 5 protection security patch on CentOS.

Install Suhosin PHP 5 Protection Security Patch on CentOS

Step 1. First let’s start by ensuring your system is up-to-date.

yum clean all
yum -y update

Step 2. Download latest version of Suhosin:

#yum install php-devel
#http://download.suhosin.org/suhosin-0.9.35.tgz
#tar -xvf suhosin-0.9.35.tgz

 Next, run the following commands to compile Suhosin under PHP 5:

#cd suhosin-0.9.33
#phpize
#./configure
#make
#make install

Create the suhosin configuration, type the following command:

 #echo 'extension=suhosin.so' > /etc/php.d/suhosin.ini

Restart web server Nginx, Lighttpd or Apache:

#service nginx restart
#service lighttpd restart
#service httpd restart

Step 3. Verify Suhosin installation

 #php -v

Suhosin should now be installed. You can check by creating a file called info.php in /var/www/html/ with the following content:

<?php
phpinfo();
?>

installed php-suhosin successfully

The features of the Suhosin patch are listed under Engine Protection (only with patch); all the other features come with the Suhosin extension. But if you would like configure it according to your setup, then visit the suhosin configuration page for more information.

How To Protect Directory With Password on Nginx

Protect Directory With Password on Nginx

Unlike Apache, Nginx does not have any .htaccess file. Password protection is achieved by using the Nginx HttpAuthBasic module directives in the configuration file. For future reference, I will show you a steps to protect directory with password on nginx. This article assumes you have at least basic knowledge of linux, know how to use the shell, and most importantly, you host your site on your own VPS.

Protect Directory With Password on Nginx

Step 1. First add the following to your Nginx configuration file:

location / {
  auth_basic            "Restricted";
  auth_basic_user_file  /etc/nginx/htpasswd;
}

Step 2. Create the htpasswd file, notice that the file is /etc/nginx/htpasswd. This means you need to use htpasswd to create that file:

htpasswd -c /etc/nginx/htpasswd yourusername
New password: 
Re-type new password: 
Adding password for user yourusername

Step 3. This will create the password file. Next restart nginx’s configuration:

 service nginx restart

Now when you visit your directory or domain, you will be asked to enter a username and password that you chose beforehand. This is definitely not the most secure way of restricting domain access.

Congratulation’s! You have successfully protect directory on Nginx. Thanks for using this tutorial for protect directory with password on Nginx system. For additional help or useful information, we recommend you to check the official Nginx web site.

You Might Also Like: How To Install Let’s Encrypt SSL With Nginx on Ubuntu 16.04 LTS

How To Install Fail2Ban on Ubuntu

Install Fail2Ban on Ubuntu

Fail2Ban is a utility that is used to detect and prevent brute force intrusion. By scanning logs for certain actions, such as repeated failed login attempts, Fail2Ban is able to alter firewall configurations to halt further events. This article assumes you have at least basic knowledge of linux, know how to use the shell, and most importantly, you host your site on your own VPS. Follow guide how to install Fail2Ban on Ubuntu.

In this tutorial we will show you how to install and configuration of Fail2Ban on your Ubuntu server.

Install Fail2Ban on Ubuntu

Step 1. First log-in as root user and enter the following command to install Fail2ban.

 apt-get install fail2ban

Step 2. Once that has finished, go ahead and create your “local” jail (this is where you define your overrides of jail.conf). You can read more about jails here.

 cp /etc/fail2ban/jail.conf /etc/fail2ban/jail.local

Step 3. Setup Fail2ban default configuration.

 nano /etc/fail2ban/jail.local

Now, you will see default section with some basic rules that are followed by fail2ban itself. If you want to add some extra layer of protection to your server, then you can customize the each rule section as per your needs. There are few lines act as basic setup you can edit as necessary to suit your need including: ignoreip, bantime, findtime, and maxretry. You can read what each line means in the explanation available there.

[DEFAULT]

# "ignoreip" can be an IP address, a CIDR mask or a DNS host. Fail2ban will not
# ban a host which matches an address in this list. Several addresses can be
# defined using space separator.
ignoreip = 127.0.0.1/8

# "bantime" is the number of seconds that a host is banned.
bantime = 600

# A host is banned if it has generated "maxretry" during the last "findtime"
# seconds.
findtime = 600
maxretry = 3

# Destination email address used solely for the interpolations in
# jail.{conf,local} configuration files.
destemail = root@localhost

Step 4. Restarting Fail2Ban service.

 service fail2ban restart

Congratulation’s! You have successfully installed Fail2Ban. Thanks for using this tutorial for installing Fail2Ban on Linux ubuntu system. For additional help or useful information, we recommend you to check the official Fail2Ban web site.

Tutorials on Working with Security in CakePHP

Working with Security in CakePHP

Security is the most important feature while building web applications. It assures the users of the website that their data is secured. CakePHP provides some tools to secure your application.

Encryption and Decryption

Security library in CakePHP provides methods by which we can encrypt and decrypt data. Following are the two methods which are used for the same purpose.

static Cake\Utility\Security::encrypt($text, $key, $hmacSalt = null)
static Cake\Utility\Security::decrypt($cipher, $key, $hmacSalt = null)

The encrypt method will take text and key as the argument to encrypt data and the return value will be the encrypted value with HMAC checksum.

To hash a data hash() method is used. Following is the syntax of the hash() method.

Syntax

static Cake\Utility\Security::hash($string, $type = NULL, $salt = false)

CSRF

CSRF stands for Cross Site Request Forgery. By enabling the CSRF Component, you get protection against attacks. CSRF is a common vulnerability in web applications. It allows an attacker to capture and replay a previous request, and sometimes submit data requests using image tags or resources on other domains. The CSRF can be enabled by simply adding the CsrfComponent to your components array as shown below.

public function initialize(){
   parent::initialize();
   $this->loadComponent('Csrf');
}

The CsrfComponent integrates seamlessly with FormHelper. Each time you create a form with FormHelper, it will insert a hidden field containing the CSRF token.

While this is not recommended, you may want to disable the CsrfComponent on certain requests. You can do so by using the controller’s event dispatcher, during the beforeFilter() method.

public function beforeFilter(Event $event){
   $this->eventManager()->off($this->Csrf);
}

Security Component

Security Component applies tighter security to your application. It provides methods for various tasks like −

  • Restricting which HTTP methods your application accepts − You should always verify the HTTP method being used before executing side-effects. You should check the HTTP method or use Cake\Network\Request::allowMethod() to ensure the correct HTTP method is used.
  • Form tampering protection − By default, the SecurityComponent prevents users from tampering with forms in specific ways. The SecurityComponent will prevent the following things −
    • Unknown fields cannot be added to the form.
    • Fields cannot be removed from the form.
    • Values in hidden inputs cannot be modified.
  • Requiring that SSL be used − all actions to require a SSL-secured.
  • Limiting cross controller communication − We can restrict which controller can send request to this controller. We can also restrict which actions can send request to this controller’s action.

Example

Make changes in the config/routes.php file as shown in the following program.

config/routes.php

<?php
   use Cake\Core\Plugin;
   use Cake\Routing\RouteBuilder;
   use Cake\Routing\Router;

   Router::defaultRouteClass('DashedRoute');
   Router::scope('/', function (RouteBuilder $routes) {
      $routes->connect('login',['controller'=>'Logins','action'=>'index']);
      $routes->fallbacks('DashedRoute'); 
   });
   Plugin::routes();

Create a LoginsController.php file at src/Controller/LoginsController.php. Copy the following code in the controller file.

src/Controller/LoginsController.php

<?php
   namespace App\Controller;
   use App\Controller\AppController;

   class LoginsController extends AppController{
      public function initialize(){
         parent::initialize();
         $this->loadComponent('Security');
      }
      public function index(){
      }
   }
?>

Create a directory Logins at src/Template and under that directory create a View file called index.ctp. Copy the following code in that file.

src/Template/Logins/index.ctp

<?php
   echo $this->Form->create("Logins",array('url'=>'/login'));
   echo $this->Form->input('username');
   echo $this->Form->input('password');
   echo $this->Form->button('Submit');
   echo $this->Form->end();
?>

Execute the above example by visiting the following URL −http://localhost:85/CakePHP/login

Read the Full CakePHP security details from official CakePHP website