In this tutorial, we will learn how to create a niche review site in WordPress like a Pro, so you can earn money from it.
Why Create a Reviews Site?
What’s the first thing that you do when you’re looking to buy something online? If you’re like most of us, then you check the online reviews of that product to see what others are saying about it.
This is why a popular online review site, TripAdvisor, is worth roughly $12 billion dollars.
Now while everyone cannot be as big as TripAdvisor, we know several folks that are earning anywhere from few hundreds to few thousand dollars a month from running a niche review site.
There are two popular ways of creating a reviews site. The first is to add a reviews section on your existing blog. The second is to create a completely independent online reviews site.
Regardless of the direction you choose, it’s important that don’t pick a highly competitive niche.
For example: there are tons of sites talking about digital camera reviews, but not as many that are talking about camera accessory reviews.
The secret to building a successful review site is to finding the right niche. A perfect niche has low competition, and it should be something that you’re passionate about.
Here are few factors to think about:
- What resources can you offer to build traffic?
- Can you easily attract advertisers? (i.e are there people selling paid products)
- Are there affiliate programs available?
- Are other people making money in this niche?
- What is the competition like?
You can use tools like SEMRush, BuzzSumo, and Google Keyword Planner to help with research.
Once you have picked your niche, let’s take a look at how you can create a reviews site.
Step 0. Before You Start
To get started with WordPress, the first thing you would need is a good WordPress hosting and your own domain name.
Once you have signed up for WordPress hosting and set up your domain name, the next step is to install WordPress on your hosting account. We have a step by step guide on how to make a WordPress website.
If you already have a WordPress site, then just move to step 2.
Step 1. Choosing the Perfect WordPress “Review” Theme
The first step after setting up your WordPress site is to select a perfect WordPress theme.
When you look around for WordPress themes, you will probably find tons of articles about the best WordPress review themes, stay away from those.
You don’t need a WordPress review site template. Most of those WordPress review themes are bloated and will lock you into use them forever.
That’s why it’s better to use a WordPress reviews plugin because plugins will work with any theme / design that you choose.
You will have the flexibility to change your themes in the future without having to hire a developer.
We have an article that will help you find the perfect theme and install it in WordPress.
Basically pick a theme that you like in terms of look and feel. We will show you how to add the reviews functionality in the next step.
Step 2. Installing the best WordPress Reviews Plugin
First thing you need to do is install and activate the WP Product Review plugin.

The base plugin is free, and does not lack features that would hold you back. However, for additional functionality you will need to buy their premium addons package.
WP Product Review plugin is easy to use and it helps you stand out in search engines by adding schema markup on your review.
In plain English, it adds those star ratings next to your reviews in Google to help you stand out.

So go ahead and install this plugin.
Upon activation, you will notice a new menu item labeled ‘Product Review’ in your WordPress admin menu. Clicking on it will take you to plugin’s settings page.
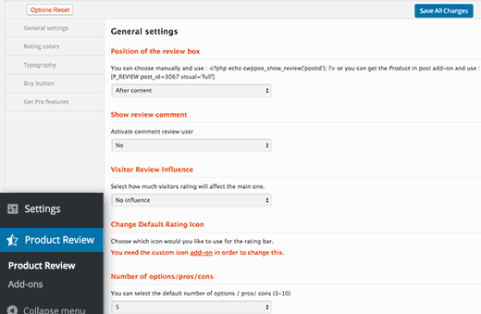
The settings page is divided into different sections. First you need to set up the general settings.
Start by selecting where you want to display the review box. There are three options to choose from. You can show the review box after or before the content, or you can manually add it using the shortcode.
The next option is to choose whether you want to allow users to add their reviews as comments. If you allow this, then you also need to select how much influence user reviews will have on the actual review.
After that you need to choose how many number of options, pros, and cons you want to be displayed. By default the plugin will allow you to add 5 of each. You can adjust that if you need.
Now move on to the rating colors tab in settings. This is where you can define the default colors used by the plugin for ratings. WP Product review uses different colors for excellent, good, not bad, and weak ratings.
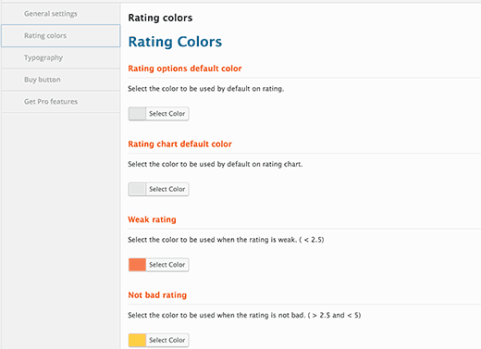
You can change the rating colors to match with your theme.
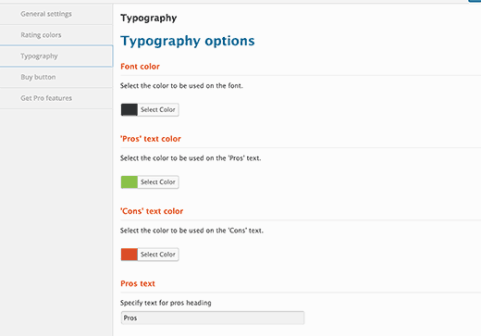
Next, click on the ‘Typography’ tab in the settings. This is where you can choose the default text for pros and cons columns. You can also change the text colors for different sections.
The final tab on the settings page is the buy button. On this tab, you can select the colors you want to use for the buy button.
Buy button will also have your affiliate link, so it is important that you choose a color that encourages more users to click.
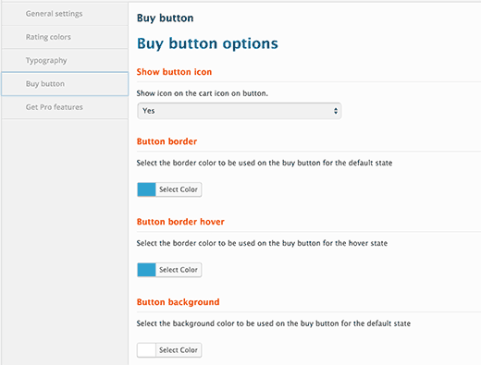
Don’t forget to click on the ‘Save All Changes’ button to store your settings.
Step 3: Adding a Review in WordPress
Adding a review using WP Product Review plugin is quite easy. Simply edit or create a new post in WordPress.
You will write your main review, like you would write any other post in WordPress.
On the post edit screen, scroll down to the bottom, and you will find the ‘Product review extra settings’ meta box. Click on ‘Yes’ next to the option ‘Is this a review post?’.
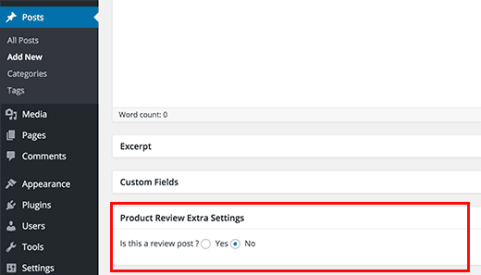
This will expand the meta box and you will now see the additional settings for your review.
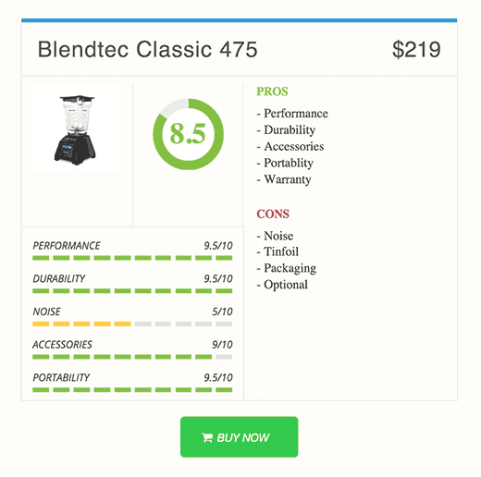
First you need to provide product details like images, buy now button text, product or affiliate link, and product price.
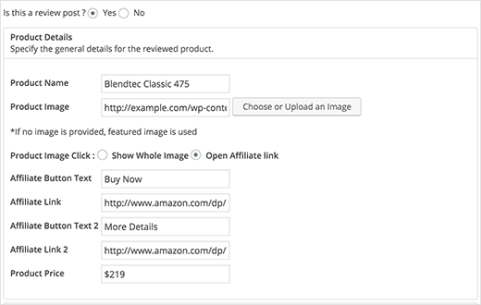
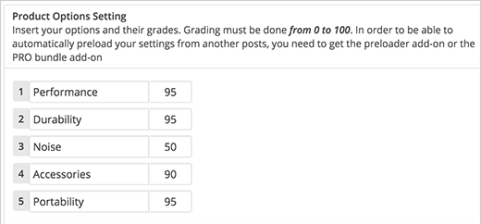
After that you need to add your options. These are like different aspects of the product and how you grade it for those qualities. You can add a number from 0 to 100, where 100 is the highest grade and 0 is the lowest.
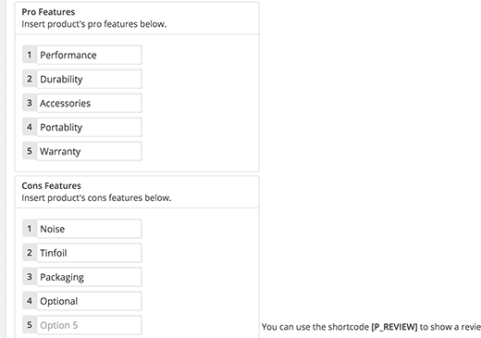
Next you will add the pros and cons lists. Add the best features of the product in the pros list and the features it lacked in the cons list.
Once you are done, simply save or publish your post.
You can now visit the post to see the review box in action.
Step 4. Displaying Your Reviews in Sidebar
WP Product Review allows you to show your review posts in the sidebar and other widget-ready areas. Visit Appearance » Widgets page, and you will find the top products widget and the latest products widget in a list of available widgets.
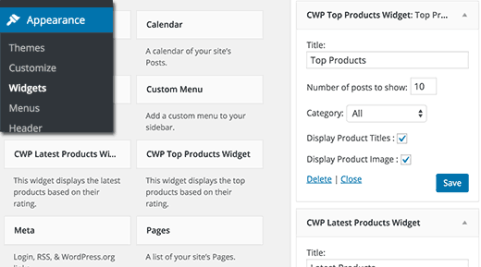
Simply add the widget to a sidebar and configure its options. You can select the number of products you want to display, product title and image display settings. Once you are done, click on the save button to store your widget settings.
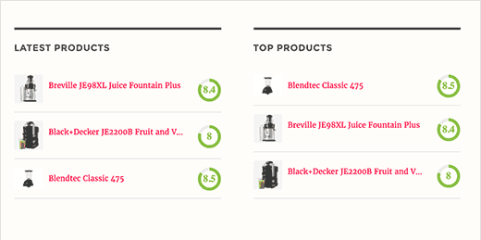
Now go ahead and visit your website to see the reviews widget in action. It will show the latest reviews with ratings and product image.
We hope this tutorial helped you create a beautiful reviews site with WordPress.
