In this tutorial, we will show you how to easily convert WooCommerce visitors into customers like a pro.
Why I Need to Conversion Optimization for My WooCommerce Store
Most eCommerce stores rely on search engines or paid advertising campaigns for traffic. There are many other ways to get more traffic to your website.
However, more than 75% visitors who find your website through search engines will never find it again. Those who stick around, only a small percentage of them will add products to the cart.
In the end, more than 69% shopping carts are abandoned without making the purchase. Shipping costs, complicated checkout experience, and bad design are among the top reasons for abandoned carts.
Now, considering these statistics, your eCommerce website will continue losing potential customers if you don’t work on converting those visitors into customers.
How do I Convert Visitors into Customers?
The process and technique that are used to convert visitors into customers is called conversion rate optimization (CRO). Marketers and usability experts use CRO to successfully drive visitors to become a customer or a potential customer.
Basically, you remove obstacles that affect a user’s experience on your website. You also incentivize users to make a purchasing decision.
Lastly if a user must leave without making a purchase, then your goal is to try and get their information through lead generation. This allows you to communicate with them via email and offer personalized messages, special discounts, or new product announcements.
In early days of eCommerce, you would have needed programming skills to work on all these but not anymore. Now you have tools that make it extremely easy to do all these things without writing code or acquiring any new technical skills.
That being said let’s take a look at how to convert WooCommerce visitors into customers.
What You Need to Boost WooCommerce Conversions
First, you will need a WooCommerce store. If you don’t already have one, see our guide on how to create an online store.
This tutorial is about WooCommerce, so we will be using it in our screenshots. However, all these techniques would also work on any other eCommerce platform including Shopify.
We will be using the OptinMonster tool. It is the best conversion optimization software on the market and helps you easily convert WooCommerce visitors into customers.
OptinMonster is a paid service, and you will need at least their Pro plan to access all the features mentioned later in this article.
Ready? let’s begin.
Disclosure: We believe in full transparency. WPCademy founder, Syed Balkhi, is also the co-founder of OptinMonster. We only recommend tools that we personally use and believe will add value to our readers.
Installing and Setting up OptinMonster
After you have purchased OptinMonster, you will need to install the OptinMonster plugin. For more details, see our step by step guide on how to install a WordPress plugin.
This plugin is just a connector between your WooCommerce store and OptinMonster.
Upon activation, you need to click on the OptinMonster menu item in your WordPress admin sidebar. You will be asked to enter your license key. You can find this information under your account on OptinMonster website.
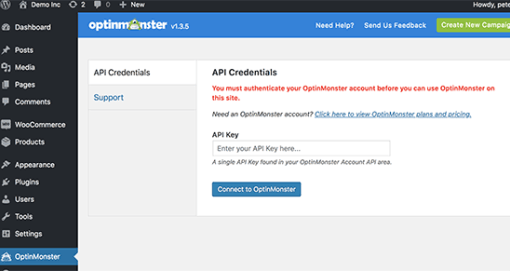
You have now successfully connected your WooCommerce store to OptinMonster, and you can now start optimizing your conversion rates.
Creating Your First WooCommerce Conversion Optimization Campaign
Let’s create your first WooCommerce conversion optimization campaign using OptinMonster. Our first campaign will reduce shopping cart abandonment ratewhile increasing conversions at the same time.
Visit the OptinMonster page in WordPress admin area and then click on ‘Create New Campaign’ button.
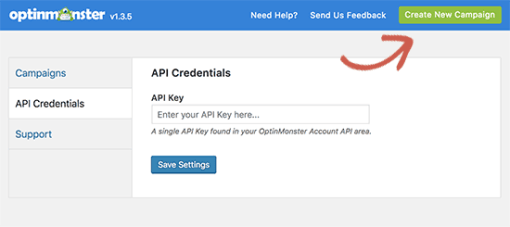
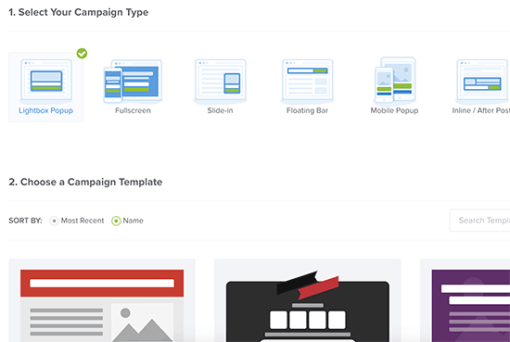
This will take you to the OptinMonster website where you will be asked to select a campaign type and a campaign template. For this tutorial, you need to select lightbox as your campaign type. We will be using the ‘Coupon’ template in this tutorial, but you can use any template that you like.
As soon as you select a template, you will be asked to provide a name for your campaign and enter the website address where you will be using it.
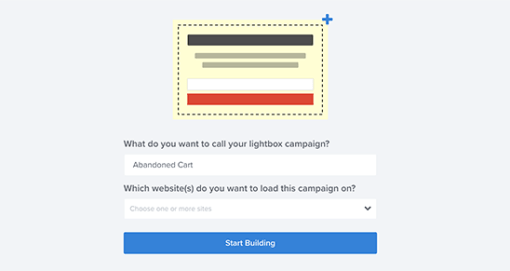
After entering this information, click on the ‘Start Building’ button to continue.
This will launch the OptinMonster builder interface with a live preview of your popup. You can simply point and click on any item to edit it.
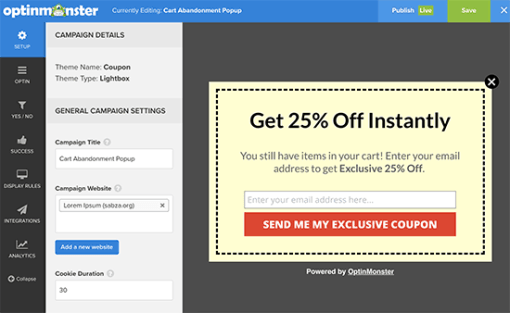
As you can see we are using a popup that collects user’s email address. You can connect OptinMonster to your favorite email service provider by clicking on the integrations tab.
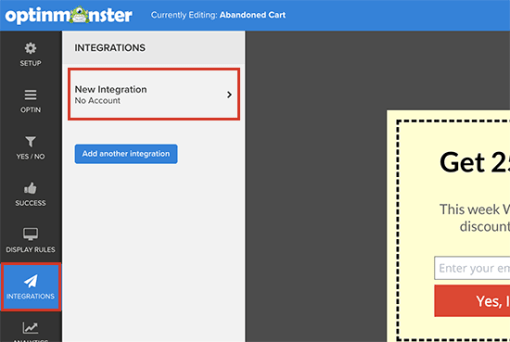
From here you can add a new integration to connect with your email service by following the on-screen prompts.
Next, you need to choose which users will see the popup and when.
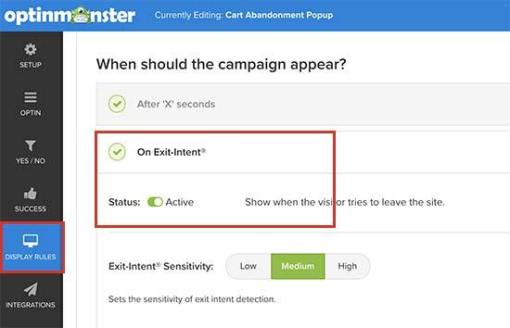
Click on the ‘Display Rules’ tab from the left menu, and OptinMonster will show you a list of default display rulesets that you can use.
First, click on the ‘Exit Intent’ ruleset to expand it, and then make sure it is active. Exit-Intent basically detects user’s behavior and prompt them with a message at the precise moment they’re about to leave.
When a visitor adds a product to the cart, WooCommerce automatically sets a cookie ‘woocommerce_items_in_cart’ in their browser with the number of items in their cart.
We only want to show our popup to users who have products in their cart. To do that, scroll down a little and then click on ‘Select visitors with a specific cookie’ ruleset to expand it.
This ruleset allows you to trigger a campaign when a specific cookie is found. From here you need to switch the status toggle to ‘Active’.
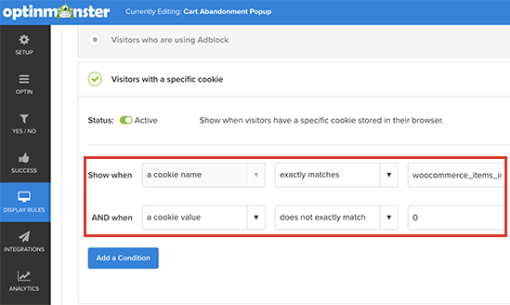
First, option in this ruleset is to show when a cookie name is matched. After that, click on ‘Add a condition’ button and select ‘Cookie value’ does not exactly match 0.
Lastly, click on the save button at the top right corner of the screen to save your changes and then click on the publish button next to it.
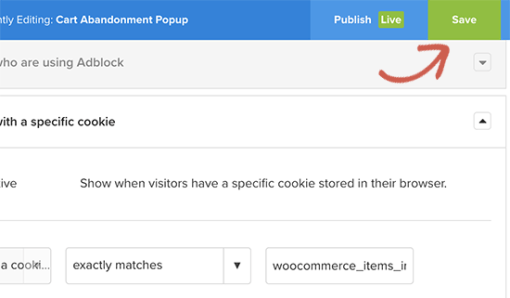
Your campaign is now ready to be served on your WooCommerce store. You just need to click on the ‘OptinMonster’ tab in your WordPress admin area and then click on ‘Campaigns’ tab.
You will see the campaign you just created listed there. If you don’t see your campaign, then click on the ‘Refresh campaigns’ button.
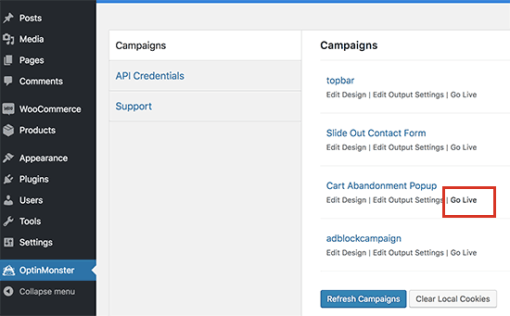
Next, you need to click on the ‘Go Live’ link below your campaign.
That’s all your lightbox popup is live now. To test it out, you will need to open a new browser window in the incognito mode and visit your store. Simply add a few products to your cart and then try to leave.
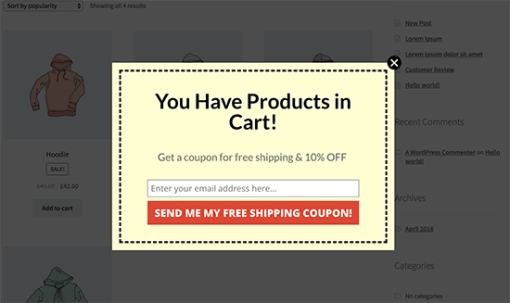
Congratulations! you have just set up your first conversion optimization campaign targeting users who are about to abandon their cart and leave without purchasing.
Other Campaign Ideas to Boost WooCommerce Conversions
OptinMonster is a powerful tool with tons of different campaign styles that you can use with a wide range of display rules. This allows you to target customers with highly effective messaging at the perfect time.
Here are some more campaign ideas that can help you boost WooCommerce conversions.
Using Multiple Campaign Types
OptinMonster comes with several campaign styles including lightbox popups, slide-in scroll box, floating bar, countdown timer, sidebar forms, in-line forms, and more.
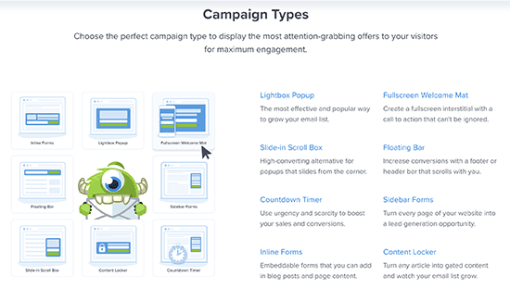
You can maximize your WooCommerce conversion rates by using multiple campaign types. For example, you can target users leaving your website with an Exit-Intent ® popup while showing other campaigns throughout your store.
Page Level Targeting
OptinMonster allows you to display your campaigns on any page on your website. This page can be a product, product category, a blog post, homepage, or a landing page.
Simply go to OptinMonster page in your WordPress admin area and click on the ‘Edit output settings’ link below your campaign.
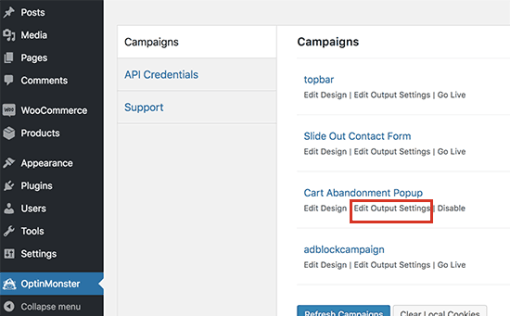
This will show you a variety of page level targeting options that you can use. It also includes WooCommerce specific targeting options.
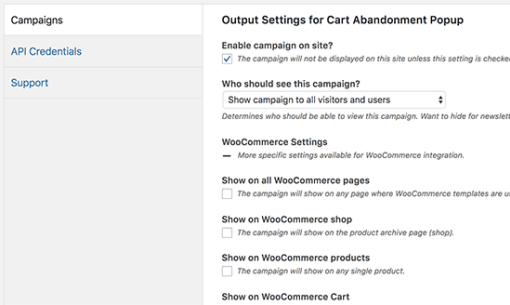
Apart from these options, you also have display rulesets in the OptinMonster app which provide even more page level targeting options.
Peronalization and Behavioral Targeting
Personalization helps you improve user experience by making it more personal for each user. Behavioral targetting allows you to target your campaigns based on customer behavior.
For example, you can greet logged in customers with their name, show them products based on their browsing history, offer them discount or coupon.
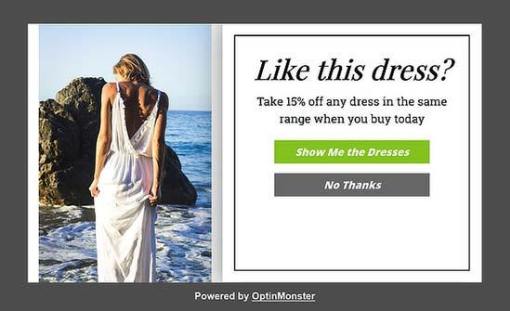
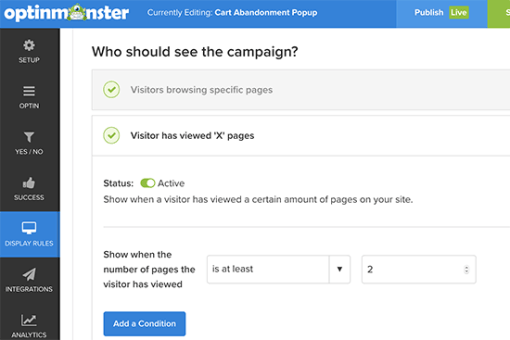
Edit your campaign in the OptinMonster app and click on the ‘Display Rules’ tab. Scroll down to the ‘Who should see the campaign’ section, and you will find a treasure of targeting options.
Click on any of these options to expand them. From here you can activate the ruleset and set it up.
Using FOMO to Increase WooCommerce Conversions
FOMO or ‘fear of missing out’ is a psychological term used to describe anxiety about missing out on something exciting and trendy.
As an eCommerce store owner, you can take advantage of this human behavior with your marketing strategy and improve your conversions.
OptinMonster comes with the countdown timer templates, floating bars, and coupon themes that you can use to build up FOMO in your marketing campaigns.
Combine it with behavioral targeting and customization to make your campaigns even more effective.
For more on this topic, see our article on how to use FOMO on your WordPress site to increase conversions or see these clever FOMO marketing examples from across the web.
We hope this article helped you learn how to convert WooCommerce visitors into customers.

