How To Install OwnCloud 8 With Nginx and PHP-FPM on CentOS 6 Server

Install OwnCloud 8 With Nginx

OwnCloud is a free and open-source software which enables you to create a private “file-hosting” cloud. OwnCloud is similar to DropBox service with the diference of being free to download and install on your private server. Owncloud made by PHP and backend database MySQL (MariaDB), SQLLite or PostgreSQL. OwnCloud also enables you to easily view and sync address book, calendar events, tasks and bookmarks. You can access it via the good looking and easy to use web interface or install OwnCloud client on your Desktop or Laptop machine (supports Linux, Windows and Mac OSX).

This article assumes you have at least basic knowledge of linux, know how to use the shell, and most importantly, you host your site on your own VPS. The installation is quite simple. We will learn through the step by step installation OwnCloud 8 with nginx and php-fpm on CentOS 6 server.

Install OwnCloud 8 With Nginx and PHP-FPM on CentOS 6

Step 1. First, we need to install the latest EPEL and Remi repository RPM suited to your architecture.

wget http://rpms.famillecollet.com/enterprise/remi-release-6.rpm
rpm -Uvh remi-release-6.rpm

wget http://download.fedoraproject.org/pub/epel/6/x86_64/epel-release-6-8.noarch.rpm
rpm -ivh epel-release-6-8.noarch.rpm

Step 2. Install Nginx webserver.

 yum install nginx

Step 3. Install the necessary PHP components.

yum update
yum install php-fpm php php-mysql sqlite php-dom php-mbstring php-gd php-pdo php-json php-xml php-zip php-gd curl php-curl php-ldap php-magickwand php-xmlrpc php-magpierss -y

Step 4. Install MySQL.

 yum install mysql-server -y

Start MySQL:

 service mysql start

By default, MySQL is not hardened. You can secure MySQL using the mysql_secure_installation script. you should read and below each steps carefully which will set root password, remove anonymous users, disallow remote root login, and remove the test database and access to secure MySQL.

 mysql_secure_installation

Step 5. Create a new MySQL database using the following commands.

#mysql -uroot -p

CREATE DATABASE owncloud;
GRANT ALL PRIVILEGES ON owncloud.* TO 'owncloud_user'@'localhost' IDENTIFIED BY 'owncloud_user_pasword';
FLUSH PRIVILEGES;

Step 6. Install OwnCloud and dependencies.

wget https://download.owncloud.org/community/owncloud-8.0.0.tar.bz2
tar -xjf owncloud-8.0.0.tar.bz2
mv owncloud /var/www/html/owncloud/

Set the directory permissions:

 chown -R www-data:www-data /var/www/html/owncloud/

Step 7. Configuring Nginx for OwnCloud.

Create a new virtual hosts for your domain with the following content:

#nano /etc/nginx/conf.d/yourdomain.tld.conf

server {
listen 80;
server_name yourdomain.tld www.yourdomain.tld;

root /var/www/owncloud;
index index.php index.html;

rewrite ^/caldav(.*)$ /remote.php/caldav$1 redirect;
rewrite ^/carddav(.*)$ /remote.php/carddav$1 redirect;
rewrite ^/webdav(.*)$ /remote.php/webdav$1 redirect;
error_page 403 /core/templates/403.php;
error_page 404 /core/templates/404.php;

  location = /robots.txt {
    allow all;
    log_not_found off;
    access_log off;
    }

  location ~ ^/(?:\.htaccess|data|config|db_structure\.xml|README){
    deny all;
    }

  location / {
   rewrite ^/.well-known/host-meta /public.php?service=host-meta last;
   rewrite ^/.well-known/host-meta.json /public.php?service=host-meta-json last;
   rewrite ^/.well-known/carddav /remote.php/carddav/ redirect;
   rewrite ^/.well-known/caldav /remote.php/caldav/ redirect;
   rewrite ^(/core/doc/[^\/]+/)$ $1/index.html;

   try_files $uri $uri/ /index.php;
   }

  location ~ \.php$ {
   try_files $uri =404;
   fastcgi_split_path_info ^(.+\.php)(/.+)$;
   fastcgi_pass 127.0.0.1:9000;
   fastcgi_index index.php;
   fastcgi_param SCRIPT_FILENAME $document_root$fastcgi_script_name;
   include fastcgi_params;
}
}

Remember to restart all services related to Nginx server and php-fpm.

service nginx restart
service php-fpm restart

Step 8. Access OwnCloud application.

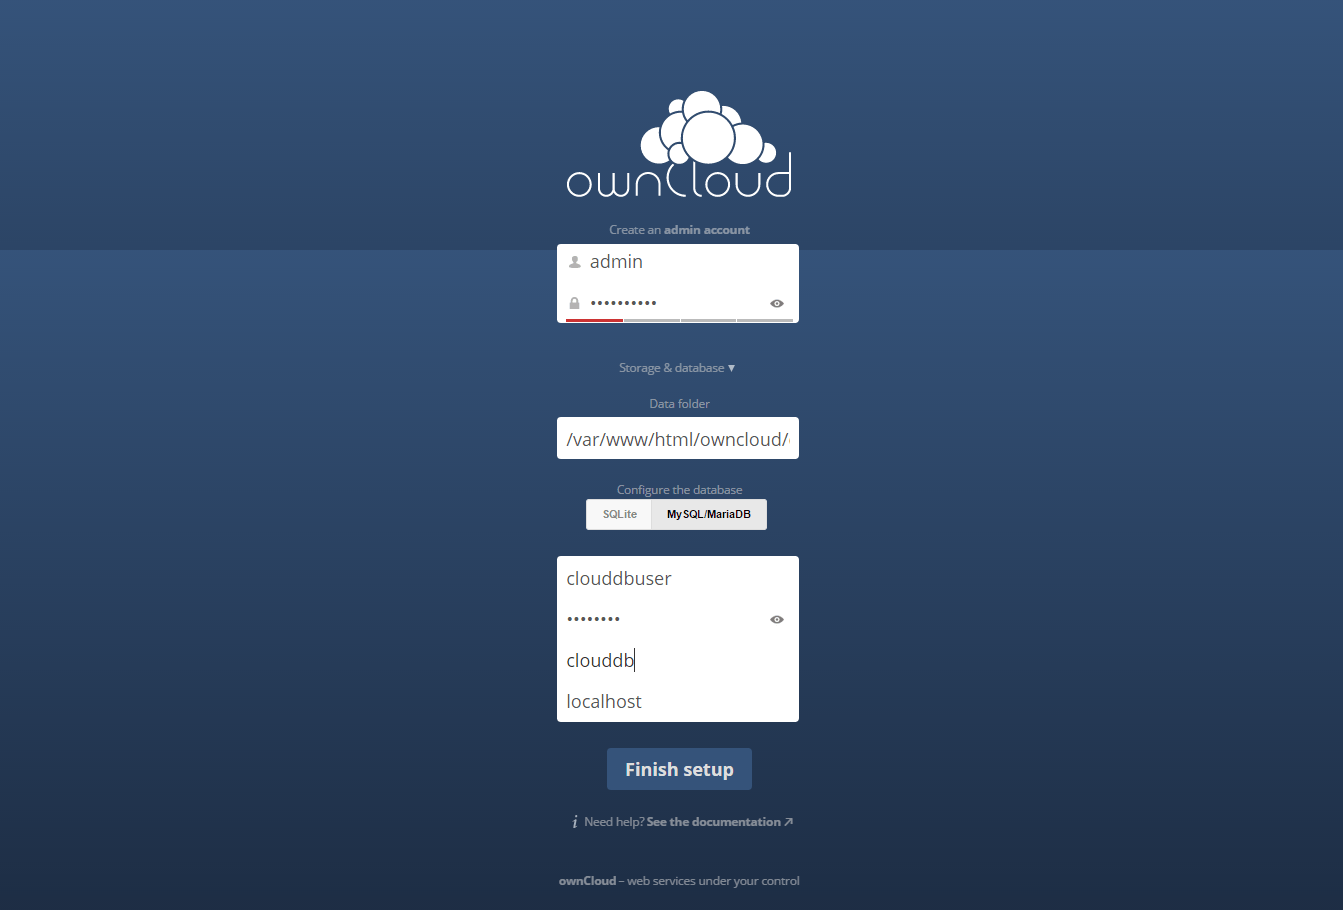
Navigate to http://your-domain.com/ and follow the easy instructions. Enter username and password for the administrator user account, click on the ‘Advanced options’ hyperlink and enter the data directory (or leave the default setting), then enter database username, database password, database name, host (localhost) and click ‘Finish setup’.
owncloud 8 installed successfully

Congratulation’s! You have successfully installed OwnCloud. Thanks for using this tutorial for installing OwnCloud 8 in CentOS 6 system. For additional help or useful information, we recommend you to check the official OwnCloud web site.

Click here to learn How To Install OwnCloud 8 on Ubuntu 14.04

How To Install OwnCloud 8 on Ubuntu 14.04

Install OwnCloud 8 on Ubuntu

OwnCloud is a free and open-source software which enables you to create a private “file-hosting” cloud. OwnCloud is similar to DropBox service with the diference of being free to download and install on your private server. Owncloud made by PHP and backend database MySQL (MariaDB), SQLLite or PostgreSQL. OwnCloud also enables you to easily view and sync address book, calendar events, tasks and bookmarks. You can access it via the good looking and easy to use web interface or install OwnCloud client on your Desktop or Laptop machine (supports Linux, Windows and Mac OSX).

This article assumes you have at least basic knowledge of linux, know how to use the shell, and most importantly, you host your site on your own VPS. The installation is quite simple. I will show you through the step by step installation OwnCloud 8 on Ubuntu 14.04.

Install OwnCloud 8 on Ubuntu 14.04

Step 1. First of all log in to your server as root and make sure that all packages are up to date.

apt-get update
apt-get upgrade

Step 2. Instal Apache web server on your Ubuntu 14.04 VPS if it is not already installed.

 apt-get install apache2

Step 3. Next, install PHP on your server.

 apt-get install php5 php5-mysql

Once the installation is done add the following PHP modules required by OwnCloud:

 apt-get install php5-gd php5-json php5-curl php5-intl php5-mcrypt php5-imagick

Step 4. Install MySQL database server.

 apt-get install mysql-server

By default, MySQL is not hardened. You can secure MySQL using the mysql_secure_installation script. you should read and below each steps carefully which will set root password, remove anonymous users, disallow remote root login, and remove the test database and access to secure MySQL.

 mysql_secure_installation

Step 5. Create a new MySQL database for OwnCloud using the following commands.

#mysql -u root -p
Enter password:

mysql> CREATE USER 'ownclouduser'@'localhost' IDENTIFIED BY 'YOURPASSWORD';
mysql> CREATE DATABASE ownclouddb;
mysql> GRANT ALL ON ownclouddb.* TO 'ownclouduser'@'localhost';
mysql> FLUSH PRIVILEGES;
mysql> exit

Step 6. Installing Owncloud 8.

First we will need to download the latest stable release of OwnCloud on your server (at the time version 8.0.0).

wget https://download.owncloud.org/community/owncloud-8.0.0.tar.bz2
tar -xvf owncloud-8.0.0.tar.bz2 -C /var/www/html/

Set the directory permissions:

 chown www-data:www-data -R /var/www/html/owncloud/

Step 7. Configuring Apache for OwnCloud.

While configuring Apache web server, it is recommended that you to enable .htaccess to get a enhanced security features, by default .htaccess is disabled in Apache server. To enable it, open your virtual host file and make AllowOverride is set to All.For example, here i used external config file instead of modifying main file.

### nano /etc/apache2/sites-available/owncloud.conf

<IfModule mod_alias.c>
Alias /owncloud /var/www/html/owncloud
</IfModule>
<Directory “/var/www/html/owncloud”>
Options Indexes FollowSymLinks
AllowOverride All
Order allow,deny
allow from all
</Directory>

Remember to restart all services related to Apache server.

 service apache2 restart

Step 8. Access OwnCloud application.

Navigate to http://your-domain.com/ and follow the easy instructions. Enter username and password for the administrator user account, click on the ‘Advanced options’ hyperlink and enter the data directory (or leave the default setting), then enter database username, database password, database name, host (localhost) and click ‘Finish setup’.

You Might Also Like: How To Install OwnCloud 8 on CentOS 6

How To Install OwnCloud 8 on CentOS 6

Install OwnCloud 8 on CentOS 6

OwnCloud is a free and open-source software which enables you to create a private “file-hosting” cloud. OwnCloud is similar to DropBox service with the diference of being free to download and install on your private server. Owncloud made by PHP and backend database MySQL (MariaDB), SQLLite or PostgreSQL. OwnCloud also enables you to easily view and sync address book, calendar events, tasks and bookmarks. You can access it via the good looking and easy to use web interface or install OwnCloud client on your Desktop or Laptop machine (supports Linux, Windows and Mac OSX).

This article assumes you have at least basic knowledge of linux, know how to use the shell, and most importantly, you host your site on your own VPS. The installation is quite simple. I will show you through the step by step installation OwnCloud 8 on CentOS 6.

Step 1. First, we need to install the latest EPEL and Remi repository RPM suited to your architecture.

wget http://rpms.famillecollet.com/enterprise/remi-release-6.rpm
rpm -Uvh remi-release-6.rpm

wget http://download.fedoraproject.org/pub/epel/6/x86_64/epel-release-6-8.noarch.rpm
rpm -ivh epel-release-6-8.noarch.rpm

Step 2. Install the necessary PHP components.

yum update
yum install httpd php php-mysql sqlite php-dom php-mbstring php-gd php-pdo php-json php-xml php-zip php-gd curl php-curl -y


Step 3.
Install MySQL.

 yum install mysql-server -y

Start MySQL:

 service mysql start

By default, MySQL is not hardened. You can secure MySQL using the mysql_secure_installation script. you should read and below each steps carefully which will set root password, remove anonymous users, disallow remote root login, and remove the test database and access to secure MySQL.

 mysql_secure_installation

Step 4. Create a new MySQL database using the following commands.

#mysql -uroot -p

CREATE DATABASE owncloud;
GRANT ALL PRIVILEGES ON owncloud.* TO 'owncloud_user'@'localhost' IDENTIFIED BY 'owncloud_user_pasword';
FLUSH PRIVILEGES;

Step 5. Install OwnCloud and dependencies.

wget https://download.owncloud.org/community/owncloud-8.0.0.tar.bz2
tar -xjf owncloud-8.0.0.tar.bz2
mv owncloud /var/www/html/owncloud/

Set the directory permissions:

 chown -R apache.apache /var/www/html/owncloud/

Step 5. Configuring Apache for OwnCloud.

While configuring Apache web server, it is recommended that you to enable .htaccess to get a enhanced security features, by default .htaccess is disabled in Apache server. To enable it, open your virtual host file and make AllowOverride is set to All.For example, here i used external config file instead of modifying main file.

#nano /etc/httpd/conf.d/owncloud.conf

<IfModule mod_alias.c>
Alias /owncloud /var/www/html/owncloud
</IfModule>
<Directory “/var/www/html/owncloud”>
Options Indexes FollowSymLinks
AllowOverride All
Order allow,deny
allow from all
</Directory>

Remember to restart all services related to Apache server.

 service httpd restart

Step 6. Access OwnCloud application.

Navigate to http://your-domain.com/ and follow the easy instructions. Enter username and password for the administrator user account, click on the ‘Advanced options’ hyperlink and enter the data directory (or leave the default setting), then enter database username, database password, database name, host (localhost) and click ‘Finish setup’.

You Might Also Like: How To Install OwnCloud 8 on Ubuntu 14.04