How To Install Sitemagic CMS on Ubuntu 18.04 LTS

Install Sitemagic CMS on Ubuntu 18

Sitemagic CMS is an amazing Content Management System that helps you build and maintain professional websites. Sitemagic CMS is a lightweight yet very capable Content Management System. Sitemagic CMS is super user friendly. Installation is easy as no database is required (but MySQL is supported for big websites). The administration menu provides easy access to all the built in functionality. Sitemagic CMS is super fast, super reliable, and super flexible, as you would expect from a professional Content Management System.

This article assumes you have at least basic knowledge of linux, know how to use the shell, and most importantly, you host your site on your own VPS. The installation is quite simple and assumes you are running in the root account, if not you may need to add ‘sudo’ to the commands to get root privileges. I will show you through the step by step installation Sitemagic CMS on a Ubuntu 18.04 LTS (Bionic Beaver) server.

Install Sitemagic CMS on Ubuntu 18.04 LTS

Step 1. First make sure that all your system packages are up-to-date

sudo apt-get update
sudo apt-get upgrade

Step 2. Install LAMP (Linux, Apache, MariaDB and PHP) server.

A Ubuntu 18.04 LAMP server is required. If you do not have LAMP installed, you can follow our guide here. Also install all required PHP modules:

apt-get install php7.1-cli php7.1-gd php7.1-opcache php7.1-mysql php7.1-json php7.1-mcrypt php7.1-xml php7.1-curl

Step 3. Installing Sitemagic CMS on Ubuntu 18.04 LTS.

First thing to do is to go to Sitemagic CMS’s download page and download the latest stable version of Sitemagic CMS, At the moment of writing this article it is version 4.3.0 series:

wget https://github.com/Jemt/SitemagicCMS/archive/master.zip
unzip master.zip
sudo mv SitemagicCMS-master /var/www/html/sitemagic

We will need to change some folders permissions:

chown -R www-data:www-data /var/www/html/sitemagic/
chmod -R 755 /var/www/html/sitemagic/

Step 4. Configuring MariaDB for Sitemagic CMS.

By default, MariaDB is not hardened. You can secure MariaDB using the mysql_secure_installation script. you should read and below each steps carefully which will set root password, remove anonymous users, disallow remote root login, and remove the test database and access to secure MariaDB:

mysql_secure_installation

Configure it like this:

- Set root password? [Y/n] y
- Remove anonymous users? [Y/n] y
- Disallow root login remotely? [Y/n] y
- Remove test database and access to it? [Y/n] y
- Reload privilege tables now? [Y/n] y

Next we will need to log in to the MariaDB console and create a database for the Sitemagic CMS. Run the following command:

mysql -u root -p

This will prompt you for a password, so enter your MariaDB root password and hit Enter. Once you are logged in to your database server you need to create a database for Sitemagic CMS installation:

CREATE DATABASE sitemagic;
CREATE USER 'siteuser'@'localhost' IDENTIFIED BY 'PASSWORD';
GRANT ALL PRIVILEGES ON `sitemagic`.* TO 'siteuser'@'localhost';
FLUSH PRIVILEGES;
exit

Step 5. Configuring Apache web server for Sitemagic CMS.

Create a new virtual host directive in Apache. For example, create a new Apache configuration file named ‘sitemagic.conf’ on your virtual server:

touch /etc/apache2/sites-available/sitemagic.conf
ln -s /etc/apache2/sites-available/sitemagic.conf /etc/apache2/sites-enabled/sitemagic.conf
nano /etc/apache2/sites-available/sitemagic.conf

Add the following lines:

<VirtualHost *:80>
ServerAdmin [email protected]
DocumentRoot /var/www/html/sitemagic
ServerName your-domain.com
ServerAlias www.your-domain.com
<Directory "/var/www/html/sitemagic/">
Options FollowSymLinks
AllowOverride All
Order allow,deny
allow from all
</Directory>
ErrorLog /var/log/apache2/your-domain.com-error_log
CustomLog /var/log/apache2/your-domain.com-access_log common
</VirtualHost>

Now, we can restart Apache web server so that the changes take place:

a2ensite sitemagic.conf
a2enmod rewrite
systemctl restart apache2.service

Step 6. Accessing Sitemagic CMS.

Sitemagic CMS will be available on HTTP port 80 by default. Open your favorite browser and navigate to http://yourdomain.com/ or http://server-ip/ and complete the required the steps to finish the installation, Also log in using ‘admin’ as username and ‘admin’ as password. If you are using a firewall, please open port 80 to enable access to the control panel.

Congratulation’s! You have successfully installed Sitemagic CMS. Thanks for using this tutorial for installing Sitemagic Content Management System on your Ubuntu 18.04 LTS (Bionic Beaver) system. For additional help or useful information, we recommend you to check the official Sitemagic web site.

How To Install CodeIgniter 3.x on Ubuntu 18.04 LTS

Install CodeIgniter on Ubuntu 18

CodeIgniter is a powerful PHP framework with a very small footprint, built for PHP coders who need a simple and elegant toolkit to create full-featured web applications.

This article assumes you have at least basic knowledge of Linux, know how to use the shell, and most importantly, you host your site on your own VPS. The installation is quite simple and assumes you are running in the root account, if not you may need to add ‘sudo’ to the commands to get root privileges. I will show you through the step by step installation CodeIgniter on a Ubuntu 18.04 LTS (Bionic Beaver) server.

Install CodeIgniter on Ubuntu 18.04 LTS

Step 1. First make sure that all your system packages are up-to-date

sudo apt-get update
sudo apt-get upgrade

Step 2. Install LAMP (Linux, Apache, MariaDB and PHP) server.

A Ubuntu 18.04 LAMP server is required. If you do not have LAMP installed, you can follow our guide here. Also install all required PHP modules:

apt-get install php7.1-cli php7.1-gd php7.1-opcache php7.1-mysql php7.1-json php7.1-mcrypt php7.1-xml php7.1-curl

Step 3. Installing CodeIgniter on Ubuntu 18.04 LTS.

First, Download the latest stable release of Codeigniter:

wget https://github.com/bcit-ci/CodeIgniter/archive/3.1.8.zip
unzip 3.1.8.zip
cp -r CodeIgniter-3.1.8 /var/www/html/codeigniter

We will need to change some folders permissions:

chown -R www-data:www-data /var/www/html/codeigniter
chmod -R 777 /var/www/html/codeigniter/

Step 4. Configuring Apache web server for CodeIgniter.

Create a new virtual host directive in Apache. For example, create a new Apache configuration file named ‘codeigniter.conf’ on your virtual server:

touch /etc/apache2/sites-available/codeigniter.conf
ln -s /etc/apache2/sites-available/codeigniter.conf /etc/apache2/sites-enabled/codeigniter.conf
nano /etc/apache2/sites-available/codeigniter.conf

Add the following lines:

<VirtualHost *:80>
ServerAdmin [email protected]
DocumentRoot /var/www/html/codeigniter
ServerName your-domain.com
ServerAlias www.your-domain.com
<Directory /var/www/html/codeigniter/>
Options FollowSymLinks
AllowOverride All
Order allow,deny
allow from all
</Directory>
ErrorLog /var/log/apache2/your-domain.com-error_log
CustomLog /var/log/apache2/your-domain.com-access_log common
</VirtualHost>

Now, we can restart Apache web server so that the changes take place:

sudo a2ensite codeigniter.conf
sudo a2enmod rewrite
sudo systemctl restart apache2.service

Step 5. Accessing CodeIgniter.

CodeIgniter will be available on HTTP port 80 by default. Open your favorite browser and navigate to http://yourdomain.com or http://server-ip and complete the required the steps to finish the installation. If you are using a firewall, please open port 80 to enable access to the control panel.

Congratulation’s! You have successfully installed CodeIgniter. Thanks for using this tutorial for installing CodeIgniter on your Ubuntu 18.04 LTS (Bionic Beaver) system. For additional help or useful information, we recommend you to check the official CodeIgniter web site.

How To Install WordPress 5.1.1 on Ubuntu 18.04 LTS

Install WordPress on Ubuntu 18

WordPress is an online, open source website creation tool written in PHP. But in non-geek speak, it’s probably the easiest and most powerful blogging and website content management system (or CMS) in existence today.

This article assumes you have at least basic knowledge of Linux, know how to use the shell, and most importantly, you host your site on your own VPS. The installation is quite simple and assumes you are running in the root account, if not you may need to add ‘sudo’ to the commands to get root privileges. I will show you through the step by step installation WordPress content management systems on an Ubuntu 18.04 Bionic Beaver server.

Install WordPress on Ubuntu 18.04 LTS

Step 1. First make sure that all your system packages are up-to-date

sudo apt-get update
sudo apt-get upgrade

Step 2. Install LAMP (Linux, Apache, MariaDB, PHP) server.

A Ubuntu 18.04 LAMP server is required. If you do not have LAMP installed, you can follow our guide here. Also install all required PHP modules:

apt-get install php7.1-cli php7.1-gd php7.1-opcache php7.1-mysql php7.1-json php7.1-mcrypt php7.1-xml php7.1-curl php7.1-mysql php7.1-xml php7.1-xmlrpc

Step 3. Installing WordPress on Ubuntu 18.04 LTS.

First thing to do is to go to WordPress’s download page and download the latest stable version of WordPress, At the moment of writing this article it is version 4.9.7:

wget http://wordpress.org/latest.zip

Unpack the WordPress archive to the document root directory on your server:

unzip -q latest.zip -d /var/www/html/
cd wordpress
cp -a * ..

We will need to change some folders permissions:

chown www-data:www-data -R /var/www/html/

We need to create the upload directory manually:

mkdir -p /var/www/html/wp-content/uploads

Allow the Apache web server to write to the uploads directory. Do this by assigning group ownership of this directory to your web server which will allow Apache to create files and directories. Issue the following command:

chown www-data:www-data -R /var/www/html/wp-content/uploads

Step 4. Configuring MariaDB for WordPress.

By default, MariaDB is not hardened. You can secure MariaDB using the mysql_secure_installation script. you should read and below each steps carefully which will set root password, remove anonymous users, disallow remote root login, and remove the test database and access to secure MariaDB:

mysql_secure_installation

Configure it like this:

- Set root password? [Y/n] y
- Remove anonymous users? [Y/n] y
- Disallow root login remotely? [Y/n] y
- Remove test database and access to it? [Y/n] y
- Reload privilege tables now? [Y/n] y

Next we will need to log in to the MariaDB console and create a database for the WordPress. Run the following command:

mysql -u root -p

This will prompt you for a password, so enter your MariaDB root password and hit Enter. Once you are logged in to your database server you need to create a database for WordPress installation:

create database wordpress;
grant all privileges on wordpress.* to wpuser@localhost identified by 'your-password';
flush privileges;
exit;

Step 5. Configuring WordPress

In this step we will configure the main configuration file of WordPress, where we need to configure it’s basic parameters so that it can be connected with the database and user:

mv wp-config-sample.php wp-config.php

Now open it using any of your favourite editor, to make any changes in the WordPress configuration file:

nano wp-config.php

Here are the values that we need to update according to our previous database and user’s setup:

// ** MySQL settings - You can get this info from your web host ** //
/** The name of the database for WordPress */
define('DB_NAME', 'wordpress');

/** MySQL database username */
define('DB_USER', 'wpuser');

/** MySQL database password */
define('DB_PASSWORD', 'your_password');

/** MySQL hostname */
define('DB_HOST', 'localhost');

Step 6. Configuring Apache web server for WordPress.

Create a new virtual host directive in Apache. For example, create a new Apache configuration file named ‘wordpress.conf’ on your virtual server:

touch /etc/apache2/sites-available/wordpress.conf
ln -s /etc/apache2/sites-available/wordpress.conf /etc/apache2/sites-enabled/wordpress.conf
nano /etc/apache2/sites-available/wordpress.conf

Add the following lines:

&lt;VirtualHost *:80&gt;
ServerAdmin [email protected]
DocumentRoot /var/www/html/
ServerName your-domain.com
ServerAlias www.your-domain.com
&lt;Directory /var/www/html/&gt;
Options FollowSymLinks
AllowOverride All
Order allow,deny
allow from all
&lt;/Directory&gt;
ErrorLog /var/log/apache2/your-domain.com-error_log
CustomLog /var/log/apache2/your-domain.com-access_log common
&lt;/VirtualHost&gt;

Next step we will need to adjust the some some values in the PHP configuration files as follow:

nano /etc/php/7.1/apache2/php.ini

Add/modify the following settings:

max_execution_time = 300
max_input_time = 600
memory_limit = 256M
post_max_size = 64M
upload_max_filesize = 64M

Now, we can restart Apache web server so that the changes take place:

sudo a2ensite wordpress.conf
sudo a2enmod rewrite 
sudo systemctl restart apache2.service

Step 7. Accessing WordPress.

WordPress will be available on HTTP port 80 by default. Open your favorite browser and navigate to http://yourdomain.com or http://server-ip/ and complete the required the steps to finish the installation. If you are using a firewall, please open port 80 to enable access to the control panel.

Congratulation’s! You have successfully installed WordPress. Thanks for using this tutorial for installing WordPress CMS (Content Management Systems) on your Ubuntu 18.04 Bionic Beaver. For additional help or useful information, we recommend you to check the official WordPress installation guideline .

How To Install Microweber CMS (latest version) on Ubuntu 18.04 LTS

Install Microweber CMS on Ubuntu 18

Microweber is an open source drag and drop CMS and it is built on top of Laravel. The core idea of the software is to let you create your own website, online shop or blog. Tagging all along will be different modules, customizations and features of the CMS, among them many specifically tailored for e-commerce enthusiasts and bloggers.

This article assumes you have at least basic knowledge of Linux, know how to use the shell, and most importantly, you host your site on your own VPS. The installation is quite simple and assumes you are running in the root account, if not you may need to add ‘sudo’ to the commands to get root privileges. I will show you through the step by step installation Microweber on a Ubuntu 18.04 LTS (Bionic Beaver) server.

Install Microweber CMS on Ubuntu 18.04 LTS

Step 1. First make sure that all your system packages are up-to-date

sudo apt-get update
sudo apt-get upgrade

Step 2. Install LAMP (Linux, Apache, MariaDB and PHP) server.

A Ubuntu 18.04 LAMP server is required. If you do not have LAMP installed, you can follow our guide here. Also install all required PHP modules:

apt-get install php7.1-cli php7.1-gd php7.1-opcache php7.1-mysql php7.1-json php7.1-mcrypt php7.1-xml php7.1-curl

Step 3. Intsalling Microweber CMS on Ubuntu 18.04 LTS.

First, Download the latest release of Microweber CMS and unzip it:

wget https://microweber.com/download.php -O microweber-latest.zip
mkdir /var/www/html/microweber
unzip microweber-latest.zip -d /var/www/html/microweber

We will need to change some folders permissions:

chown -R www-data:www-data /var/www/html/microweber/
chmod -R 755 /var/www/html/microweber/

Step 4. Configuring MariaDB for Microweber CMS.

By default, MariaDB is not hardened. You can secure MariaDB using the mysql_secure_installation script. you should read and below each steps carefully which will set root password, remove anonymous users, disallow remote root login, and remove the test database and access to secure MariaDB:

mysql_secure_installation

Configure it like this:

- Set root password? [Y/n] y
- Remove anonymous users? [Y/n] y
- Disallow root login remotely? [Y/n] y
- Remove test database and access to it? [Y/n] y
- Reload privilege tables now? [Y/n] y

Next we will need to log in to the MariaDB console and create a database for the Microweber CMS. Run the following command:

mysql -u root -p

This will prompt you for a password, so enter your MariaDB root password and hit Enter. Once you are logged in to your database server you need to create a database for Microweber CMS installation:

CREATE DATABASE microweber;
CREATE USER 'microweberuser'@'localhost' IDENTIFIED BY 'new_password_here';
GRANT ALL ON microweber.* TO 'microweberuser'@'localhost' IDENTIFIED BY 'user_password_here' WITH GRANT OPTION;
FLUSH PRIVILEGES;

Step 5. Configuring Apache web server for Microweber CMS.

Create a new virtual host directive in Apache. For example, create a new Apache configuration file named ‘microweber.conf’ on your virtual server:

touch /etc/apache2/sites-available/microweber.conf
ln -s /etc/apache2/sites-available/microweber.conf /etc/apache2/sites-enabled/microweber.conf
nano /etc/apache2/sites-available/microweber.conf

Add the following lines:

<VirtualHost *:80>
ServerAdmin [email protected]
DocumentRoot /var/www/html/microweber
ServerName your-domain.com
ServerAlias www.your-domain.com
<Directory /var/www/html/microweber/>
Options FollowSymLinks
AllowOverride All
Order allow,deny
allow from all
</Directory>
ErrorLog /var/log/apache2/your-domain.com-error_log
CustomLog /var/log/apache2/your-domain.com-access_log common
</VirtualHost>

Now, we can restart Apache web server so that the changes take place:

sudo a2ensite microweber.conf
sudo a2enmod rewrite
sudo systemctl restart apache2.service

Step 6. Accessing Microweber CMS.

Microweber CMS will be available on HTTP port 80 by default. Open your favorite browser and navigate to http://yourdomain.com or http://server-ip and complete the required the steps to finish the installation. If you are using a firewall, please open port 80 to enable access to the control panel.

Congratulation’s! You have successfully installed Microweber. Thanks for using this tutorial for installing Microweber on your Ubuntu 18.04 system. For additional help or useful information, we recommend you to check the official Microweber web site.

How To Install Cacti Monitoring V1.2.3 on Ubuntu 18.04 LTS

Cacti Monitoring

Cacti is an open-source, web-based network monitoring and graphing tool designed as a front-end application for the open-source, industry-standard data logging tool RRDtool. It is used by IT businesses and stores all of the necessary information about bandwidth, hard disk usage, CPU usage, load average, RAM statistics etc in a MySQL database. Cacti creates graphs and populates them with data. It offers SNMP support, 3rd party templates and plugins and has built in user authentications and user permission features.

This article assumes you have at least basic knowledge of Linux, know how to use the shell, and most importantly, you host your site on your own VPS. The installation is quite simple and assumes you are running in the root account, if not you may need to add ‘sudo’ to the commands to get root privileges. I will show you through the step by step installation Cacti Monitoring on a Ubuntu 18.04 (Bionic Beaver) server.

Install Cacti Monitoring on Ubuntu 18.04 LTS

Step 1. First make sure that all your system packages are up-to-date Install Cacti Monitoring on Ubuntu 18

sudo apt-get update
sudo apt-get upgrade

Step 2. Install LAMP (Linux, Apache, MariaDB and PHP) server.

A Ubuntu 18.04 LAMP server is required. If you do not have LAMP installed, you can follow our guide here. Also install all required PHP modules:

apt-get install php7.1-cli php7.1-gd php7.1-opcache php7.1-mysql php7.1-json php7.1-mcrypt php7.1-xml php7.1-curl

Step 3. Configuring MariaDB for Cacti.

By default, MariaDB is not hardened. You can secure MariaDB using the mysql_secure_installation script. you should read and below each steps carefully which will set root password, remove anonymous users, disallow remote root login, and remove the test database and access to secure MariaDB:

mysql_secure_installation

Configure it like this:

- Set root password? [Y/n] y
- Remove anonymous users? [Y/n] y
- Disallow root login remotely? [Y/n] y
- Remove test database and access to it? [Y/n] y
- Reload privilege tables now? [Y/n] y

Next we will need to log in to the MariaDB console and create a database for the Cacti. Run the following command:

mysql -u root -p

This will prompt you for a password, so enter your MariaDB root password and hit Enter. Once you are logged in to your database server you need to create a database for Cacti installation:

Ccreate database cacti;
GRANT ALL ON cacti.* TO cactiuser@localhost IDENTIFIED BY 'cactipassword';
flush privileges;
exit

The newly created database user (cactiuser) should have access to the mysql.time_zone_name Table. To do that, import the mysql_test_data_timezone.sql to mysql database:

mysql -u root -p mysql < /usr/share/mysql/mysql_test_data_timezone.sql

Then, log in to Mariadb:

mysql -u root -p

Grant the permission to cactiuser:

GRANT SELECT ON mysql.time_zone_name TO cactiuser@localhost;
flush privileges;
exit

Step 4. Installing the Cacti packages.

Install SNMP and SNMP and RRDtools:

sudo apt-get install snmp snmpd snmp-mibs-downloader rrdtool

Now use the following command to install Cacti:

apt-get install cacti cacti-spine

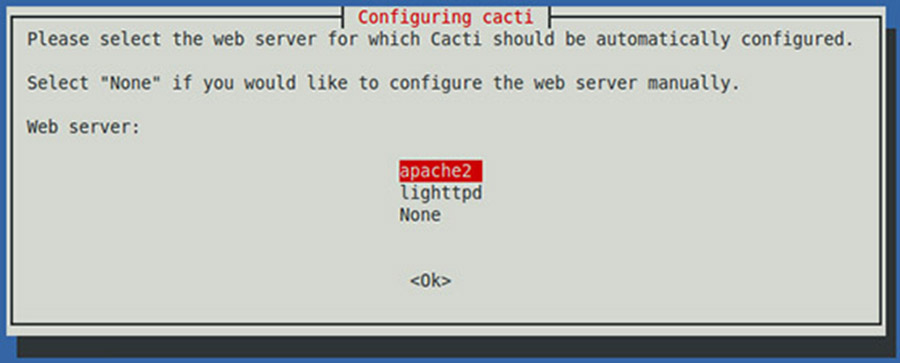
During the installation process you will be prompted to configure Cacti with few options to select from available options. First of all Choose the web server that you wish to use for configure with Cacti like we are using Apache and then press ‘OK’ key to continue:

cacti-installation-ubunut-1

Now it will ask you for a webserver that you will use it, we choose Apache2 since that’s what we installed in the dependencies.
cacti-installation-ubunut-2

Next it will ask to configure the Cacti database, select Yes.
cacti-installation-ubunut-3
Now it will ask for your root password of MySQL/MariaDB database.
cacti-installation-ubunut-4

Once the installation process is complete, you will have to restart all services to reflect the changes made:

systemctl restart apache2.service
systemctl restart mysql.service
systemctl restart snmpd.service

Step 5. Accessing cacti.

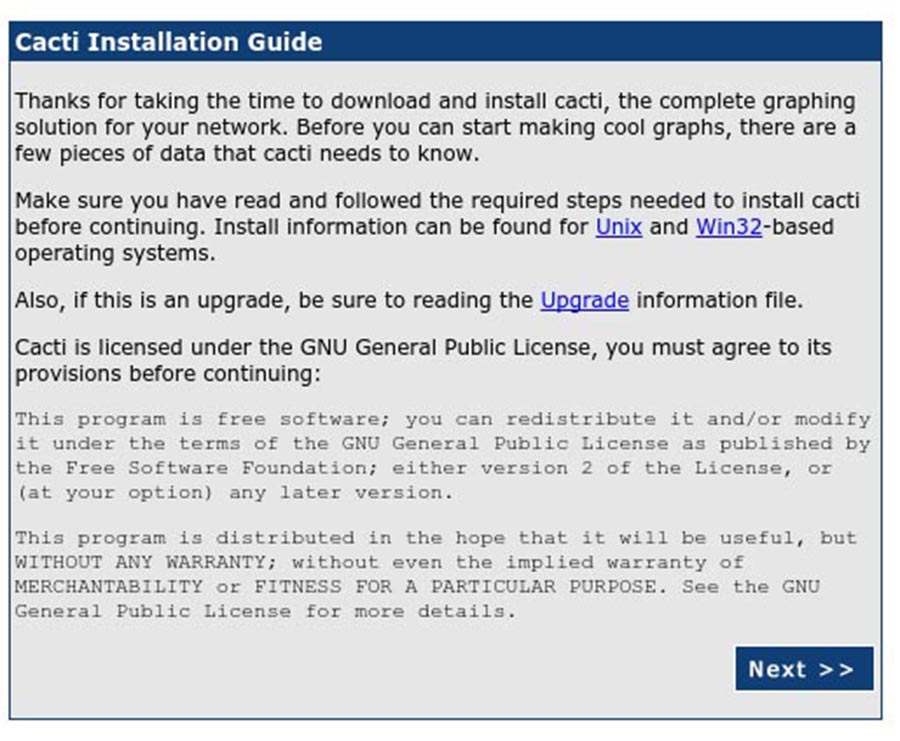
Cacti will be available on HTTP port 80 by default. Open your favorite browser and navigate to http://yourdomain.com/cacti or http://server-ip/cacti and complete the required the steps to finish the installation. You will get the “Cacti Installation Guide” on screen. Click on ‘Next’ button.

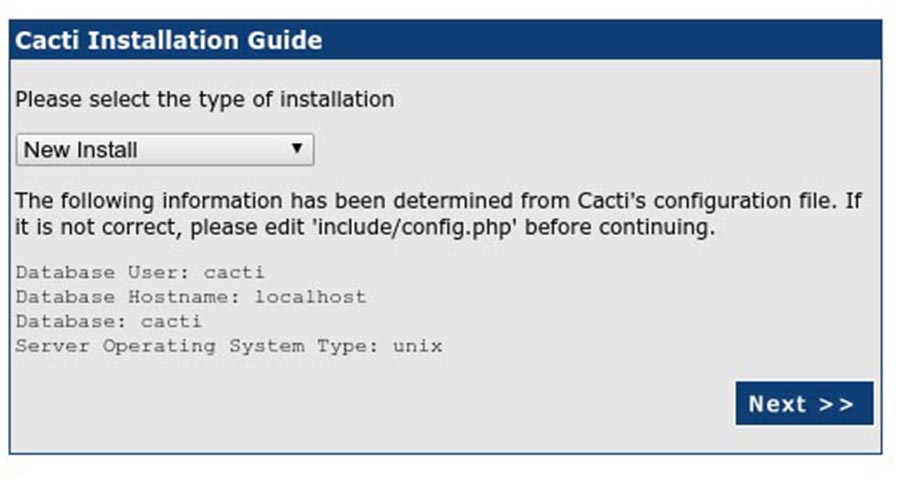
In next screen, you will get drop down button. Because this fresh installation select ‘New Install’ and click ‘Next’ button.
Cacti_installing-2
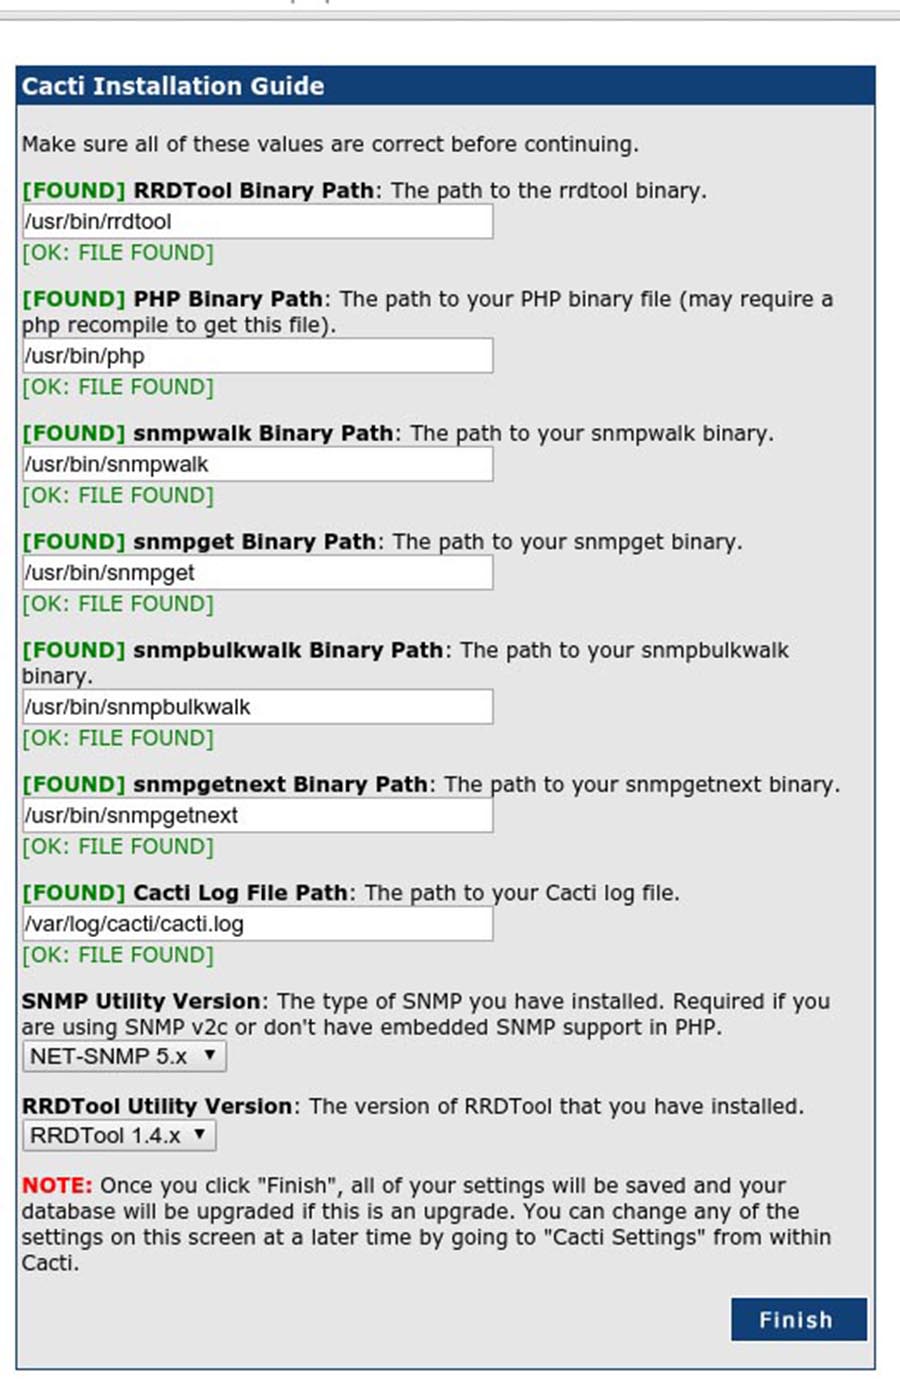
Cacti will now check for the packages it needs to run properly. Make sure all the checks appear with an “OK” status, and then click Finish.
Cacti_installing-3
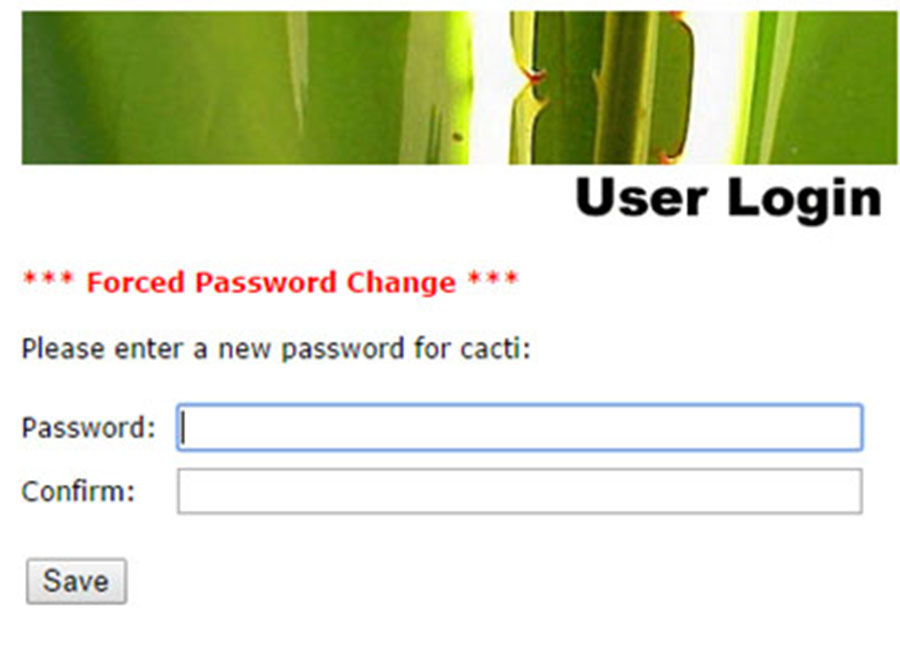
The next page is the login page. The first time you log into Cacti, use admin as username and password.
Cacti-installing-4

Congratulation’s! You have successfully installed Cacti. Thanks for using this tutorial for installing Cacti Monitoring on Ubuntu 18.04 LTS (Bionic Beaver) system. For additional help or useful information, we recommend you to check the official Cacti Monitoring web site.

How To Install Habari CMS V0.9.2 on Ubuntu 18.04 LTS

Install Habari CMS on Ubuntu 18

Habari is a free and open source blog engine written in PHP and currently supports MySQL, SQLite and PostgreSQL for the database backend and application framework with a modular, object-oriented core.

This article assumes you have at least basic knowledge of Linux, know how to use the shell, and most importantly, you host your site on your own VPS. The installation is quite simple and assumes you are running in the root account, if not you may need to add ‘sudo’ to the commands to get root privileges. I will show you through the step by step installation Habari CMS on a Ubuntu 18.04 LTS (Bionic Beaver) server.

Install Habari CMS on Ubuntu 18.04 LTS


Step 1. First make sure that all your system packages are up-to-date

sudo apt-get update
sudo apt-get upgrade

Step 2. Install LAMP (Linux, Apache, MariaDB and PHP) server.

A Ubuntu 18.04 LAMP server is required. If you do not have LAMP installed, you can follow our guide here. Also install all required PHP modules:

apt-get install php7.1-cli php7.1-gd php7.1-opcache php7.1-mysql php7.1-json php7.1-mcrypt php7.1-xml php7.1-curl

Step 3. Installing Habari on Ubuntu 18.04 LTS.

First thing to do is to go to Habari’s download page and download the latest stable version of Habari, At the moment of writing this article it is version 0.9.2:

wget http://habariproject.org/dist/habari-0.9.2.zip
sudo mkdir -p /var/www/html/habari
sudo unzip habari-0.9.2.zip -d /var/www/html/habari

We will need to change some folders permissions:

sudo chown -R www-data:www-data /var/www/html/habari/
sudo chmod -R 755 /var/www/html/habari/

Step 4. Configuring MariaDB for Habari.

By default, MariaDB is not hardened. You can secure MariaDB using the mysql_secure_installation script. you should read and below each steps carefully which will set root password, remove anonymous users, disallow remote root login, and remove the test database and access to secure MariaDB:

mysql_secure_installation

Configure it like this:

- Set root password? [Y/n] y
- Remove anonymous users? [Y/n] y
- Disallow root login remotely? [Y/n] y
- Remove test database and access to it? [Y/n] y
- Reload privilege tables now? [Y/n] y

Next we will need to log in to the MariaDB console and create a database for the Habari. Run the following command:

mysql -u root -p

This will prompt you for a password, so enter your MariaDB root password and hit Enter. Once you are logged in to your database server you need to create a database for Habari installation:

create database habari;
grant all privileges on habari.* to habariuser@localhost identified by 'your_password';
flush privileges;
exit

Step 5. Configuring Apache web server for Habari.

Create a new virtual host directive in Apache. For example, create a new Apache configuration file named ‘habari.conf’ on your virtual server:

touch /etc/apache2/sites-available/habari.conf
ln -s /etc/apache2/sites-available/habari.conf /etc/apache2/sites-enabled/habari.conf
nano /etc/apache2/sites-available/habari.conf

Add the following lines:

<VirtualHost *:80>
ServerAdmin [email protected]
DocumentRoot /var/www/html/habari
ServerName your-domain.com
ServerAlias www.your-domain.com
<Directory /var/www/html/habari/>
Options FollowSymLinks
AllowOverride All
Order allow,deny
allow from all
</Directory>
ErrorLog /var/log/apache2/your-domain.com-error_log
CustomLog /var/log/apache2/your-domain.com-access_log common
</VirtualHost>

Now, we can restart Apache web server so that the changes take place:

a2ensite habari.conf
a2enmod rewrite
systemctl restart apache2.service

Step 6. Accessing Habari.

Habari will be available on HTTP port 80 by default. Open your favorite browser and navigate to http://yourdomain.com/ or http://server-ip and complete the required the steps to finish the installation. If you are using a firewall, please open port 80 to enable access to the control panel.

Congratulation’s! You have successfully installed Habari. Thanks for using this tutorial for installing Habari Content Management System on your Ubuntu 18.04 LTS (Bionic Beaver) system. For additional help or useful information, we recommend you to check the official Habari web site.

How To Install PrestaShop on Ubuntu 18.04 LTS

Install PrestaShop on Ubuntu 18

PrestaShop is an open-source e-commerce solution which allows you to maintain your own online shop. It PrestaShop is 100% free. This software is published under the Open Software License (OSL). It is written in PHP programming language with support for the MySQL database management system. More than 250,000 ecommerce sites run on PrestaShop. It supports many different payment gateway systems like PayPal, Google Checkout etc.

This article assumes you have at least basic knowledge of Linux, know how to use the shell, and most importantly, you host your site on your own VPS. The installation is quite simple and assumes you are running in the root account, if not you may need to add ‘sudo’ to the commands to get root privileges. I will show you through the step by step installation PrestaShop open-source shopping cart on a Ubuntu 18.04 LTS (Bionic Beaver) server.

Install PrestaShop on Ubuntu 18.04 LTS

Step 1. First make sure that all your system packages are up-to-date

sudo apt-get update
sudo apt-get upgrade

Step 2. Install LAMP (Linux, Apache, MariaDB and PHP) server.

A Ubuntu 18.04 LAMP server is required. If you do not have LAMP installed, you can follow our guide here. Also install all required PHP modules:

apt-get install php7.1-cli php7.1-gd php7.1-opcache php7.1-mysql php7.1-json php7.1-mcrypt php7.1-xml php7.1-curl

Step 3. Installing PrestaShop on Ubuntu 18.04 LTS.

First thing to do is to go to PrestaShop’s download page and download the latest stable version of PrestaShop, At the moment of writing this article it is version 1.7.3.3:

wget https://download.prestashop.com/download/releases/prestashop_1.7.3.3.zip

Unpack the PrestaShop archive to the document root directory on your server:

unzip prestashop_1.7.3.3.zip -d /var/www/html

We will need to change some folders permissions:

chown -R www-data.www-data /var/www/html/prestashop

Step 4. Configuring MariaDB for PrestaShop.

By default, MariaDB is not hardened. You can secure MariaDB using the mysql_secure_installation script. you should read and below each steps carefully which will set root password, remove anonymous users, disallow remote root login, and remove the test database and access to secure MariaDB:

mysql_secure_installation

Configure it like this:

- Set root password? [Y/n] y
- Remove anonymous users? [Y/n] y
- Disallow root login remotely? [Y/n] y
- Remove test database and access to it? [Y/n] y
- Reload privilege tables now? [Y/n] y

Next we will need to log in to the MariaDB console and create a database for the PrestaShop. Run the following command:

mysql -u root -p

This will prompt you for a password, so enter your MariaDB root password and hit Enter. Once you are logged in to your database server you need to create a database for PrestaShop installation:

CREATE DATABASE prestashop;
CREATE USER 'prestashopuser'@'localhost' IDENTIFIED BY 'PASSWORD';
GRANT ALL PRIVILEGES ON `prestashop`.* TO 'prestashopuser'@'localhost';
FLUSH PRIVILEGES;

Step 5. Configuring Apache web server for PrestaShop.

Create a new virtual host directive in Apache. For example, create a new Apache configuration file named ‘prestashop.conf’ on your virtual server:

sudo a2enmod rewrite
touch /etc/apache2/sites-available/prestashop.conf
ln -s /etc/apache2/sites-available/prestashop.conf /etc/apache2/sites-enabled/prestashop.conf
nano /etc/apache2/sites-available/prestashop.conf

Add the following lines:

<VirtualHost *:80>
ServerAdmin [email protected]
DocumentRoot /var/www/html/prestashop/
ServerName your-domain.com
ServerAlias www.your-domain.com
<Directory /var/www/html/prestashop/>
Options FollowSymLinks
AllowOverride All
Order allow,deny
allow from all
</Directory>
ErrorLog /var/log/apache2/your-domain.com-error_log
CustomLog /var/log/apache2/your-domain.com-access_log common
</VirtualHost>

Now, we can restart Apache web server so that the changes take place:

systemctl restart apache2.service

Step 6. Accessing PrestaShop.

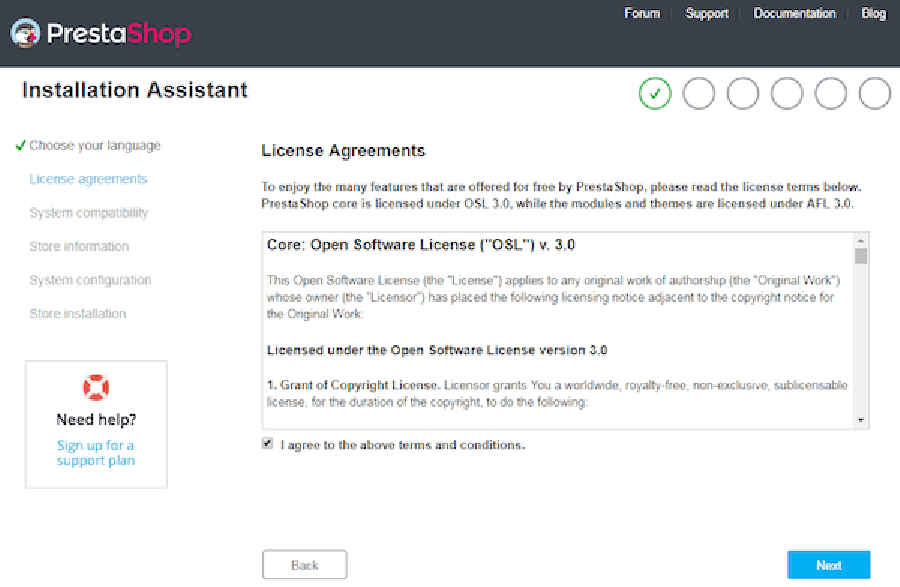
PrestaShop will be available on HTTP port 80 by default. Open your favorite browser and navigate to http://yourdomain.com/ or http://server-ip/ and complete the required the steps to finish the installation. If you are using a firewall, please open port 80 to enable access to the control panel.

install-PrestaShop

Congratulation’s! You have successfully installed PrestaShop. Thanks for using this tutorial for installing PrestaShop open-source shopping cart software on your Ubuntu 18.04 LTS (Bionic Beaver) system. For additional help or useful information, we recommend you to check the official PrestaShop web site.