In this tutorial, we will show you how to add a user interface for shortcodes in WordPress with Shortcake.
What is Shortcake?
WordPress offers an easier way to add executeable code inside posts and pages by using shortcodes. Many WordPress themes and plugins allow users to add additional functionality using shortcodes. However, sometimes these shortcodes can become complicated when a user needs to enter parameters for customization.
For example, in a typical WordPress theme if there is a shortcode to enter a button, then the user will probably need to add atleast two to five parameters. Like this:
[themebutton url=”http://example.com” title=”Download Now” color=”purple” target=”newwindow”]
Shortcake is a WordPress plugin and a proposed future WordPress feature. It aims to solve this problem by providing a user interface to enter these values. This will make shortcodes a lot easier to use.
Getting Started
This tutorial is aimed for users who are new to WordPress development. Beginner level users who like to tweak their WordPress themes would also find this tutorial helpful.
Having said that, let’s get started.
First thing you need to do is install and activate the Shortcake (Shortcode UI)plugin.
You will now need a shortcode that accepts a few parameters of user input. If you need a little refresher, here is how to add a shortcode in WordPress.
For the sake of this tutorial we will be using a simple shortcode that allows users to insert a button into their WordPress posts or pages. Here is the sample code for our shortcode, and you can use this by adding it to your theme’s functions file or in a site-specific plugin.
add_shortcode( 'cta-button', 'cta_button_shortcode' );

function cta_button_shortcode( $atts ) {
       extract( shortcode_atts(
               array(
                       'title' => 'Title',
                       'url' => ''
               ),
               $atts
       ));
       return '' . $title . '';
}
You will also need to add some CSS to style your button. You can use this CSS in your theme’s stylesheet.
.cta-button {
padding: 10px;
font-size: 18px;
border: 1px solid #FFF;
border-radius: 7px;
color: #FFF;
background-color: #50A7EC;
}
This is how a user will use the shortcode in their posts and pages:
[cta-button title="Download Now" url="http://example.com"]
Now that we have a shortcode that accepts parameters, let’s create a UI for it.
Registering Your Shortcode User Interface with Shortcake
Shortcake API allows you to register your shortcode’s user interface. You will need to describe what attributes your shortcode accepts, input field types, and which post types will show the shortcode UI.
Here is a sample code snippet we will use to register our shortcode’s UI. We have tried to explain each step with inline comments. You can paste this in your theme’s functions file or in a site-specific plugin.
shortcode_ui_register_for_shortcode(

/** Your shortcode handle */
'cta-button',

/** Your Shortcode label and icon */
array(

/** Label for your shortcode user interface. This part is required. */
'label' => 'Add Button',

/** Icon or an image attachment for shortcode. Optional. src or dashicons-$icon.  */
'listItemImage' => 'dashicons-lightbulb',

/** Shortcode Attributes */
'attrs'          => array(

/**
* Each attribute that accepts user input will have its own array defined like this
* Our shortcode accepts two parameters or attributes, title and URL
* Lets first define the UI for title field.
*/

array(

/** This label will appear in user interface */
'label'        => 'Title',

/** This is the actual attr used in the code used for shortcode */
'attr'         => 'title',

/** Define input type. Supported types are text, checkbox, textarea, radio, select, email, url, number, and date. */
'type'         => 'text',

/** Add a helpful description for users
'description'  => 'Please enter the button text',
),

/** Now we will define UI for the URL field */

array(
'label'        => 'URL',
'attr'         => 'url',
'type'         => 'text',
'description'  => 'Full URL',
),
),
),

/** You can select which post types will show shortcode UI */
'post_type'     => array( 'post', 'page' ),
)
);
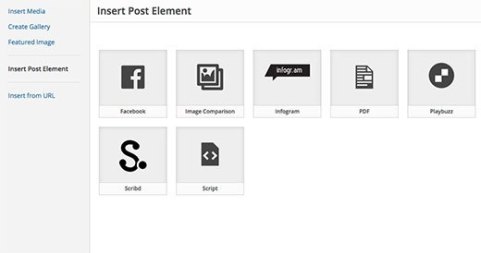
That’s all, you can now see the shortcode user interface in action by editing a post. Simply click on the Add Media button above a post editor. This will bring up the media uploader where you will notice a new item ‘Insert Post Element’ in the left hand column. Clicking on it will show you a button to insert your code.
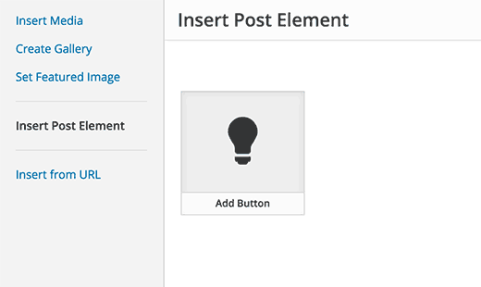
Clicking on the thumbnail containing the lightbulb icon and your shortcake label will show you the shortcode UI.
Adding Shortcode With Multiple Inputs
In the first example, we used a very basic shortcode. Now lets make it a little more complicated and a lot more useful. Let’s add a shortcode that allows users to choose a button color.
First we will add the shortcode. It is nearly the same shortcode, except that it now excepts user input for color.
add_shortcode( 'mybutton', 'my_button_shortcode' );

function my_button_shortcode( $atts ) {
       extract( shortcode_atts(
               array(
                       'color' => 'blue',
                       'title' => 'Title',
                       'url' => ''
               ),
               $atts
       ));
       return '' . $title . '';
}
Since our shortcode will be showing buttons in different colors so we will need to update our CSS too. You can use this CSS in your theme’s stylesheet.
.mybutton {
    padding: 10px;
    font-size: 18px;
    border: 1px solid #FFF;
    border-radius: 7px;
    color: #FFF;
}

.blue-button  {
    background-color: #50A7EC;
}
.orange-button {
background-color:#FF7B00;
}

.green-button {
background-color:#29B577;
}
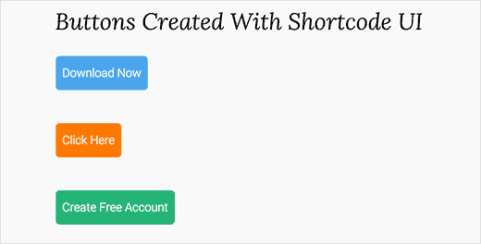
This is how the buttons will look like:
Now that our shortcode is ready, the next step is to register shortcode UI. We will be using essentially the same code, except that this time we have another parameter for color and we are offering users to select from blue, orange, or green buttons.
shortcode_ui_register_for_shortcode(

/** Your shortcode handle */
'mybutton',

/** Your Shortcode label and icon */
array(

/** Label for your shortcode user interface. This part is required. */
'label' => 'Add a colorful button',

/** Icon or an image attachment for shortcode. Optional. src or dashicons-$icon.  */
'listItemImage' => 'dashicons-flag',

/** Shortcode Attributes */
'attrs'          => array(

/**
* Each attribute that accepts user input will have its own array defined like this
* Our shortcode accepts two parameters or attributes, title and URL
* Lets first define the UI for title field.
*/

array(

/** This label will appear in user interface */
'label'        => 'Title',

/** This is the actual attr used in the code used for shortcode */
'attr'         => 'title',

/** Define input type. Supported types are text, checkbox, textarea, radio, select, email, url, number, and date. */
'type'         => 'text',

/** Add a helpful description for users */
'description'  => 'Please enter the button text',
),

/** Now we will define UI for the URL field */

array(
'label'        => 'URL',
'attr'         => 'url',
'type'         => 'text',
'description'  => 'Full URL',
),

/** Finally we will define the UI for Color Selection */
array(
'label'     => 'Color',
'attr'      => 'color',

/** We will use select field instead of text */
'type'      => 'select',
    'options' => array(
        'blue'      => 'Blue',
        'orange'    => 'Orange',
        'green'     => 'Green',
    ),
),

),

/** You can select which post types will show shortcode UI */
'post_type'     => array( 'post', 'page' ),
)
);
That’s all, you can now edit a post or page and click on the Add Media button. You will notice your newly added shortcode under ‘Insert Post Elements’.
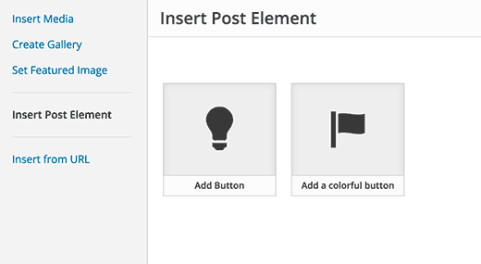
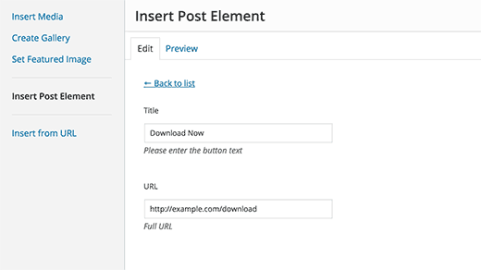
Clicking on your newly created shortcode will bring up the shortcode UI, where you can simply enter the values.

You can download the code used in this tutorial as a plugin.
wpb-shortcake-tutorial
We have included the CSS, so you can use it to study or use it to add your own call to action buttons in WordPress using an easier user interface. Feel free to modify the source and play with it.
We hope this tutorial helped you learn how to add a user interface for shortcodes in WordPress with Shortcake.