How To Install Java JDK 8 on Ubuntu 14.04

install java jdk on ubuntu

In this tutorial we will show you how to install and configuration of Java on your Ubuntu 14.04 server. There are many programs and scripts that require java to run it, but usually Java is not installed by default on VPS or Dedicated Server.

This article assumes you have at least basic knowledge of linux, know how to use the shell, and most importantly, you host your site on your own VPS. The installation is quite simple and assumes you are running in the root account, if not you may need to add ‘sudo’ to the commands to get root privileges. I will show you through the step by step installation Java JDK 8 on a Ubuntu 14.04 server.

Install Java JDK 8 on Ubuntu 14.04

Step 1. Remove the OpenJDK from the system, if you have it already installed.

 sudo apt-get remove --purge openjdk*

Step 2. Add the webupd8team Java PPA repository in your system.

 sudo add-apt-repository -y ppa:webupd8team/java

Step 3. Install Java JDK 8

After added the PPA, run commands below one by one to install Java JDK 8:

sudo apt-get update
sudo aptitude -y install oracle-java8-installer

Step 4. Verify Installed Java Version.

 java -version

Result:

java version "1.8.0_40"
Java(TM) SE Runtime Environment (build 1.8.0_40-b25)
Java HotSpot(TM) 64-Bit Server VM (build 25.40-b25, mixed mode)

Congratulation’s! You have successfully installed Java. Thanks for using this tutorial for installing Oracle Java (JDK) 8 on Ubuntu 14.04 system. For additional help or useful information, we recommend you to check the official Java web site.

How To Install Winusb on Ubuntu 14.04

install winusb ubuntu

WinUSB is simple tool allows to create bootable Windows USB install stick from Ubuntu Linux.  It comprises of both GUI and command line tool and you can decide to choose which to use based on your preference. This tool supports Windows 7, 8, Vista, XP and can use either an ISO or a DVD as a source. Currently there is no version for Ubuntu 14.04 in Ubuntu Repository. To successfully install Winusb on Ubuntu 14.04, you need to install the Saucy version and run the dependencies fix switch to fix the dependencies.

This article assumes you have at least basic knowledge of linux, know how to use the shell, and most importantly, you host your site on your own VPS. The installation is quite simple. I will show you through the step by step installation Winusb on Ubuntu 14.04.

Step 1. Download the winusb package that is compatible with your operating system’s architecture

Open the terminal and run the following commands:

##for Ubuntu 32-Bit##
wget https://launchpad.net/~colingille/+archive/freshlight/+files/winusb_1.0.11+saucy1_i386.deb

##for Ubuntu 64-Bit##
wget https://launchpad.net/~colingille/+archive/freshlight/+files/winusb_1.0.11+saucy1_amd64.deb

Step 2. Install Winusb.

 sudo dpkg -i winusb_1.0.11+saucy1*

Step 3. Fix dependencies errors.

 sudo apt-get -f install

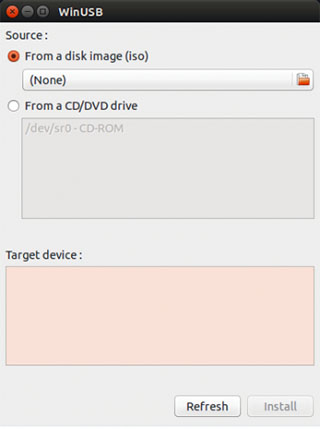
Step 4. Afterwards, you can search for WinUSB in Unity Dash and use it to create a live USB of Windows in Ubuntu 14.04.

winusb ubuntu

These three steps will install the WinUSB graphical interface and the WinUSB command line tool. The WinUSB GUI is much easier to use than the WinUSB command line tool.

Congratulation’s! You have successfully installed Winusb. Thanks for using this tutorial for installing Winusb on Ubuntu 14.04 system.