Ubuntu 17.04 released, codenamed “Zesty Zapus”; bringing yet another version of a remarkable operating system in the Ubuntu ecosystem, with the latest and some of the greatest open source technologies in a high-quality, easy-to-use Linux distribution.
This article assumes you have at least basic knowledge of linux, know how to use the shell, and most importantly, you host your site on your own VPS. The installation is quite simple and assumes you are running in the root account, if not you may need to add ‘sudo’ to the commands to get root privileges. We will show you through the step by step upgrade from Ubuntu 16.10 to Ubuntu 17.04 (Zesty Zapus).
Prerequisites:
There a couple of things you should do before performing an Ubuntu upgrade, like making a backup of important files and folders, disabling or purging third-party PPAs (the upgrade process will disable these, but it doesn’t hurt to be proactive), and installing all available updates.
Upgrade From Ubuntu 16.10 to Ubuntu 17.04
Step 1. First make sure that all your system packages are up-to-date by running these following apt-get commands in the terminal.
sudo apt update
sudo apt dist-upgrade
Step 2. Upgrade Ubuntu 16.10 to 17.04.
You can upgrade to Ubuntu 17.04 in one of two ways, using the Software Updater app, or using the command line.
Upgrade Ubuntu 16.10 to Ubuntu 17.04 Using Command Line
Then make sure you have update-manager-core package installed:
sudo apt install update-manager-core
Next, edit a configuration file using nano or your preferred command line text editor:
sudo nano /etc/update-manager/release-upgrades
At the bottom of this file, change the value of Prompt from lts to normal:
Prompt=normal
Afterwards, launch the upgrade tool with the command below:
sudo do-release-upgrade
[php]


Once that upgrade has completed reboot, login and run the command again, this time to upgrade to Ubuntu 17.04:
[php]
sudo do-release-upgrade -d
Upgrade Ubuntu 16.10 to Ubuntu 17.04 Using Graphical Update Manager
Ensure that you system is fully up-to-date, run the commands below:
sudo apt update
sudo apt dist-upgrade
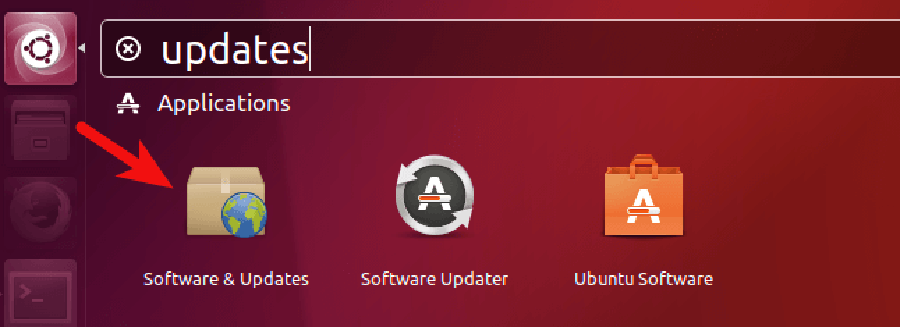
Then open Software & Updates from Unity Dash or your favorite application menu:

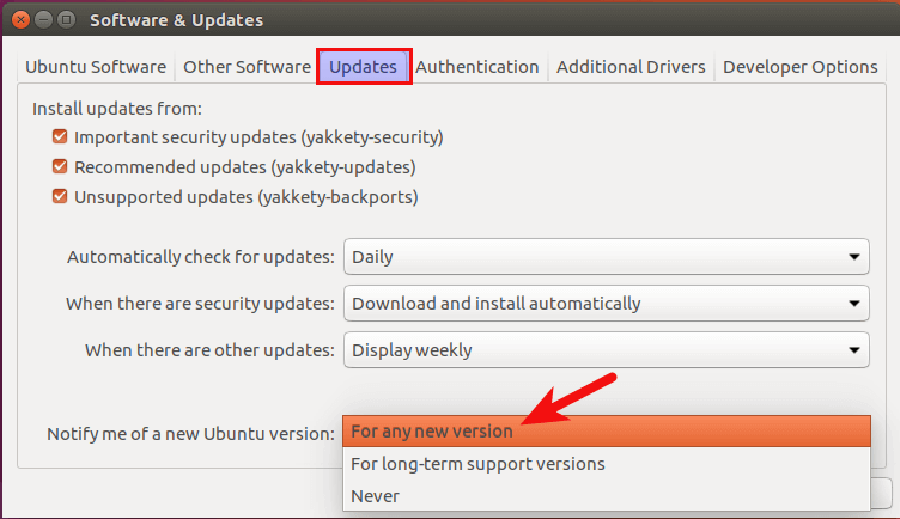
Next, Select the Updates tab and then at the bottom of window, change notification settings from For long-term support version to For any new version:

Click the close button. You will be asked to enter your password to apply the above changes. Next, issue the following command in terminal:
update-manager -d
You should be notified that software is up-to-date and Ubuntu 17.04 is now available. Click the Upgrade button:

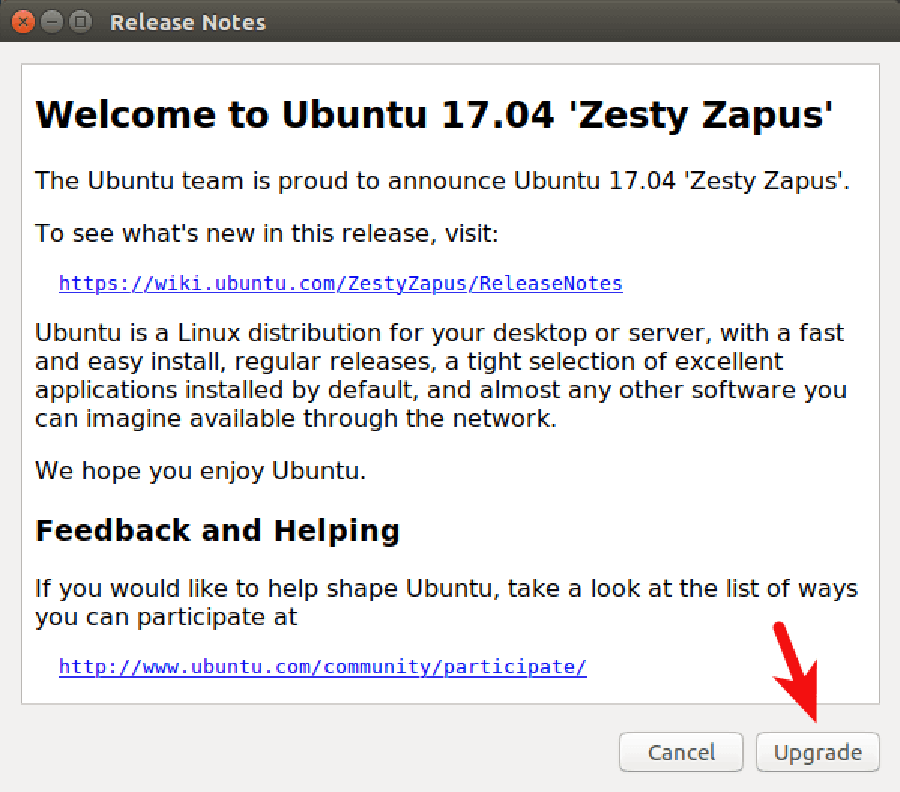
Then enter your password. The Ubuntu 17.04 release notes window will appear. Click Upgrade and wait for the upgrade to finish:

Congratulation’s! You have successfully upgrade Ubuntu. Thanks for using this tutorial for upgrade from Ubuntu 16.10 to Ubuntu 17.04 (Zesty Zapus) system. For additional help or useful information, we recommend you to check the official Ubuntu web site.
You Might Also Like: How To Install Ubuntu 17.04 Server Zesty Zapus
