Initial Server Setup with Ubuntu

ubuntu-server-setup

Introduction
As part of the initial setup for a brand-new Ubuntu server, you should carry out a few crucial configuration tasks. These changes will improve your server’s security and usability and lay a strong foundation for further activities.

Step 1 — Logging in as root

log in now as the root user using the following command (substitute the highlighted portion of the command with your server’s public IP address

ssh root@your_server_ip

Accept the warning about host authenticity if it appears. If you are using password authentication, provide your root password to log in.

The root user is the administrative user in a Linux environment that has very broad privileges. Because of the heightened privileges of the root account, you are discouraged from using it on a regular basis. This is because the root account is able to make very destructive changes, even by accident.

The next step is setting up a new user account with reduced privileges for day-to-day use.

Step 2 — Creating a New User

Once you are logged in as root, you’ll be able to add the new user account. In the future, we’ll log in with this new account instead of root.

This example creates a new user called john, but you should replace that with a username that you like:

adduser john

You will be asked a few questions, starting with the account password.

Enter a strong password and, optionally, fill in any of the additional information if you would like. This is not required and you can just hit ENTER in any field you wish to skip.

Step 3 — Granting Administrative Privileges
Now we have a new user account with regular account privileges. However, we may sometimes need to do administrative tasks.

To avoid having to log out of our normal user and log back in as the root account, we can set up what is known as superuser or root privileges for our normal account. This will allow our normal user to run commands with administrative privileges by putting the word sudo before the command.

To add these privileges to our new user, we need to add the user to the sudo group.

usermod -aG sudo john

Step 4 — Setting Up a Basic Firewall
Ubuntu servers can use the UFW firewall to make sure only connections to certain services are allowed. We can set up a basic firewall using this application.

Applications can register their profiles with UFW upon installation. These profiles allow UFW to manage these applications by name. OpenSSH, the service allowing us to connect to our server now, has a profile registered with UFW.

You can see this by typing:

ufw app list
Output
Available applications:
  OpenSSH

We need to make sure that the firewall allows SSH connections so that we can log back in next time. We can allow these connections by typing:

ufw allow OpenSSH

Afterwards, we can enable the firewall by typing:

ufw enable

Type y and press ENTER to proceed. You can see that SSH connections are still allowed by typing:

ufw status

As the firewall is currently blocking all connections except for SSH, if you install and configure additional services, you will need to adjust the firewall settings to allow traffic in.

Step 5 — Enabling External Access for Your Regular User

Now that we have a regular user for daily use, we need to make sure we can SSH into the account directly.

If you logged in to your root account using a password, then password authentication is enabled for SSH. You can SSH to your new user account by opening up a new terminal session and using SSH with your new username:

ssh john@your_server_ip

After entering your regular user’s password, you will be logged in. Remember, if you need to run a command with administrative privileges, type sudo before it like this:

sudo command_to_run

You will be prompted for your regular user password when using sudo for the first time each session (and periodically afterwards).

How To Serve Flask Applications with uWSGI and Nginx on Ubuntu 20.04

How To Serve Flask Applications with uWSGI and Nginx on Ubuntu 20.04

Introduction

In this guide, you will build a Python application using the Flask microframework on Ubuntu 20.04. The bulk of this article will be about how to set up the uWSGI application server and how to launch the application and configure Nginx to act as a front-end reverse proxy.

Before starting this guide, you should have:

  • A server with Ubuntu 20.04 installed and a non-root user with sudo privileges. Follow our initial server setup guide for guidance.
  • Nginx installed, following Steps 1 through 3 of How To Install Nginx on Ubuntu 20.04.
  • A domain name configured to point to your server. You can purchase one on Namecheap or get one for free on Freenom. You can learn how to point domains to DigitalOcean by following the relevant documentation on domains and DNS. This tutorial assumes you’ve created the following DNS records:
    • An A record with your_domain pointing to your server’s public IP address.
    • An A record with www.your_domain pointing to your server’s public IP address.

Additionally, it may be helpful to have some familiarity with uWSGI, the application server you’ll set up in this guide, and the WSGI specification. This discussion of definitions and concepts goes over both in detail.

Step 1 — Installing the Components from the Ubuntu Repositories

Your first step will be to install all of the pieces that you need from the Ubuntu repositories. The packages you need to install include pip, the Python package manager, to manage your Python components. You’ll also get the Python development files necessary to build uWSGI.

First, update the local package index:

 $ sudo apt update

Then install the packages that will allow you to build your Python environment. These will include python3-pip, along with a few more packages and development tools necessary for a robust programming environment:

 $ sudo apt install python3-pip python3-dev build-essential libssl-dev libffi-dev python3-setuptools

With these packages in place, you’re ready to move on to creating a virtual environment for your project.

Step 2 — Creating a Python Virtual Environment

A Python virtual environment is a self-contained project directory that contains specific versions of Python and the Python modules required for the given project. This is useful for isolating one application from others on the same system by managing each one’s dependencies separately. In this step, you’ll set up a Python virtual environment from which you’ll run your Flask application.

Start by installing the python3-venv package, which will install the venv module:

 $ sudo apt install python3-venv

Next, make a parent directory for your Flask project:

  • mkdir ~/myproject

Move into the directory after you create it:

  • cd ~/myproject

Create a virtual environment to store your Flask project’s Python requirements by typing:

  • python3.8 -m venv myprojectenv

This will install a local copy of Python and pip into a directory called myprojectenv within your project directory.

Before installing applications within the virtual environment, you need to activate it. Do so by typing:

  • source myprojectenv/bin/activate

Your prompt will change to indicate that you are now operating within the virtual environment. It will look something like this: (myprojectenv)user@host:~/myproject$.

Now that you are in your virtual environment, you can install Flask and uWSGI and then get started on designing your application.

First, install wheel with the local instance of pip to ensure that your packages will install even if they are missing wheel archives:

  • pip install wheel

Note: Regardless of which version of Python you are using, when the virtual environment is activated, you should use the pip command (not pip3).

Next, install Flask and uWSGI:

  • pip install uwsgi flask

Creating a Sample App

Now that you have Flask available, you can create a sample application. Flask is a microframework. It does not include many of the tools that more full-featured frameworks might, and exists mainly as a module that you can import into your projects to assist you in initializing a web application.

While your application might be more complex, in this example you’ll create your Flask app in a single file, called myproject.py:

  • nano ~/myproject/myproject.py

The application code will live in this file. It will import Flask and instantiate a Flask object. You can use this to define the functions that you want to be run when a specific route is requested:

~/myproject/myproject.py
from flask import Flask
app = Flask(__name__)

@app.route("/")
def hello():
    return "<h1 style='color:blue'>Hello There!</h1>"

if __name__ == "__main__":
    app.run(host='0.0.0.0')

Essentially, this defines what content to present to whoever accesses the root domain. Save and close the file when you’re finished. If you used nano to edit the file, as in the previous example, do so by pressing CTRL + XY, and then ENTER.

If you followed the initial server setup guide, you should have a UFW firewall enabled. To test the application, you need to allow access to port 5000:

sudo ufw allow 5000

Now, you can test your Flask app by typing:

  • python myproject.py

You will see output like the following, including a helpful warning reminding you not to use this server setup in production:

Output
* Serving Flask app "myproject" (lazy loading)
 * Environment: production
   WARNING: Do not use the development server in a production environment.
   Use a production WSGI server instead.
 * Debug mode: off
 * Running on http://0.0.0.0:5000/ (Press CTRL+C to quit)

Visit your server’s IP address followed by :5000 in your web browser:

http://your_server_ip:5000

You will see something like this:

Flask sample app

When you are finished, hit CTRL + C in your terminal window to stop the Flask development server.

Creating the WSGI Entry Point

Next, create a file that will serve as the entry point for your application. This will tell your uWSGI server how to interact with it.

Call the file wsgi.py:

  • nano ~/myproject/wsgi.py

In this file, import the Flask instance from your application and then run it:

~/myproject/wsgi.py
from myproject import app

if __name__ == "__main__":
    app.run()

Save and close the file when you are finished.

Step 4 — Configuring uWSGI

Your application is now written with an entry point established. You can move on to configuring uWSGI.

Testing Whether uWSGI Can Serve the Application

As a first step, test to make sure that uWSGI can correctly serve your application by passing it the name of your entry point. This is constructed by the name of the module (minus the .pyextension) plus the name of the callable within the application. In the context of this tutorial, the name of the entry point is wsgi:app.

Also, specify the socket so that it will be started on a publicly available interface, as well as the protocol, so that it will use HTTP instead of the uwsgi binary protocol. Use the same port number, 5000, that you opened earlier:

  • uwsgi –socket 0.0.0.0:5000 –protocol=http -w wsgi:app

Visit your server’s IP address with :5000 appended to the end in your web browser again:

http://your_server_ip:5000

You will see your application’s output again:

Flask sample app

When you have confirmed that it’s functioning properly, press CTRL + C in your terminal window.

You’re now done with your virtual environment, so you can deactivate it:

  • deactivate

Any Python commands will now use the system’s Python environment again.

Creating a uWSGI Configuration File

You have tested that uWSGI is able to serve your application, but ultimately you will want something more robust for long-term usage. You can create a uWSGI configuration file with the relevant options for this.

Place that file in your project directory and call it myproject.ini:

  • nano ~/myproject/myproject.ini

Inside, start the file off with the [uwsgi] header so that uWSGI knows to apply the settings. Below that, specify module itself — by referring to the wsgi.py file minus the extension — and the callable within the file, app:

~/myproject/myproject.ini
[uwsgi]
module = wsgi:app

Next, tell uWSGI to start up in master mode and spawn five worker processes to serve actual requests:

~/myproject/myproject.ini
[uwsgi]
module = wsgi:app

master = true
processes = 5

When you were testing, you exposed uWSGI on a network port. However, you’re going to be using Nginx to handle actual client connections, which will then pass requests to uWSGI. Since these components are operating on the same computer, a Unix socket is preferable because it is faster and more secure. Call the socket myproject.sock and place it in this directory.

Next, change the permissions on the socket. You’ll be giving the Nginx group ownership of the uWSGI process later on, so you need to make sure the group owner of the socket can read information from it and write to it. Also, add the vacuum option and set it to true; this will clean up the socket when the process stops:

~/myproject/myproject.ini
[uwsgi]
module = wsgi:app

master = true
processes = 5

socket = myproject.sock
chmod-socket = 660
vacuum = true

The last thing to do is set the die-on-term option. This can help ensure that the init system and uWSGI have the same assumptions about what each process signal means. Setting this aligns the two system components, implementing the expected behavior:

~/myproject/myproject.ini
[uwsgi]
module = wsgi:app

master = true
processes = 5

socket = myproject.sock
chmod-socket = 660
vacuum = true

die-on-term = true

You may have noticed that these lines do not specify a protocol like you did from the command line. That is because by default, uWSGI speaks using the uwsgi protocol, a fast binary protocol designed to communicate with other servers. Nginx can speak this protocol natively, so it’s better to use this than to force communication by HTTP.

When you are finished, save and close the file.

With that, uWSGI is configured on your system. In order to give you more flexibility in how you manage your Flask application, you can now configure it to run as a systemd service.

Step 5 — Creating a systemd Unit File

Systemd is a suite of tools that provides a fast and flexible init model for managing system services. Creating a systemd unit file will allow Ubuntu’s init system to automatically start uWSGI and serve the Flask application whenever the server boots.

Create a unit file ending in .service within the /etc/systemd/system directory to begin:

  • sudo nano /etc/systemd/system/myproject.service

Inside, start with the [Unit] section, which is used to specify metadata and dependencies. Then put a description of the service here and tell the init system to only start this after the networking target has been reached:

/etc/systemd/system/myproject.service
[Unit]
Description=uWSGI instance to serve myproject
After=network.target

Next, open up the [Service] section. This will specify the user and group that you want the process to run under. Give your regular user account ownership of the process since it owns all of the relevant files. Then give group ownership to the www-data group so that Nginx can communicate easily with the uWSGI processes. Remember to replace the username here with your username:

/etc/systemd/system/myproject.service
[Unit]
Description=uWSGI instance to serve myproject
After=network.target

[Service]
User=sammy
Group=www-data

Next, map out the working directory and set the PATH environmental variable so that the init system knows that the executables for the process are located within your virtual environment. Also, specify the command to start the service. Systemd requires that you give the full path to the uWSGI executable, which is installed within your virtual environment. Here, we pass the name of the .ini configuration file you created in your project directory.

Remember to replace the username and project paths with your own information:

/etc/systemd/system/myproject.service
[Unit]
Description=uWSGI instance to serve myproject
After=network.target

[Service]
User=sammy
Group=www-data
WorkingDirectory=/home/sammy/myproject
Environment="PATH=/home/sammy/myproject/myprojectenv/bin"
ExecStart=/home/sammy/myproject/myprojectenv/bin/uwsgi --ini myproject.ini

Finally, add an [Install] section. This will tell systemd what to link this service to if you enable it to start at boot. In this case, set the service to start when the regular multi-user system is up and running:

/etc/systemd/system/myproject.service
[Unit]
Description=uWSGI instance to serve myproject
After=network.target

[Service]
User=sammy
Group=www-data
WorkingDirectory=/home/sammy/myproject
Environment="PATH=/home/sammy/myproject/myprojectenv/bin"
ExecStart=/home/sammy/myproject/myprojectenv/bin/uwsgi --ini myproject.ini

[Install]
WantedBy=multi-user.target

With that, your systemd service file is complete. Save and close it now.

You can now start the uWSGI service you created:

  • sudo systemctl start myproject

Then enable it so that it starts at boot:

  • sudo systemctl enable myproject

Check the status:

  • sudo systemctl status myproject

You will see output like this:

Output
● myproject.service - uWSGI instance to serve myproject
     Loaded: loaded (/etc/systemd/system/myproject.service; enabled; vendor preset: enabled)
     Active: active (running) since Wed 2020-05-20 13:21:39 UTC; 8h ago
   Main PID: 22146 (uwsgi)
      Tasks: 6 (limit: 2345)
     Memory: 25.5M
     CGroup: /system.slice/myproject.service
             ├─22146 /home/sammy/myproject/myprojectenv/bin/uwsgi --ini myproject.ini
             ├─22161 /home/sammy/myproject/myprojectenv/bin/uwsgi --ini myproject.ini
             ├─22162 /home/sammy/myproject/myprojectenv/bin/uwsgi --ini myproject.ini
             ├─22163 /home/sammy/myproject/myprojectenv/bin/uwsgi --ini myproject.ini
             ├─22164 /home/sammy/myproject/myprojectenv/bin/uwsgi --ini myproject.ini
             └─22165 /home/sammy/myproject/myprojectenv/bin/uwsgi --ini myproject.ini

If you see any errors, be sure to resolve them before continuing with the tutorial. Otherwise, you can move on to configuring your Nginx installation to pass requests to the myproject.socksocket.

Step 6 — Configuring Nginx to Proxy Requests

Your uWSGI application server is now up and running, waiting for requests on the socket file in the project directory. In this step, you’ll configure Nginx to pass web requests to that socket using the uwsgi protocol.

Begin by creating a new server block configuration file in Nginx’s sites-available directory. To keep in line with the rest of the guide, the following example refers to this as myproject:

 $ sudo nano /etc/nginx/sites-available/myproject


Open up a server block and tell Nginx to listen on the default port 80. Additionally, tell it to use this block for requests for your server’s domain name:

/etc/nginx/sites-available/myproject


server {
    listen 80;
    server_name your_domain www.your_domain;
}

Next, add a location block that matches every request. Within this block, include the uwsgi_paramsfile that specifies some general uWSGI parameters that need to be set. Then pass the requests to the socket you defined using the uwsgi_pass directive:

/etc/nginx/sites-available/myproject
server {
    listen 80;
    server_name your_domain www.your_domain;

    location / {
        include uwsgi_params;
        uwsgi_pass unix:/home/sammy/myproject/myproject.sock;
    }
}

Save and close the file when you’re finished.

To enable the Nginx server block configuration you’ve just created, link the file to the sites-enabled directory:

  • sudo ln -s /etc/nginx/sites-available/myproject /etc/nginx/sites-enabled

With the file in that directory, you can test for syntax errors by typing:

  • sudo nginx -t

If this returns without indicating any issues, restart the Nginx process to read the new configuration:

  • sudo systemctl restart nginx

Finally, adjust the firewall once again. You no longer need access through port 5000, so you can remove that rule. Then, you can allow access to the Nginx server:

  • sudo ufw delete allow 5000
  • sudo ufw allow ‘Nginx Full’

You will now be able to navigate to your server’s domain name in your web browser:

http://your_domain

You will see your application output:

Flask sample app

If you encounter any errors, trying checking the following:

  • sudo less /var/log/nginx/error.log: checks the Nginx error logs.
  • sudo less /var/log/nginx/access.log: checks the Nginx access logs.
  • sudo journalctl -u nginx: checks the Nginx process logs.
  • sudo journalctl -u myproject: checks your Flask app’s uWSGI logs.

To ensure that traffic to your server remains secure, obtain an SSL certificate for your domain. There are multiple ways to do this, including getting a free certificate from Let’s Encrypt, generating a self-signed certificate, or buying one from a commercial provider. For the sake of expediency, this tutorial explains how to obtain a free certificate from Let’s Encrypt.

First, install Certbot and its Nginx plugin with apt:

  • sudo apt install certbot python3-certbot-nginx

Certbot provides a variety of ways to obtain SSL certificates through plugins. The Nginx plugin will take care of reconfiguring Nginx and reloading the config whenever necessary. To use this plugin, type the following:

  • sudo certbot –nginx -d your_domain -d www.your_domain

This runs certbot with the --nginx plugin, using -d to specify the names you’d like the certificate to be valid for.

If this is your first time running certbot on this server, you will be prompted to enter an email address and agree to the terms of service. After doing so, certbot will communicate with the Let’s Encrypt server, then run a challenge to verify that you control the domain you’re requesting a certificate for.

If that’s successful, certbot will ask how you’d like to configure your HTTPS settings:

Output
Please choose whether or not to redirect HTTP traffic to HTTPS, removing HTTP access.
- - - - - - - - - - - - - - - - - - - - - - - - - - - - - - - - - - - - - - - -
1: No redirect - Make no further changes to the webserver configuration.
2: Redirect - Make all requests redirect to secure HTTPS access. Choose this for
new sites, or if you're confident your site works on HTTPS. You can undo this
change by editing your web server's configuration.
- - - - - - - - - - - - - - - - - - - - - - - - - - - - - - - - - - - - - - - -
Select the appropriate number [1-2] then [enter] (press 'c' to cancel):

Select your choice then hit ENTER. The configuration will be updated, and Nginx will reload to pick up the new settings. certbot will wrap up with a message telling you the process was successful and where your certificates are stored:

Output
IMPORTANT NOTES:
 - Congratulations! Your certificate and chain have been saved at:
   /etc/letsencrypt/live/your_domain/fullchain.pem
   Your key file has been saved at:
   /etc/letsencrypt/live/your_domain/privkey.pem
   Your cert will expire on 2020-08-18. To obtain a new or tweaked
   version of this certificate in the future, simply run certbot again
   with the "certonly" option. To non-interactively renew *all* of
   your certificates, run "certbot renew"
 - Your account credentials have been saved in your Certbot
   configuration directory at /etc/letsencrypt. You should make a
   secure backup of this folder now. This configuration directory will
   also contain certificates and private keys obtained by Certbot so
   making regular backups of this folder is ideal.
 - If you like Certbot, please consider supporting our work by:

   Donating to ISRG / Let's Encrypt:   https://letsencrypt.org/donate
   Donating to EFF:                    https://eff.org/donate-le

If you followed the Nginx installation instructions in the prerequisites, you will no longer need the redundant HTTP profile allowance:

  • sudo ufw delete allow ‘Nginx HTTP’

To verify the configuration, navigate once again to your domain, using https://:

https://your_domain

You will see your application output once again, along with your browser’s security indicator, which should indicate that the site is secured.

Conclusion

In this guide, you created and secured a basic Flask application within a Python virtual environment. Then you created a WSGI entry point so that any WSGI-capable application server can interface with it, and then configured the uWSGI app server to provide this function. Afterwards, you created a systemd service file to automatically launch the application server on boot. You also created an Nginx server block that passes web client traffic to the application server, thereby relaying external requests, and secured traffic to your server with Let’s Encrypt.

Flask is a simple yet flexible framework meant to provide your applications with functionality without being too restrictive about structure or design. You can use the general stack described in this guide to serve the flask applications that you design.

How To Install and Use PostgreSQL on Ubuntu 20.04

How To Install and Use PostgreSQL on Ubuntu 20.04

Introduction

Relational database management systems are a key component of many web sites and applications. They provide a structured way to store, organize, and access information.

PostgreSQL, or Postgres, is a relational database management system that provides an implementation of the SQL querying language. It’s standards-compliant and has many advanced features like reliable transactions and concurrency without read locks.

This guide demonstrates how to install Postgres on an Ubuntu 20.04 server. It also provides some instructions for general database administration.

prerequisites
To follow along with this tutorial, you will need one Ubuntu 20.04 server that has been configured by following our Initial Server Setup for Ubuntu 20.04 guide. After completing this prerequisite tutorial, your server should have a non-root user with sudo permissions and a basic firewall.

Step 1 — Installing PostgreSQL

Ubuntu’s default repositories contain Postgres packages, so you can install these using the aptpackaging system.

If you’ve not done so recently, refresh your server’s local package index:

 $ sudo apt update

Then, install the Postgres package along with a -contrib package that adds some additional utilities and functionality:

  • sudo apt install postgresql postgresql-contrib

Now that the software is installed, we can go over how it works and how it may be different from other relational database management systems you may have used.

Step 2 — Using PostgreSQL Roles and Databases

By default, Postgres uses a concept called “roles” to handle authentication and authorization. These are, in some ways, similar to regular Unix-style accounts, but Postgres does not distinguish between users and groups and instead prefers the more flexible term “role”.

Upon installation, Postgres is set up to use ident authentication, meaning that it associates Postgres roles with a matching Unix/Linux system account. If a role exists within Postgres, a Unix/Linux username with the same name is able to sign in as that role.

The installation procedure created a user account called postgres that is associated with the default Postgres role. In order to use Postgres, you can log into that account.

There are a few ways to utilize this account to access Postgres.

Switching Over to the postgres Account

Switch over to the postgres account on your server by typing:

You can now access the PostgreSQL prompt immediately by typing:

From there you are free to interact with the database management system as necessary.

Exit out of the PostgreSQL prompt by typing:

This will bring you back to the postgres Linux command prompt.

Accessing a Postgres Prompt Without Switching Accounts

You can also run the command you’d like with the postgres account directly with sudo.

For instance, in the last example, you were instructed to get to the Postgres prompt by first switching to the postgres user and then running psql to open the Postgres prompt. You could do this in one step by running the single command psql as the postgres user with sudo, like this:

This will log you directly into Postgres without the intermediary bash shell in between.

Again, you can exit the interactive Postgres session by typing:

Many use cases require more than one Postgres role. Read on to learn how to configure these.

Step 3 — Creating a New Role

Currently, you just have the postgres role configured within the database. You can create new roles from the command line with the createrole command. The --interactive flag will prompt you for the name of the new role and also ask whether it should have superuser permissions.

If you are logged in as the postgres account, you can create a new user by typing:

If, instead, you prefer to use sudo for each command without switching from your normal account, type:

The script will prompt you with some choices and, based on your responses, execute the correct Postgres commands to create a user to your specifications.

Enter name of role to add: sammy
Shall the new role be a superuser? (y/n) y

You can get more control by passing some additional flags. Check out the options by looking at the man page:

  • man createuser

Your installation of Postgres now has a new user, but you have not yet added any databases. The next section describes this process.

Step 4 — Creating a New Database

Another assumption that the Postgres authentication system makes by default is that for any role used to log in, that role will have a database with the same name which it can access.

This means that if the user you created in the last section is called sammy, that role will attempt to connect to a database which is also called “sammy” by default. You can create the appropriate database with the createdb command.

If you are logged in as the postgres account, you would type something like:

  • createdb sammy

If, instead, you prefer to use sudo for each command without switching from your normal account, you would type:

 $ sudo -u postgres createdb

This flexibility provides multiple paths for creating databases as needed.

Step 5 — Opening a Postgres Prompt with the New Role

To log in with ident based authentication, you’ll need a Linux user with the same name as your Postgres role and database.

If you don’t have a matching Linux user available, you can create one with the adduser command. You will have to do this from your non-root account with sudo privileges (meaning, not logged in as the postgres user):

 $ sudo adduser

Once this new account is available, you can either switch over and connect to the database by typing:

 $ sudo -i -u
  • psql

Or, you can do this inline:

 $ sudo -u

This command will log you in automatically, assuming that all of the components have been properly configured.

If you want your user to connect to a different database, you can do so by specifying the database like this:

  • psql -d postgres

Once logged in, you can get check your current connection information by typing:

  • \conninfo
Output
You are connected to database "sammy" as user "sammy" via socket in "/var/run/postgresql" at port "5432".

This is useful if you are connecting to non-default databases or with non-default users.

Now that you know how to connect to the PostgreSQL database system, you can learn some basic Postgres management tasks.

The basic syntax for creating tables is as follows:

CREATE TABLE table_name (
    column_name1 col_type (field_length) column_constraints,
    column_name2 col_type (field_length),
    column_name3 col_type (field_length)
);

As you can see, these commands give the table a name, and then define the columns as well as the column type and the max length of the field data. You can also optionally add table constraints for each column.

You can learn more about how to create and manage tables in Postgres here.

For demonstration purposes, create the following table:

  • CREATE TABLE playground (
  • equip_id serial PRIMARY KEY,
  • type varchar (50) NOT NULL,
  • color varchar (25) NOT NULL,
  • location varchar(25) check (location in (‘north’, ‘south’, ‘west’, ‘east’, ‘northeast’, ‘southeast’, ‘southwest’, ‘northwest’)),
  • install_date date
  • );

This command will create a table that inventories playground equipment. The first column in the table will hold equipment ID numbers of the serial type, which is an auto-incrementing integer. This column also has the constraint of PRIMARY KEY which means that the values within it must be unique and not null.

The next two lines create columns for the equipment type and color respectively, neither of which can be empty. The line after these creates a location column as well as a constraint that requires the value to be one of eight possible values. The last line creates a date column that records the date on which you installed the equipment.

For two of the columns (equip_id and install_date), the command doesn’t specify a field length. The reason for this is that some data types don’t require a set length because the length or format is implied.

You can see your new table by typing:

  • \d
Output
                  List of relations
 Schema |          Name           |   Type   | Owner 
--------+-------------------------+----------+-------
 public | playground              | table    | sammy
 public | playground_equip_id_seq | sequence | sammy
(2 rows)

Your playground table is here, but there’s also something called playground_equip_id_seq that is of the type sequence. This is a representation of the serial type which you gave your equip_idcolumn. This keeps track of the next number in the sequence and is created automatically for columns of this type.

If you want to see just the table without the sequence, you can type:

  • \dt
Output
          List of relations
 Schema |    Name    | Type  | Owner 
--------+------------+-------+-------
 public | playground | table | sammy
(1 row)

With a table at the ready, let’s use it to practice managing data.

Step 7 — Adding, Querying, and Deleting Data in a Table

Now that you have a table, you can insert some data into it. As an example, add a slide and a swing by calling the table you want to add to, naming the columns and then providing data for each column, like this:

  • INSERT INTO playground (type, color, location, install_date) VALUES (‘slide’, ‘blue’, ‘south’, ‘2017-04-28’);
  • INSERT INTO playground (type, color, location, install_date) VALUES (‘swing’, ‘yellow’, ‘northwest’, ‘2018-08-16’);

You should take care when entering the data to avoid a few common hangups. For one, do not wrap the column names in quotation marks, but the column values that you enter do need quotes.

Another thing to keep in mind is that you do not enter a value for the equip_id column. This is because this is automatically generated whenever you add a new row to the table.

Retrieve the information you’ve added by typing:

  • SELECT * FROM playground;
Output
 equip_id | type  | color  | location  | install_date 
----------+-------+--------+-----------+--------------
        1 | slide | blue   | south     | 2017-04-28
        2 | swing | yellow | northwest | 2018-08-16
(2 rows)

Here, you can see that your equip_id has been filled in successfully and that all of your other data has been organized correctly.

If the slide on the playground breaks and you have to remove it, you can also remove the row from your table by typing:

  • DELETE FROM playground WHERE type = ‘slide’;

Query the table again:

  • SELECT * FROM playground;
Output
 equip_id | type  | color  | location  | install_date 
----------+-------+--------+-----------+--------------
        2 | swing | yellow | northwest | 2018-08-16
(1 row)

Notice that the slide row is no longer a part of the table.

Step 8 — Adding and Deleting Columns from a Table

After creating a table, you can modify it by adding or removing columns. Add a column to show the last maintenance visit for each piece of equipment by typing:

  • ALTER TABLE playground ADD last_maint date;

If you view your table information again, you will see the new column has been added but no data has been entered:

  • SELECT * FROM playground;
Output
 equip_id | type  | color  | location  | install_date | last_maint 
----------+-------+--------+-----------+--------------+------------
        2 | swing | yellow | northwest | 2018-08-16   | 
(1 row)

If you find that your work crew uses a separate tool to keep track of maintenance history, you can delete of the column by typing:

  • ALTER TABLE playground DROP last_maint;

This deletes the last_maint column and any values found within it, but leaves all the other data intact.

Step 9 — Updating Data in a Table

So far, you’ve learned how to add records to a table and how to delete them, but this tutorial hasn’t yet covered how to modify existing entries.

You can update the values of an existing entry by querying for the record you want and setting the column to the value you wish to use. You can query for the swing record (this will match everyswing in your table) and change its color to red. This could be useful if you gave the swing set a paint job:

  • UPDATE playground SET color = ‘red’ WHERE type = ‘swing’;

You can verify that the operation was successful by querying the data again:

  • SELECT * FROM playground;
Output
 equip_id | type  | color | location  | install_date 
----------+-------+-------+-----------+--------------
        2 | swing | red   | northwest | 2018-08-16
(1 row)

As you can see, the slide is now registered as being red.

Conclusion

You are now set up with PostgreSQL on your Ubuntu 20.04 server. If you’d like to learn more about Postgres and how to use it, we encourage you to check out the following guides:

How To Install Elasticsearch, Logstash, and Kibana (Elastic Stack) on Ubuntu 20.04

Introduction

The Elastic Stack — formerly known as the ELK Stack — is a collection of open-source software produced by Elastic which allows you to search, analyze, and visualize logs generated from any source in any format, a practice known as centralized logging. Centralized logging can be useful when attempting to identify problems with your servers or applications as it allows you to search through all of your logs in a single place. It’s also useful because it allows you to identify issues that span multiple servers by correlating their logs during a specific time frame.

The Elastic Stack has four main components:

  • Elasticsearch: a distributed RESTful search engine which stores all of the collected data.
  • Logstash: the data processing component of the Elastic Stack which sends incoming data to Elasticsearch.
  • Kibana: a web interface for searching and visualizing logs.
  • Beats: lightweight, single-purpose data shippers that can send data from hundreds or thousands of machines to either Logstash or Elasticsearch.

In this tutorial, you will install the Elastic Stack on an Ubuntu 20.04 server. You will learn how to install all of the components of the Elastic Stack — including Filebeat, a Beat used for forwarding and centralizing logs and files — and configure them to gather and visualize system logs. Additionally, because Kibana is normally only available on the localhost, we will use Nginx to proxy it so it will be accessible over a web browser. We will install all of these components on a single server, which we will refer to as our Elastic Stack server.

Note: When installing the Elastic Stack, you must use the same version across the entire stack. In this tutorial we will install the latest versions of the entire stack which are, at the time of this writing, Elasticsearch 7.7.1, Kibana 7.7.1, Logstash 7.7.1, and Filebeat 7.7.1.

Prerequisites

To complete this tutorial, you will need the following:

Additionally, because the Elastic Stack is used to access valuable information about your server that you would not want unauthorized users to access, it’s important that you keep your server secure by installing a TLS/SSL certificate. This is optional but strongly encouraged.

However, because you will ultimately make changes to your Nginx server block over the course of this guide, it would likely make more sense for you to complete the Let’s Encrypt on Ubuntu 20.04guide at the end of this tutorial’s second step. With that in mind, if you plan to configure Let’s Encrypt on your server, you will need the following in place before doing so:

  • A fully qualified domain name (FQDN). This tutorial will use your_domain throughout. You can purchase a domain name on Namecheap, get one for free on Freenom, or use the domain registrar of your choice.
  • Both of the following DNS records set up for your server. You can follow this introduction to DigitalOcean DNS for details on how to add them.
    • An A record with your_domain pointing to your server’s public IP address.
    • An A record with www.your_domain pointing to your server’s public IP address.

Step 1 — Installing and Configuring Elasticsearch

The Elasticsearch components are not available in Ubuntu’s default package repositories. They can, however, be installed with APT after adding Elastic’s package source list.

All of the packages are signed with the Elasticsearch signing key in order to protect your system from package spoofing. Packages which have been authenticated using the key will be considered trusted by your package manager. In this step, you will import the Elasticsearch public GPG key and add the Elastic package source list in order to install Elasticsearch.

To begin, use cURL, the command line tool for transferring data with URLs, to import the Elasticsearch public GPG key into APT. Note that we are using the arguments -fsSL to silence all progress and possible errors (except for a server failure) and to allow cURL to make a request on a new location if redirected. Pipe the output of the cURL command into the apt-key program, which adds the public GPG key to APT.

    $ curl -fsSL https://artifacts.elastic.co/GPG-KEY-elasticsearch | sudo apt-key add -

Next, add the Elastic source list to the sources.list.d directory, where APT will search for new sources:

  • echo "deb https://artifacts.elastic.co/packages/7.x/apt stable main" | sudo tee -a /etc/apt/sources.list.d/elastic-7.x.list

Next, update your package lists so APT will read the new Elastic source:

  • sudo apt update

Then install Elasticsearch with this command:

  • sudo apt install elasticsearch

Elasticsearch is now installed and ready to be configured. Use your preferred text editor to edit Elasticsearch’s main configuration file, elasticsearch.yml. Here, we’ll use nano:

  • sudo nano /etc/elasticsearch/elasticsearch.yml

Note: Elasticsearch’s configuration file is in YAML format, which means that we need to maintain the indentation format. Be sure that you do not add any extra spaces as you edit this file.

The elasticsearch.yml file provides configuration options for your cluster, node, paths, memory, network, discovery, and gateway. Most of these options are preconfigured in the file but you can change them according to your needs. For the purposes of our demonstration of a single-server configuration, we will only adjust the settings for the network host.

Elasticsearch listens for traffic from everywhere on port 9200. You will want to restrict outside access to your Elasticsearch instance to prevent outsiders from reading your data or shutting down your Elasticsearch cluster through its REST API. To restrict access and therefore increase security, find the line that specifies network.host, uncomment it, and replace its value with localhost like this:

/etc/elasticsearch/elasticsearch.yml
. . .
# ---------------------------------- Network -----------------------------------
#
# Set the bind address to a specific IP (IPv4 or IPv6):
#
network.host: localhost
. . .

We have specified localhost so that Elasticsearch listens on all interfaces and bound IPs. If you want it to listen only on a specific interface, you can specify its IP in place of localhost. Save and close elasticsearch.yml. If you’re using nano, you can do so by pressing CTRL+X, followed by Yand then ENTER .

These are the minimum settings you can start with in order to use Elasticsearch. Now you can start Elasticsearch for the first time.

Start the Elasticsearch service with systemctl. Give Elasticsearch a few moments to start up. Otherwise, you may get errors about not being able to connect.

  • sudo systemctl start elasticsearch

Next, run the following command to enable Elasticsearch to start up every time your server boots:

  • sudo systemctl enable elasticsearch

You can test whether your Elasticsearch service is running by sending an HTTP request:

  • curl -X GET "localhost:9200"

You will see a response showing some basic information about your local node, similar to this:

Output
{
  "name" : "Elasticsearch",
  "cluster_name" : "elasticsearch",
  "cluster_uuid" : "qqhFHPigQ9e2lk-a7AvLNQ",
  "version" : {
    "number" : "7.7.1",
    "build_flavor" : "default",
    "build_type" : "deb",
    "build_hash" : "ef48eb35cf30adf4db14086e8aabd07ef6fb113f",
    "build_date" : "2020-03-26T06:34:37.794943Z",
    "build_snapshot" : false,
    "lucene_version" : "8.5.1",
    "minimum_wire_compatibility_version" : "6.8.0",
    "minimum_index_compatibility_version" : "6.0.0-beta1"
  },
  "tagline" : "You Know, for Search"
}

Now that Elasticsearch is up and running, let’s install Kibana, the next component of the Elastic Stack.

Step 2 — Installing and Configuring the Kibana Dashboard

According to the official documentation, you should install Kibana only after installing Elasticsearch. Installing in this order ensures that the components each product depends on are correctly in place.

Because you’ve already added the Elastic package source in the previous step, you can just install the remaining components of the Elastic Stack using apt:

  • sudo apt install kibana

Then enable and start the Kibana service:

  • sudo systemctl enable kibana
  • sudo systemctl start kibana

Because Kibana is configured to only listen on localhost, we must set up a reverse proxy to allow external access to it. We will use Nginx for this purpose, which should already be installed on your server.

First, use the openssl command to create an administrative Kibana user which you’ll use to access the Kibana web interface. As an example we will name this account kibanaadmin, but to ensure greater security we recommend that you choose a non-standard name for your user that would be difficult to guess.

The following command will create the administrative Kibana user and password, and store them in the htpasswd.users file. You will configure Nginx to require this username and password and read this file momentarily:

  • echo "kibanaadmin:`openssl passwd -apr1`" | sudo tee -a /etc/nginx/htpasswd.users

Enter and confirm a password at the prompt. Remember or take note of this login, as you will need it to access the Kibana web interface.

Next, we will create an Nginx server block file. As an example, we will refer to this file as your_domain, although you may find it helpful to give yours a more descriptive name. For instance, if you have a FQDN and DNS records set up for this server, you could name this file after your FQDN.

Using nano or your preferred text editor, create the Nginx server block file:

  • sudo nano /etc/nginx/sites-available/your_domain

Add the following code block into the file, being sure to update your_domain to match your server’s FQDN or public IP address. This code configures Nginx to direct your server’s HTTP traffic to the Kibana application, which is listening on localhost:5601. Additionally, it configures Nginx to read the htpasswd.users file and require basic authentication.

Note that if you followed the prerequisite Nginx tutorial through to the end, you may have already created this file and populated it with some content. In that case, delete all the existing content in the file before adding the following:

/etc/nginx/sites-available/your_domain
server {
    listen 80;

    server_name your_domain;

    auth_basic "Restricted Access";
    auth_basic_user_file /etc/nginx/htpasswd.users;

    location / {
        proxy_pass http://localhost:5601;
        proxy_http_version 1.1;
        proxy_set_header Upgrade $http_upgrade;
        proxy_set_header Connection 'upgrade';
        proxy_set_header Host $host;
        proxy_cache_bypass $http_upgrade;
    }
}

When you’re finished, save and close the file.

Next, enable the new configuration by creating a symbolic link to the sites-enabled directory. If you already created a server block file with the same name in the Nginx prerequisite, you do not need to run this command:

  • sudo ln -s /etc/nginx/sites-available/your_domain /etc/nginx/sites-enabled/your_domain

Then check the configuration for syntax errors:

  • sudo nginx -t

If any errors are reported in your output, go back and double check that the content you placed in your configuration file was added correctly. Once you see syntax is ok in the output, go ahead and restart the Nginx service:

  • sudo systemctl reload nginx

If you followed the initial server setup guide, you should have a UFW firewall enabled. To allow connections to Nginx, we can adjust the rules by typing:

  • sudo ufw allow 'Nginx Full'

Note: If you followed the prerequisite Nginx tutorial, you may have created a UFW rule allowing the Nginx HTTP profile through the firewall. Because the Nginx Full profile allows both HTTP and HTTPS traffic through the firewall, you can safely delete the rule you created in the prerequisite tutorial. Do so with the following command:

  • sudo ufw delete allow 'Nginx HTTP'


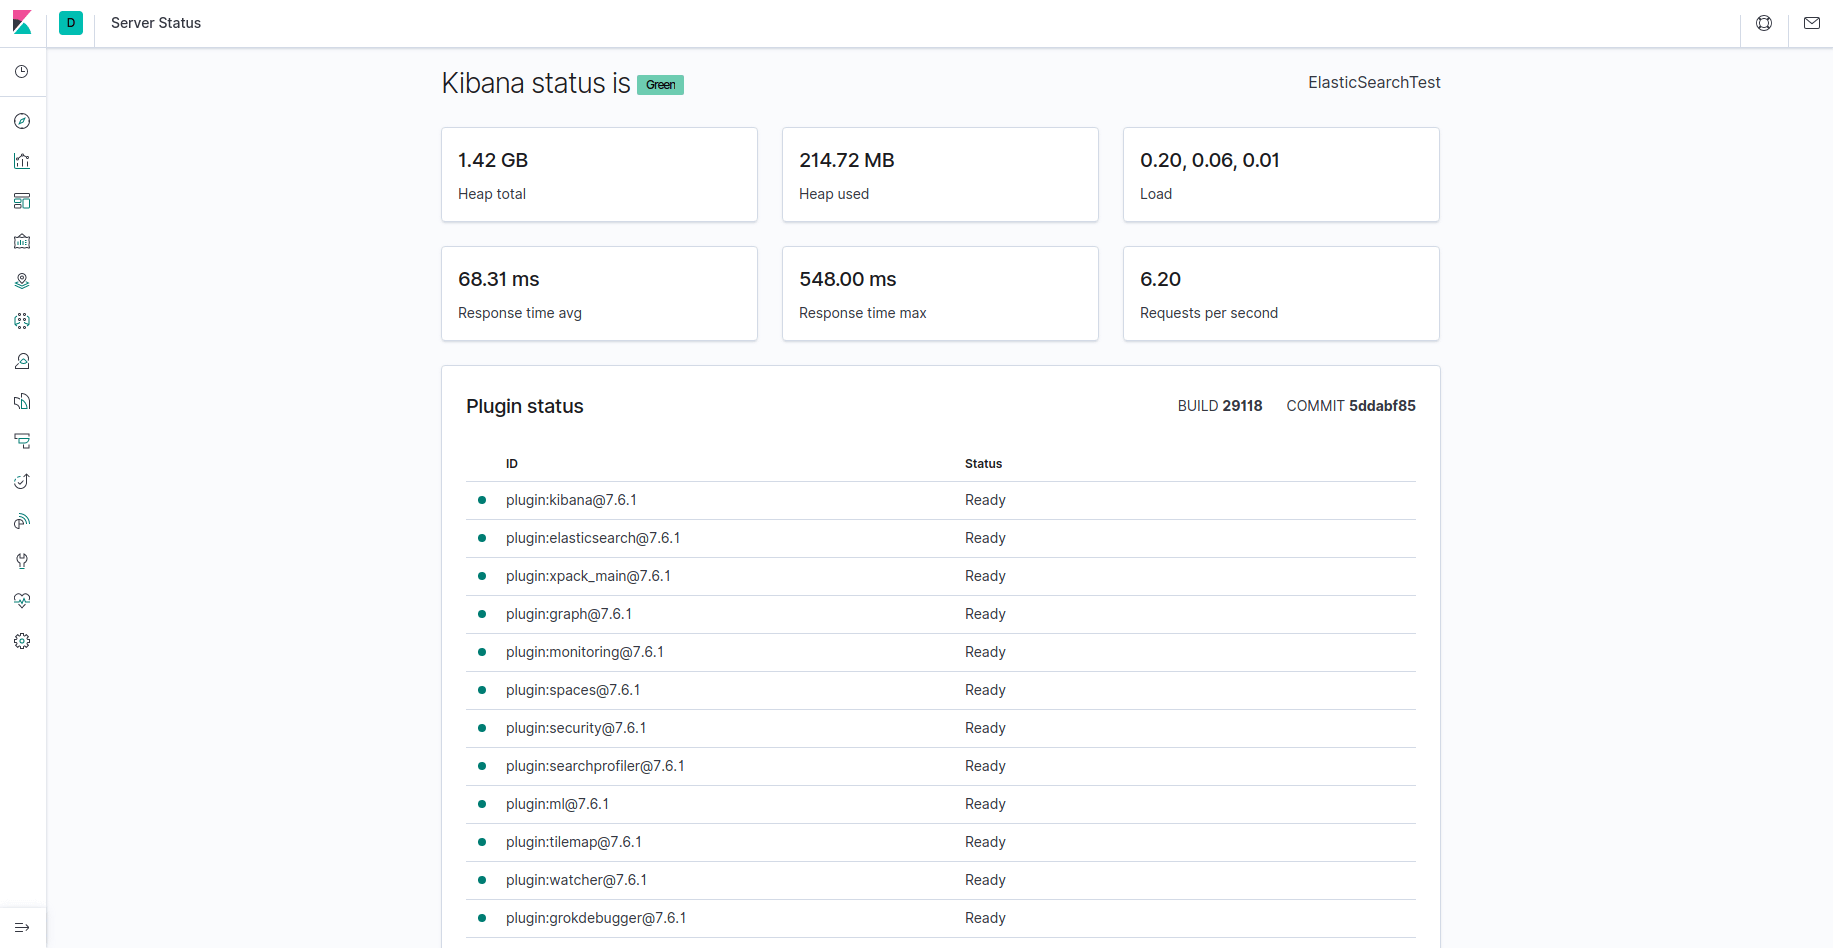
Kibana is now accessible via your FQDN or the public IP address of your Elastic Stack server. You can check the Kibana server’s status page by navigating to the following address and entering your login credentials when prompted:

http://your_domain/status

This status page displays information about the server’s resource usage and lists the installed plugins.

|Kibana status page

Note: As mentioned in the Prerequisites section, it is recommended that you enable SSL/TLS on your server. You can follow the Let’s Encrypt guide now to obtain a free SSL certificate for Nginx on Ubuntu 20.04. After obtaining your SSL/TLS certificates, you can come back and complete this tutorial.

Now that the Kibana dashboard is configured, let’s install the next component: Logstash.

Step 3 — Installing and Configuring Logstash

Although it’s possible for Beats to send data directly to the Elasticsearch database, it is common to use Logstash to process the data. This will allow you more flexibility to collect data from different sources, transform it into a common format, and export it to another database.

Install Logstash with this command:

  • sudo apt install logstash

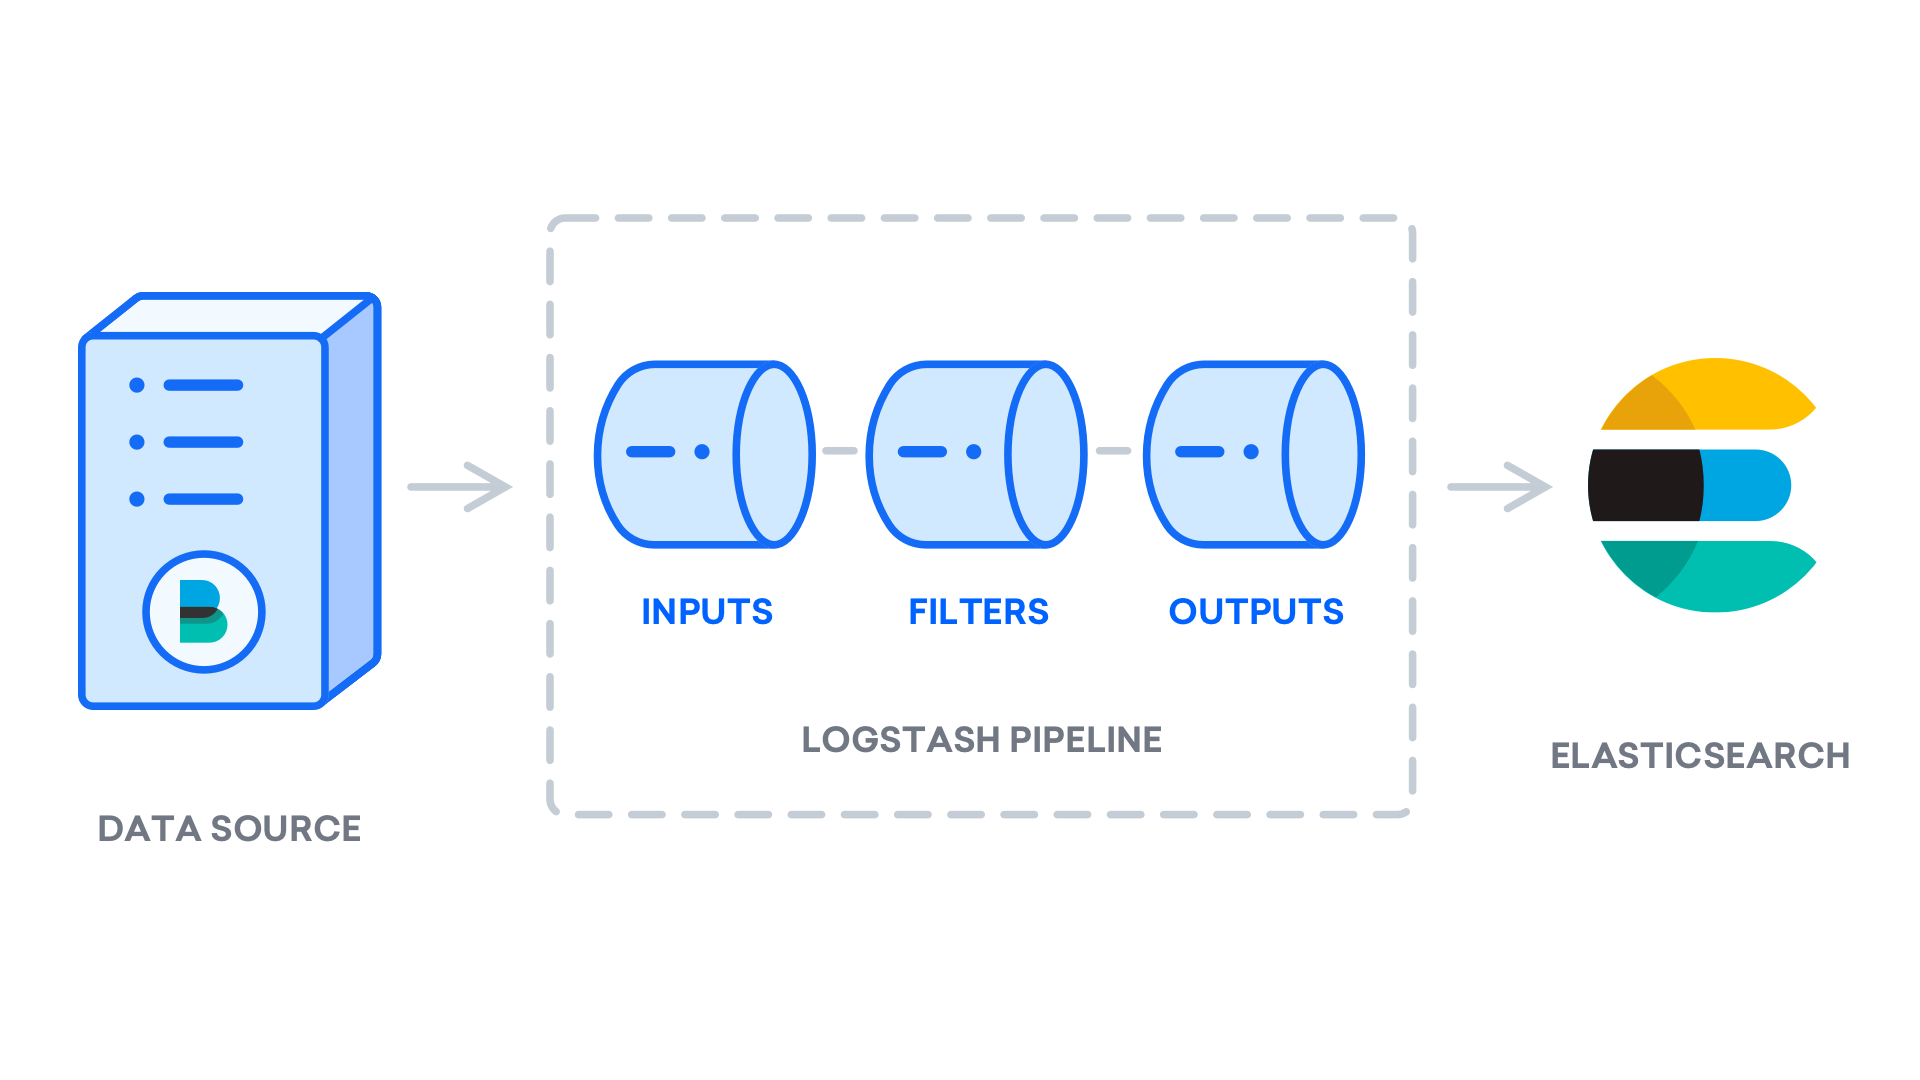
After installing Logstash, you can move on to configuring it. Logstash’s configuration files reside in the /etc/logstash/conf.d directory. For more information on the configuration syntax, you can check out the configuration reference that Elastic provides. As you configure the file, it’s helpful to think of Logstash as a pipeline which takes in data at one end, processes it in one way or another, and sends it out to its destination (in this case, the destination being Elasticsearch). A Logstash pipeline has two required elements, input and output, and one optional element, filter. The input plugins consume data from a source, the filter plugins process the data, and the output plugins write the data to a destination.

Logstash pipeline

Create a configuration file called 02-beats-input.conf where you will set up your Filebeat input:

  • sudo nano /etc/logstash/conf.d/02-beats-input.conf

Insert the following input configuration. This specifies a beats input that will listen on TCP port 5044.

/etc/logstash/conf.d/02-beats-input.conf
input {
  beats {
    port => 5044
  }
}

Save and close the file.

Next, create a configuration file called 30-elasticsearch-output.conf:

  • sudo nano /etc/logstash/conf.d/30-elasticsearch-output.conf

Insert the following output configuration. Essentially, this output configures Logstash to store the Beats data in Elasticsearch, which is running at localhost:9200, in an index named after the Beat used. The Beat used in this tutorial is Filebeat:

/etc/logstash/conf.d/30-elasticsearch-output.conf
output {
  if [@metadata][pipeline] {
    elasticsearch {
    hosts => ["localhost:9200"]
    manage_template => false
    index => "%{[@metadata][beat]}-%{[@metadata][version]}-%{+YYYY.MM.dd}"
    pipeline => "%{[@metadata][pipeline]}"
    }
  } else {
    elasticsearch {
    hosts => ["localhost:9200"]
    manage_template => false
    index => "%{[@metadata][beat]}-%{[@metadata][version]}-%{+YYYY.MM.dd}"
    }
  }
}

Save and close the file.

Test your Logstash configuration with this command:

  • sudo -u logstash /usr/share/logstash/bin/logstash --path.settings /etc/logstash -t

If there are no syntax errors, your output will display Config Validation Result: OK. Exiting Logstash after a few seconds. If you don’t see this in your output, check for any errors noted in your output and update your configuration to correct them. Note that you will receive warnings from OpenJDK, but they should not cause any problems and can be ignored.

If your configuration test is successful, start and enable Logstash to put the configuration changes into effect:

  • sudo systemctl start logstash
  • sudo systemctl enable logstash

Now that Logstash is running correctly and is fully configured, let’s install Filebeat.

Step 4 — Installing and Configuring Filebeat

The Elastic Stack uses several lightweight data shippers called Beats to collect data from various sources and transport them to Logstash or Elasticsearch. Here are the Beats that are currently available from Elastic:

  • Filebeat: collects and ships log files.
  • Metricbeat: collects metrics from your systems and services.
  • Packetbeat: collects and analyzes network data.
  • Winlogbeat: collects Windows event logs.
  • Auditbeat: collects Linux audit framework data and monitors file integrity.
  • Heartbeat: monitors services for their availability with active probing.

In this tutorial we will use Filebeat to forward local logs to our Elastic Stack.

Install Filebeat using apt:

  • sudo apt install filebeat

Next, configure Filebeat to connect to Logstash. Here, we will modify the example configuration file that comes with Filebeat.

Open the Filebeat configuration file:

  • sudo nano /etc/filebeat/filebeat.yml

Note: As with Elasticsearch, Filebeat’s configuration file is in YAML format. This means that proper indentation is crucial, so be sure to use the same number of spaces that are indicated in these instructions.

Filebeat supports numerous outputs, but you’ll usually only send events directly to Elasticsearch or to Logstash for additional processing. In this tutorial, we’ll use Logstash to perform additional processing on the data collected by Filebeat. Filebeat will not need to send any data directly to Elasticsearch, so let’s disable that output. To do so, find the output.elasticsearch section and comment out the following lines by preceding them with a #:

/etc/filebeat/filebeat.yml
...
#output.elasticsearch:
  # Array of hosts to connect to.
  #hosts: ["localhost:9200"]
...

Then, configure the output.logstash section. Uncomment the lines output.logstash: and hosts: ["localhost:5044"] by removing the #. This will configure Filebeat to connect to Logstash on your Elastic Stack server at port 5044, the port for which we specified a Logstash input earlier:

/etc/filebeat/filebeat.yml
output.logstash:
  # The Logstash hosts
  hosts: ["localhost:5044"]

Save and close the file.

The functionality of Filebeat can be extended with Filebeat modules. In this tutorial we will use the system module, which collects and parses logs created by the system logging service of common Linux distributions.

Let’s enable it:

  • sudo filebeat modules enable system

You can see a list of enabled and disabled modules by running:

  • sudo filebeat modules list

You will see a list similar to the following:

Output
Enabled:
system

Disabled:
apache2
auditd
elasticsearch
icinga
iis
kafka
kibana
logstash
mongodb
mysql
nginx
osquery
postgresql
redis
traefik
...

By default, Filebeat is configured to use default paths for the syslog and authorization logs. In the case of this tutorial, you do not need to change anything in the configuration. You can see the parameters of the module in the /etc/filebeat/modules.d/system.yml configuration file.

Next, we need to set up the Filebeat ingest pipelines, which parse the log data before sending it through logstash to Elasticsearch. To load the ingest pipeline for the system module, enter the following command:

  • sudo filebeat setup --pipelines --modules system

Next, load the index template into Elasticsearch. An Elasticsearch index is a collection of documents that have similar characteristics. Indexes are identified with a name, which is used to refer to the index when performing various operations within it. The index template will be automatically applied when a new index is created.

To load the template, use the following command:

  • sudo filebeat setup --index-management -E output.logstash.enabled=false -E 'output.elasticsearch.hosts=["localhost:9200"]'
Output
Index setup finished.

Filebeat comes packaged with sample Kibana dashboards that allow you to visualize Filebeat data in Kibana. Before you can use the dashboards, you need to create the index pattern and load the dashboards into Kibana.

As the dashboards load, Filebeat connects to Elasticsearch to check version information. To load dashboards when Logstash is enabled, you need to disable the Logstash output and enable Elasticsearch output:

  • sudo filebeat setup -E output.logstash.enabled=false -E output.elasticsearch.hosts=['localhost:9200'] -E setup.kibana.host=localhost:5601

You should receive output similar to this:

Output
Overwriting ILM policy is disabled. Set `setup.ilm.overwrite:true` for enabling.

Index setup finished.
Loading dashboards (Kibana must be running and reachable)
Loaded dashboards
Setting up ML using setup --machine-learning is going to be removed in 8.0.0. Please use the ML app instead.
See more: https://www.elastic.co/guide/en/elastic-stack-overview/current/xpack-ml.html
Loaded machine learning job configurations
Loaded Ingest pipelines

Now you can start and enable Filebeat:

  • sudo systemctl start filebeat
  • sudo systemctl enable filebeat

If you’ve set up your Elastic Stack correctly, Filebeat will begin shipping your syslog and authorization logs to Logstash, which will then load that data into Elasticsearch.

To verify that Elasticsearch is indeed receiving this data, query the Filebeat index with this command:

  • curl -XGET 'http://localhost:9200/filebeat-*/_search?pretty'

You should receive output similar to this:

Output
...
{
{
  "took" : 4,
  "timed_out" : false,
  "_shards" : {
    "total" : 2,
    "successful" : 2,
    "skipped" : 0,
    "failed" : 0
  },
  "hits" : {
    "total" : {
      "value" : 4040,
      "relation" : "eq"
    },
    "max_score" : 1.0,
    "hits" : [
      {
        "_index" : "filebeat-7.7.1-2020.06.04",
        "_type" : "_doc",
        "_id" : "FiZLgXIB75I8Lxc9ewIH",
        "_score" : 1.0,
        "_source" : {
          "cloud" : {
            "provider" : "digitalocean",
            "instance" : {
              "id" : "194878454"
            },
            "region" : "nyc1"
          },
          "@timestamp" : "2020-06-04T21:45:03.995Z",
          "agent" : {
            "version" : "7.7.1",
            "type" : "filebeat",
            "ephemeral_id" : "cbcefb9a-8d15-4ce4-bad4-962a80371ec0",
            "hostname" : "june-ubuntu-20-04-elasticstack",
            "id" : "fbd5956f-12ab-4227-9782-f8f1a19b7f32"
          },


...

If your output shows 0 total hits, Elasticsearch is not loading any logs under the index you searched for, and you will need to review your setup for errors. If you received the expected output, continue to the next step, in which we will see how to navigate through some of Kibana’s dashboards.

Step 5 — Exploring Kibana Dashboards

Let’s return to the Kibana web interface that we installed earlier.

In a web browser, go to the FQDN or public IP address of your Elastic Stack server. If your session has been interrupted, you will need to re-enter entering the credentials you defined in Step 2. Once you have logged in, you should receive the Kibana homepage:

Kibana Homepage

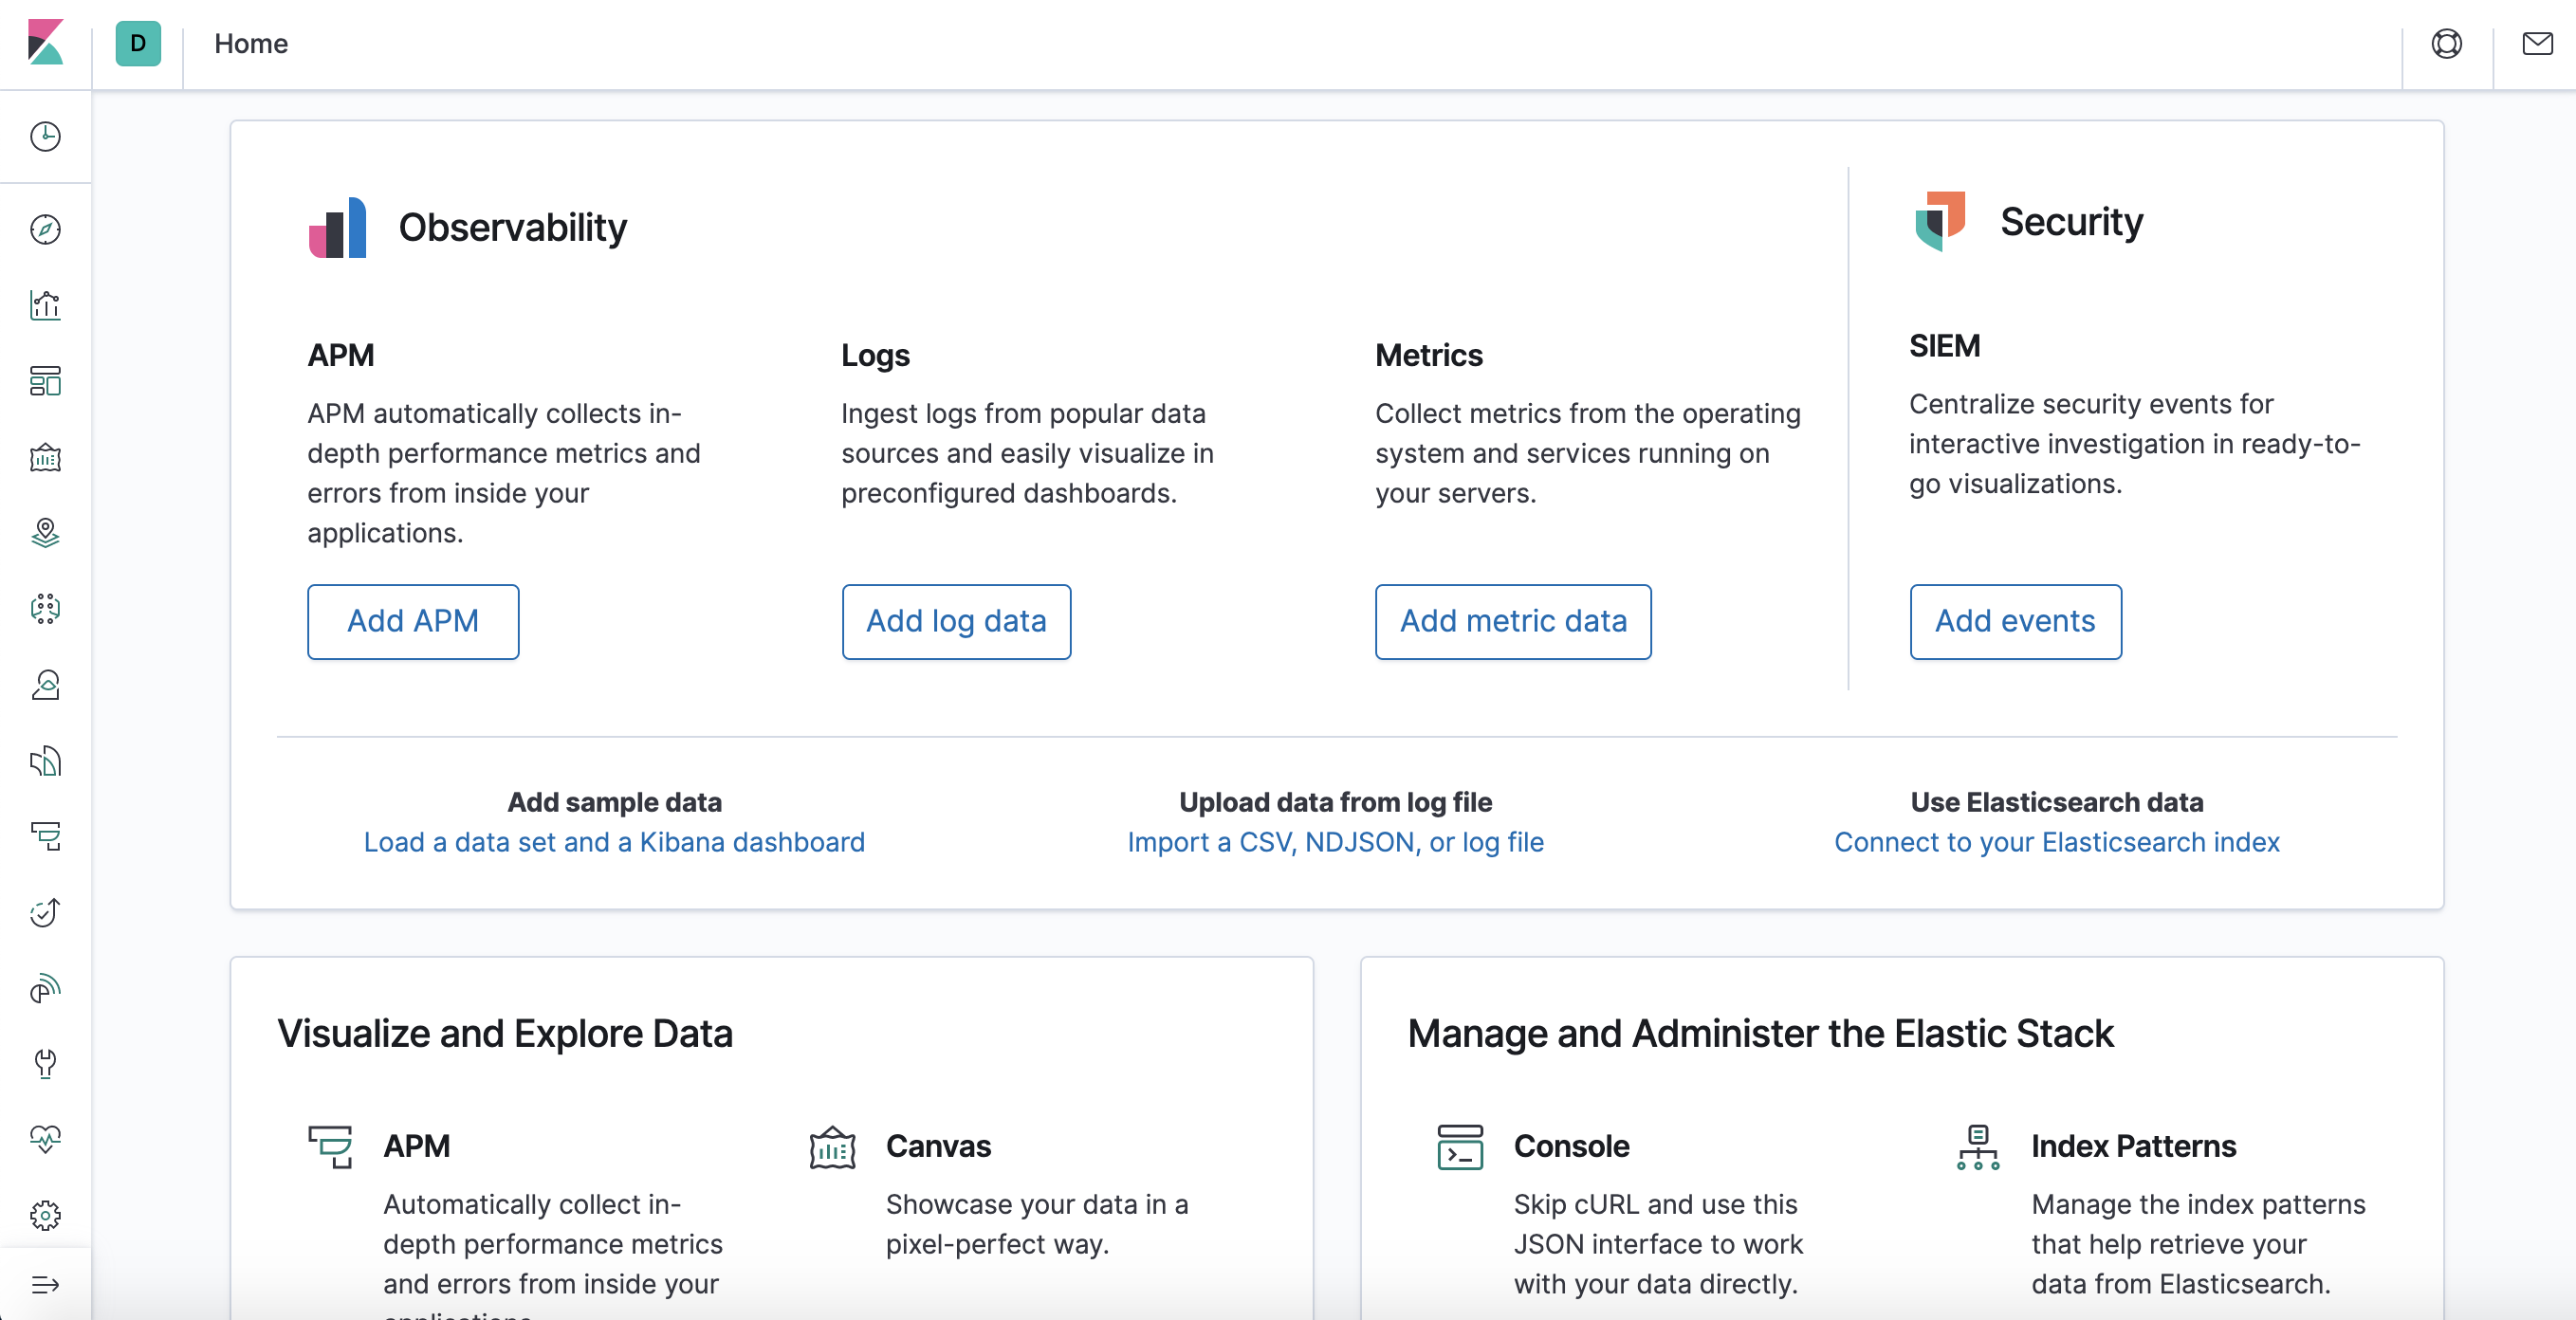
Click the Discover link in the left-hand navigation bar (you may have to click the the Expand icon at the very bottom left to see the navigation menu items). On the Discover page, select the predefined filebeat-* index pattern to see Filebeat data. By default, this will show you all of the log data over the last 15 minutes. You will see a histogram with log events, and some log messages below:

Discover page

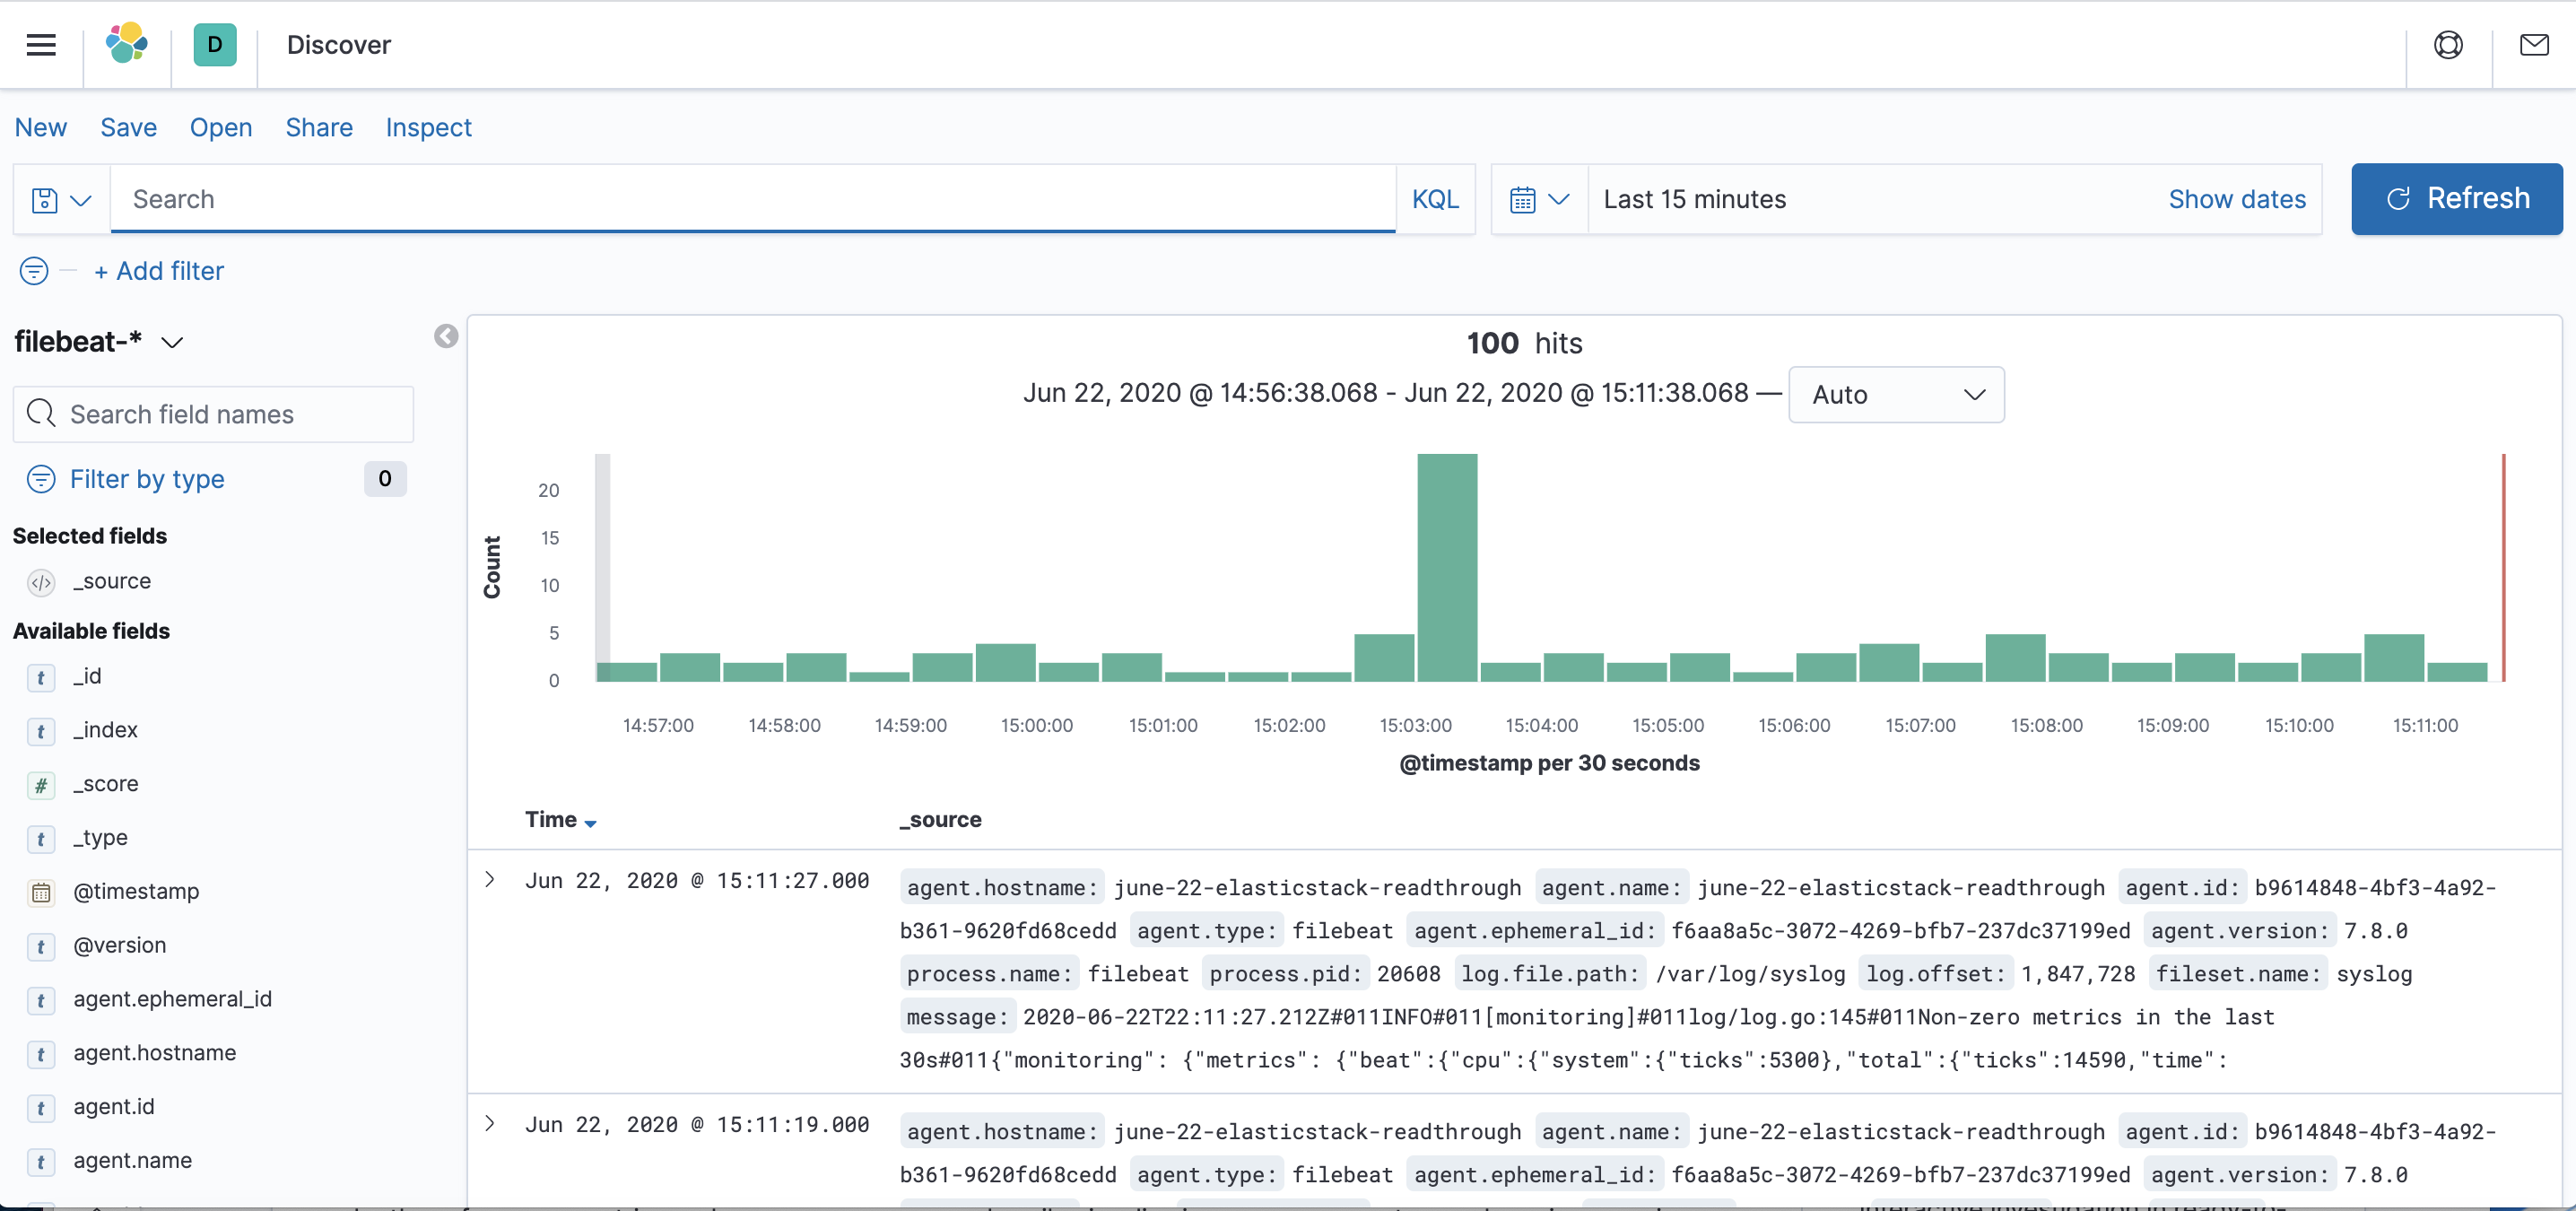
Here, you can search and browse through your logs and also customize your dashboard. At this point, though, there won’t be much in there because you are only gathering syslogs from your Elastic Stack server.

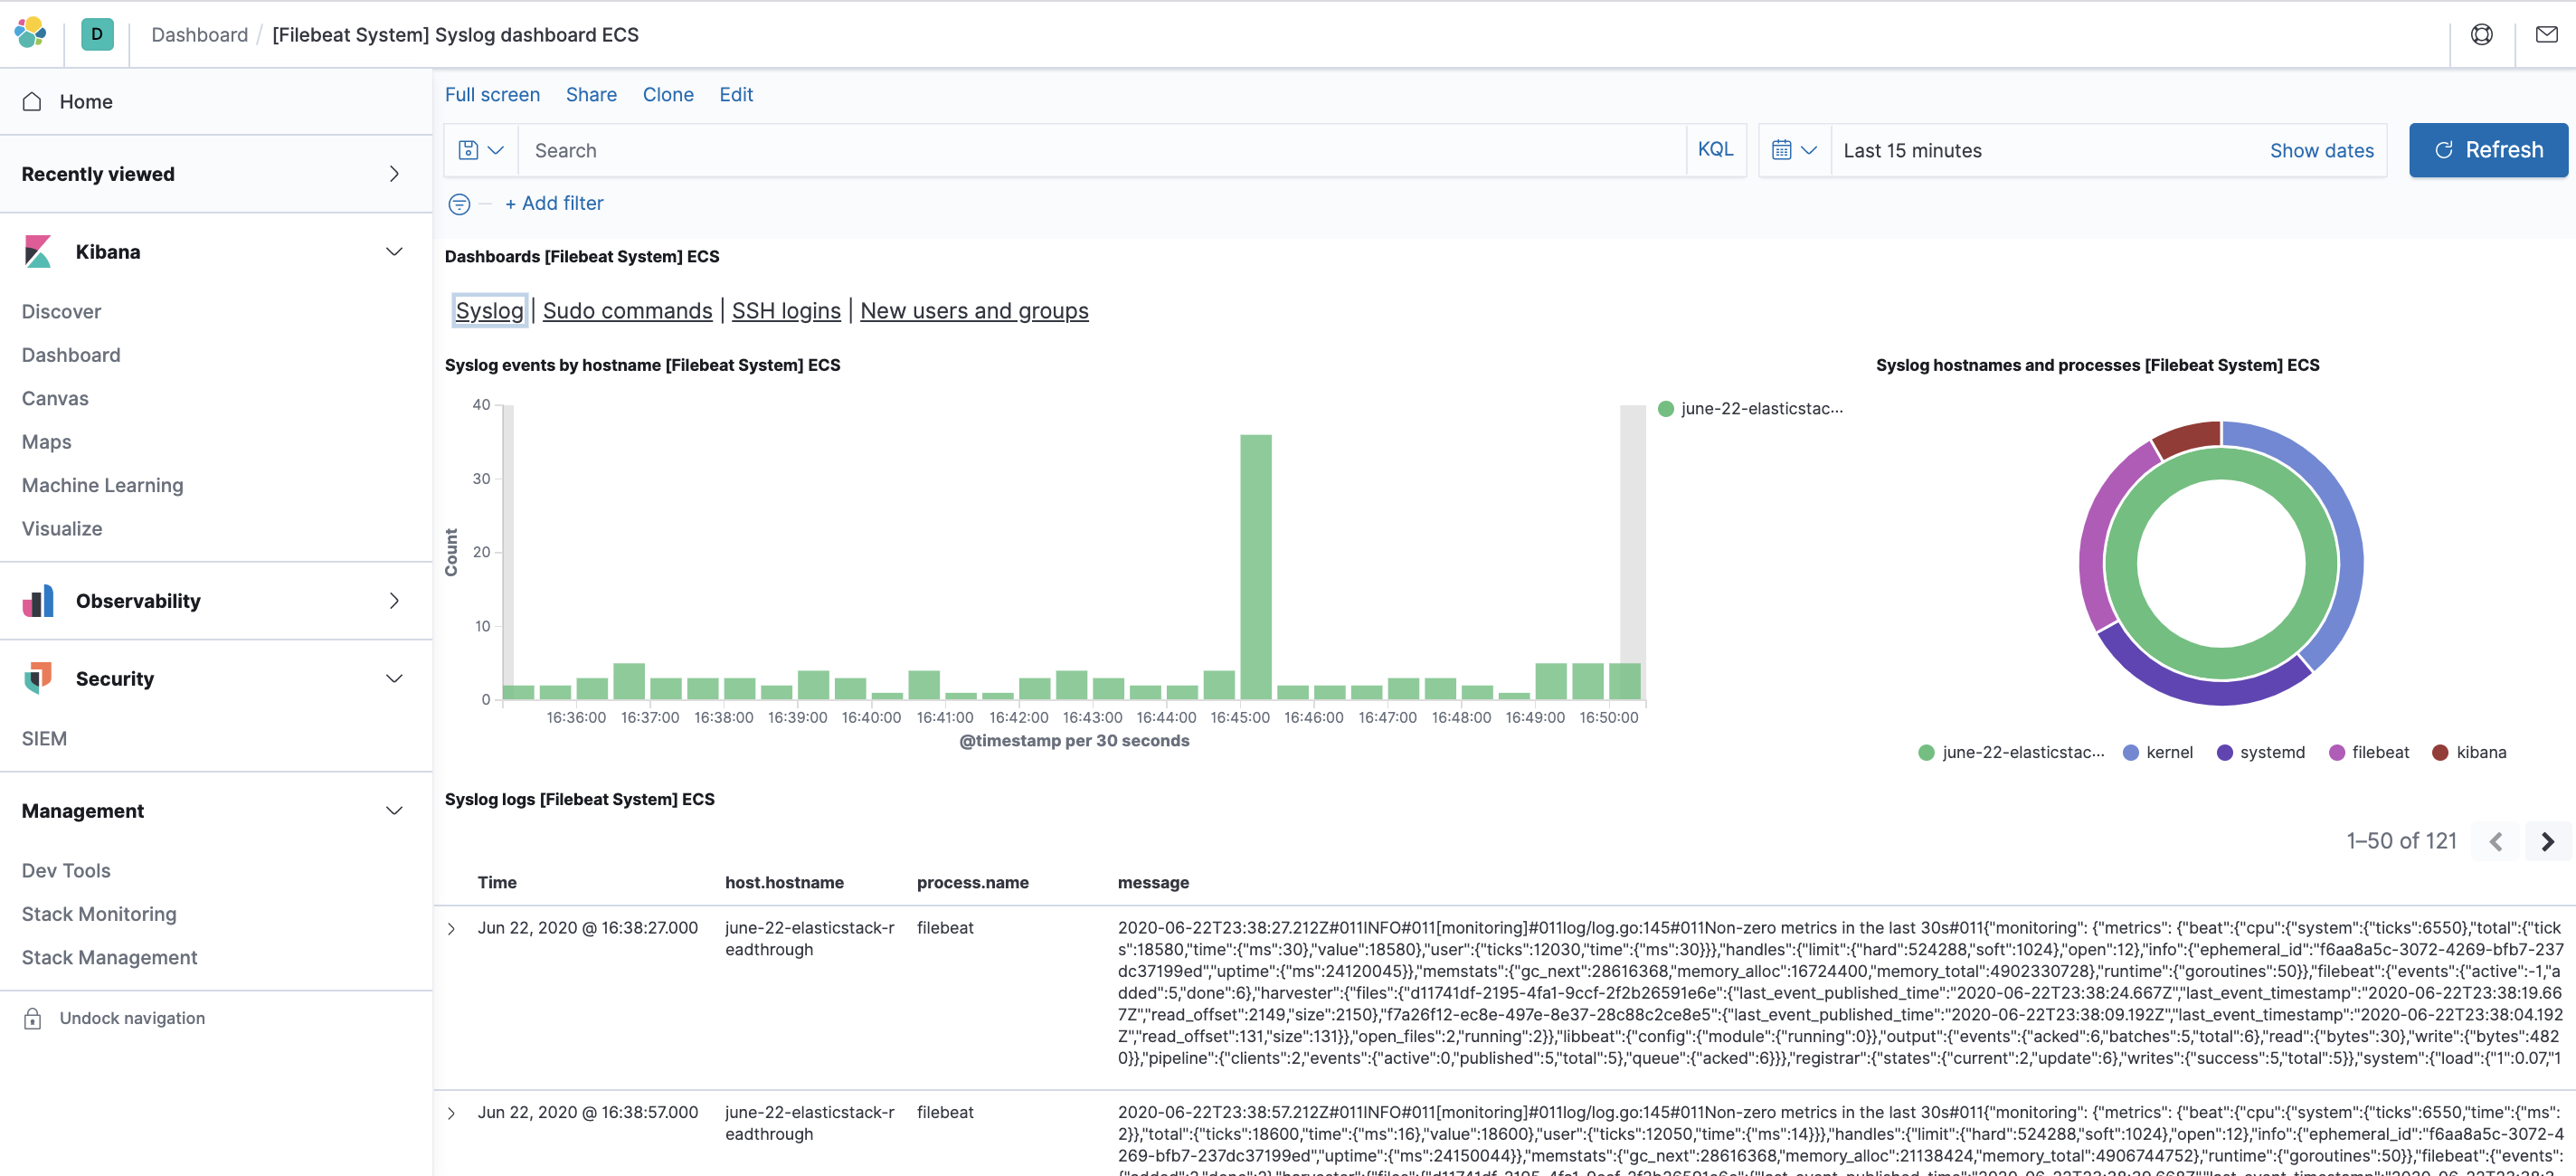
Use the left-hand panel to navigate to the Dashboard page and search for the Filebeat Systemdashboards. Once there, you can select the sample dashboards that come with Filebeat’s systemmodule.

For example, you can view detailed stats based on your syslog messages:

Syslog Dashboard

You can also view which users have used the sudo command and when:

Sudo Dashboard

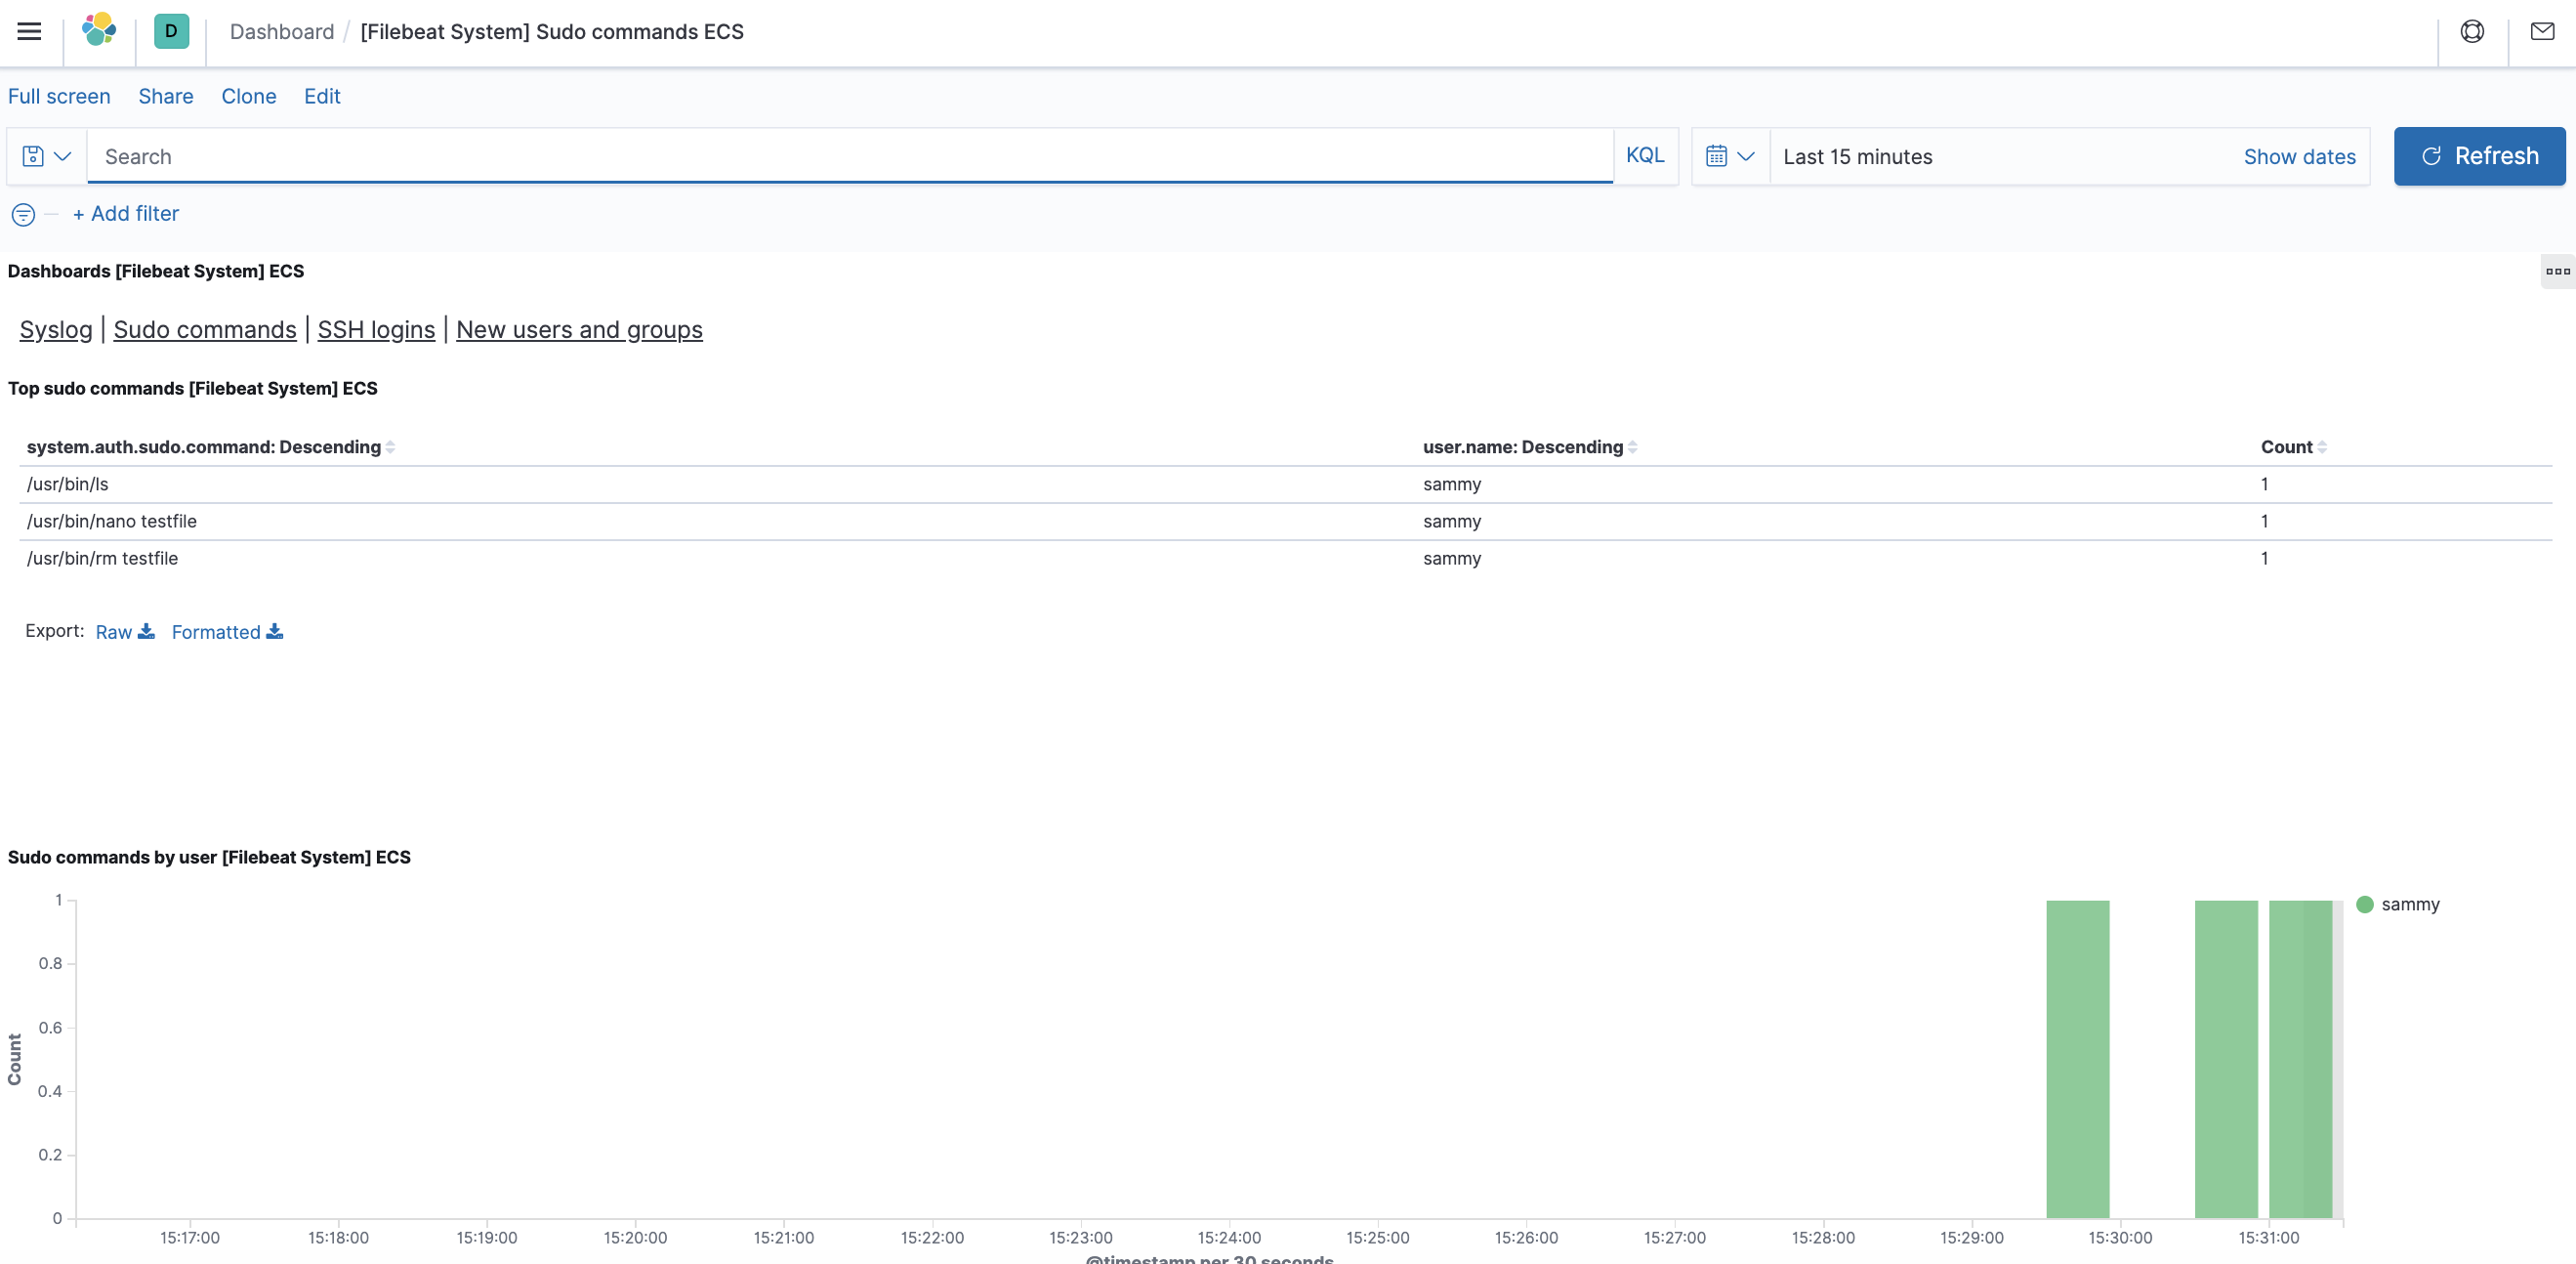
Kibana has many other features, such as graphing and filtering, so feel free to explore.

Conclusion

In this tutorial, you’ve learned how to install and configure the Elastic Stack to collect and analyze system logs. Remember that you can send just about any type of log or indexed data to Logstash using Beats, but the data becomes even more useful if it is parsed and structured with a Logstash filter, as this transforms the data into a consistent format that can be read easily by Elasticsearch.

How To Install Grafana on Ubuntu CentOS 7

Grafana on Ubuntu CentOS 7

Grafana is an open source data visualization and tracking suite. It offers support for Graphite, Elasticsearch, Included, Prometheus, and a lot more databases. The application gives a beautiful dashboard and metric analytics, with capability to control and create your own dashboard to your own apps or infrastructure performance monitoring.

Table of Contents

Step 1. First let’s start by ensuring your system is up-to-date.

Step 2. Installing Grafana.

Step 3. Configure Firewall for Grafana.

Step 4. Accessing Grafana.

Prerequisites

This article assumes you have at least basic knowledge of Linux, know how to use the shell, and most importantly, you host your site on your own VPS. The installation is quite simple and assumes you are running in the root accge of Linount, if not you may need to add ‘sudo’ to the commands to get root privileges. I will show you through the step by step installation Grafana open source data visualization on a CentOS 7 server.
Install Grafana on Ubuntu CentOS 7

Step 1. First let’s start by ensuring your system is up-to-date.

yum clean all
yum -y update

Step 2. Installing Grafana.

First, Add new Grafana repository:

cat <<EOF | sudo tee /etc/yum.repos.d/grafana.repo
[grafana]
name=grafana
baseurl=https://packagecloud.io/grafana/stable/el/6/$basearch
repo_gpgcheck=1
enabled=1
gpgcheck=1
gpgkey=https://packagecloud.io/gpg.key https://grafanarel.s3.amazonaws.com/RPM-GPG-KEY-grafana
sslverify=1
sslcacert=/etc/pki/tls/certs/ca-bundle.crt
EOF

Now we can start Grafana installation with the following command:

yum install grafana

After the installation process is finished, execute the following commands to start your Grafana service:

systemctl daemon-reload
systemctl start grafana-server
systemctl enable grafana-server

Step 3. Configure Firewall for Grafana.

By default, Grafana is running on port 3000. In case your server is using a firewall, open the port using command below:

firewall-cmd --permanent --zone=public --add-port=3000/tcp
firewall-cmd --reload

Step 4. Accessing Grafana.

Grafana will be available on HTTP port 3000 by default. Open your favorite browser and navigate to http://mydomain.com:3000 and complete the required the steps to finish the installation. If you are using a firewall, please open port 3000 to enable access to the control panel.

Congratulation’s! You have successfully installed Grafana. Thanks for using this tutorial for installing Grafana open source data visualization on CentOS 7 systems. For additional help or useful information, we recommend you to check the official Grafana web site.

How To Install BIND9 DNS Server on Ubuntu Step by Step

BIND is a widely used DNS Server. Ideally, DNS server consist of 2 machines that work together simultaneously, one act as master and the other one act as slave. If your domain registrar doesn’t provide you a free DNS server, or if you want to create a custom DNS record, then you might need to host your own DNS server.

In this tutorial, we will learn how to install and configure BIND9 Master and Slave DNS server. Both server will use Ubuntu OS. We will start configuring the master then the slave.

Install BIND9 Master and Slave DNS Server on Ubuntu

Here are the servers example data:

Server1 (master) IP address: 108.100.100.1
Server2 (slave) IP address: 108.100.100.2
Domain: wpcademy.com
This domain will be hosted on this server: 192.168.100.07

ON MASTER

Step1. Update ubuntu repository and install Bind using apt-get.

apt-get update
apt-get install bind9

Step2. Configure bind options

*)do this if you haven't installed nano text editor: 
apt-get install nano

nano /etc/bind/named.conf.options
options {
	directory "/var/cache/bind";
	additional-from-auth no;
	additional-from-cache no;
	version "Bind Server";

	// If there is a firewall between you and nameservers you want
	// to talk to, you may need to fix the firewall to allow multiple
	// ports to talk.  See http://www.kb.cert.org/vuls/id/800113

	// If your ISP provided one or more IP addresses for stable 
	// nameservers, you probably want to use them as forwarders.  
	// Uncomment the following block, and insert the addresses replacing 
	// the all-0's placeholder.

	 forwarders {
	 	8.8.8.8;
		8.8.4.4;
	 };

	//========================================================================
	// If BIND logs error messages about the root key being expired,
	// you will need to update your keys.  See https://www.isc.org/bind-keys
	//========================================================================
	dnssec-validation auto;
	allow-recursion { 127.0.0.1; };
	auth-nxdomain no;    # conform to RFC1035
	listen-on-v6 { any; };
};

Step 3. Store the domain name and zone file setting

 nano /etc/bind/named.conf.local
//place these lines at the bottom of file

zone "wpcademy.com" {
        type master;
        file "/etc/bind/zones/wpcademy.com.db";
        allow-transfer { 108.200.200.2; };
        also-notify { 108.200.200.200.2; };
};

Step4. Because in the above config we put zone file in “/etc/bind/zones/wpcademy.com.db”, then we need to create the folder and file

mkdir /etc/bind/zones
nano /etc/bind/zones/wpcademy.com.db
$TTL    86400
$ORIGIN wpcademy.com.
@       IN      SOA     ns1.wpcademy.com. root.wpcademy.com. (
                              1         ; Serial
                          86400         ; Refresh
                           7200         ; Retry
                        2419200         ; Expire
                         604800 )       ; Negative Cache TTL
;
@       IN      NS      ns1.wpcademy.com.
@       IN      NS      ns2.wpcademy.com.
ns1      IN      A       108.100.100.1
ns2      IN      A       108.100.100.2

;also list other computers
@       IN      A       192.168.100.07
www     IN      A       192.168.100.07

Step 5. (last step on master) Restart bind9 dns service

 service bind9 restart

ON SLAVE

Repeat step 1-2 similar to the master.

Step 3. Configure slave bind options

 nano /etc/bind/named.conf.options
zone "wpcademy.com" {
	type slave;
	file "/var/cache/bind/wpcademy.com.db";
	masters {108.100.100.1;};
};

notice the difference in this config file from the master.

Step 4. Restart bind9 service.

 service bind9 restart

What to do next?

This DNS server will not work until you change your domain’s nameserver. It can be done from your domain’s registrar website. In this scenario, we change nameserver to:

ns1.wpcademy.com
ns2.wpcademy.com

Testing BIND

This test could be done either on the DNS server itself or from another server, or from your own PC. In this case, we will do the test from another server running Ubuntu OS.

Step 1.Install dnsutils

 apt-get install dnsutils

Step 2. Do the dig dns test

 dig wpcademy.com

Step 3. Do the nslookup dns test

 nslookup wpcademy.com

How To Install OpenCart v3.0.3.2 on Ubuntu 18.04 LTS

Install OpenCart on Ubuntu 18

OpenCart is a free open source ecommerce platform for online merchants. OpenCart provides a professional and reliable foundation from which to build a successful online store. In this tutorial we will learn you how to install OpenCart on Ubuntu 18.04 LTS.

This article assumes you have at least basic knowledge of Linux, know how to use the shell, and most importantly, you host your site on your own VPS. The installation is quite simple and assumes you are running in the root account, if not you may need to add ‘sudo’ to the commands to get root privileges. I will show you through the step by step installation OpenCart on a Ubuntu 18.04 (Bionic Beaver) server.

Install OpenCart on Ubuntu 18.04 LTS

Step 1. First make sure that all your system packages are up-to-date

sudo apt update
sudo apt upgrade

Step 2. Install LAMP (Linux, Apache, MariaDB and PHP) server.

A Ubuntu 18.04 LAMP server is required. If you do not have LAMP installed, you can follow our guide here. Also install all required PHP modules:

apt-get install php7.1-cli php7.1-mbstring php7.1-gd php7.1-opcache php7.1-mysql php7.1-json php7.1-mcrypt php7.1-xml php7.1-curl

Step 3. Download OpenCart

First thing to do is to go to OpenCart’s download page and download the latest stable version of OpenCart:

sudo mkdir -p /var/www/html/example.com
cd /tmp
wget https://github.com/opencart/opencart/releases/download/3.0.3.1/opencart-3.0.3.1.zip
unzip opencart-*.zip
sudo mv /tmp/upload/* /var/www/html/example.com/

Next, copy the configurations files:

sudo cp /var/www/html/example.com/{config-dist.php,config.php}
sudo cp /var/www/html/example.com/admin/{config-dist.php,config.php}

We will need to change some folders permissions:

sudo chown -R www-data: /var/www/html

Step 4. Configuring MariaDB for OpenCart.

By default, MariaDB is not hardened. You can secure MariaDB using the mysql_secure_installation script. You should read and below each steps carefully which will set root password, remove anonymous users, disallow remote root login, and remove the test database and access to secure MariaDB.

mysql_secure_installation

Configure it like this:

- Set root password? [Y/n] y
- Remove anonymous users? [Y/n] y
- Disallow root login remotely? [Y/n] y
- Remove test database and access to it? [Y/n] y
- Reload privilege tables now? [Y/n] y

Next we will need to log in to the MariaDB console and create a database for the OpenCart. Run the following command:

mysql -u root -p

This will prompt you for a password, so enter your MariaDB root password and hit Enter. Once you are logged in to your database server you need to create a database for OpenCart installation:

MariaDB [(none)]> CREATE DATABASE opencart;
MariaDB [(none)]> GRANT ALL PRIVILEGES ON opencart.* TO 'opencartuser'@'localhost' IDENTIFIED BY 'opencartuser_passwd';
MariaDB [(none)]> FLUSH PRIVILEGES;
MariaDB [(none)]> \q

Step 5. Configuring Apache web server for OpenCart.

Create a new virtual host directive in Apache. For example, create a new Apache configuration file named ‘opencart.conf’ on your virtual server:
[/php]
touch /etc/apache2/sites-available/opencart.conf
ln -s /etc/apache2/sites-available/opencart.conf /etc/apache2/sites-enabled/opencart.conf
nano /etc/apache2/sites-available/opencart.conf
[/php]

Add the following lines:

<VirtualHost *:80>
ServerAdmin [email protected]
DocumentRoot /var/www/html/example.com
ServerName your-domain.com
ServerAlias www.your-domain.com
<Directory /var/www/html/example.com/>
Options FollowSymLinks
AllowOverride All
</Directory>
ErrorLog /var/log/apache2/your-domain.com-error_log
CustomLog /var/log/apache2/your-domain.com-access_log common

Save and close the file. Restart the apache service for the changes to take effects:

sudo a2ensite magento.conf
sudo a2enmod rewrite
sudo systemctl restart apache2

Step 6. Accessing OpenCart.

OpenCart will be available on HTTP port 80 by default. Open your favorite browser and navigate to http://your-domain.com/ or http://server-ip and complete the required the steps to finish the installation. If you are using a firewall, please open port 80 to enable access to the control panel.

Congratulation’s! You have successfully installed OpenCart. Thanks for using this tutorial for installing OpenCart e-commerce on Ubuntu 18.04 systems. For additional help or useful information, we recommend you to check the official OpenCart website.