Easy Guide to Disable Automatic Update Email Notification in WordPress

In this tutorial, we will learn how to easily disable automatic update email notification in WordPress.

About Automatic Updates in WordPress

WordPress is an open source software which is maintained by a community of developers. It is regularly updated to fix security issues, bugs, and to add new features.

Disable Automatic Update Email Notification

This is why you should always use the latest version of WordPress to make sure that your website is safe and up to date.

WordPress automatically installs minor updates as soon as they are available. After the update, your WordPress site sends a notification to the WordPress admin email address.

The purpose of this email notification is just to inform you that your WordPress site is updated.

If you maintain multiple WordPress sites, then you will get an email from each website. This can be a bit annoying.

Let’s see how to easily turn off the automatic update email notification in WordPress.

Method 1: Disable Automatic Update Email Notification Using Plugin

This method is simpler and does not require you to add any code to your WordPress site.

First thing you need to do is install and activate the Disable WordPress Core Update Email. For more details, see our step by step guide on how to install a WordPress plugin.

The plugin works out of the box, and there are no settings for you to configure.

Upon activation, it simply disables email notification sent after WordPress automatic update.

Method 2: Disable Automatic Update Email Notification Using Code

This method requires you to add code to your WordPress files. If you haven’t done this before, then take a look at our beginner’s guide on pasting snippets from web into WordPress.

You will need to add this code to your theme’s functions.php file or a site-specific plugin.

add_filter( 'auto_core_update_send_email', 'wpb_stop_auto_update_emails', 10, 4 );
  
function wpb_stop_update_emails( $send, $type, $core_update, $result ) {
if ( ! empty( $type ) && $type == 'success' ) {
return false;
}
return true;
}

This code simply adds a filter to disable email notification after automatic core update.

Managing Notifications and Updates in WordPress

By default, WordPress does not allow you to automatically install updates. Many site owners find it a bit annoying to update themes and plugins, especially if they maintain multiple WordPress sites.

Luckily, there are plugins that allow you to more efficiently manage WordPress updates.

Similarly, WordPress by default has no unified interface to manage notification emails. It may not even send email notifications and you wouldn’t notice it.

There are plugins that allow you to manage and control emails sent by WordPress. You can even customize default WordPress emails. For detailed instructions take a look at our guide on how to add better custom notifications in WordPress.

That’s all, we hope this tutorial helped you learn how to disable automatic update email notification in WordPress.

Easy Guide to Add Custom Admin Notices in WordPress

In this tutorial, we will learn how you can add admin notices in WordPress.

Why and When to Use Admin Notices in WordPress?

WordPress uses admin notices to alert users about errors, warnings, and success messages.

Custom Admin Notices in WordPress

Individual site owners, plugin authors, and theme developers can also use admin notices.

If you are working on a website for clients who are not familiar with WordPress, then you can add admin notices to display helpful information across their WordPress admin area.

Custom admin notices can also be helpful if you run a multi-author WordPress site. You can add notices to guide new authors and help them find their way around.

However, we recommend using admin notices carefully. They can be really annoying and may ruin the WordPress experience for your users.

Having said that, let’s take a look at how you can add your own custom admin notices in WordPress.

Method 1: Add Custom Notices in WordPress Manually

This method requires you to add code to your WordPress site. If you have never added code before, then take a look at our guide on pasting snippets from the web into WordPress.

Let’s get started.

First you need to add this code to your theme’s functions.php file or a site-specific plugin.

function general_admin_notice(){
    global $pagenow;
    if ( $pagenow == 'options-general.php' ) {
         echo '
‘; } } add_action(‘admin_notices’, ‘general_admin_notice’);

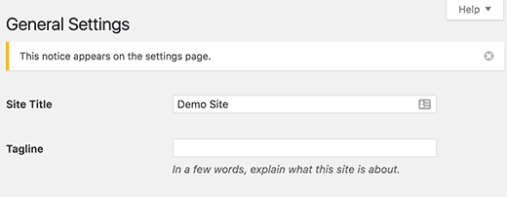
This code displays a notice on the settings page with a yellow border and a button to close the notice. This is how it will appear on your site:

Custom Admin Notices in WordPress

If you study the code, you will notice that we have used $pagenow variable to detect the current page.

After that we added the condition that checks if the current page meets the page where we want to display the notice.

If it does, then we show the notice wrapped in a <div> element. This div element uses CSS classes already defined in the WordPress admin stylesheet for different type of notices.

You need to use notice class and then you can add notice-errornotice-warningnotice-success, or notice-info.

Optionally, you can use is-dismissible class which adds a button to close the notice.

Apart from checking the current page, you can add all kind of conditions to show notices matching different scenarios.

For example, you want to display a notice only to users with the author user role.

Here is how you will do that:

function author_admin_notice(){
    global $pagenow;
    if ( $pagenow == 'index.php' ) {
    $user = wp_get_current_user();
    if ( in_array( 'author', (array) $user->roles ) ) {
    echo '
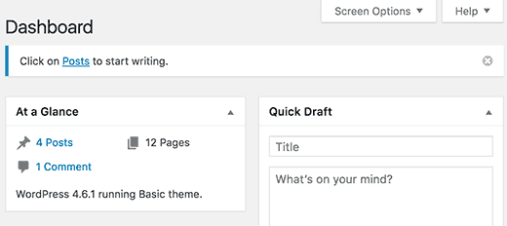
  Click on Posts to start writing.

‘; } } } add_action(‘admin_notices’, ‘author_admin_notice’);

As you can see that we have added an extra check to detect the user role in our function.

This is how it will appear on your site.

Custom Admin Notices in WordPress

Feel free to practice with different conditions, filters, and hooks to play with admin notices.

Method 2: Add Admin Notices Using a WordPress Plugin

This method is simpler as it does not require you to add code. However, it is not as flexible as the custom code method.

First thing you need to do is install and activate the KJM Admin Notices plugin. For more details, see our step by step guide on how to install a WordPress plugin.

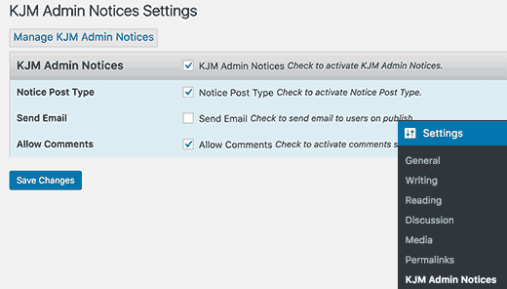
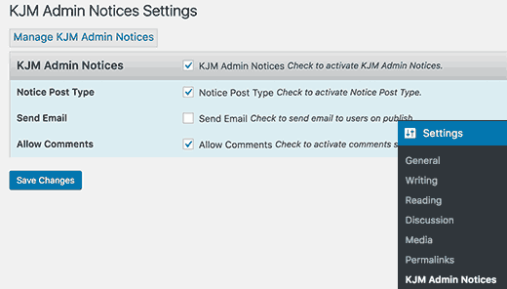
Upon activation, you need to visit Settings » KJM Admin Notices page to configure plugin settings.

Custom Admin Notices in WordPress

First, you need to check the option to enable KJM Admin Notices. The second option adds a custom post type where you can add and edit your custom admin notices.

The plugin also allows you to send an email to registered users when you publish a new notice. You can check the box next to ‘Send Email’ option if you want to use this feature.

You can also enable comments for your notices which will allow users to respond to notices by adding comments. To enable this feature, check the box next to ‘Allow Comments’ option.

Don’t forget to click on the save changes button to store your settings.

You will now see a new menu item labeled notices in your WordPress admin bar. This is where you can add and edit your custom admin notices.

Let’s create your first admin notice.

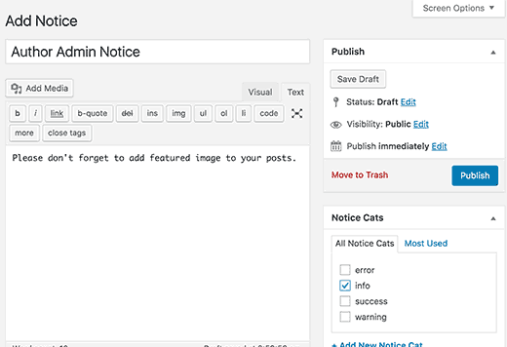
Visit Notices » Add Notice page. You will see a screen much like the WordPress post edit screen.

Custom Admin Notices in WordPress

Start by adding a title for your notice, then add the actual notice in the post editor. You can select the notice category from the box on your right hand.

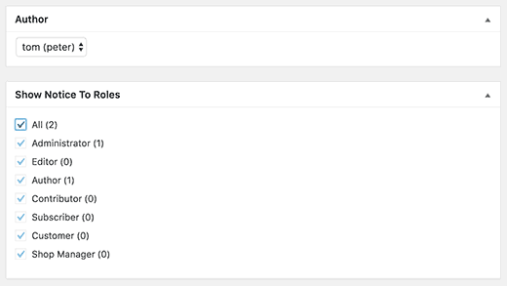
Next you need to select the user roles which will see this notice.

Custom Admin Notices in WordPress

You can optionally show or hide title, author and date, and the button to dismiss notice.

Once you are finished, click on the publish button and your custom admin notice will go live.

Custom Admin Notices in WordPress

KJM Admin Notices allows you to manage your custom admin notices without writing any code. You can delete or unpublish notices that you don’t want to display any more.

Using the email feature, you can also use it to alert all your users even if they don’t log in to check notices.

Having problems sending emails? See our guide on how to fix WordPress not sending email issue.

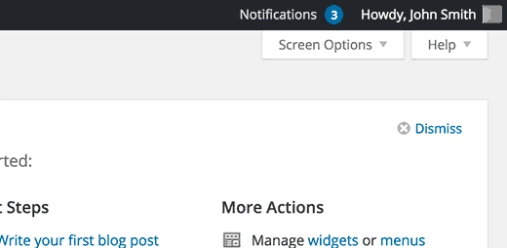
You may also want to take a look at WP Notification Center plugin. It adds a Facebook-like notification center in WordPress. Users can click on the notification icon to see their notifications.

Custom Admin Notices in WordPress

That’s all. We hope this article helped you learn how to add custom admin notices in WordPress. You may also want to see our guide on how to create a custom user registration form in WordPress.

Easy Guide to Show Total Number of Registered Users in WordPress

In this tutorial, we will learn how to show total number of registered users in WordPress.

Method 1: Show Registered User Count Using a WordPress Plugin

First thing you need to do is install and activate the Simple Blog Stats plugin. For more details, see our step by step guide on how to install a WordPress plugin.

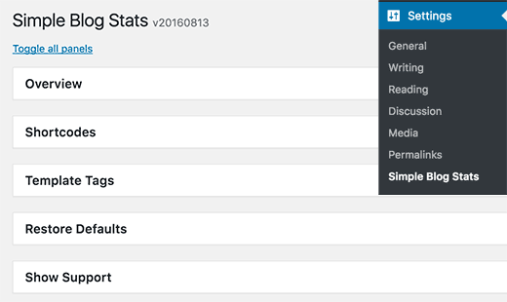
Upon activation, you need to visit Settings » Simple Blog Stats page to configure plugin settings.

Total Number of Registered Users in WordPress

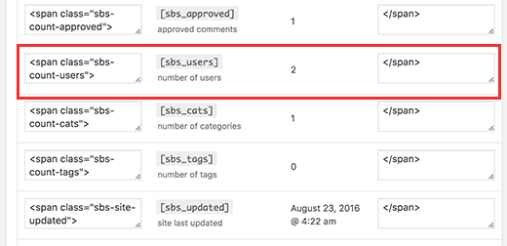
This plugin allows you to show different stats from your WordPress site. You need to click on the shortcodes tab to expand it and then scroll down to the ‘number of users’ row.

Total Number of Registered Users in WordPress

You will see the shortcode [sbs_users] with two text fields on both sides. These text fields contain HTML the plugin will add before and after the number of users.

By default, the shortcode will output HTML like this:

856

If you are unsure, then just copy the shortcode [sbs_users] and click on the save settings button.

You can now add this shortcode to any WordPress post or page. You can also add it to a sidebar widget. If the shortcode does not work in the widget, then follow instructions in our guide on how to use shortcodes in your WordPress sidebar widget.

Method 2: Manually Show Number of Registered Users in WordPress with Code

This method requires you to add code to your WordPress site. If you haven’t done this before, then see our beginner’s guide on pasting snippets from web into WordPress.

You need to add the following code to your theme’s functions.php file or a site-specific plugin.

// Function to return user count
function wpb_user_count() { 
$usercount = count_users();
$result = $usercount['total_users']; 
return $result; 
} 
// Creating a shortcode to display user count
add_shortcode('user_count', 'wpb_user_count');

This code creates shortcode [user_count] which you can use in your WordPress posts, pages, or a sidebar widget to display the user count.

The function does not add any HTML formatting to the user count and simply returns the number. You may want to wrap the shortcode around HTML to use CSS or basic HTML formatting. For example:

Join [user_count] other users who share your interest:

Here is how it looked on our demo site:

Total Number of Registered Users in WordPress

Note: We added a free signup button that redirected to a custom WordPress user registration page.

That’s all, we hope this tutorial helped you learn how to show the total number of registered users in WordPress.

Easy Guide to Add Custom Styles to WordPress Visual Editor

In this tutorial, we will learn how to add custom styles to the WordPress visual editor.

Note: This tutorial requires basic working knowledge of CSS.

Why and When You Need Custom Styles for WordPress Visual Editor

By default, WordPress visual editor comes with some basic formatting and style options. However, sometimes you may need custom styles of your own to add CSS buttons, content blocks, taglines, etc.

You can always switch from visual to text editor and add custom HTML and CSS. But if you regularly use some styles, then it would be best to add them into visual editor so that you can easily reuse them.

This will save you time spent on switching back and forth between text and visual editor. It will also allow you to consistently use the same styles throughout your website.

Most importantly, you can easily tweak or update styles without having to edit posts on your website.

Method 1: Add Custom Styles in Visual Editor Using Plugin

First thing you need to do is install and activate the TinyMCE Custom Stylesplugin. For more details, see our step by step guide on how to install a WordPress plugin.

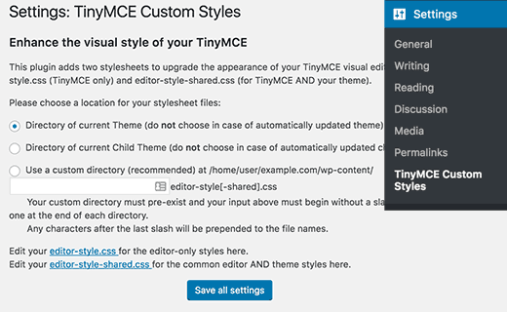
Upon activation, you need to visit Settings » TinyMCE Custom Styles page to configure the plugin settings.
tinymce custom style

The plugin allows you to choose the location of stylesheet files. It can use your theme or child theme’s stylesheets, or you can choose a custom location of your own.

After that, you need to click on the ‘Save All Settings’ button to store your changes.

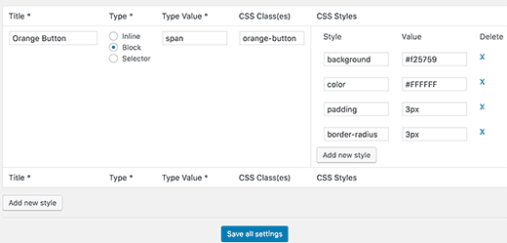
Now you can add your custom styles. You need to scroll down a little to the style section and click on the Add new style button.

First you need to enter a title for the style. This title will be displayed in the drop down menu. Next, you need to choose whether it is an inline, block, or selector element.

After that add a CSS class and then add your CSS rules as shown in the screenshot below.
custom style change in wp

Once you have added a CSS style, simply click on the ‘Save All Settings’ button to store your changes.

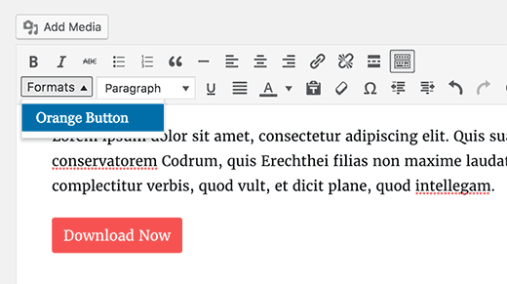
You can now edit an existing post or create a new one. You will notice a Format drop down menu in the second row of WordPress visual editor.
Add Custom Styles to WordPress

Simply select some text in the editor and then select your custom style from the Formats dropdown menu to apply it.

You can now preview your post to see that your custom styles are applied correctly.

Method 2: Manually Add Custom Styles to WordPress Visual Editor

This method requires you to manually add code to your WordPress files. If this is your first time adding code to WordPress, then please see our guide on adding code snippets from web into WordPress.

Step 1: Add a custom styles drop down menu in WordPress Visual Editor

First, we will add a Formats drop down menu in the WordPress visual editor. This drop down menu will then allow us to select and apply our custom styles.

You need to add the following code to your theme’s functions.php file or a site-specific plugin.

function wpb_mce_buttons_2($buttons) {
    array_unshift($buttons, 'styleselect');
    return $buttons;
}
add_filter('mce_buttons_2', 'wpb_mce_buttons_2');

Step 2: Add select options to drop down menu

Now you will need to add the options to the drop down menu you just created. You will then be able to select and apply these options from the Formats drop down menu.

For the sake of this tutorial, we are adding three custom styles to create content block and buttons.

You will need to add the following code to your theme’s functions.php file or a site-specific plugin.

/*
* Callback function to filter the MCE settings
*/
 
function my_mce_before_init_insert_formats( $init_array ) {  
 
// Define the style_formats array
 
    $style_formats = array(  
/*
* Each array child is a format with it's own settings
* Notice that each array has title, block, classes, and wrapper arguments
* Title is the label which will be visible in Formats menu
* Block defines whether it is a span, div, selector, or inline style
* Classes allows you to define CSS classes
* Wrapper whether or not to add a new block-level element around any selected elements
*/
        array(  
            'title' => 'Content Block',  
            'block' => 'span',  
            'classes' => 'content-block',
            'wrapper' => true,
             
        ),  
        array(  
            'title' => 'Blue Button',  
            'block' => 'span',  
            'classes' => 'blue-button',
            'wrapper' => true,
        ),
        array(  
            'title' => 'Red Button',  
            'block' => 'span',  
            'classes' => 'red-button',
            'wrapper' => true,
        ),
    );  
    // Insert the array, JSON ENCODED, into 'style_formats'
    $init_array['style_formats'] = json_encode( $style_formats );  
     
    return $init_array;  
   
} 
// Attach callback to 'tiny_mce_before_init' 
add_filter( 'tiny_mce_before_init', 'my_mce_before_init_insert_formats' ); 

You can now add a new post in WordPress and click on the Formats drop down menu in the Visual editor. You will notice that your custom styles are now visible under formats.

However, selecting them does not make any difference in the post editor right now.

Step 3: Add CSS Styles

Now the final step is to add CSS style rules for your custom styles.

You will need to add this CSS into your theme or child theme’s style.css and editor-style.css files.

.content-block { 
    border:1px solid #eee; 
    padding:3px;
    background:#ccc;
    max-width:250px;
    float:right; 
    text-align:center;
}
.content-block:after { 
    clear:both;
} 
.blue-button { 
    background-color:#33bdef;
    -moz-border-radius:6px;
    -webkit-border-radius:6px;
    border-radius:6px;
    border:1px solid #057fd0;
    display:inline-block;
    cursor:pointer;
    color:#ffffff;
    padding:6px 24px;
    text-decoration:none;
}
 
.red-button {
    background-color:#bc3315;
    -moz-border-radius:6px;
    -webkit-border-radius:6px;
    border-radius:6px;
    border:1px solid #942911;
    display:inline-block;
    cursor:pointer;
    color:#ffffff;
    padding:6px 24px;
    text-decoration:none;
}
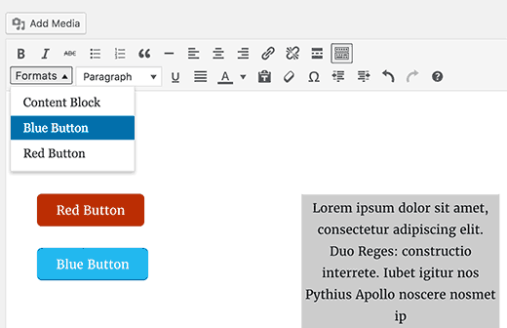
Add Custom Styles to WordPress

The editor stylesheet controls the appearance of your content in the visual editor. Check your theme’s documentation to find out the location of this file.

If your theme doesn’t have an editor stylesheet file, then you can always create one. Simply create a new CSS file and name it custom-editor-style.css.

You need to upload this file to your theme’s root directory and then add this code in your theme’s functions.php file.

function my_theme_add_editor_styles() {
    add_editor_style( 'custom-editor-style.css' );
}
add_action( 'init', 'my_theme_add_editor_styles' );

That’s all. You have successfully added your custom styles into WordPress visual editor. Feel free to play around with the code by adding your own elements and styles.

We hope this tutorial helped you learn how to add custom styles to WordPress visual editor.
Easy Guide to Fix “Upload: Failed to Write File to Disk” Error in WordPress

In this tutorial, we will learn how to fix “Upload: failed to write file to disk” error in WordPress.

What Causes Failed To Write File To Disk Error in WordPress?

This error can occur due to a number of reasons. However, the most common one is incorrect folder permissions.

Each file and folder on your website has a set of permissions. Your web server controls access to the files based on these permissions.

Incorrect permissions to a folder can take away your ability to write files on server. This means your web server cannot create or add new files to that particular folder.

If you try to upload images or any other files from WordPress admin area, you will get one of the following error messages:

  • WordPress failed to write to disk
  • WordPress has failed to upload due to an error failed to write file to disk
  • Unable to create directory wp-content/uploads/2016/03. Is its parent directory writable by the server?

Fix Upload Failed to Write to Disk Error in WordPress

First, you need to connect to your WordPress site using a FTP client.

For this tutorial, we are using the free FileZilla FTP client. If you are using some other FTP client, then it might look a little different.

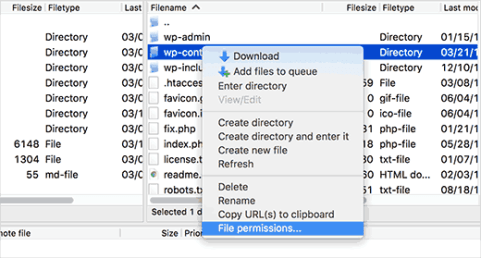
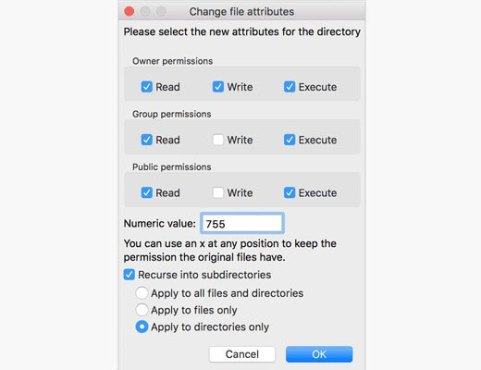
Once you are connected, you need to right click on the wp-content folder and select file permissions.

This will bring up file permissions dialog box in your FTP client. It will show you file permissions for owner, group, and public.

You need to enter 755 in the numeric value field.

After that, you need to check the box next to ‘Recurse into subdirectories’.

Lastly, you need to click on ‘Apply to directories only’ option.

Click on the OK button to continue.

Your FTP client will now set folder permissions to 755 and apply it to all sub-folders inside wp-content. This includes uploads folder where all your images are stored.

You also want to make sure that file permissions for individual files in your wp-content folder are correct.

Once again, right click on wp-content folder and select file permissions. This time we will change permissions for files.

Enter 644 in the numeric value and then check the box next to ‘Recurse into subdirectories’.

Lastly, you need to click on ‘Apply to files only’ option.

Click on the OK button to continue. Your FTP client will now set file permissions to 644 for all files in wp-content folder.

You can now visit your WordPress site and try uploading files.

If you still see the error, then you will need to contact your WordPress hostingprovider and ask them to empty the temporary files directory.

WordPress uploads your images using PHP which first saves the uploads to a temporary directory on your web server. After that it moves them to your WordPress uploads folder.

If this temporary directory is full or is poorly configured, then WordPress will not be able to write the file to disk.

This temporary folder is located on your server and in most cases you cannot access it using FTP. You will need to contact your web host and ask them to empty it for you.

We hope this tutorial helped you resolve ‘Upload: Failed to Write File to Disk’ Error in WordPress.

Easy Guide to Add Google Search in WordPress Site

In this  tutorial, we will learn how to easily add Google Search in a WordPress site.

Why You Should Use Google Search in WordPress?

The default WordPress search feature is not very useful. It often fails to find the relevant results. This forces site owners to look for alternatives.

There are plenty of search plugins for WordPress like SearchWP, Swiftype, etc. The problem is that you still have to manage them, and they will have an impact on your server resources.

On the other hand, you can use Google’s reliable and powerful search feature instead. It is free, allows you to limit the search to your sites only, and can be run from your own site.

Other benefits of using Google search are speed, users already trust Google brand, and you will not have to maintain or update it.

Having said that, let’s see how you can easily add Google site search to your WordPress site.

To make it easy, we have created a video tutorial on how to add Google search that you can watch below.

However if you just want to follow text-instructions, then you can follow our step by step tutorial on how to add Google search in a WordPress site.

Method 1: Adding Google Search in WordPress with Plugin

This first method is easier and recommended for beginners. It allows you to add Google search to your WordPress site without modifying your theme files.

First thing you need to do is install and activate the WP Google Search plugin. For more details, see our step by step guide on how to install a WordPress plugin.

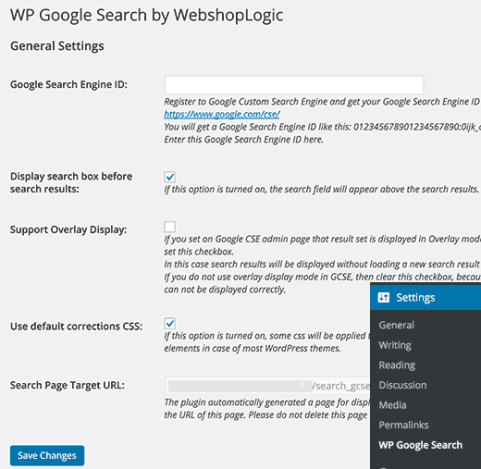
Upon activation, you need to visit Settings » WP Google Search to setup the plugin.

The plugin will ask you to provide a Google Search Engine id. Here is how you will get a search engine ID.

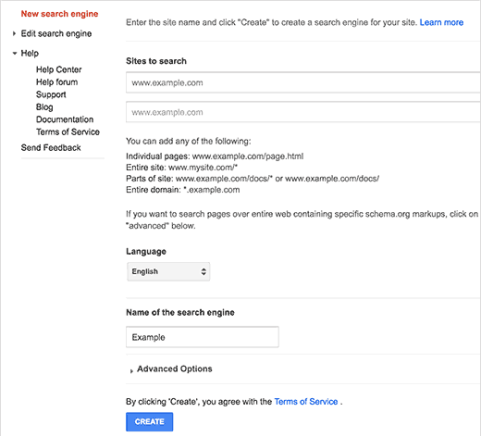
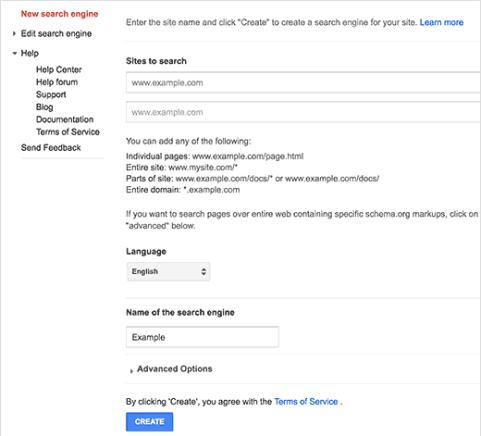
Visit Google Custom Search website and click on New Search Engine link on the left.

Simply provide your WordPress site’s URL in ‘Sites to Search’ field. Next, you need to choose the language of your website. Lastly, click on the create button to continue.

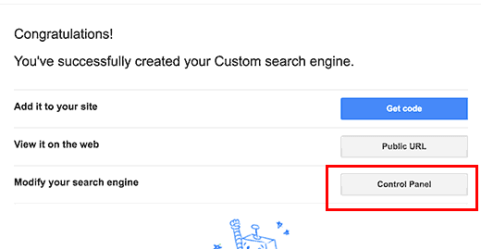
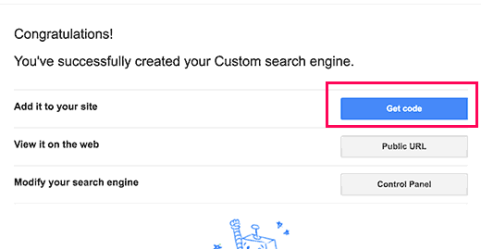
Google will now create your custom search engine and will show you a success message with links to further actions. You need to click on the control panel button to continue editing your search engine.

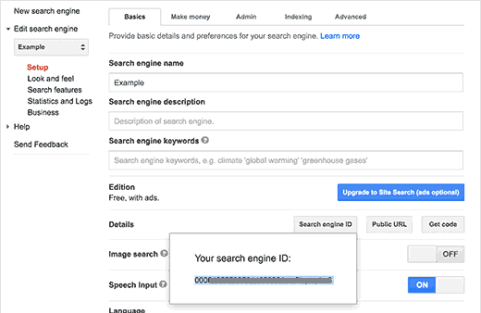
This will take you to the control panel for your custom search engine. First, you need to click on the ‘Search engine ID’ button and copy your search engine ID.

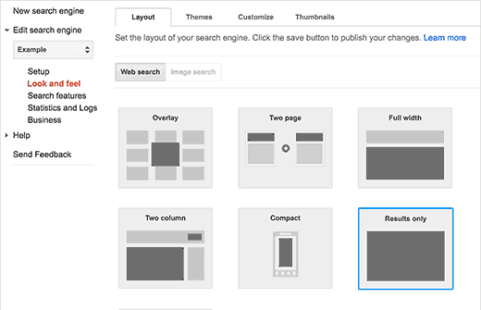
Next, you need to click on the ‘Look and Feel’ section. Under the layout tab, select results only.

Once you are done, click on the save button at the bottom of the page to store your changes.

Now you can switch back to your WordPress site. Paste the search engine ID you copied earlier in the WP Google Search’s settings page and then click on the save changes button to store plugin settings.

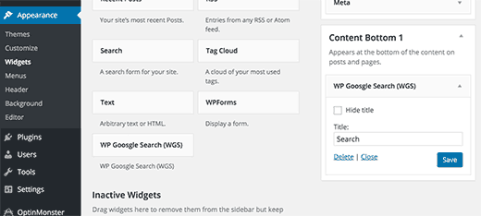
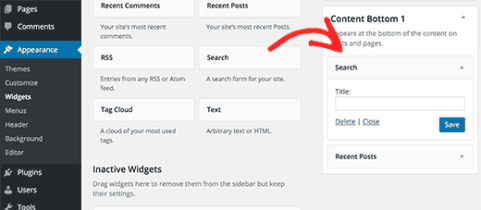
After that you need to visit Appearance » Widgets page. There you will notice WP Google Search widget in the list of available widgets. Drag and drop the widget to a sidebar where you want to display the search form.

Click on the save button to store your widget settings.

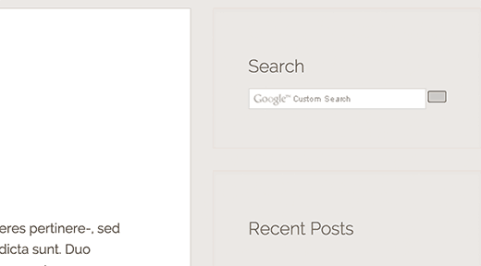
You can now visit your website to see the search form in action.

Method 2: Manually Adding Google Search in WordPress

This method requires making changes to your WordPress theme or child theme files. It is not recommended for beginners. Make sure to backup your WordPress site before making any changes to your theme files.

Visit Google Custom Search website and click on New Search Engine link on the left.

Simply provide your WordPress site’s URL in ‘Sites to Search’ field. Next, you need to choose the language of your website. Lastly, click on the create button to continue.

Google will now create your custom search engine and will show you a success message with links to further actions. You need to click on the Get Code button to continue.

On the next screen, you will see some code in a textarea. You need to copy this code.

For this next step, you will need an FTP client. If you need help, then see our guide on how to use FTP to upload WordPress files.

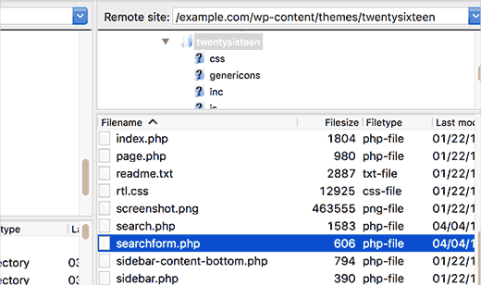
Connect to your website using FTP and then go to /wp-content/themes/your-current-theme/ folder. Replace your current theme folder with the name of your current theme.

Locate the searchform.php file in your WordPress theme directory. Download this file to your computer and open it in a plain text editor like Notepad.

Delete all contents of the file and paste your Google custom search engine code. Save the file and then upload it to back to your WordPress site using FTP.

After pasting Google custom search code, go to Appearance » Widgets to drag and drop the Search widget into your sidebar.

Click on the save button to store your widget settings.

You can now visit your website to see the Google search in action on your WordPress site.

Customizing Google Custom Search Engine Colors and Looks

Go to Google Custom Search website and edit your search engine. This will show settings for your custom search engine. Click on Look and Feel from sidebar.

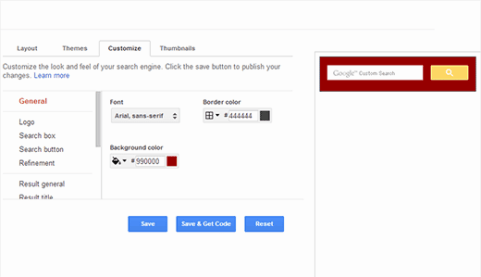
Google custom search has some pre-made themes available to choose from. You can also click on customize tab and choose your own font, border, and background colors.

Once you are done customizing the look of your search box, simply save your changes. You don’t need to paste the code again, these changes will be automatically applied to your search form.

We hope this tutorial helped you learn how to add Google search in a WordPress site.

Easy Guide to Fix WordPress RSS Feed Errors

In this tutorial, we will learn how to find and fix WordPress RSS feed errors.

Most Common WordPress RSS Feed Errors

Most common WordPress RSS feed errors are caused by poor formatting. WordPress outputs RSS feeds in XML which is a strict markup language. A missing line break or an extra tab can break your RSS feed.

The RSS error message will look something like this:

XML Parsing Error: XML or text declaration not at start of entity
Location: http://example.com/feed
Line Number 2, Column 1:

Depending on what browser you are using, your RSS feed error message may vary.

You can also see this error message when visiting your feed in a browser.

Warning: Cannot modify header information – headers already sent by (output started at /home/username/example.com/wp-content/themes/twentysixteen/functions.php:433) in /home/username/example.com/wp-includes/pluggable.php on line 1228

If you are using FeedBurner, then your errors may look different.

Having said that, let’s take a look at what causes these RSS feed errors and how to fix them.

Manually Fixing RSS Feed Errors in WordPress

The most likely reason for your RSS feeds to show error is poor formatting. This poor formatting can be caused by a blank space after closing php tag in a plugin or in your theme’s functions.php file.

If you recently added a code snippet to your theme or child theme‘s functions.php file. Then you need to edit your functions file.

If there is a closing php tag at the end of your functions file, make sure that there is no extra space or line breaks after it.

Ideally, the closing PHP tag is not required at the end of the file. This is why it would be best if you remove the closing php tag altogether.

This should fix the problem in most cases. However, if it does not fix your RSS feed error, then continue reading.

Fixing WordPress RSS Feed Errors Using Plugin

First thing you need to do is install and activate the Fix My Feed RSS Repair plugin. Upon activation, simply go to Tools » RSS Feed Fix page.

Click on the Fix feed button and that’s all.

You can now visit your feed in a browser window or test it with a feed validator tool.

We hope this tutorial helped you fix WordPress RSS feed errors on your site.