Easy Guide to Create a “Sticky” Floating Footer Bar in WordPress

In this tutorial, we will learn how to create a sticky floating footer bar in WordPress.

What is Floating Footer Bar?

A sticky floating footer bar allows you to prominently display your important content to users. This bar remains visible to users at all time, so they are more likely to click on it and discover more useful content.

You can use the floating footer bar to:

  • Drive more clicks to other blog posts
  • Build your email list
  • Bring attention to special offers / sale

In this article, we will show you two methods to add a sticky floating footer bar on your WordPress site. One uses a plugin while the other is a code method that we’re using on WPCademy. You can choose the one you find easier to use.

Method 1: Manually Create Sticky Floating Footer Bar in WordPress

This method requires you to add code in your WordPress files. If you are new to adding code, then please take a look at our guide on how to paste snippets from web into WordPress.

First, you need to connect to your WordPress site using an FTP client or file manager in cPanel.

In your FTP client, you need to locate the footer.php file in your WordPress theme folder and download it to your desktop. It would be located at a path like this:

/wp-content/themes/your-theme-folder/

Next, you need to open the footer.php file in a plain text editor like Notepad and add the following code just before the </body> tag.

You can add as many list items as you want. We will show you how to randomly rotate them on each page load.

The next step is adding the CSS styles.

You can add CSS to your WordPress theme’s style.css file or use the Simple Custom CSS plugin.

/*Footer Bar*/
 
.fixedbar {
background: #000; 
bottom: 0px; 
color:#fff; 
font-family: Arial, Helvetica, sans-serif; 
left:0; 
padding: 0px 0; 
position:fixed; 
font-size:16px; 
width:100%; 
z-index:99999; 
float:left; 
vertical-align:middle; 
margin: 0px 0 0; 
opacity: 0.95; 
font-weight: bold;
}
.boxfloat {
text-align:center; 
width:920px; 
margin:0 auto;
}
 
#tips, #tips li {
margin:0; 
padding:0; 
list-style:none
}
#tips {
width:920px; 
font-size:20px; 
line-height:120%;
}
#tips li {
padding: 15px 0; 
display:none;
}
#tips li a{
color: #fff;
}
#tips li a:hover {
text-decoration: none;
}

After adding the CSS, you may not be able to see the changes on your website. This is because we have set the display for items in our list to none.

Next, we will use jQuery to randomly display one item from our list on each page load.

You need to open a plain text editor like Notepad on your computer and add this code to a blank file:

(function($) {
this.randomtip = function(){
    var length = $("#tips li").length;
    var ran = Math.floor(Math.random()*length) + 1;
    $("#tips li:nth-child(" + ran + ")").show();
};
 
$(document).ready(function(){   
    randomtip();
});
})( jQuery );

Once you are done, you need to save this file as floatingbar.js on your desktop.

Now open your FTP client and connect to your web server. Go to your theme folder and locate js folder. It would be at a path like this:

/wp-content/themes/your-theme-folder/js

If there is no js folder in your theme directory, then you need to create one.

Now you need to upload floatingbar.js file you created earlier to the js folder you just created.

The next step is to enqueue (load) the JavaScript file in your WordPress theme.

Paste this code in your theme’s functions.php file or a site-specific plugin.

function wpb_floating_bar() {
    wp_enqueue_script( 'wpb-footerbar', get_stylesheet_directory_uri() . '/js/floatingbar.js', array( 'jquery' ) );
}
add_action( 'wp_enqueue_scripts', 'wpb_floating_bar' );

That’s all, you can now visit your website to see the floating footer bar in action. Reload the page a couple of times to see footer bar randomly showing different items from your list.

The benefit of using this method is that you get to randomly rotate multiple links in the floating footer bar like we’re doing.

However the difficulty is that you need to add code. Furthermore, you can’t use this floating bar for other things without doing too much CSS customizations.

Method 2: Using OptinMontser to Add Floating Footer Bar in WordPress

OptinMonster is a popular lead generation plugin that works on all websites. It helps you convert website visitors into subscribers and customers.

One of the features OptinMonster has is a floating header and footer bar that you can use to display an email optin form as well as to promote single links / offers.

The benefit of using this method is:

  • Easy to Setup (no code)
  • You can show custom floating bars on different pages / categories of your website.
  • You can use it to build your email list as well as promote offers.

The only downside is that OptinMonster is a paid service. But you can use our OptinMonster Coupon: WPB10 to get 10% discount on any OptinMonster plan.

After you have purchased OptinMonster (Plus or Pro plan), you can use the OptinMonster WordPress API plugin on your site. For more details, see our step by step guide on how to install a WordPress plugin.

This plugins just acts as a connector between your WordPress site and OptinMonster.

Upon activation, the plugin will add a new menu item labeled OptinMonster to your WordPress admin bar. Clicking on it will take you to plugin’s settings page.
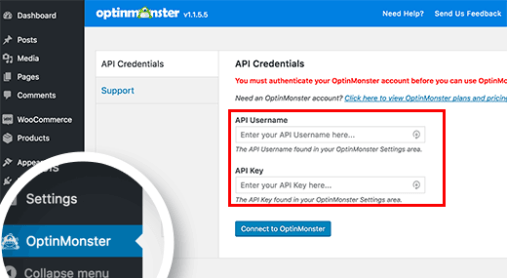
You will be asked to provide your OptinMonster API username and key. You can get these keys from your OptinMonster account.
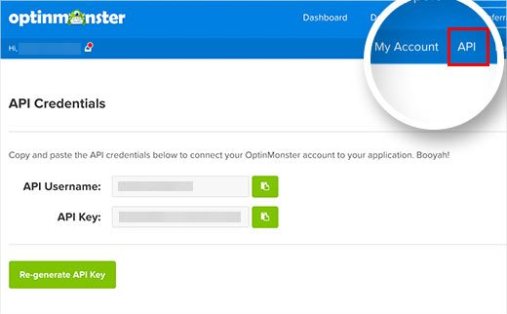
Copy and paste the keys into the plugin settings and click on ‘Connect to OptinMonster’ button. The plugin will now connect your WordPress site to your OptinMonster account.

Next, you need to click on the ‘Create New Optin’ button.

This will take you to ‘Create New Optin’ page on OptinMonster website.

First you need to provide a title for your Optin Campaign and select a website where you will be using this optin. If your site is not listed then click on ‘Add a new website’ link.
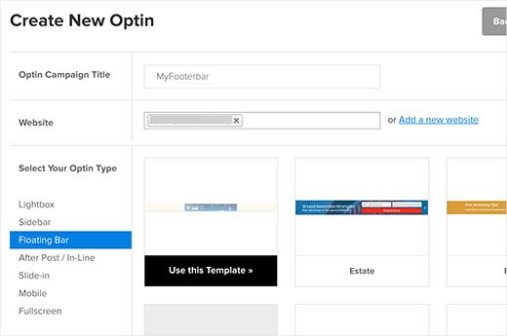
Next, you can click on the Floating bar under the ‘Select your optin type’ to use templates available to use as a floating bar.

You can customize all these templates to your own liking. Select the one that looks closest to what you have in mind.

As soon as you select a template, OptinMonster will launch their design customizer. It is a point-and-click builder where you can configure appearance and settings for your optin.
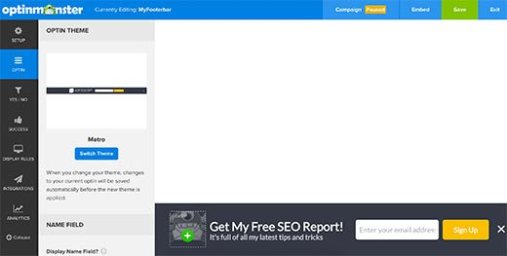
When you are done configuring the appearance of your optin, be sure to click on the save button.

While these are called optins, they don’t always have to be. You can use the Yes / No feature to add the button to view a blog post or claim a special discount.

When you first create your floating bar, it’s Paused by default.

Once you’ve finished configuring it, hover over to the status bar in the top menu and choose Start Campaign.

Your floating bar is now ready to be added to your WordPress site.

Return to the admin area of your WordPress site and visit OptinMonster » Optins. You will see your optin listed here. If you don’t see it, then click on Refresh Optins button and the plugin will display it.

Click on the ‘Edit output settings’ link to continue.
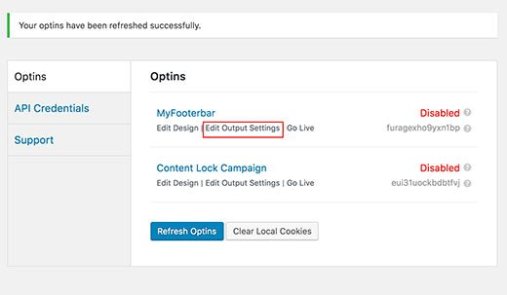
On the next page, check the box next to ‘Enable optin on site’ option and then click on the save settings.

You can also use the Advanced option to only show the floating bar on specific posts, pages, categories, and other areas.

That’s all, floating footer bar optin is now live on your WordPress site.

We hope this tutorial helped you add a floating footer bar to your WordPress site.

Easy Guide to Start an Online Store in 2019 (Step by Step)

What Do You Need to Start an Online Store?

There had never been a better time to start an online business than today.

Anyone with a computer can get started within a matter of minutes and without acquiring any special skills.

The three things you need to start an online store are:

  1. A domain name idea (this will be the name of your online store i.e wpcademy.com)
  2. A web hosting account (this is where your website lives on the internet)
  3. Your undivided attention for 30 minutes.

Yep, it is really that simple.

You can setup your own online store with WordPress in less than 30 minutes and we’ll walk you through each step of the process.

Step 1: Setting up Your Online Store Platform

The biggest mistake most users make is not choosing the right platform for their online store.

Thankfully you’re here, so you won’t be making that mistake.

There are two popular eCommerce platforms that we recommend: Shopify or WordPress + WooCommerce.

Shopify is a fully hosted eCommerce solution that starts at $29 / month. It’s a hassle-free solution where you just login and start selling. The downside to Shopify is that it gets quite expensive, and your payment options are limited unless you pay additional fees.

This is why most users choose WordPress + WooCommerce because of the flexibility it offers. It does require some setup, but it’s worth doing it for the long run. WooCommerce is the world’s largest eCommerce platform (see: Shopify vs WooCommerce comparison).

In this tutorial, we will walk you through how to setup an online store in WordPress using WooCommerce.

To setup your store, you need to have a domain name, web hosting, and a SSL certificate.

A domain name is your website’s address on the internet. It is what users will type in their browsers to reach your website (for example: google.com or wpcademy.com).

Web hosting is where your website lives on the internet. It’s your website’s house on the internet. Every website on the internet needs web hosting.

SSL certificate adds a special security layer on your website, so you can accept sensitive information such as credit card numbers and other personal information. This is required for you to accept credit card payments on your website.

Normally a domain name costs around $14.99 / year, web hosting costs around $7.99 / month, and SSL certificate costs around $69.99 / year.

That’s a lot of startup cost.

Thankfully, Bluehost, an official WordPress and WooCommerce recommended hosting provider, has agreed to offer our users a free domain namefree SSL certificate, and a discount on web hosting.

Basically, you can get started for $6.95 / month.

Bluehost is one of the oldest web hosting companies, started in 1996 (that’s before Google). They are also the largest brand name when it comes to WordPress hosting because they host millions of websites including our own.

NOTE: At WPCademy we believe in transparency. If you sign up with Bluehostusing our referral link, we will earn a small commission at no extra cost to you (in fact, you will save money and get a free domain). We would get this commission for recommending just about any WordPress hosting company, but we only recommend products that we use personally use and believe will add value to our readers.

Let’s go ahead and purchase your domain + hosting + SSL.

Open up Bluehost in a new window using this link and follow along.

First thing you need to do is click on the green Get Started Now button to get started.

On the next screen, select the plan that you need (starter and plus are the most popular).

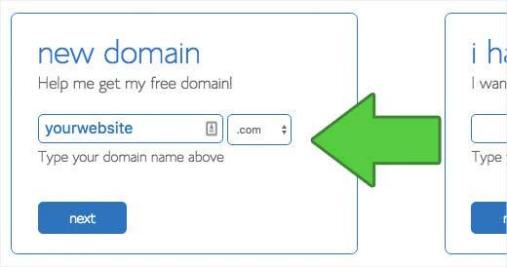
After that, you will be asked to enter the domain name for your website.

Lastly, you will need to add your account information and finalize the package info to complete the process. On this screen, you will see optional extras that you can purchase.

It’s entirely up to you whether or not you purchase these, but we generally don’t recommend purchasing these. You can always add them later on, if you decide that you need them.


Once completed, you will receive an email with details on how to login to your web hosting control panel (cPanel). This is where you manage everything from support, emails, among other things.

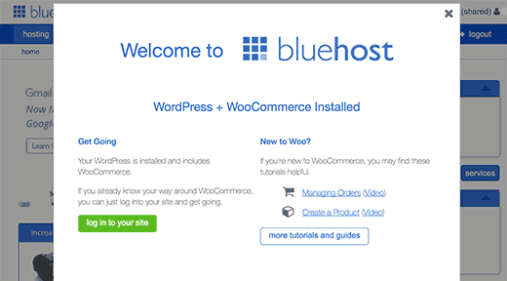
Go ahead and login to your cPanel. You will be greeted with a popup informing you that WordPress with WooCommerce is pre-installed on your website.

You just need to click on ‘Login to your site’ button, and it will take you to your WordPress site’s dashboard.

Congrats, you have finished setting up hosting and domain part.

The next step is to setup your WordPress site and then your online store.

Step 2. Setting up WordPress

Bluehost has automatically installed WordPress and WooCommerce on your website.

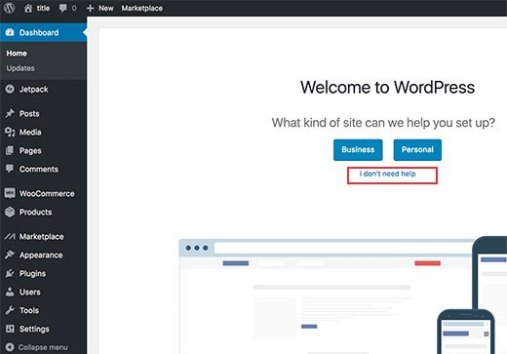
When you first login to WordPress, you will see a welcome message. You will be asked what kind of website you want to set up.

Go ahead and click on ‘I don’t need help’ link. Don’t worry we will walk you through all the necessary steps.

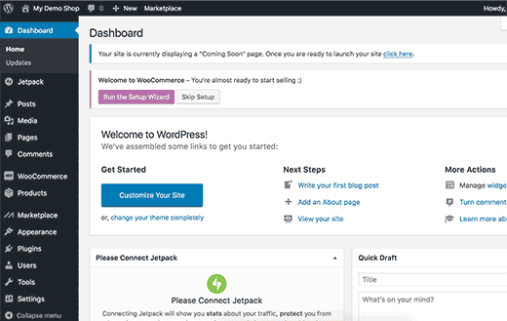
Closing the setup wizard will show your WordPress admin dashboard which looks like this:

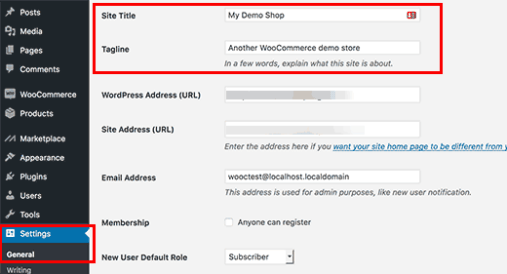
First, you need to visit Settings » General page to setup your WordPress site title and description.

Setting up HTTPS to Use SSL

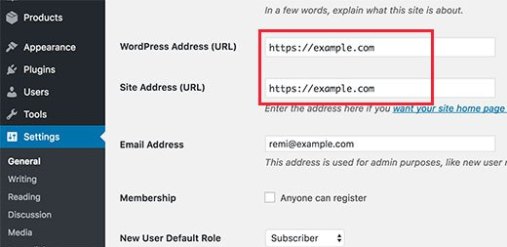
Your WordPress hosting package came with a free SSL Certificate. This certificate is pre-installed for your domain name. However, your WordPress site needs to be configured, so it loads as https vs http.

On the Settings » General page, you need to change your WordPress Address and Site Address to use https instead of http.

Don’t forget to scroll down to the bottom of the page and click on the save changes button to store your settings.

Your basic WordPress setup is complete. Now it is time to setup your online store.

Step 3. Setting up Your WooCommerce Store

Before you can start selling, there are a few things like currency, payments, and shipping information that you need to set up.

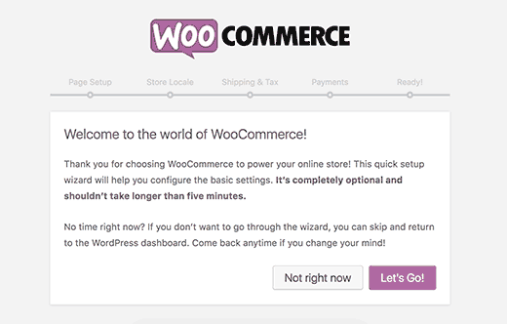
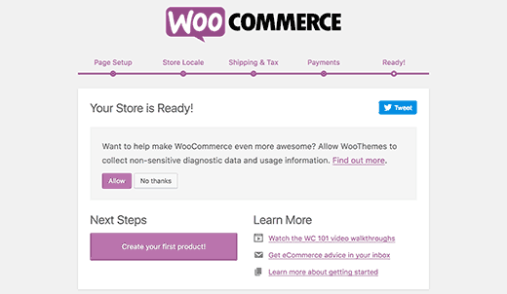
You will be seeing a ‘Welcome to WooCommerce’ notification on your WordPress admin pages. Go ahead and click on the ‘Run setup wizard’ button in the notification.


This will launch the WooCommerce setup wizard where you need to click on the ‘Let’s go’ button to get started.

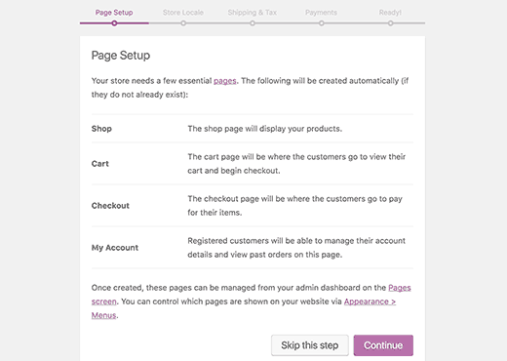
WooCommerce needs few essential pages for cart, account, shop, and checkout. You can click on the continue button to automatically create these pages.

This will bring you to the next step.

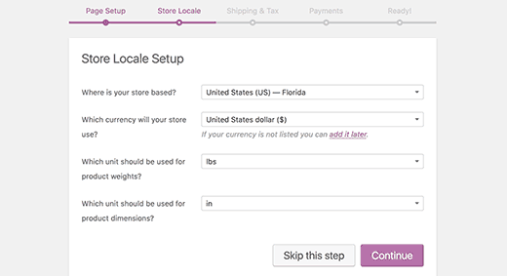
Now you will need to tell WooCommerce where your store is located and which currency and unit measures to use.

After selecting your location and currency, click on the continue button to move on.

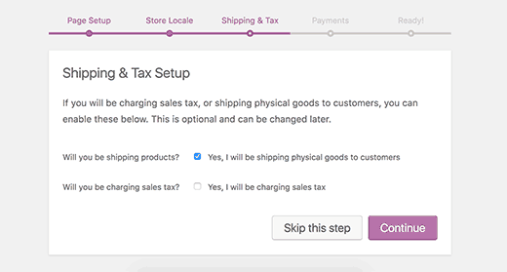
Next, you need to enter shipping and tax information.

WooCommerce can be used to sell both digital downloads and physical goods that need shipping.

You need to check the box if you will be shipping goods, or you can leave it unchecked if you will only be selling digital goods.

Next you need to answer the tax question. WooCommerce can help you automatically calculate and add taxes to your prices.

If you are not sure, then you can leave it unchecked. You can always add tax information later from WooCommerce settings.

Click on the continue button to move on.

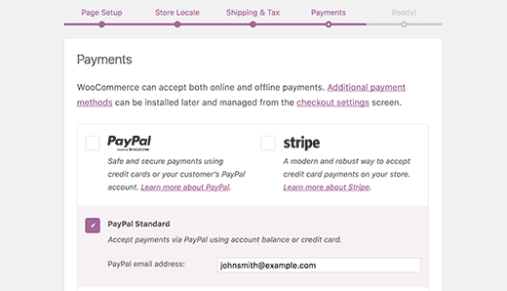
Next, you will be asked to choose a payment method for your online store.

By default, WooCommerce comes with support for PayPal, PayPal Standard, and Stripe payment gateways. There are many other payment methods available for WooCommerce which you can install later if you need.

The easiest way to accept payment is using PayPal Standard.

Simply enter your PayPal email address and click on the continue button.

A lot of people including us, use both PayPal and Stripe. By using Stripe, you allow your users to enter their credit card information on the checkout page without having to leave your site and going to PayPal.

You can setup Stripe by following the instructions on the WooCommerce screen.

Once you’re done, your WooCommerce online store is all setup.

You need to click on the ‘Return to WordPress dashboard’ link to exit the setup wizard.

After finishing the WooCommerce setup, you are now ready to add products to your online store.

Step 4. Adding Products to Your Online Store

Let’s start with adding the first product to your online store.

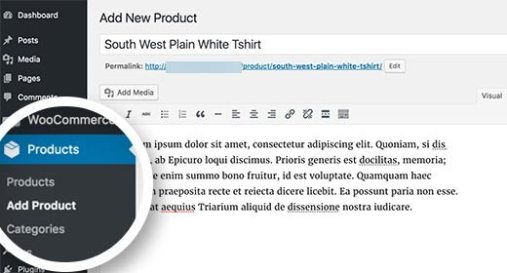
You need to visit Products » Add New page to add a new product.

First, provide a title for your product and then some detailed description.

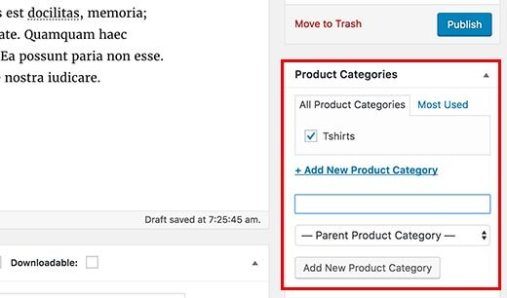
On the right hand column, you will see the ‘Product Categories’ box. Click on the ‘+Add New Product Category’ to create a category for this product. This allows you and your customers to sort and browse products easily.

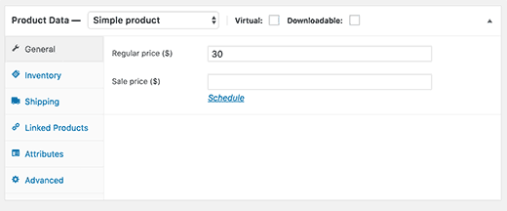
Scroll down a little and you will notice the Product Data box. This is where you will provide product related information like pricing, inventory, shipping etc.

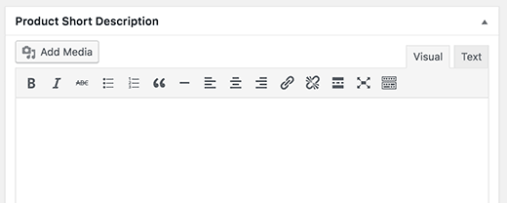
Below product data box, you will see a box to add product short description. This short description will be used when users are viewing multiple products on a page.

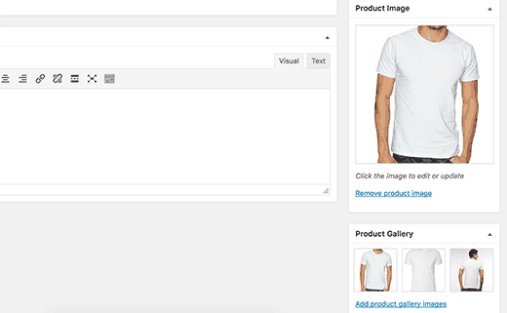
Lastly, on your right hand column you will see boxes to add a main product image and a product gallery.

Once you are satisfied with all the product information you have added, you can click on the Publish button to make it live on your website.

Repeat the process to add more products as needed.

Step 5. Select and Customize WordPress Theme

Themes control how your WordPress sites look to the users when they visit it. For a WooCommerce shop, they also control how your products are displayed.

There are thousands of paid and free WordPress themes available.

Your Bluehost hosting account, automatically installs the Storefront theme for your website. You will need to customize it to meet your needs.

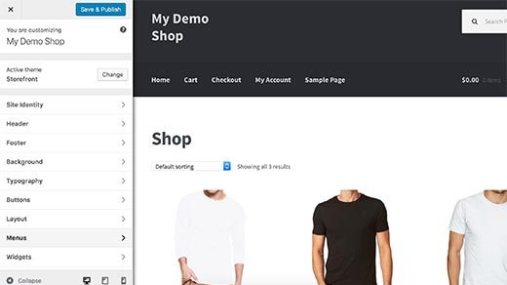
Head over to Appearance » Customize page. This will launch theme customizer where you can change different theme settings.

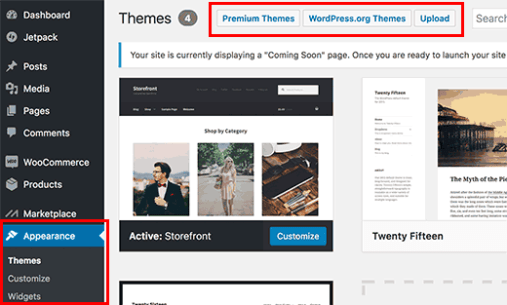
If you don’t like the Storefront theme, then you can use another theme by visiting Appearance » Themes page.

If you need help selecting a theme, then please refer to our guide on 9 things you should consider when selecting a perfect WordPress theme.

Step 6. Extend Your Online Store With Plugins

Now that you have your online store ready, you probably want to get started with adding other usual elements on your website such as a contact form, about page, and more.

To further customize WordPress and add features like contact forms, galleries, sliders, etc, you need to use WordPress plugins.

WordPress plugins are apps that allow you to add new features to your website.

There are over 46,000 WordPress plugins available. At WPCademy, we feature the best WordPress plugins to help you add the functionality that you need.

Easy Guide to Exclude Specific Categories from WordPress RSS Feed

In this tutorial, we will learn how to exclude specific categories from WordPress RSS feed.

Method 1: Exclude Specific Categories from WordPress RSS Feed Using Plugin

01: First thing you need to do is install and activate the Ultimate Category Excluder plugin. For more details, see our step by step guide on how to install a WordPress plugin.

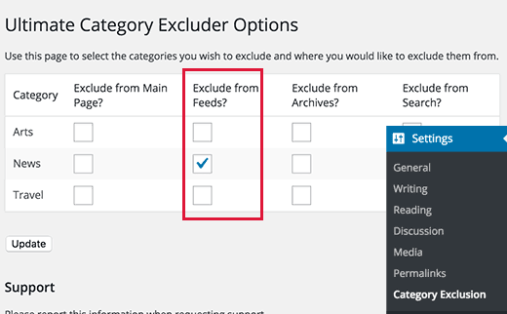
02: Upon activation you need to visit Settings » Category Exclusion to configure plugin settings.

Exclude Specific Categories from wordpress rss

03:The settings page will display all categories on your WordPress blog with options to hide them from front page, RSS feeds, archive pages, and search results.

04:Simply select the exclude from feed box next to the categories that you want to exclude from your RSS feed.

05: Don’t forget to click on update button to save your settings.

That’s all, posts filed under your selected categories will disappear from your WordPress RSS feed.

Method 2: Manually Exclude Specific Categories from WordPress RSS Feed

This method requires you to paste code in your WordPress files. You can use this method if you are comfortable with pasting code snippets from web into WordPress.

You need to add this code to your theme’s functions.php file or a site-specific plugin.

function exclude_category($query) {
    if ( $query->is_feed ) {
        $query->set('cat', '-5, -2, -3');
    }
return $query;
}
add_filter('pre_get_posts', 'exclude_category');

This code simply excludes categories that match the given IDs. Simply replace the category IDs in the code with the IDs of categories that you want to exclude.

See our guide on how to find category IDs in WordPress.

If you just want to exclude a single category, then change the code like this:

function exclude_category($query) {
    if ( $query->is_feed ) {
        $query->set('cat', '-15');
    }
return $query;
}
add_filter('pre_get_posts', 'exclude_category');

Replace -15 with the ID of category that you want to exclude from RSS feed.

We hope this tutorial helped you learn how to exclude specific categories from WordPress RSS feed.

Easy Guide to Fix Render-Blocking JavaScript and CSS in WordPress

In this tutorial, we will learn how to easily fix render blocking JavaScript and CSS in WordPress to improve your Google PageSpeed score.

What is Render-Blocking JavaScript and CSS?

Every WordPress site has a theme and plugins that add JavaScript and CSSfiles to the front-end of your website. These scripts can increase your site’s page load time, and they can also block rendering of the page.

A user’s browser will have to load those scripts and CSS before loading rest of the HTML on the page. This means that users on a slower connection will have to wait a few milliseconds more to see the page.

These scripts and stylesheets are referred to as render-blocking JavaScript and CSS.

Website owners who are trying to achieve the Google PageSpeed score of 100 will need to fix this issue to attain that perfect score.

What is Google PageSpeed Score?

Google PageSpeed Insights is an online tool created by Google to help website owners optimize and test their websites. This tool tests your website against Google’s guidelines for speed and offers suggestions to improve your site’s page load time.

It shows you a score based on the number of rules that your site passes. Most websites get somewhere between 50-70. However, some website owners feel compelled to achieve 100 (the highest a page can score).

Do You Really Need the Perfect “100” Google PageSpeed Score?

The purpose of Google PageSpeed insights is to provide you guidelines to improve speed and performance of your website. You are not required to follow these rules strictly.

A better user experience requires a lot more than just speed. You also need to offer useful information, better user interface, and engaging content with text, images, and videos.

Your goal should be to create a fast website that offers great user experience.

We recently redesigned WPCademy, and we kept our focus on speed as well as improving user experience.

We recommend that you use Google Pagespeed rules as suggestions, and if you can implement them easily without ruining user experience, then that’s great. Otherwise, you should strive to do as much as you can and then don’t worry about the rest.

Having said that, let’s take a look at what you can do to fix render blocking JavaScript and CSS in WordPress.

We will cover two methods that will fix the render blocking JavaScript and CSS in WordPress. You can choose the one that works best for your website.

1. Fix Render Blocking Scripts and CSS with Autoptimize

This method is simpler and recommended for most users.

First thing you need to do is install and activate the Autoptimize plugin. For more details, see our step by step guide on how to install a WordPress plugin.

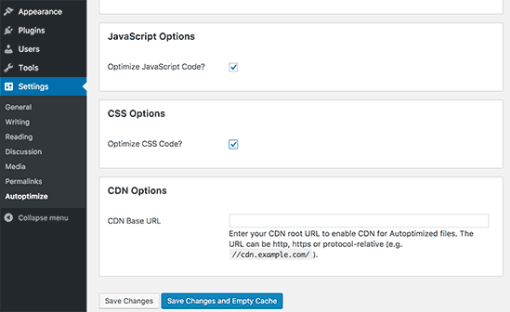
Upon activation, you need to visit the Settings » Autoptimize page to configure the plugin settings.

Fix Render-Blocking JavaScript and CSS in WP

You can start by checking the box next to JavaScript Options and CSS Options and then click on the save changes button.

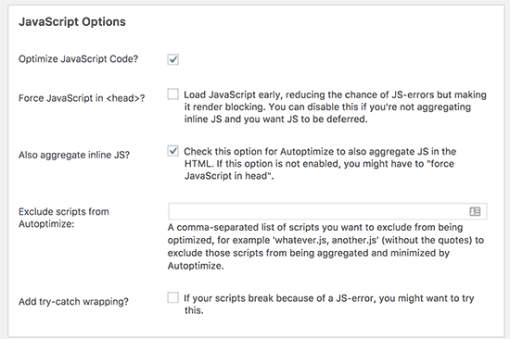
You can now test your website using PageSpeed tool. If there are still render blocking scripts, then you need to come back to the plugin’s settings page and click on ‘Show Advanced Settings’ button at the top.

Here you can allow plugin to include inline JS and remove scripts that are excluded by default like seal.js or jquery.js.

Next, scroll down to CSS option and allow plugin to aggregate inline CSS.

Click on the ‘Save changes and Empty Cache’ button to save your changes and empty plugin cache.

Once you are done, go ahead and check your website again with the PageSpeed tool.

Make sure that you thoroughly test your website to see that nothing is broken by optimizing your JavaScripts or CSS.

How does it work?

Autoptimize aggregates all enqueued JavaScript and CSS. After that, it creates minified CSS and JavaScripts files and serves cached copies to your website as async or deferred.

This allows you to fix the render blocking scripts and styles issue. However, please keep in mind that it can also affect the performance or appearance of your website.

2. Fix Render Blocking JavaScript using W3 Total Cache

This method requires a little more work and is recommended for users already using W3 Total Cache plugin on their website.

First you will need to install and activate the W3 Total Cache plugin. If you need help, then see our guide on how to install and setup W3 Total Cache for Beginners.

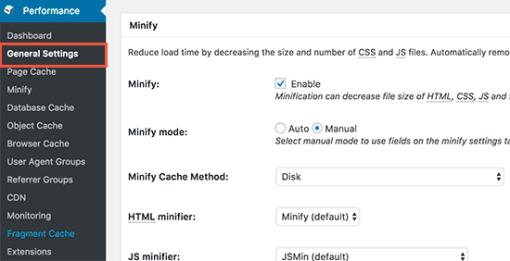
Next, you need to visit Performance » General Settings page and scroll down to Minify section.

Fix Render-Blocking JavaScript and CSS in WP

First you need to check ‘Enable’ next to Minify option and then select ‘Manual’ for minify mode option.

Click on the save all settings button to store your settings.

Next, you need to add the scripts and CSS that you want to minify.

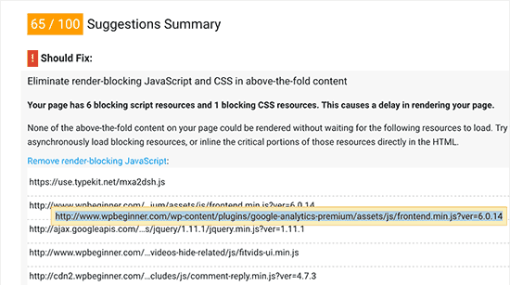
You can get the URLs of all the scripts and stylesheets that are render blocking from Google PageSpeed Insights tool.

Under the suggestions where it says: ‘Eliminate render-blocking JavaScript and CSS in above-the-fold content’, click on ‘Show how to fix’. It will show you the list of scripts and stylesheets.

Fix Render-Blocking JavaScript and CSS in WP

Take your mouse over to a script and it will show you the full URL. You can select this URL and then use your keyboard’s CTRL+C (Command+C on Mac) keys to copy the URL.

Now head over to your WordPress admin area and go to Performance » Minify page.

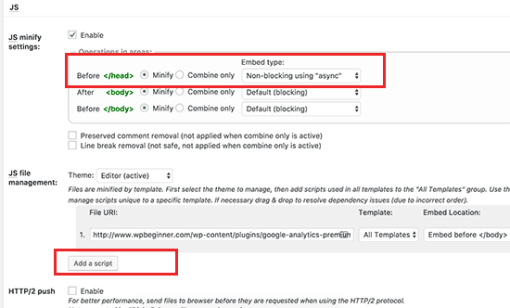
First you need to add JavaScript files that you want to be minified. Scroll down to JS section and then under the ‘Operations in areas’ set the embed type to ‘Non-blocking async’ for the <head> section.

Fix Render-Blocking JavaScript and CSS in WP

Next, you need to click on the ‘Add script’ button and then start adding script URLs that you copied from Google PageSpeed tool.

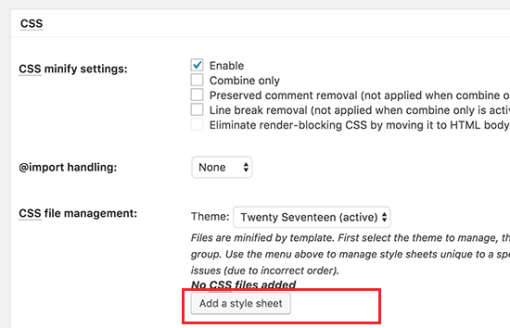
Once you are done, scroll down to CSS section and then click on the ‘Add a stylesheet’ button. Now start adding stylesheet URLs you copied from Google PageSpeed tool.

Fix Render-Blocking JavaScript and CSS in WP

Now click on the ‘Save settings and purge cache’ button to store your settings.

Visit the Google PageSpeed tool and test your website again.

Make sure that you also test your website thoroughly to see that everything is working fine.

Troubleshooting

Depending on how the plugins and your WordPress themes uses JavaScript and CSS, it could be quite challenging to completely fix all render blocking JavaScript and CSS issues.

While the above tools can help, your plugins may need certain scripts at a different priority level to work properly. In that case, the above solutions can break your plugins or they could behave unexpectedly.

Google may still show you certain issues like optimizing CSS delivery for above the fold content. Autoptimize allows you to fix that by manually adding inline CSS required to display the above fold area of your theme.

However, it could be quite difficult to find out what CSS code you will need to display above the fold content.

That’s all, we hope this tutorial helped you learn how to fix render blocking JavaScript and CSS in WordPress.

Easy Guide to Display Related Posts by Same Author in WordPress

In this tutorial, we will learn how to display related posts by same author in WordPress.

Method 1: Display Related Posts by Author in WordPress Using Plugin

This method is easier and is recommended for all users.

First thing you need to do is install and activate the Similar Posts plugin. For more details, see our step by step guide on how to install a WordPress plugin.

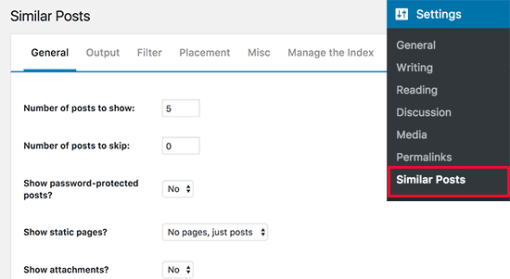
Upon activation, you need to visit Settings » Similar Posts page to configure plugin settings.

Related Posts by Same Author in WordPress

The settings page is divided into different tabs, and you will land on the General tab by default. You can review the options and change them to match your requirements.

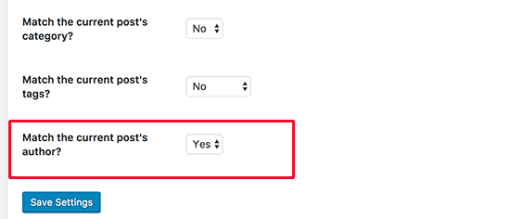
On this page, you need to scroll down to the bottom and select ‘Yes’ next to ‘Match the current post’s author’ option. You can uncheck other matching options to make sure that the plugin only fetches posts by author.

Related Posts by Same Author in WordPress

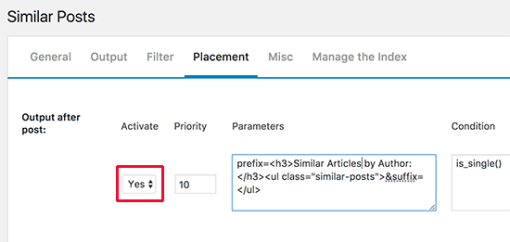
Next, you need to switch to the ‘Placement’ tab and activate ‘Output after post’ option. You can also edit output template by editing the text in the ‘Parameters’ box.

Related Posts by Same Author in WordPress

Don’t forget to click on the ‘Save Settings’ button to store your changes.

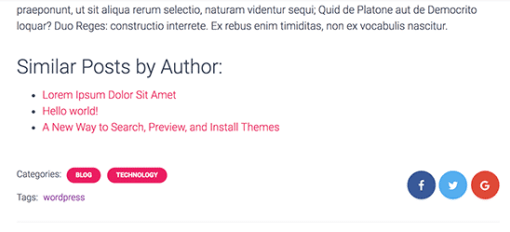
You can now visit any single post on your website, and you’ll see related posts by the same author after the post content.

Related Posts by Same Author in WordPress

Method 2: Manually Display Related Posts by Same Author in WordPress

This method requires you to add code to your WordPress theme files. If you haven’t done this before, then check out our guide on how to copy and paste code in WordPress.

You will need to add the following code to your theme’s functions.php file or in a site-specific plugin.

function wpb_related_author_posts($content) {
 
if ( is_single() ) { 
    global $authordata, $post;
     
    $content .= '

Similar Posts by The Author:

‘; $authors_posts = get_posts( array( ‘author’ => $authordata->ID, ‘post__not_in’ => array( $post->ID ), ‘posts_per_page’ => 5 ) ); $content .= ‘

‘; } $content .= ‘

‘; return $content; } else { return $content; } } add_filter(‘the_content’,’wpb_related_author_posts’);

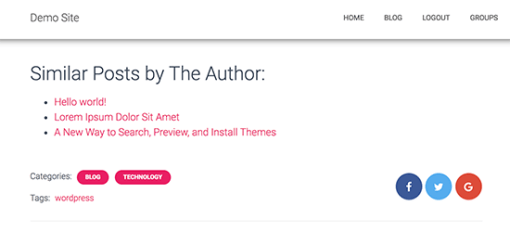
You can now visit any single post on your website, and you’ll see related posts by the same author below the content.

Related Posts by Same Author in WordPress

We hope this tutorial helped you learn how to easily display related posts by same author in WordPress.

Easy Guide to Disable PDF Thumbnail Previews in WordPress

In this tutorial, we will learn how to easily disable PDF thumbnail previews in WordPress.

Why Disable PDF Thumbnail Previews in WordPress?

WordPress 4.7 started generating thumbnail previews of PDF files uploaded from WordPress media uploader.

Easy Guide to Disable PDF Thumbnail Previews

This is a very useful feature for most WordPress sites.

However, some site owners may already be using PDF plugins that handle thumbnail previews and the overall display of the PDF downloads on their website.

If the new feature is conflicting with their existing PDF uploads, then they may want to disable PDF thumbnail previews in WordPress.

Having said that, let’s take a look at how to easily disable PDF thumbnail previews in WordPress 4.7 and later versions.

Disable PDF Thumbnail Previews in WordPress

This tutorial requires you to add a simple code snippet on your WordPress site. If you haven’t done this before, then you may want to see our guide on pasting code snippets from web into WordPress.
You will need to add this code to your theme’s functions.php file or a site-specific plugin.

function wpb_disable_pdf_previews() { 
$fallbacksizes = array(); 
return $fallbacksizes; 
} 
add_filter('fallback_intermediate_image_sizes', 'wpb_disable_pdf_previews');

Don’t forget to save your changes.

This code simply gives WordPress an empty array for PDF thumbnail sizes and stops WordPress from generating thumbnail previews.

You can now try uploading a PDF file to your WordPress site using the media uploader. You will notice that WordPress will not generate any thumbnail previews for your PDF file.

Easy Guide to Disable PDF Thumbnail Previews in WP

We hope this tutorial helped you learn how to disable PDF thumbnail previews in WordPress.

Easy Guide to Sell Ads on Your WordPress Blog (Step by Step)

In this tutorial, we will show you how to sell adds on your WordPress blog and explain the different types of ad options available to you.

What Do You Need to Sell Ads on Your WordPress Blog?

First, you need to make sure you are using the right blogging platform. There are two types of WordPress blogs, WordPress.com which is a hosted blogging service and WordPress.org also called self-hosted WordPress. See the difference in our comparison of WordPress.com vs WordPress.org.

WordPress.com have their own WordAds program and only allows third-party ads if you sign up for the business plan.

On the other hand, you can run ads on your self-hosted WordPress.org website out of the box.

If you don’t yet have a WordPress.org website, then follow the instructions in our guide on how to start a WordPress blog, and you will be up and running in no time.

That being said, let’s take a look at what kind of ads you can sell on your WordPress blog.

Types of Ads You Can Sell on Your WordPress Blog

There are different types of ads that you can sell on your WordPress blog. One ad type may work better than the other depending on your website’s topic, audience, and overall traffic.

You can also choose to combine different ad types to create an effective monetization strategy for your blog.

1. CPC or Cost-Per-Click Ads

Cost-per-click ads are the most common type of ads displayed on the majority of websites. Ads are sold on a per-click basis which means you are only eligible to get paid when a user clicks on the ad.

The reason this ad type is so successful is that it works effectively for both publishers and advertisers. Advertisers get traffic to their websites which they can use to generate leads or increase sales. The publisher is able to get paid for sending traffic.

Advertising programs like Google AdSense allow you to easily sell cost per click ads on your website. Once you sign up with the Google AdSenseprogram, your website will become available to Google’s enormous network of advertisers.
For more details see our guide on how to properly add Google AdSense in WordPress.

One downside is that if you have low traffic, or your ads are not placed at strategic locations, then you may get a very low click-through rate for ads on your website. However, many website owners quickly overcome this by optimizing their ads in WordPress.
2. CPM or Cost-Per-Thousand-Impressions Ads

CPM (cost per mille) or cost-per-thousand-impression are ads that are sold based on how many times they are displayed. This means you get paid for displaying ads on your website whether users click on them or not.

CPM ads often fail to generate the same amount of revenue as you would generate with cost-per-click ads alone. However, they can be a significant source of income if you have a high traffic website, and you don’t want to place ads too close to your content.

Advertisers are particularly keen on buying CPM ads on websites with a high reputation among their target audiences.

3. Flat Fee Ads

Flat fee ads allow you to sell ad spots on your website for a specific time-period. You can price your ads based on how much traffic your website generates on an average.

This type of ads provide more impressions and clicks to advertisers and allow website owners to know exactly how much they will earn at the end of the period.

Advertisers usually purchase this type of ads on websites with higher traffic matching their target demographics. You can sell ads directly through your website by creating an ‘Advertise Here’ page. Alternatively, you can also join programs like BuySellAds or DoubleClick by Google.

4. Affiliate Ads

Affiliate ads can also be called action based ads. Basically, you send traffic to an advertiser’s website, but you only get paid if a user completes an action. This action could be anything like making a purchase, downloading software, creating an account, etc.

Affiliate programs provide you a unique URL with your referral ID. You can then use this URL to create banners, graphics, or add links directly in your articles.

The benefit of affiliate ads is that you get paid substantially higher than what you would get paid on a cost per click or cost per mille ad.

You can sign up for affiliate programs of different products and services that you want to promote. Each product, service, and affiliate program comes with its own commission rates, terms, and conditions.
For example, WPEngine’s affiliate program allows you to earn on each new sign up you send their way. Your commission will be based on the user’s entire first month payment or fixed $200 whichever is higher.

You can easily manage your affiliate links in WordPress using ThirstyAffiliates. You will also find plenty of tools and plugins to boost your affiliate marketing.

Setting up Banner Ads on Your Website

After looking at the different ad types you can come up with a monetization strategy that works for you. Don’t worry if you are still not sure which is the right choice for you.

Most website owners use multiple ad types and then prioritize them based on their earning potential.

Once you have chosen a monetization strategy, you are now ready to add banner ads to your website. WordPress has several really good ad management plugins that you can use.
We recommend using AdSanity, it is one of the most beginner-friendly ad management plugin for WordPress.

First thing you need to do is install and activate the AdSanity plugin. For more details, see our step by step guide on how to install a WordPress plugin.

Upon activation, simply go to Adsanity » Create Ad to create your first ad.

AdSanity allows you to create any kind of ad. You can create a self-hosted ad, local ad, or add the ad code provided by an ad program like Google AdSense.

If you are running a local ad, then you can upload a banner image and graphics. If it is a third-party ad, then you can go ahead and enter the ad code.

Under the publish meta box, you can also schedule the ad to run for a specific period or allow it to run indefinitely. Don’t forget to click on the publish or update button to save your changes.

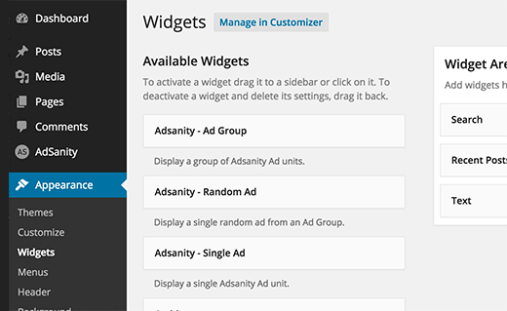
AdSanity allows you to display ads anywhere on your website using widgets and shortcodes. Simply go to Appearance » Widgets page and drag and drop the AdSanity single ad widget to a sidebar.


We hope this tutorial helped you learn how to sell ads on your WordPress blog.