Easy Guide to Add the Official Twitter Follow Button in WordPress

In this article we will cover what is the twitter follow button, and how you can add it in your WordPress site.

What is the Twitter Follow Button

Twitter follow button is a small widget which allows users to easily follow your twitter account (or any twitter account) from any website. The follow button uses the same implementation model as the official tweet button, and it is really simple to integrate. You can see the demo of the follow button on the top left corner of the image below. When you click on the follow button, a window opens with more information about the user.


You are probably wondering how it is different from the Smart Follow button below?

Well the smart follow button requires you to do the whole Twitter Anywhere integration. It also doesn’t allow you to show your follower count or do any customization. Whereas the Twitter follow button lets you show the count, and it is very easy to integrate. Check out the live example below (don’t forget to click follow to see what it does):

How to Add the Official Twitter Follow Button in WordPress

You can go to the Follow Button page and generate a code for you. Or you can simply copy the code below:

1
2
<a href="http://twitter.com/wpbeginner" class="twitter-follow-button" data-show-count="true">Follow @wpbeginner</a>

P.S. Make sure to change the username with your own.

If you are using the official tweet button, then you do not need to paste the script twice. So your code will look like this:

1
<a href="http://twitter.com/wpcademy" class="twitter-follow-button" data-show-count="true">Follow @wpcademy</a>

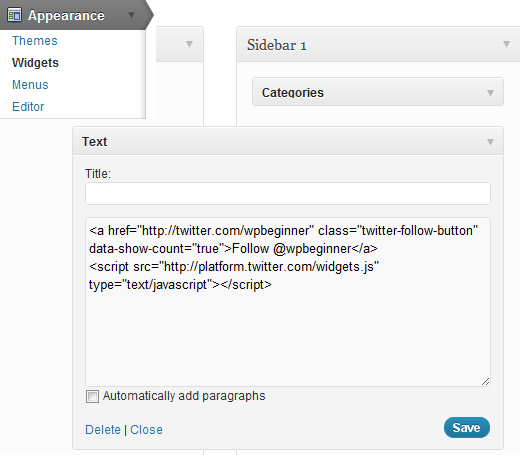
Now you can paste the code anywhere you like in your WordPress theme. Most folks will put such code in their sidebar.php file. However, if you don’t feel comfortable editing a theme file, then you can utilize WordPress theme widgets as well. All good themes come with widget-ready sidebars. So all you would have to do is go to Appearence » Widgets tab. Then add a text widget to your appropriate sidebar. Lastly, paste the code above, and you are done. Look in the screenshot below for the example:
There is really no need to add a plugin to do something as simple as this.

Advanced Customization

This section is for designers and developers who want to customize this button further to match their site’s color scheme etc. Twitter lets you customize the button color, text color, link color, language, widget, and alignment of the plugin.

Available variables in the JavaScript version that we are using:

  • data-show-count (true or false)
  • data-button (blue or grey)
  • data-text-color (hex code)
  • data-link-color (hex code)
  • data-lang (en, fr, de, es) – uses the two letter ISO-639-1 language code
  • data-width – (300px)
  • data-align – (right)

If you want to specify it in the a code it would look something like this:

1
<a href="http://twitter.com/wpbeginner" class="twitter-follow-button" data-button="grey" data-text-color="#FFFFFF" data-link-color="#ffa24f" data-show-count="true">Follow @wpbeginner</a>

Resources:

Follow Button Documentation
Follow Button Generator

Easy Guide to Change WordPress Theme via phpMyAdmin

Change WordPress Theme via phpMyAdmin

In this tutorial we are going to learn how to change WordPress theme from the database. WordPress makes it extremely easy to manage themes from the admin area. However, if you are unable to access your WordPress admin area, then you will need to find other ways to change your WordPress theme.

Why and When You Need to Use phpMyAdmin?

Normally, the easiest way to change your WordPress theme is by visiting the Appearance » Themes page in WordPress admin area. However, sometimes a WordPress error can make your website admin area inaccessible.

In that case, the safest way to recover your website is by restoring it from backup. Another way is to troubleshoot the WordPress error causing the problem. In troubleshooting, the easiest way to switch themes is to make a backup of your existing theme via FTP, and then remove all theme folders from /wp-content/themes/ except for the default theme. WordPress will automatically revert to the default theme.

Both of the above methods will give you access to the WordPress admin area, and you will be able to change the theme.

However if you don’t have a backup, and you don’t want to revert to a default theme, then you can change to a custom WordPress theme from your database by using phpMyAdmin.

That being said, let’s take a look at how to change your WordPress theme via phpMyAdmin.

Changing Your WordPress Theme via phpMyAdmin

This method allows you to tell WordPress which theme to use by changing the information in the database. For this method to work, the theme you want to switch to must already be installed on your website.

You will need to connect to your website using a FTP client and go to the /wp-content/themes/ folder. There you will be able to see all the themes that are currently installed on your website.

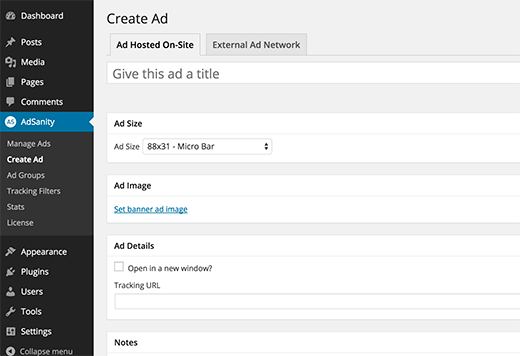
create ad with wordpress blog

Note: Write down the theme folder name that you want to switch to. You will need it in the next step.

If the theme you want to switch to isn’t installed on your website, then you can manually install a WordPress theme via FTP.

After making sure that theme you want is installed on your website, you can now go ahead and change the theme via phpMyAdmin.

Step 01. you need to go to cPanel dashboard of your WordPress hosting account. Next, scroll down to the databases section and then click on phpMyAdmin.

Once you are in phpMyAdmin, you’ll see a list of databases on the left side of the screen. Simply click on the database that you are using for your WordPress site.

If you are not using cPanel but using phpMyadmin, go to yourdomain.com/phpmyadmin or yourip/phpmyadmin.

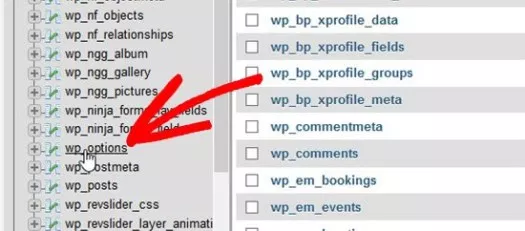
Step 02. it will show you the list of tables in this database. You need to click on the ‘wp_options’ table to open it.

Note: By default, WordPress database tables use wp_ as the prefix for table names. However, it is possible to see a different database prefix if you or an administrator on your site had changed the WordPress database prefix.

select table from database

Step 03. Upon opening the table, you need to scroll down and locate ‘template’ and ‘stylesheet’ rows. Next, click on the Edit button next to the template row.

Step 04. This will open the row editor where you need to change the value for the option_value field to the theme you want to use. It is usually the same as the folder name in /wp-content/themes/ folder.

Step 05. After that click on the ‘Go’ button below to save your changes. Now, repeat the process for stylesheet row as well.

Once you have saved your changes, you can go to your website to see the new theme in action.

Congratulations! You have changed your WordPress theme via phpMyAdmin successfully. You may also want to see how to install phpMyAdmin.

How to fix Potential for Information Disclosure in CakePHP

fix Potential for Information Disclosure in CakePHP

The default application skeleton contained a beforeRender() method on the AppController that could potentially lead to unwanted information disclosure in your application. The unsafe default code was present between 3.1.0 and 3.5.0 of the application skeleton.

Risks

The default beforeRender hook would automatically serialize all view variables into JSON/XML if the _serialize view variable was not defined by the controller action. Controller methods that define the _serialize variable would behave correctly and only expose the named variables.

This behavior is triggered by the AppController and ErrorController loading RequestHandlerComponent, which configures the View class to be used based on the client’s Accept header. Then code in AppController::beforeRender() would enable all view variables to be serialized if no variables were explicitly listed.

The default controllers generated by bake set the _serialize view variable. This helps limit the impact, but could still lead to unwanted information exposure if entity classes are not correctly configured.

How to fix

You can fix the potential for information disclosure by modifying your application code. Unfortunately we cannot resolve this problem for you through a patch release of CakePHP or its appplication skeleton.

If you don’t have ErrorController in your src/Controller directory (CakePHP <= 3.3)

If you are using CakePHP 3.3.0 or greater and do not have an ErrorController in your application, you should download an ErrorController and put it into your src/Controller directory.

If you don’t use JSON/XML response based on client requests

  • Remove $this->loadComponent(‘RequestHandler’) from the initialize() method of your AppController and ErrorController.
  • Remove $this->set(‘_serialize’, true); from the beforeRender() of your AppController.

If you use JSON/XML response based on client requests

  • Remove $this->set(‘_serialize’, true); from the beforeRender() of your AppController.
  • Remove $this->set(‘_serialize’, [ (variable names) ]) from all controller actions, that should not return JSON/XML.
  • Add $this->set(‘_serialize’, [ (variable names) ]) explicitly to some actions of your controllers, which you want to return JSON/XML.

While we have no reports of information disclosure in the wild, this issue was found by Kurita Takashi and we felt this was important to disclose.

Read From Official CakePHP blog

How To Install and Configure HAproxy on CentOS 6

Install and Configure HAproxy on CentOS 6

HAProxy is a free and open-source Linux application used for load balancing network traffic. This article assumes you have at least basic knowledge of linux, know how to use the shell, and most importantly, you host your site on your own VPS. The installation is quite simple. I will show you through the step by step installation of HAproxy on CentOS 6.x from source.

In this tutorial we will show you how to install and configuration of HAProxy on your CentOS 6 server.

Install and Configure HAproxy on CentOS 6

Step 1. First add yum repository your system.

HAProxy isn’t available in the default repositories for CentOS. In order for us to be able to install it, we need to either compile it from source (preferred) or add the EPEL repository to our server and install it using Yum.

#CentOS 6 – 32-bit
 rpm -Uvh http://mirror.overthewire.com.au/pub/epel/6/i386/epel-release-6-8.noarch.rpm

#CentOS 6 – 64-bit
 rpm -Uvh http://download.fedoraproject.org/pub/epel/6/x86_64/epel-release-6-8.noarch.rpm

Step 2. Install HAProxy using Yum.

 yum install haproxy

Step 3. Configuring HAProxy.

We have to modify the configuraion file of haproxy i.e. /etc/haproxy/haproxy.cfg as per our requirement. (Change this configuration as your network requirements). For more configuration details check this url.

#nano /etc/haproxy/haproxy.cfg global

log 127.0.0.1 local0
log 127.0.0.1 local1 debug
maxconn 45000 # Total Max Connections. This is dependent on ulimit
user haproxy
group haproxy
daemon

defaults
timeout server 86400000
timeout connect 86400000
timeout client 86400000
timeout queue 1000s

# Configuration for HTTP site
listen http_wpcademy 192.168.2.102:80
mode http
balance roundrobin # Load Balancing algorithm
option httpchk
option forwardfor
server server1 192.168.2.100:80 weight 1 maxconn 512 check
server server2 192.168.2.101:80 weight 1 maxconn 512 check

# Configuration for HTTPS site listen  
https_wpcademy 192.168.2.102:443
mode tcp
balance source# Load Balancing algorithm
reqadd X-Forwarded-Proto:\ http
server server1 192.168.2.100:443 weight 1 maxconn 512 check
server server2 192.168.2.101:443 weight 1 maxconn 512 check

listen stats 192.168.2.102:31337
mode http
option httpclose
balance roundrobin
stats uri /
stats realm Haproxy\ Statistics
stats refresh 5s
stats auth admin:passwd123

Step 4. Once you have configured HAProxy, its time to start the service.

service haproxy start
chkconfig haproxy on

Step 5. Now you will able to browse your applicaiton using the IP of the haproxy server. For haproxy Status dashboard you have to browse the URL: http://192.168.2.102:31337. It will ask you for the username and password. Use the username and password you defined on the configuraion file as “stats auth”.

Congratulation’s! You have successfully installed HAProxy. Thanks for using this tutorial for installing HAProxy on CentOS 6 system. For additional help or useful information, we recommend you to check the official HAProxy web site.

You Might Also Like: How To Install Nginx Web Server On CentOS

How to View Elements in CakePHP

View Elements in CakePHP

Certain parts of the web pages are repeated on multiple web pages but at different locations. CakePHP can help us reuse these repeated parts. These reusable parts are called Elements − help box, extra menu etc. An element is basically a mini-view. We can also pass variables in elements.

Cake\View\View::element(string $elementPath, array $data, array $options =[])

There are three arguments to the above function −

  • The first argument is the name of the template file in the /src/Template/Element/ folder.
  • The second argument is the array of data to be made available to the rendered view.
  • The third argument is for the array of options. e.g. cache.

Out of the 3 arguments, the first one is compulsory while, the rest are optional.

Example

Create an element file at src/Template/Element directory called helloworld.ctp. Copy the following code in that file.

src/Template/Element/helloworld.ctp

<p>Hello World</p>

Create a folder Elems at src/Template and under that directory create a View file called index.ctp. Copy the following code in that file.

src/Template/Elems/index.ctp

Element Example: <?php echo $this→element('helloworld'); ?>

Make Changes in the config/routes.php file as shown in the following program.

config/routes.php

<?php
   use Cake\Core\Plugin;
   use Cake\Routing\RouteBuilder;
   use Cake\Routing\Router;

   Router::defaultRouteClass('DashedRoute');
   Router::scope('/', function (RouteBuilder $routes) {
      $routes->connect('/elementexample',['controller'=>'Elems','action'=>'index']);
      $routes->fallbacks('DashedRoute');
   });
   Plugin::routes();

Create an ElemsController.php file at src/Controller/ElemsController.php. Copy the following code in the controller file.

src/Controller/ElemsController.php

<?php
   namespace App\Controller;
   use App\Controller\AppController; 
   use Cake\ORM\TableRegistry;
   use Cake\Datasource\ConnectionManager;

   class ElemsController extends AppController{
      public function index(){
      }
   }
?>

Execute the above example by visiting the following URL.

http://localhost:85/CakePHP/element-example

Output

Upon execution, the above URL will give you the following output.

How to View Events, Callbacks in CakePHP

View Events, Callbacks in CakePHP

There are several callbacks/events that we can use with View Events. These events are helpful to perform several tasks before something happens or after something happens. The following is a list of callbacks that can be used with CakePHP.

S.No Event Function & Description
1 Helper::beforeRender(Event $event, $viewFile)

The beforeRender method is called after the controller’s beforeRender method but before the controller renders view and layout. This receives the file being rendered as an argument.

2 Helper::beforeRenderFile(Event $event, $viewFile)

This method is called before each view file is rendered. This includes elements, views, parent views and layouts.

3 Helper::afterRenderFile(Event $event, $viewFile, $content)

This method is called after each View file is rendered. This includes elements, views,parent views and layouts. A callback can modify and return $content to change how the rendered content will be displayed in the browser.

4 Helper::afterRender(Event $event, $viewFile)

This method is called after the view has been rendered but before the layout rendering has started.

5 Helper::beforeLayout(Event $event, $layoutFile)

This method is called before the layout rendering starts. This receives the layout filename as an argument.

6 Helper::afterLayout(Event $event, $layoutFile)

This method is called after the layout rendering is complete. This receives the layout filename as an argument.

How to Working with Views in CakePHP

Working with Views in CakePHP

The letter “V” in the MVC is for Views. Views are responsible for sending output to user based on request. View Classes is a powerful way to speed up the development process.

View Templates

The View Templates file of CakePHP has default extension .ctp (CakePHP Template). These templates get data from controller and then render the output so that it can be displayed properly to the user. We can use variables, various control structures in template.

Template files are stored in src/Template/, in a directory named after the controller that uses the files, and named after the action it corresponds to. For example, the View file for the Products controller’s “view()” action, would normally be found in src/Template/Products/view.ctp.

In short, the name of the controller (ProductsController) is same as the name of the folder (Products) but without the word Controller and name of action/method (view()) of the controller (ProductsController) is same as the name of the View file(view.ctp).

View Variables

View variables are variables which get the value from controller. We can use as many variables in view templates as we want. We can use the set() method to pass values to variables in views. These set variables will be available in both the view and the layout your action renders. The following is the syntax of the set() method.

Syntax

Cake\View\View::set(string $var, mixed $value)

This method takes two arguments − the name of the variable and its value.

Example

Make Changes in the config/routes.php file as shown in the following program.

config/routes.php

<?php
   use Cake\Core\Plugin;
   use Cake\Routing\RouteBuilder;
   use Cake\Routing\Router;

   Router::defaultRouteClass('DashedRoute');
   Router::scope('/', function (RouteBuilder $routes) {
      $routes->connect('template',['controller'=>'Products','action'=>'view']);
      $routes->fallbacks('DashedRoute');
   });
   Plugin::routes();

Create a ProductsController.php file at src/Controller/ProductsController.php. Copy the following code in the controller file.

src/Controller/ProductsController.php

<?php
   namespace App\Controller;
   use App\Controller\AppController;
   
   class ProductsController extends AppController{
      public function view(){
         $this->set('Product_Name','XYZ');
      }
   }
?>

Create a directory Products at src/Template and under that folder create a View file called view.ctp. Copy the following code in that file.

src/Template/Products/view.ctp

Value of variable is: <?php echo $Product_Name; ?>

Execute the above example by visiting the following URL.

http://localhost:85/CakePHP/template

Output

The above URL will produce the following output.


products