How to connect to a remote MySQL database using Linux terminal

MySQL is an open-source relational database management system (RDBMS).

connect remote mysqlIn this article we will connect to remote MySQL database in the simple way. After you setup a user with proper access rights run the below commands.

$ mysql -u yourUser -p -h

Lets explanation the above command:

-u tells mysql what is your username

-p tells mysql you have a password and will prompt you to enter it after you press enter

-h tells mysql the hostname or IP address of your MySQL server

You can learn more form MySQL database documentation

How To Setup a NGINX Virtual Host – Easy Guide

In this tutorial we are going to learn how to install and configuration of virtual hosts “Server Blocks” Nginx on your Linux server. Virtual hosts such as nginx are used for running two or more domains or websites using just one server which you can learn more about in this hosting fundamentals course. Here’s a brief tutorial that shows you how to create a virtual host or server block on Nginx web server. This guide assumes that you’ve been following along from the previous tutorial: How to Install and Configure a NGINX Server.

Setup a NGINX Virtual Host

Create a New Directory

cd /var/www
mkdir -p wpcademy.com/{public_html,logs,stats}
Create vhost conf file
#nano /etc/nginx/conf.d/wpcademy.com.conf

server {
   listen  80;
   server_name  wpcademy.com www.wpcademy.com;
 
   access_log  /var/www/wpcademy.com/logs/access.log ;
   error_log    /var/www/wpcademy.com/logs/error.log ;
 
   location / {
       root   /var/www/wpcademy.com/public_html;
       index  index.php index.html index.htm;
 
   }
 
   error_page   500 502 503 504  /50x.html;
   location = /50x.html {
       root   /var/www/wpcademy.com/public_html;
   }
 
  # pass the PHP scripts to FastCGI server listening on 127.0.0.1:9000
  location ~ .php$ {
fastcgi_pass   127.0.0.1:9000;
fastcgi_index  index.php;
root    /var/www/wpcademy.com/public_html;
fastcgi_param  SCRIPT_FILENAME  /var/www/wpcademy.com/public_html$fastcgi_script_name;
include fastcgi_params;
}
 
 
   location ~ /.ht {
       deny  all;
   }
}
# nano /etc/nginx/conf.d/wpcademy.com.conf
server {
   listen  80;
   server_name  wpcademy.com www.wpcademy.com;
 
   access_log  /var/www/wpcademy.com/logs/access.log ;
   error_log    /var/www/wpcademy.com/logs/error.log ;
 
   location / {
       root   /var/www/wpcademy.com/public_html;
       index  index.php index.html index.htm;
 
   }
 
   error_page   500 502 503 504  /50x.html;
   location = /50x.html {
       root   /var/www/wpcademy.com/public_html;
   }
 
  # pass the PHP scripts to FastCGI server listening on 127.0.0.1:9000
  location ~ .php$ {
fastcgi_pass   127.0.0.1:9000;
fastcgi_index  index.php;
root    /var/www/wpcademy.com/public_html;
fastcgi_param  SCRIPT_FILENAME  /var/www/wpcademy.com/public_html$fastcgi_script_name;
include fastcgi_params;
}
 
   location ~ /.ht {
       deny  all;
   }
}

Add vhost on nginx.conf

# nano /etc/nginx/nginx.conf
### add line like this on http section:
include /etc/nginx/conf.d/*.conf;

Restarting nginx and php-fpm

# /etc/init.d/nginx restart
# /etc/init.d php-fpm restart

Note: Please make sure that all the domain names are propagated and are properly directed to your servers ip address, if not you will not able able to check if your new configuration works or not.

Congratulation’s! You have successfully installed server blocks Nginx. Thanks for using this tutorial for installing Virtual hosts Nginx on Linux system. For additional help or useful information, we recommend you to check the official Nginx web site

How to use Linux and Unix TAR Command

Linux and Unix TAR Command

The tar command used to rip a collection of files and directories into highly compressed archive file commonly called tarball or tar, gzip and bzip in Linux. The tar is most widely used command to create compressed archive files and that can be moved easily from one disk to anther disk or machine to machine. The main purpose of this article is to provide various tar command examples that might be helpful you to understand and become expert in tar archive manipulation. In this tutorial we will learn how to use Linux and UNIX TAR command.

Linux and Unix TAR Command

Create tar Archive File

Example command create a tar archive file wpcademy.tar for a directory /home/wpcademy in current working directory.

#tar -cvf wpcademy.tar /home/wpcademy/

/home/wpcademy/
/home/wpcademy/install.sh
/home/wpcademy/openvpn-2.0.9-1.tar.gz

Create tar.gz Archive File

Example command create a compressed gzip archive file wpcademy.tar for a directory /home/wpcademy in current working directory.

#tar cvzf Mythemes.tar.gz /home/wpcademy

/home/wpcademy/
/home/wpcademy/kardun
/home/wpcademy/eleganthemes
/home/wpcademy/adsready

Untar a tar File or gzip-bz2 tar File

#tar xvzf wpcademy.gz - for uncompress a gzip tar file (.tgz or .tar.gz)
#tar xvjf wpcademy.tar.bz2 - for uncompress a bzip2 tar file (.tbz or .tar.bz2)
#tar xvf wpcademy.tar - for uncompressed tar file (.tar)

Tar Command Options

c – create a archive file.
x – extract a archive file.
v – show the progress of archive file.
f – filename of archive file.
t – viewing content of archive file.
j – filter archive through bzip2.
z – filter archive through gzip.
r – append or update files or directories to existing archive file.
W – Verify a archive file.

How To Fix 504 Gateway Time-out on Nginx Web Server

Fix 504 Gateway Time-out on Nginx

In this tutorial we are going to learn how to fix 504 gateway time-out on Nginx web server on Linux server. If you run a Nginx web server you may have already encountered the annoying 504 Gateway Time-out errors. This is pretty common error, are generated most probably by the PHP max execution time limit or by the FastCGI read timeout settings.

This article assumes you have at least basic knowledge of linux, know how to use the shell, and most importantly, you host your site on your own VPS. The installation is quite simple and assumes you are running in the root account, if not you may need to add ‘sudo’ to the commands to get root privileges. I will show you through the step by step installation to fix nginx 504 gateway timeout on the nginx webserver.

Fix 504 Gateway Time-out on Nginx

Changes in php.ini

Try raising max_execution_time setting in php.ini file (CentOS path is /etc/php.ini):

 max_execution_time = 150

Changes in PHP-FPM

Try raising request_terminate_timeout setting in php.ini file (CentOS path is /etc/php-fpm.d):

 request_terminate_timeout = 150

Changes in Nginx Config

Finally, add fastcgi_read_timeout variable inside our Nginx virtual host configuration:

location ~* \.php$ {
    include         fastcgi_params;
    fastcgi_index   index.php;
    fastcgi_read_timeout 150;
    fastcgi_pass    127.0.0.1:9000;
    fastcgi_param   SCRIPT_FILENAME    $document_root$fastcgi_script_name;
}

Reload PHP-FPM and Nginx

 
service php-fpm restart
service nginx restart

For Nginx as Proxy for Apache web server, this is what you have to try to fix the 504 Gateway Timeout error:

Add following variables to nginx.conf file:

proxy_connect_timeout       600;
proxy_send_timeout          600;
proxy_read_timeout          600;
send_timeout                600;

Once complete, simply reload Nginx:

 service nginx restart

Congratulation’s! You have successfully fix error nginx 504 gateway time out. Thanks for using this tutorial for fix 504 gateway timeout error in Linux system. For additional help or useful information, we recommend you to check the official Nginx web site.

How To Hide Nginx Server Default Header

Hide Nginx Server Default Header

In this tutorial we will learn How To Hide Nginx Server Default Header on your Linux server.  In default Nginx configuration, the server sends HTTP Header with the information of Nginx version number of the Server. The HTTP response header “Server” displays the version number of the server. This information can be used to try to exploit any vulnerabilities in the Nginx, specially if you are running an older version with known vulnerabilities.

Hiding nginx version is very easy and it’s done using server_tokens directive. This tutorial helps you customize the name of the server on your host.

Hide Nginx Server Header

Step 1. Go to nginx/conf folder (it can be located at /etc/nginx/nginx.conf or /usr/local/nginx/conf/nginx.conf file)

Step 2. Hide Nginx version.

Add following in nginx.conf under server section:

 server_tokens off;

Step 3. Restart nginx web server:

 service nginx restart

Let’s verify if we see the server information now:

curl -I https://wpcademy.com/
HTTP/1.1 200 OK
Server: nginx
Date: Sun, 03 Aug 2014 06:06:52 GMT
Content-Type: text/html; charset=UTF-8
Connection: keep-alive
Vary: Accept-Encoding
X-Pingback: https://wpcademy.com/xmlrpc.php

Congratulation’s! You have successfully hide Nginx version. For additional help or useful information, we recommend you to check the official Nginx web site.

You Might Also Like: How To Install Nginx Web Server On CentOS

How To Check Disk Space Usage on Linux With Ncdu Utility

Disk Space Usage on Linux With Ncdu

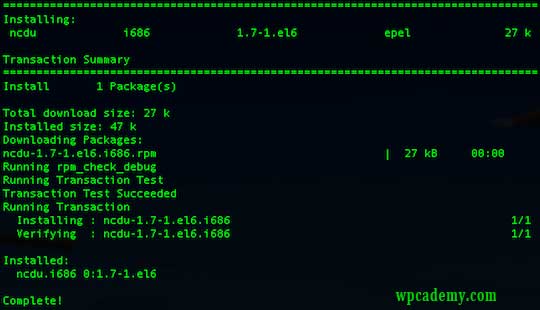
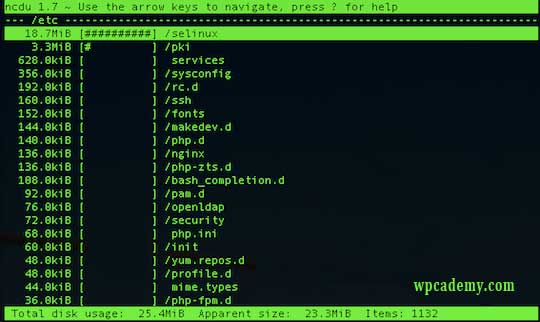
Ncdu (NCurses Disk Usage)  is a command line tool to view and analyse disk space usage on linux. It can drill down into directories and report space used by individual directories. This way it is very easy to track down space consuming files/directories. This article walks you through the process of installing and using NCDU on a Linux server.

In this tutorial we will learn How To Check Disk Space Usage on Linux With Ncdu Utility on linux server.

Check Disk Space Usage With Ncdu Utility

 apt-get install ncdu -y

Install ncdu on RHEL/CentOS

 yum install ncdu -y

Ncdu-linux

Ncdu sample usage

To start  ncdu type following command on your terminal:

 ncdu

Ncdu-sample-usage

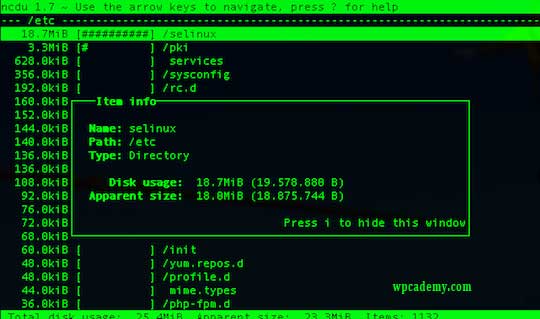
To get more information on selected directory press “i” button:

Disk Space Usage on Linux With Ncdu

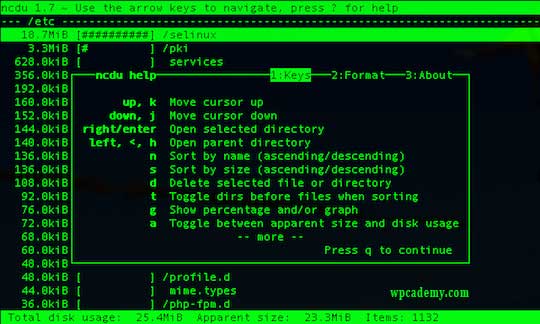
To see help window with ncdu available options press  “Shift+?” key combination. You can use arrow keys to move up and down for more options.

Ncdu windows help

For command line options and other information, go through the man page of ncdu command.

If you are not satisfied with the standard du command and are looking for a fast, ncurses based du-like utility then try out ncdu. It provides lots of customization options. You’ll definitely like it. Follow Wpcademy Facebook page

You Might Also Like: How To Install NCDU on Ubuntu 17.04

How To Backup and Restore MySQL Database Using Command Line

Backup and Restore MySQL Database

Many of the world’s largest and fastest-growing organizations including Facebook, Google, Adobe, Alcatel Lucent and Zappos rely on MySQL to save time and money powering their high-volume Web sites, business-critical systems and packaged software.

In this tutorial we will guide you through two easy ways to backup and restore the data in your MySQL database using mysqldump. You can also use this process to move your data to a new web server. We assume that you already have MySQL installed on Linux system with administrative privileges and we assume that you already have badic knowledge on MySQL and command line or terminal.

The parameters of the said command as follows.

  • [uname] Your database username.
  • [passwd] The password for your database (note there is no space between -p and the password).
  • [dbname] The name of your database.
  • [backupdb.sql] The filename for your database backup.

Backup and Restore MySQL Database Using Command Line

Backup MySQL database

First, you can check MySQL databases from your server:

#mysql -h localhost -u root -p
#mysql> show databases;

The following command will dump all databases to an sql file. Replace pass with your root database password and filename with the name of the file you wish to create such as backupdb.sql

Back up multiple databases in MySQL

 #mysqldump –u[uname] –p[passwd] [database name 1] [database name 2] > backup.sql

Example:

 #mysqldump –u root –pidroidus chedelics radiks > backup.sql

Backup all databases in MySQL

 #mysqldump –u [uname] –p[passwd] –all-databases > backup.sql

Example:

 #mysqldump –u root –pidroidus –all-databases > backup.sql

Back up your MySQL Database with Compress

 #mysqldump -u root -p[passwd] --databases [dbname] | gzip > backup.sql.gz

Example:

 #mysqldump -u root -pidroidus --databases  | gzip > backup.sql.gz

Restore MySQL database from a backup file

Above we backup the Tutorials database into backupdb.sql file. To re-create the Tutorials database you should follow two steps:

  • Create an appropriately named database on the target machine
  • Load the file using the mysql command:
 #mysqladmin -u root -p create [dbname]
 #gzip -d backupdb.sql.gz #mysql -uroot -p[passwd] [dbname] < backupdb.sql

Example:

#mysqladmin -u root -p create chedelics
#gzip -d backupdb.sql.gz
#backupdb.sql
#mysql -uroot -pidroidus chedelics < backupdb.sql

You Might Also Like: How To Reset Root Password on MySQL Server