
In this tutorial, we will learn how to improve WordPress email deliverability with SendGrid.
The Problem with Emails in WordPress
By default, WordPress uses the PHP mail function to send out emails. Many WordPress hosting providers do not have this function configured properly. Some even block it to make sure that their servers aren’t used to send spam.
This becomes problematic for site owners because their WordPress site fails to send some or all emails.
WordPress emails are crucial for resetting passwords, sending notification emails, running an online store, getting contact form notifications, and more. If WordPress can’t send emails, you could get locked out of your site or lose customers by missing out on important notifications.
Having said that, let’s take a look at how to improve WordPress email deliverability with SendGrid (for free).
What is SendGrid?
SendGrid is an email service provider. They offer highly optimized email servers that you can use to send out your emails.
They offer both transactional email service (one-to-one emails like WordPress notices, order receipts, password resets, etc.) and email marketing services.
Like all good email service providers, SendGrid spends significant resources to improve deliverability. This ensures that your WordPress emails land in your users’ inboxes, instead of being marked as spam. This is why companies like Uber, Spotify, Airbnb, Yelp, and thousands of others use SendGrid.
Sending WordPress Emails Using SendGrid
To set up SendGrid to work with your WordPress site, first you’ll need to visit the SendGrid website and sign up for an account.
SendGrid is a paid service, but they also offer a free plan which allows you to send up to 12,000 emails each month. That’s plenty for most small to medium-sized websites.
As your site grows, you can upgrade to their paid plan. It starts at $9.90 per month for up to 40,000 emails. You can scale your pricing based on how many emails you need to send every month, but in our experience the free plan is sufficient for most folks.
Next, you need to install and activate the SendGrid WordPress plugin. For more details, see our step by step guide on how to install a WordPress plugin.
Upon activation, visit Settings » SendGrid to configure the plugin.
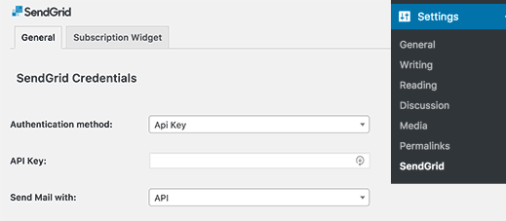
The plugin allows you to connect your WordPress site to SendGrid. You can do that by adding an API key or by using your SendGrid username or password.
We recommend using the API key method because it’s more secure. We will only cover the API method in this tutorial.
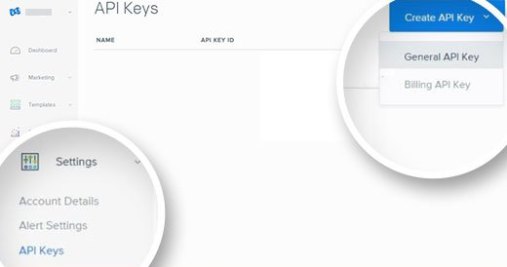
Start by visiting your SendGrid account dashboard and then click on Settings » API Keys.
Next, you need to choose how to send mail. You can send it using the SendGrid API, or with SMTP.
The SMTP method requires Swift Mailer support. You can add it by installing and activating the Swift Mailer plugin on your WordPress site.
But you don’t need that. We recommend using the API method, since it’s easier to set up and more secure.
Go back to the Settings » SendGrid page in your WordPress dashboard. Under the Mail Settings heading, you’ll need to provide the sender name, email address, and reply-to address.
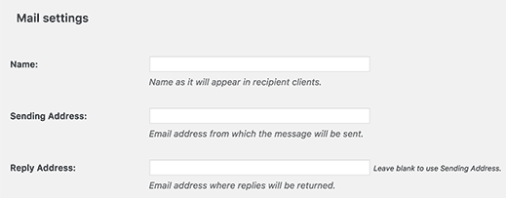
The name can be your website name, and the sending address can be your professional email address.
In other optional settings, you can choose to use email templates from SendGrid website and add their template ID in plugin settings. You can also create and use categories for emails you send through WordPress.
Don’t forget to click on the Save Changes button to store your settings.
That’s all! SendGrid will now replace the default WordPress mail function with SendGrid API, providing more reliable email service.
You can test it by performing any action that generates an email notification from WordPress. For example, you could reset your password, add a new user, or fill out your contact form.
We hope this tutorial helped you improve your WordPress email deliverability with SendGrid.