
In this tutorial, we will learn how to move GoDaddy website builder site to WordPress.
Step 0: Getting Started
The success of your WordPress site depends on the WordPress hosting you choose. If you already have GoDaddy’s hosting service, then you can use that for your WordPress site.
Step 1: Preparing to Move From GoDaddy Website Builder to WordPress
WordPress has import tools for many services and tools like Blogger, Tumblr, LiveJournal, etc. But it does not have an import tool for Website Builder.
This is why you will need to backup your Website Builder site manually. It can be a little consuming, depending on how much content you have on your website.
Backing up GoDaddy Website Builder Content
If you have just a few pages, then you can backup by simply saving images and copying text into text files on your computer.
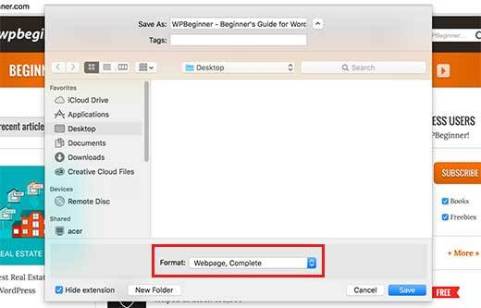
You can also visit each page on your website in your browser, and then press CTRL+S (Command+S on Mac) on your keyboard.
This will bring up the save dialog box. Make sure that you select ‘Webpage, Complete’ in the ‘format’ or ‘save as type’ field.
Repeat the process for all pages on your website.
Make sure that you have downloaded all your images and text. Disconnect internet on your computer and then open the files you have downloaded to double-check.
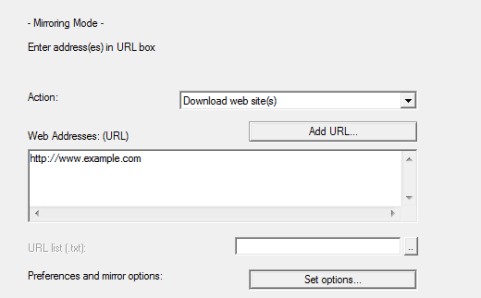
Alternatively, you can use the free HTTrack tool to copy the website on your computer.
HTTrack is a website copier. You can simply enter the URL of your website, and it will make a copy of it on your computer.
The problem is that, GoDaddy website builder and its templates store their files on different CDN servers. The name and addresses of these servers vary from one site to another.
This makes it harder to download all your image files. However, if your website is mainly based on text and you don’t mind losing images, then Httrack is the fastest way to copy your website.
Once you disable website builder, you will not be able to get back to your website. Take your time to make sure that you have a backup of all your website data.
At this time, you’re probably wondering why isn’t there an easier way. Probably because Godaddy doesn’t want you to switch. That’s why choosing the right platform is an important decision, but we’re glad that you have made the right choice to go with WordPress.
Backing up Your Link Structure
You will need to redirect people visiting old URLs of your website to the new URLs in WordPress. To do that, you need to have a list of all URLs on your website.
If you have just a few pages, then you can simply copy and paste the URL of each page on your site in a plain text file.
Alternately, you can use online tools to extract URLs from your site. You can use Klipper, a Google Chrome extension to save URLs in a txt file.
Don’t worry if you miss out a page. We will also show you how to automatically set up alerts for 404 errors in WordPress and redirect users in WordPress.
Step 2: Moving Website Builder Site to GoDaddy Shared Hosting
This step is only for users who will be using GoDaddy’s hosting service to run their WordPress site. If you are using some other WordPress hosting provider like Bluehost, Siteground, Hostgator, etc, then skip this and jump to the next step.
Disable GoDaddy Website Builder
If you want to use GoDaddy’s hosting service for your WordPress website, then you cannot install WordPress on that domain until you deactivate Website Builder service.
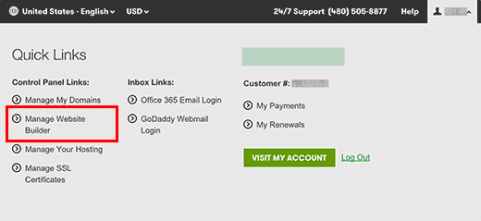
Simply login to your GoDaddy account and click on your username on the toolbar at top. This will display a flydown menu where you need to click on ‘Manage Website Builder’.
This will show your Website Builder account. You need to click on the options button next to your domain name.
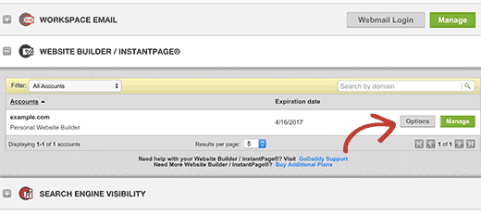
It will bring you to the Website Builder options page. Under the overview tab, you will find a link to cancel your account. Click on it to deactivate Website Builder on your domain name.
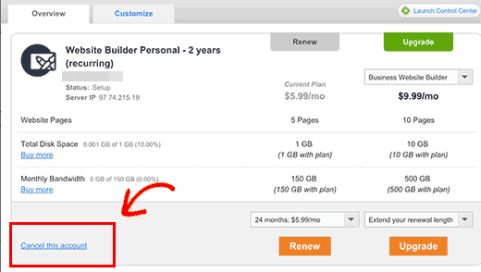
Your website builder account will now be deactivated, and your domain would become available to host your WordPress website. It will take nearly an hour before your Website Builder account is fully deactivated.
Adding Hosting to Your Domain
Now that your domain is free from GoDaddy website builder. You still need to add hosting service to that domain.
Click on web hosting under account manager and then click on manage button next to your account.
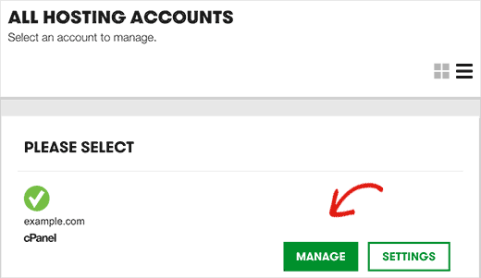
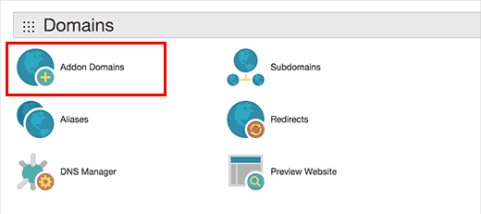
This will bring you to the cPanel dashboard of your hosting account. You need to scroll down to the domains section and then click on Add on domains.
Now you can enter your domain name. The subdomain and document root fields will be automatically filled.
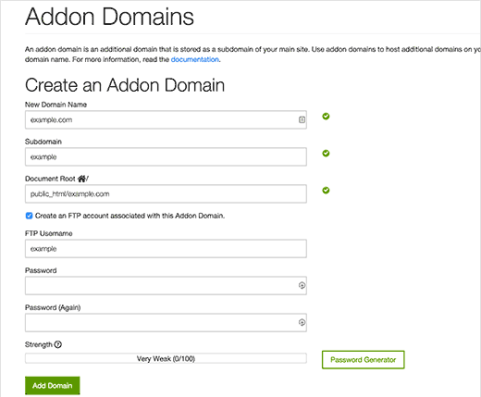
You also need to check the box to create an FTP account. Simply select a username and password for your FTP account. Finally, click on the add domain button.
That’s all you have successfully freed up your domain from Website Builder and added web hosting for your domain.
You can now jump to Step 4, to learn how to install WordPress and continue moving your website.
Step 3: Pointing Domain to Other WordPress Hosting Services
This step is for users who have their domain registered with GoDaddy and want to use it with some other WordPress hosting provider like BlueHost or Siteground.
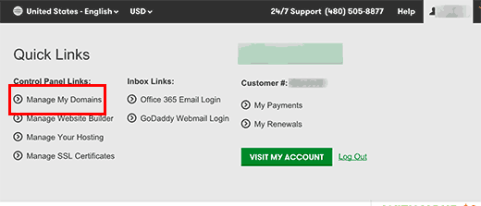
Log in to your GoDaddy account and click on your username on the toolbar at top. This will reveal a flydown menu where you need to click on manage my domains.
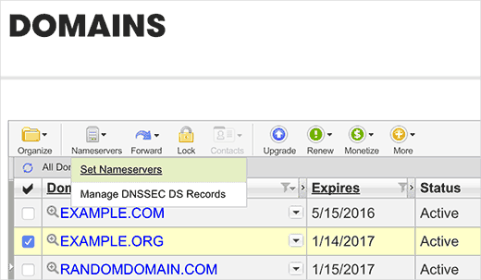
Select your domain from the list and click on the Nameservers button on the top and then select set nameservers.
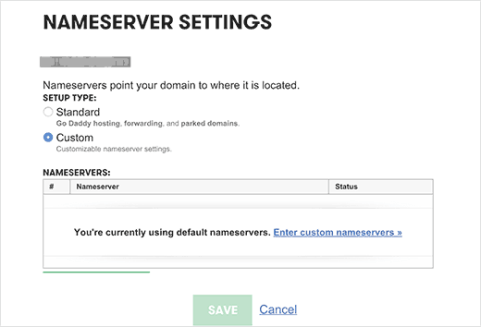
This will bring up a popup where you need to click on custom and then click on the link to enter custom nameserver.
A new popup will appear with two fields. You can add your new WordPress hosts nameservers here. If your WordPress host has more than two nameservers, then you can click on the Add Nameserver button to add another line.
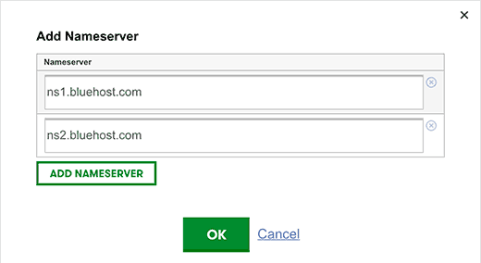
Click on the OK button and then click on the save button to store your settings. Remember that DNS changes may take upto 24 hours to propagate throughout the internet. Although it usually only takes a few hours.
Once your domain starts pointing to your new WordPress host, you can proceed to the next step.
Step 4: Installing WordPress
By now your domain should be pointing to your hosting service and you are ready to install WordPress. Whether you are using GoDaddy or any other hosting service, the process is the same.
WordPress is famous for its 5-minute install. Most hosting companies offer 1-click installers for new WordPress websites, which allows you to install WordPress on your website with just a few clicks.
For more details, see our step by step WordPress installation tutorial for beginners.
Step 5: Importing Website Builder Content in WordPress
As we mentioned earlier that you will have to manually backup your Website Builder content. It is not possible to automatically import content from Website Builder.
By default WordPress comes with two built-in content types called posts and pages. See our guide on the difference between posts and pages.
You need to create new pages or posts on your website and copy paste your GoDaddy website builder content.
Creating posts and pages in WordPress is really simple. See our detailed tutorial on how add a new post in WordPress and utilize all the features.
Step 6: Setting up Redirects
If you have the list of links from old website builder site, then you can go right ahead and setup redirects.
First thing you need to do is install and activate the Simple 301 Redirectsplugin. For more details, see our step by step guide on how to install a WordPress plugin.
Upon activation, you need to visit Settings » 301 Redirects page. Enter your old URL under the ‘Request’ field and enter the new WordPress URL for that page in the ‘Destination’ field.
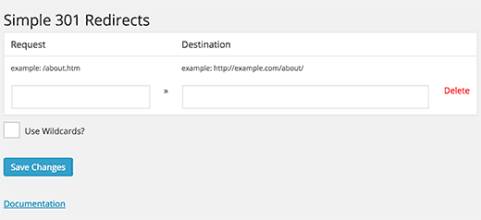
Click on save changes button to store this redirect. Repeat the process for all other URLs.
For more detailed instructions and other ways to setup redirects, take a look at our beginner’s guide to creating redirects in WordPress.
Step 7: Customizing Your WordPress Site
WordPress comes with thousands of beautiful themes both paid and free. Take a look at our guide on selecting the perfect theme for WordPress.