PHP (recursive acronym for PHP: Hypertext Preprocessor) is an open source, popular general-purpose scripting language that is widely-used and best suited for developing websites and web-based applications. It is a server-side scripting language that can be embedded in HTML.
This article assumes you have at least basic knowledge of Linux, know how to use the shell, and most importantly, you host your site on your own VPS. The installation is quite simple and assumes you are running in the root account, if not you may need to add ‘sudo’ to the commands to get root privileges. I will show you through the step by step installation PHP 7.2 on a Ubuntu 18.04 (Bionic Beaver) server.
Install PHP 7.2 on Ubuntu 18.04 LTS
Step 1. First make sure that all your system packages are up-to-date
sudo apt update
sudo apt upgrade
Step 2. Installing PHP 7.2 on Ubuntu 18.04 LTS.
If Apache is installed and configured as your web server, then you can follow the steps below to install PHP 7.2:
sudo apt install php libapache2-mod-php
Once, the process is complete, execute the following command to restart your Apache service:
sudo systemctl restart apache2
Step 3. Installing PHP With Nginx Web Server.
Run the command below to install the latest version of PHP and the required PHP FPM packages:
sudo apt install php-fpm
[php]

Once the modules are installed, you can run the command below to check the status of your PHP FPM service:
[php]
systemctl status php7.2-fpm
Then, edit your Nginx server block and include the lines below to enable Nginx web server to process PHP files:
server {
        # . . . other code
        location~ .php$ {
            include snippets/fastcgi-php.conf;
            fastcgi_pass unix:/run/php/php7.2-fpm.sock;
        }
    }
Restart your Nginx web server for the configuration changes to take effect:
sudo systemctl restart nginx
Step 4. Installing PHP Extensions.
First, execute the command below to see all the available PHP modules:
sudo apt-cachesearch php7.2
To install one PHP 7.2 extension run the command:
sudo apt install php-[package name]
To test PHP, create a test file named info.php with he content below. Save the file, then browse to it to see if PHP is working:
nano /var/www/html/info.php
In this file, paste the following code:
<?php
phpinfo();
?>
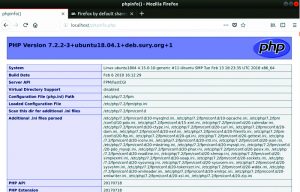
Try to access it at http://your_server_ip/info.php . If the PHP info page is rendered in your browser then everything looks good and you are ready to proceed further.
Congratulation’s! You have successfully installed PHP 7.2. Thanks for using this tutorial for installing PHP 7.2 on Ubuntu 18.04 LTS (Bionic Beaver) system. For additional help or useful information, we recommend you to check the official PHP web site.