How To Install Monica on Ubuntu 16.04 LTS

Install Monica on Ubuntu

Monica is a Personal Relationship Management (PRM) system Composed in Laravel framework. It’s designed and built to Assist You have more Meaningful relationships with your family and friends, and keep tabs on All important details about your friends and family.

This article assumes you have at least basic knowledge of Linux, know how to use the shell, and most importantly, you host your site on your own VPS. The installation is quite simple and assumes you are running in the root account, if not you may need to add ‘sudo’ to the commands to get root privileges. I will show you through the step by step installation Monica on an Ubuntu 16.04 Xenial Xerus server.

Install Monica on Ubuntu 16.04 LTS

Step 1. First make sure that all your system packages are up-to-date by running these following apt-get commands in the terminal.

sudo apt-get update
sudo apt-get upgrade

Step 2. Install LAMP (Linux, Apache, MariaDB, PHP) server.

A Ubuntu 16.04 LAMP server is required. If you do not have LAMP installed, you can follow our guide here. Also install all required PHP modules:

apt-get install php7.0-mysql php7.0-curl php7.0-json php7.0-cgi php7.0 libapache2-mod-php7.0 php7.0-mcrypt php7.0-xmlrpc php7.0-gd

Step 3. Configuring MariaDB for Monica.

By default, MariaDB is not hardened. You can secure MariaDB using the mysql_secure_installation script. you should read and below each steps carefully which will set root password, remove anonymous users, disallow remote root login, and remove the test database and access to secure MariaDB:

mysql_secure_installation

Configure it like this:

- Set root password? [Y/n] y
- Remove anonymous users? [Y/n] y
- Disallow root login remotely? [Y/n] y
- Remove test database and access to it? [Y/n] y
- Reload privilege tables now? [Y/n] y

Next we will need to log in to the MariaDB console and create a database for the Monica. Run the following command:

mysql -u root -p

This will prompt you for a password, so enter your MariaDB root password and hit Enter. Once you are logged in to your database server you need to create a database for Monica installation:

CREATE DATABASE monica;
GRANT ALL PRIVILEGES ON monica.* TO 'monicauser'@'localhost' IDENTIFIED BY 'YOURPASSWORD';
FLUSH PRIVILEGES;
\q

Step 4. Installing Monica.

First, Clone the Monica git repository:

mkdir /var/www/html/monica
git clone https://github.com/monicahq/monica.git /var/www/html/monica/

We will need to change some folders permissions:

chown -R www-data:www-data /var/www/html/monica

Installing nodejs:

curl -sL https://deb.nodesource.com/setup_6.x | sudo -E bash -
apt-get install -y nodejs

Installing composer:

php -r "copy('https://getcomposer.org/installer', 'composer-setup.php');"
php -r "if (hash_file('SHA384', 'composer-setup.php') === '669656bab3166a7aff8a7506b8cb2d1c292f042046c5a994c43155c0be6190fa0355160742ab2e1c88d40d5be660b410') { echo 'Installer verified'; } else { echo 'Installer corrupt'; unlink('composer-setup.php'); } echo PHP_EOL;"
php composer-setup.php
php -r "unlink('composer-setup.php');"

Once all dependencies installed, run composer in the directory the repository has been cloned, to install Monica’s:

cd /var/www/html/monica
composer install

Create .env file using the example provided and update it with your information:

cp .env.example .env

DB_CONNECTION=mysql
DB_HOST=127.0.0.1
DB_PORT=3306
DB_DATABASE=monica
DB_USERNAME=monicauser
DB_PASSWORD=YOURPASSWORD
DB_TEST_DATABASE=monica_test
DB_TEST_USERNAME=monicauser
DB_TEST_PASSWORD=YOURPASSWORD

Run the following command to generate an application key:

php artisan key:generate
Application key [base64:j8RgNwHGsqir1ovhDWXYlEa6BMWe46wRGMaQTm4ZBTs=] set successfully.

Run all migrations executing the following command:

php artisan migrate

Enable avatar uploads for the contacts created in Monica:

php artisan storage:link
The [public/storage] directory has been linked.

Populate the activity types and countries table:

php artisan db:seed --class ActivityTypesTableSeeder
php artisan db:seed --class CountriesSeederTable

Final step, we have to set a cronjob that runs every minute with the following command:

php artisan schedule:run

Step 5. Accessing Monica Personal Relationship Management.

Monica will be available on HTTP port 80 by default. Open your favorite browser and navigate to http://yourdomain.com/monica or http://server-ip/monica and complete the required the steps to finish the installation. If you are using a firewall, please open port 80 to enable access to the control panel.

Congratulation’s! You have successfully installed Monica. Thanks for using this tutorial for installing Monica Personal Relationship Management on your Ubuntu 16.04. For additional help or useful information, we recommend you to check the official Monica web site.


How To Install WordPress with Docker on Ubuntu 16.04 LTS

Install WordPress with Docker on Ubuntu 16

Docker is an open-source project that automates the deployment of application inside the software container. The container allows the developer to package up all project resources such as libraries, dependencies, assets etc. Docker is written in Go Programming language and is developed by Dotcloud. It is basically a container engine which uses the Linux Kernel features like namespaces and control groups to create containers on top of an operating system and automates the application deployment on the container.

This article assumes you have at least basic knowledge of Linux, know how to use the shell, and most importantly, you host your site on your own VPS. The installation is quite simple and assumes you are running in the root account, if not you may need to add ‘sudo’ to the commands to get root privileges. I will show you through the step by step installation WordPress content management systems on an Ubuntu 16.04 Xenial Xerus server.

Install WordPress with Docker on Ubuntu 16.04 LTS

Step 1. First make sure that all your system packages are up-to-date by running these following apt-get commands in the terminal.

sudo apt-get update
sudo apt-get upgrade

Step 2. Installing Docker.

A Ubuntu 16.04 Docker server is required. If you do not have Docker installed, you can follow our guide here.

Step 3. Installing MariaDB Container.

Before installing WordPress with Docker you will need to have somewhere to store the data. MariaDB is a community-developed relational database management system and a drop-in replacement for MySQL:

mkdir ~/wordpress && cd ~/wordpress

Next we create the MariaDB container with the command:

docker run -e MYSQL_ROOT_PASSWORD=<password> -e MYSQL_DATABASE=wordpress --name wordpressdb -v "$PWD/database":/var/lib/mysql -d mariadb:latest

If Docker was successful at creating the container, you should see a code at the end of the output similar to the example below:

...
Status: Downloaded newer image for mariadb:latest
23df0ec2e48beb1fb8704ba612e9eb083f4193BMWe4611102bc91232955cccc54

You can confirm that the MariaDB container is running by using the following command:

docker ps

Step 4. Installing WordPress Container.

WordPress is made officially available on Docker Hub, pull the image using with the command below:

docker pull wordpress

Run the command below while replacing the and as appropriate to your cloud server:

docker run -e WORDPRESS_DB_PASSWORD=<password> --name wordpress --link wordpressdb:mysql -p <server public IP>:80:80 -v "$PWD/html":/var/www/html -d wordpress

Finally step, restart Docker and the database container, also make sure no other service is already bound to the port 80:

sudo service docker restart
docker start wordpressdb

*Note: Full command-line documentation is also available over at Docker support page.

Step 5. Accessing WordPress Installation.

WordPress will be available on HTTP port 80 by default. Open your favorite browser and navigate to http://yourdomain.com/wp-admin/install.php or http://server-ip/wp-admin/install.php and complete the required the steps to finish the installation. If you are using a firewall, please open port 80 to enable access to the control panel.

Congratulation’s! You have successfully installed WordPress with Docker. Thanks for using this tutorial for installing WordPress with Docker on your Ubuntu 16.04. For additional help or useful information, we recommend you to check the official Docker web site.

You Might Also Like: How To Install WordPress with OpenLiteSpeed on Ubuntu 16.04 LTS

How To Install WordPress with OpenLiteSpeed on Ubuntu 16.04 LTS

Install WordPress with OpenLiteSpeed on Ubuntu

WordPress is an online, open source website creation tool written in PHP. But in non-geek speak, it’s probably the easiest and most powerful blogging and website content management system (or CMS) in existence today.

This article assumes you have at least basic knowledge of Linux, know how to use the shell, and most importantly, you host your site on your own VPS. The installation is quite simple and assumes you are running in the root account, if not you may need to add ‘sudo’ to the commands to get root privileges. I will show you through the step by step installation WordPress content management systems on an Ubuntu 16.04 Xenial Xerus server.
Install WordPress with OpenLiteSpeed on Ubuntu 16.04 LTS

Step 1. First make sure that all your system packages are up-to-date by running these following apt-get commands in the terminal.

sudo apt-get update
sudo apt-get upgrade

Step 2. Installing OpenLiteSpeed.

First, download the OpenLiteSpeed 1-click script on your server:

wget https://raw.githubusercontent.com/litespeedtech/ols1clk/master/ols1clk.sh

Make the file executable with the following command:

chmod +x ols1clk.sh

Step 3. Install PHP 7 on OpenLiteSpeed.

To install PHP 7, run the following command:

./ols1clk.sh --lsphp 70

When the installation is complete, configure an administrative username and password for the OpenLiteSpeed’s web interface by running the following command:

/usr/local/lsws/admin/misc/admpass.sh

Step 4. Installing MariaDB.

To install MariaDB, run the following command:

apt-get install -y mariadb-server

Configuring MariaDB for WordPress.

By default, MariaDB is not hardened. You can secure MariaDB using the mysql_secure_installation script. you should read and below each steps carefully which will set root password, remove anonymous users, disallow remote root login, and remove the test database and access to secure MariaDB:

mysql_secure_installation

Configure it like this:

- Set root password? [Y/n] y
- Remove anonymous users? [Y/n] y
- Disallow root login remotely? [Y/n] y
- Remove test database and access to it? [Y/n] y
- Reload privilege tables now? [Y/n] y

Next we will need to log in to the MariaDB console and create a database for the WordPress. Run the following command:

mysql -u root -p

This will prompt you for a password, so enter your MariaDB root password and hit Enter. Once you are logged in to your database server you need to create a database for WordPress installation:

CREATE DATABASE wordpress character set utf8 collate utf8_bin;
GRANT ALL PRIVILEGES on wordpress.* to 'wpuser'@'localhost' identified by 'your_password';
FLUSH PRIVILEGES;

Step 5. Installing WordPress.

First thing to do is to go to WordPress’s download page and download the latest stable version of WordPress, At the moment of writing this article it is version 4.8.1:

cd /usr/local/lsws/example
wget http://wordpress.org/latest.zip

Unpack the WordPress archive to the document root directory on your server:

unzip latest.zip

We will need to change some folders permissions:

chown -R nobody:nogroup /usr/local/lsws/example/wordpress/

Configuring WordPress

In this step we will configure the main configuration file of WordPress, where we need to configure it’s basic parameters so that it can be connected with the database and user:

cd wordpress
mv wp-config-sample.php wp-config.php

Now open it using any of your favourite editor, to make any changes in the WordPress configuration file:

nano wp-config.php

Here are the values that we need to update according to our previous database and user’s setup:

// ** MySQL settings - You can get this info from your web host ** //
/** The name of the database for WordPress */
define('DB_NAME', 'wordpress');

/** MySQL database username */
define('DB_USER', 'wpuser');

/** MySQL database password */
define('DB_PASSWORD', 'your_password');

/** MySQL hostname */
define('DB_HOST', 'localhost');

Step 6. Configure OpenLiteSpeed.

First, modifying the default virtual host that is already present in the OpenLiteSpeed configuration so that we can use it for our WordPress installation. First, login to the OpenLiteSpeed WebAdmin panel at https://your-ip-address:7080.

Once logged into the OLS WebAdmin Pick “Virtual Hosts” in the menu bar and click on the “View” link:

This will let you edit the configuration of your virtual server.

First, we will change the Document origin of this Virtual Host to tip into our WordPress directory.

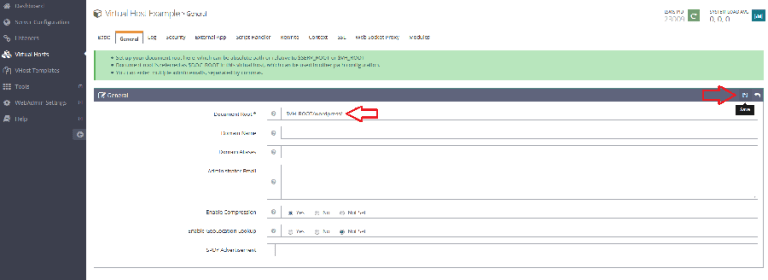
Click on the “General” tab to the virtual host and then click on the “Edit” button to the “General” table:

In the “Document Root” field, change the value from $VH_ROOT/html/ to $VH_ROOT/wordpress/:

Click “Save” when you’re finished.

Then, We’ll allow index.php files so They Can be used to Process requests that are not handled by static documents. This will allow the primary logic of WordPress to operate properly.

Click the “Edit” button for the “Index Files” table:

From the field for valid “Index Files”, add index.php before index.html to let PHP index files to take precedence:

Click “Save” when you are finished.

Configure WordPress Rewrites to Enable Permalink Support:

Next, we will install the compilation instructions in order that we could use permalinks inside our WordPress installation.

To do so, click on the “Rewrite” tab to the virtual host. From the Second screen, click on the “Edit” button to the “Rewrite Control” table:

Select “Yes” under the “Enable Rewrite” alternative:

Click “Save” to return to the primary display menu. Click on the “Edit” button for the “Rewrite Rules” table:

Remove the rules that are currently present and add the following rules to enable rewrites for WordPress:

Click on the “Save” button to execute your new rewrite rules.

The second thing that we have to do would be to change the default listening port from 8088 to 80.

Select “Listeners” in the menu bar and click on the “View” link:

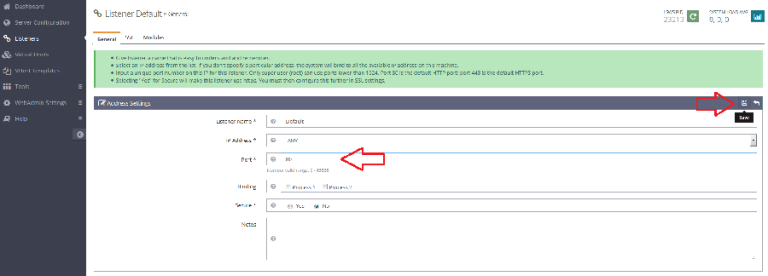
Next, click on the “Edit” button for the “Address Settings” table:

In the Port area, change the port number from 8088 to 80:

Click “Save” when you are finished.

Restart the Server to Implement the Change

With All the aforementioned configuration out of the way, we can now Gently restart the OpenLiteSpeed host to enable our modifications.

Step 7. Accessing WordPress.

WordPress will be available on HTTP port 80 by default. Open your favorite browser and navigate to http://yourdomain.com or http://server-ip/ and complete the required the steps to finish the installation.

Congratulation’s! You have successfully installed WordPress with Docker. Thanks for using this tutorial for installing WordPress with OpenLiteSpeed on your Ubuntu 16.04. For additional help or useful information, we recommend you to check the official OpenLiteSpeed web site.

You Might Also Like: How To Install WordPress with Docker on Ubuntu 16.04 LTS

How To Install FFmpeg on Ubuntu 17.04

Install FFmpeg on Ubuntu

FFmpeg is a cross-platform solution for streaming audio and video as well as recording and conversion. There’s also a great PHP package called ffmpeg-php that allows for easy use of FFmpeg from inside PHP scripts. In this tutorial i will show you the easy way to install ffmpeg and ffmpeg-php (php extension).

This article assumes you have at least basic knowledge of Linux, know how to use the shell, and most importantly, you host your site on your own VPS. The installation is quite simple and assumes you are running in the root account, if not you may need to add ‘sudo’ to the commands to get root privileges. I will show you through the step by step installation FFmpeg on an Ubuntu 17.04 Zesty Zapus server.
Install FFmpeg on Ubuntu 17.04 Zesty Zapus

Step 1. First make sure that all your system packages are up-to-date by running these following apt-get commands in the terminal.

sudo apt-get update
sudo apt-get upgrade

Step 2. Installing FFmpeg.
You’ll need to add FFmpeg’s PPA (personal package archive) to your system:

sudo add-apt-repository ppa:jonathonf/ffmpeg-3
sudo apt-get update
sudo apt upgrade

To undo the changes and restore to the stock version of FFmpeg in main Ubuntu repositories, purge the PPA via command:

sudo apt install ppa-purge
sudo ppa-purge ppa:jonathonf/ffmpeg-3

Congratulation’s! You have successfully installed FFmpeg. Thanks for using this tutorial for installing FFmpeg on your Ubuntu 17.04 Zesty Zapus. For additional help or useful information, we recommend you to check the official FFmpeg web site.

How To Install Apache Hadoop on Ubuntu 16.04 LTS

Install Apache Hadoop on Ubuntu

Apache Hadoop is a an open-source software framework written in Java for distributed storage and distributed process, it handles very large size of data sets by distributing it across computer clusters. Rather than rely on hardware to deliver high-availability, the library itself is designed to detect and handle failures at the application layer, so delivering a highly-available service on top of a cluster of computers, each of which may be prone to failures.

This article assumes you have at least basic knowledge of Linux, know how to use the shell, and most importantly, you host your site on your own VPS. The installation is quite simple and assumes you are running in the root account, if not you may need to add ‘sudo’ to the commands to get root privileges. We will show you through the step by step installation Apache Hadoop on an Ubuntu 16.04 Xenial Xerus server.

Install Apache Hadoop on Ubuntu 16.04 LTS

Step 1. First make sure that all your system packages are up-to-date by running these following apt-get commands in the terminal.

sudo apt-get update
sudo apt-get upgrade

Step 2. Installing Java (OpenJDK).

Since hadoop is based on java, make sure you have java jdk installed on the system. If you don’t have Java installed on your system, use following link to install it first.

Install Java JDK 8 on Ubuntu 16.04

[email protected] ~# java -version
java version "1.8.0_74"
Java(TM) SE Runtime Environment (build 1.8.0_74-b02)
Java HotSpot(TM) 64-Bit Server VM (build 25.74-b02, mixed mode)

Step 3. Installing Apache Hadoop.

To avoid security issues, we recommend to setup new Hadoop user group and user account to deal with all Hadoop related activities, following command:

sudo addgroup hadoopgroup
sudo adduser —ingroup hadoopgroup hadoopuser

After creating user, it also required to set up key based ssh to its own account. To do this use execute following commands:

su - hadoopuser
ssh-keygen -t rsa -P ""
cat /home/hadoopuser/.ssh/id_rsa.pub >> /home/hadoopuser/.ssh/authorized_keys
chmod 600 authorized_keys
ssh-copy-id -i ~/.ssh/id_rsa.pub slave-1
ssh slave-1

Download the latest stable version of Apache Hadoop, At the moment of writing this article it is version 2.8.1:

wget http://www-us.apache.org/dist/hadoop/common/hadoop-2.8.1/hadoop-2.8.1.tar.gz
tar xzf hadoop-2.8.1.tar.gz
mv hadoop-2.8.1 hadoop

Step 4. Configure Apache Hadoop.

Setup Hadoop environment variables. Edit ~/.bashrc file and append following values at end of file:

export HADOOP_HOME=/home/hadoop/hadoop
export HADOOP_INSTALL=$HADOOP_HOME
export HADOOP_MAPRED_HOME=$HADOOP_HOME
export HADOOP_COMMON_HOME=$HADOOP_HOME
export HADOOP_HDFS_HOME=$HADOOP_HOME
export YARN_HOME=$HADOOP_HOME
export HADOOP_COMMON_LIB_NATIVE_DIR=$HADOOP_HOME/lib/native
export PATH=$PATH:$HADOOP_HOME/sbin:$HADOOP_HOME/bin

Apply environmental variables to current running session:

source ~/.bashrc

Now edit $HADOOP_HOME/etc/hadoop/hadoop-env.sh file and set JAVA_HOME environment variable:

export JAVA_HOME=/usr/jdk1.8.0_74/

Hadoop has many of configuration files, which need to configure as per requirements of your hadoop infrastructure. Lets start with the configuration with basic hadoop single node cluster setup:

cd $HADOOP_HOME/etc/hadoop

Edit core-site.xml:

<configuration>
<property>
  <name>fs.default.name</name>
    <value>hdfs://localhost:9000</value>
</property>
</configuration>

Edit hdfs-site.xml:

<configuration>
<property>
 <name>dfs.replication</name>
 <value>1</value>
</property>

<property>
  <name>dfs.name.dir</name>
    <value>file:///home/hadoop/hadoopdata/hdfs/namenode</value>
</property>

<property>
  <name>dfs.data.dir</name>
    <value>file:///home/hadoop/hadoopdata/hdfs/datanode</value>
</property>
</configuration>

Edit mapred-site.xml:

<configuration>
 <property>
  <name>mapreduce.framework.name</name>
   <value>yarn</value>
 </property>
</configuration>

Edit yarn-site.xml:

<configuration>
 <property>
  <name>yarn.nodemanager.aux-services</name>
    <value>mapreduce_shuffle</value>
 </property>
</configuration>

Now format namenode using following command, do not forget to check the storage directory:

hdfs namenode -format

Start all hadoop services use the following command:

cd $HADOOP_HOME/sbin/
start-dfs.sh
start-yarn.sh

You should observe the output to ascertain that it tries to start datanode on slave nodes one by one. To check if all services are started well use ‘jps‘ command:

jps

Step 5. Accessing Apache Hadoop.

Apache Hadoop will be available on HTTP port 8088 and port 50070 by default. Open your favorite browser and navigate to http://yourdomain.com:50070 or http://server-ip:50070. If you are using a firewall, please open port 8088 and 50070 to enable access to the control panel.

Congratulation’s! You have successfully installed Apache Hadoop. Thanks for using this tutorial for installing Apache Hadoop on Ubuntu 16.04 system. For additional help or useful information, we recommend you to check the official Apache Hadoop web site.

How To Install Ionic Framework on Ubuntu 18.04 LTS

Install Ionic Framework on Ubuntu 18

In this tutorial we will show you how to install Ionic Framework on Ubuntu 18.04 LTS. Ionic Framework is the free, open source mobile UI toolkit for developing high-quality cross-platform apps for native iOS, Android, and the web—all from a single codebase.

This article assumes you have at least basic knowledge of Linux, know how to use the shell, and most importantly, you host your site on your own VPS. The installation is quite simple and assumes you are running in the root account, if not you may need to add ‘sudo’ to the commands to get root privileges. I will show you through the step by step installation ClamAV on a Ubuntu 18.04 LTS (Bionic Beaver) server.
Ionic Framework on Ubuntu 18.04 LTS Bionic Beaver

Step 1. First make sure that all your system packages are up-to-date by running these following apt-get commands in the terminal.

sudo apt-get update
sudo apt-get upgrade

Step 2. Installing Node.js.

First, use the following commands to install NPM and Node.js:

sudo apt-get install python-software-properties
curl -sL https://deb.nodesource.com/setup_8.x | sudo -E bash -
sudo apt-get install nodejs

Step 3. Installing Cordova.

Run the following command to install Cordova on your system using npm command:

sudo npm install -g cordova

Step 4. Installing Ionic Framework on Ubuntu 18.04 LTS.

Use NPM command to install Ionic framework on your system:

sudo npm install -g ionic

Verify the ionic installation:

ionic -v

Step 5. Create Ionic Application.

First, create a new Cordova project on your computer using the following command:

ionic start HelloM0na blank

Now use one of the following commands to enable iOS or Android platform:

ionic platform add ios
ionic platform add android

Congratulation’s! You have successfully installed Ionic Framework. Thanks for using this tutorial for installing Ionic Framework open source antivirus engine in Ubuntu 18.04 LTS Bionic Beaver system. For additional help or useful information, we recommend you to check the official Ionic Framework web site.

How To Install Java on Ubuntu 18.10 Cosmic Cuttlefish

Install Java on Ubuntu 18

In this tutorial we will show you how to install Oracle Java on your Ubuntu 18.10 LTS. For those of you who didn’t know, Java is a programming language and computing platform. It was first released by Sun Microsystems in 1995. Many programs and scripts that require Java to run it, but usually Java are not installed by default on a VPS or Dedicated Server.

This article assumes you have at least basic knowledge of Linux, know how to use the shell, and most importantly, you host your site on your own VPS. The installation is quite simple and assumes you are running in the root account, if not you may need to add ‘sudo’ to the commands to get root privileges. I will show you through the step by step installation JRE (Java Runtime Environment) and JDK (Java Development Kit) on Ubuntu 18.10 Cosmic Cuttlefish.
Install Oracle Java on Ubuntu 18.10 Cosmic Cuttlefish

Step 1. First make sure that all your system packages are up-to-date by running these following apt-get commands in the terminal.

sudo apt-get update
sudo apt-get upgrade

Step 2. Installing Oracle Java on Ubuntu 18.10.

Method 1.

Run the following commands to install the Oracle JDK by Oracle:

sudo apt install openjdk-11-jdk

Method 2.

Using Webupd8 Team’s PPA repository we can install Oracle Java on Ubuntu automatically using the apt command:

sudo add-apt-repository ppa:webupd8team/java
sudo apt update
sudo apt install oracle-java8-set-default

Please note that during the Java installation process, you will have to accept the Oracle License agreement in order to complete the installation.

Verify Installed Java version.

java -version

Result:

java 10.0.2 2018-07-17
Java(TM) SE Runtime Environment 18.3 (build 10.0.2+13)
Java HotSpot(TM) 64-Bit Server VM 18.3 (build 10.0.2+13, mixed mode)

If we have multiple Java versions installed on the server we can change the default version using the update-alternatives system:

update-alternatives --config java

Congratulation’s! You have successfully installed Java. Thanks for using this tutorial for installing Oracle Java (JRE or JDK) on Ubuntu 18.10 Bionic Beaver system. For additional help or useful information, we recommend you to check the official Java web site.

You Might Also Like: How To Install Oracle Java on Ubuntu 17.04