How To Install Htop on CentOS 6

Install Htop on CentOS 6

Htop is an interactive and real-time system-monitor process-viewer written for Linux. It is designed to replace the Unix program top. It shows a frequently updated list of the processes running on a computer, normally ordered by the amount of CPU usage. Unlike top, htop provides a full list of processes running, instead of the top resource-consuming processes. Htop uses color and gives visual information about processor, swap and memory status. It is a must have when you want to monitor the resources of your linux server over an ssh connection for example.

This article assumes you have at least basic knowledge of linux, know how to use the shell, and most importantly, you host your site on your own VPS. The installation is quite simple. Here is the steps to install ‘htop’ on CentOS 6.

Install Htop on CentOS 6

Step 1. First add yum repository your system.

wget http://packages.sw.be/rpmforge-release/rpmforge-release-0.5.2-2.el6.rf.i686.rpm
rpm -ihv rpmforge-release*.rf.i686.rpm

Step 2. Install htop using yum command:

 yum install htop

Step 3. After installation, launch htop by entering:

 htop

Install htop from source code

# wget http://downloads.sourceforge.net/project/htop/htop/1.0.2/htop-1.0.2.tar.gz
# tar -xvf htop-1.0.2.tar.gz
# cd htop-1.0.2
# ./configure
# make
# make install

htop-process-monitoring-tool

Congratulation’s! You have successfully installed htop. Thanks for using this tutorial for installing htop process monitoring tool on CentOS 6 system. For additional help or useful information, we recommend you to check the official htop web site.

You Might Also Like: How To Install Nginx Web Server On CentOS

How To Fix 502 Bad Gateway Error on Nginx

Fix 502 Bad Gateway Error on Nginx

If you run a Nginx web server you may have already encountered the annoying 502 bad gateway errors. This is pretty common error, are generated most probably by the PHP or  FastCGI buffer and timeouts settings. This tutorial shows you how to fix nginx 502 bad gateway on the nginx webserver. This post shows how to fix this problem, and the configuration option to prevent it occurring again on reboot.

This article assumes you have at least basic knowledge of linux, know how to use the shell, and most importantly, you host your site on your own VPS. The installation is quite simple and assumes you are running in the root account, if not you may need to add ‘sudo’ to the commands to get root privileges. I will show you through the step by step solve 502 bad gateway error on Nginx web server.

In this tutorial we will show you how to fix 502 bad gateway error on Nginx web server.

Fix 502 Bad Gateway Error on Nginx

Method 1. Changes in Nginx Config

#nano /etc/nginx/nginx.conf

http {
    ...
    fastcgi_buffers 8 16k;
    fastcgi_buffer_size 32k;
    ...
}

Method 2. Change PHP-FPM to listen on a unix socket or TCP socket.

#nano /etc/php-fpm.d/www.conf

listen = /var/run/php5-fpm.sock

To:

listen = 127.0.0.1:9000

If you are configuring php-fpm to listen on a Unix socket, you should also check that the socket file has the correct owner and permissions.

chmod 0660 /var/run/php5-fpm.sock
chown www-data:www-data /var/run/php5-fpm.sock

Method 3. Disable APC.

APC caching can cause 502 Bad Gateway issues under particular environments causing segmentation faults. I highly suggest using Memcache(d), but XCache is also a good alternative.

Congratulation’s! You have successfully solved 502 bad gateway issues. Thanks for using this tutorial to fix 502 bad gateway issues on Linux system. For additional help or useful information, we recommend you to check the official Nginx web site.

You Might Also Like: How To Hide Nginx Server Default Header

How To Install VestaCP on CentOS 6

Install VestaCP on CentOS 6

VestaCP is an open source hosting control panel currently supports both RHEL flavoured Linux releases (Red Hat, CentOS) and Ubuntu. It comes with all necessary software to run and manage your websites hosted on your VPS. This article assumes you have at least basic knowledge of linux, know how to use the shell, and most importantly, you host your site on your own VPS.

VestaCP Features

  • Web Server (Apache with Nginx as Reverse Proxy).
  •  DNS server.
  •  Database Server.
  •  Mail Server.
  •  FTP Server.
  •  Nginx out of the box.
  •  SSL certificates & SNI.
  •  Wildcard support.
  •  Configuration Templates.
  •  DKIM support.
  •  Fast Backups.
  •  System Monitoring.
  •  AntiSpam / Antivirus.
  •  WHMCS billing support.
  •  EPEL integration.
  •  Simple and Clean GUI.
  •  Powerfull CLI.
  •  Reliable Platform.
  •  Open Data Format.

Install VestaCP on CentOS 6

Step 1. First, login to your VPS server via ssh as root and type following command:

curl -O http://vestacp.com/pub/vst-install.sh
bash vst-install.sh -f

Step 2. If everything is fine then you will get the below screen. Type “y” where it ask if you want to proceed. The system will ask you for an email address, it’s ok to provide a real one, they won’t SPAM you and it’ll advise you when it’s complete and will issue your login credentials to that address.

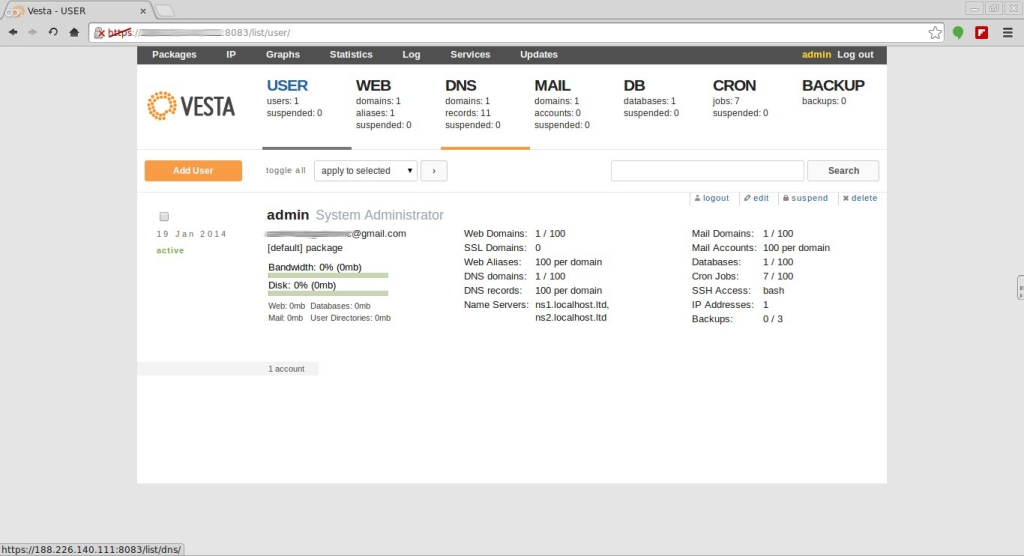
Step 3. Once the installer finishes installing, it will show you the url, Username and Password. just open that url in web browser and login using the username and password.

 https://youripaddress:8083/

install vestacp

Check more from VestaCP official website

You Might Also Like: How To Install Vesta Control Panel on Ubuntu 16.04 LTS

How To Protect Directory With Password on Nginx

Protect Directory With Password on Nginx

Unlike Apache, Nginx does not have any .htaccess file. Password protection is achieved by using the Nginx HttpAuthBasic module directives in the configuration file. For future reference, I will show you a steps to protect directory with password on nginx. This article assumes you have at least basic knowledge of linux, know how to use the shell, and most importantly, you host your site on your own VPS.

Protect Directory With Password on Nginx

Step 1. First add the following to your Nginx configuration file:

location / {
  auth_basic            "Restricted";
  auth_basic_user_file  /etc/nginx/htpasswd;
}

Step 2. Create the htpasswd file, notice that the file is /etc/nginx/htpasswd. This means you need to use htpasswd to create that file:

htpasswd -c /etc/nginx/htpasswd yourusername
New password: 
Re-type new password: 
Adding password for user yourusername

Step 3. This will create the password file. Next restart nginx’s configuration:

 service nginx restart

Now when you visit your directory or domain, you will be asked to enter a username and password that you chose beforehand. This is definitely not the most secure way of restricting domain access.

Congratulation’s! You have successfully protect directory on Nginx. Thanks for using this tutorial for protect directory with password on Nginx system. For additional help or useful information, we recommend you to check the official Nginx web site.

You Might Also Like: How To Install Let’s Encrypt SSL With Nginx on Ubuntu 16.04 LTS

How To Install Apache SVN on CentOS 7

Install Apache SVN on CentOS 7

Apache Subversion which is commonly referred to in its abbreviated form as SVN, (named after the command name SVN) is a popular software versioning and revision control system which is distributed as a free software under the Apache License. Mainly used by developers to maintain present and historic file versions like documentation, source code, and web pages, it primarily aims to be a compatible successor to the extensively used CVS (Concurrent Versions System).

SVN supports several protocols for network access: SVN, SVN+SSH, HTTP, HTTPS. If you are behind a firewall, HTTP-based Subversion is advantageous since SVN traffic will go through the firewall without any additional firewall rule setting. This article assumes you have at least basic knowledge of linux, know how to use the shell, and most importantly, you host your site on your own VPS.

In this tutorial we will show you how to install and configuration of Apache Subversion on your CentOS 7 server.

Install Apache SVN on CentOS 7

Step 1. First, you need to install subversion and mod_dav_svn (this stands for the Apache httpd module for subversion server) using the following command:

 yum install httpd subversion mod_dav_svn

Step 2. Configure Subversion with Apache.

Once installing the package, you must open the subversion httpd config file.

 nano /etc/httpd/conf.d/subversion.conf
LoadModule dav_svn_module     modules/mod_dav_svn.so
LoadModule authz_svn_module   modules/mod_authz_svn.so

<Location /svn>
   DAV svn
   SVNParentPath /var/www/svn
   AuthType Basic
   AuthName "Subversion User Authentication "
   AuthUserFile /etc/svn-users
   Require valid-user
</Location>

Step 3. Create SVN users.

Following commands will add two users for svn. It will prompt for users password to be assigned.

htpasswd -cm /etc/svn-users wpcademy
htpasswd -m /etc/svn-users p@sswd

Step 4. Create and configure SVN repository

cd /var/www/svn
svnadmin create testrepo
chown -R apache.apache testrepo

If you still have issues with SELinux Security please apply this:

chcon -R -t httpd_sys_content_t /var/www/svn/testrepo
chcon -R -t httpd_sys_rw_content_t /var/www/svn/testrepo

Step 5. Restart your web server.

 systemctl restart httpd.service

Step 6. Finally, You can visit the url http://your-ip-address/svn/testrepo to check out the content, you will be asked to enter the user name and password.

Step 7. Create basic repository structure with the below commands.

mkdir -p /tmp/svn/{trunk,branches,tags}
svn import -m 'Initializing basic repository structure' /tmp/svn/ http://localhost/svn/testrepo/

Congratulation’s! You have successfully installed Apache Subversion. Thanks for using this tutorial for installing Apache Subversion on CentOS 7 system. For additional help or useful information, we recommend you to check the official Apache SVN web site.

You Might Also Like: How To Install Apache SVN on Ubuntu 14.04

How To Install Rar/Unrar Packages on Ubuntu

Install Rar/Unrar Packages on Ubuntu

RAR is most popular tool for creating and extracting compressed archive (.rar) files, but unfortunately rar tool doesn’t pre-installed under Linux systems, we need to install it using third-party tools to open, extract, uncompress or unrar a archive files.

By default the rar and the unrar packages do not come pre-installed in the Ubuntu operating system. This means you cannot create a rar archive or unrar an existing one! It is pretty simple to install them. You need to enable multiverse repositories to install rar. There’s also a separate package called unrar. This article assumes you have at least basic knowledge of linux, know how to use the shell, and most importantly, you host your site on your own VPS.

In this tutorial we will learn how to install and configuration of Rar/Unrar on your Ubuntu.

Install Rar/Unrar Packages on Ubuntu

Step 1. First, enable multiverse repositories.

 sudo software-properties-gtk

Step 2. Installing rar and unrar packages.

Run the following command in terminal and type the password for the user, when prompted.

sudo apt-get update
sudo apt-get install rar unrar

Commands for Rar/Unrar archive

Following are the some useful and helpful rar/unrar archive commands:

# unrar x (file_name).rar           extract with full path
# unrar e -kb (file_name).rar       (Keep broken)
# unrar l (file_name).rar           list files inside
# unrar e (file_name).rar           dump files excluding folders
# rar a (file_name).rar (file_name) create a archive Rar file
# rar r (file_name).rar             recover or fix a archive file or files
# rar a -p (file_name).rar          create a archive Rar file with password

Congratulation’s! You have successfully installed rar/unrar.

You Might Also Like: Click here to learn How To Install Rar/Unrar Packages on CentOS

How To Install Lighttpd on Ubuntu 14.10

Install Lighttpd on Ubuntu

Lighttpd is a fast and secure web-server which has been optimized for high-performance environments. With a small memory footprint compared to other web-servers, effective management of the cpu-load, and advanced feature set (FastCGI, SCGI, Auth, Output-Compression, URL-Rewriting and many more) lighttpd is the perfect solution for every server that is suffering load problems. This article assumes you have at least basic knowledge of linux, know how to use the shell, and most importantly, you host your site on your own VPS. Here’s a brief tutorial will explain you the installation of Lighttpd web server on Ubuntu.

In this tutorial we will show you how to install and configuration of Lighttpd on your Ubuntu 14.04 server.

Install Lighttpd on Ubuntu 14.10

Step 1. Installing Lighttpd.

Lighttpd is available to install from the official Ubuntu repositories, So if you want to install Lighttpd, you only have to run this command.

 sudo apt-get install lighttpd

Step 2. Installing PHP5 and modules.

Ubuntu provides a FastCGI-enabled PHP5 package. We can install by issuing the following command.

 sudo apt-get install php5-cgi php5-mysql

Enable fast-cgi support.

sudo lighttpd-enable-mod fastcgi
sudo lighttpd-enable-mod fastcgi-php

Step 3. Start Lighttpd server.

 /etc/init.d/lighttpd force-reload

Step 4. Testing Lighttpd webserver.

To make sure everything installed correctly we will now test Lighttpd to ensure it is working properly. Open up any web browser and then enter the following into the web address:

 http://localhost/ or http://your.ip.addr.ess

lighttpd-ubuntu

Note: Lighttpd’s default document root is /var/www on Ubuntu, and the configuration file is /etc/lighttpd/lighttpd.conf. Additional configurations are stored in files in the /etc/lighttpd/conf-available.

Congratulation’s! You have successfully installed Lighttpd. Thanks for using this tutorial for installing Lighttpd web server on ubuntu 14.04 system. For additional help or useful information, we recommend you to check the official Lighttpd web site.

You Might Also Like: How To Install Lighttpd on CentOS