Easy Guide to Cloak Affiliate Links on Your WordPress Site

In this tutorial, we will explain what is link cloaking, and how you can cloak affiliate links in WordPress.

What is Link Cloaking and When do you need it?

Link cloaking is a technique used to make long affiliate links into a shorter and more branded link.

Often affiliate links are lengthy, hard to remember, and show your affiliate username or ID like this:

http://www.affiliatesite.com/products/?product_id=123&affiliate=123

Link cloaking allows you to shorten these lengthy ugly link into branded URLs like these:

http://www.yoursite.com/refer/productname

You can use anything as base URL. We use refer in our cloaked links on WPCademy. Some other popular URL bases are out, go, recommends, etc.

If you are someone who uses affiliate links in your blogs to make money, then you should to cloak links. Many site owners cloak links to properly manage their affiliate links.

Link cloaking allows you to create easy to understand URLs for your outgoing affiliate links. It can also help you add an additional layer of click tracking to ensure you are getting paid for every sale you refer.

You can also protect your affiliate links from getting hijacked by using link cloaking. Lastly, cloaked links allow you to easily manage your affiliate links from your WordPress admin interface.

How to Cloak Affiliate Links in WordPress

Since affiliate marketing is an important source of income for many bloggers, there are many WordPress plugins available that allows you to cloak your affiliate links and easily manage them.

We have hand-picked some of the best WordPress link cloaking plugins for you.

You can use any one of these plugins to easily add your affiliate links into WordPress and cloak them to get maximum benefits.

1. ThirstyAffiliates

ThirstyAffiliates is one of the best affiliate link manager and link cloaking plugin for WordPress. It allows you to easily add your affiliate links in WordPress and manage them from one single dashboard.

You can insert your affiliate links in any WordPress posts or pages from the buttons on the post editor screen.

Another great feature is that you can automatically replace selected keywords with affiliate links. Aside from that you can choose the base URL, automatically nofollow links, A/B test your offers, geo-target your offers, get stats, and so much more.

We use ThirstyAffiliates on WPCademy. See our guide on how to add affiliate links in WordPress using ThirstyAffiliates.

2. Pretty Link Lite

Pretty Link Lite

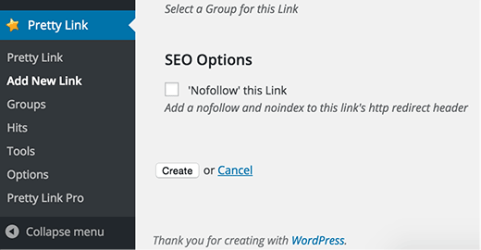
Pretty Link Lite is another WordPress link cloaking plugin. It allows you to easily manage your affiliate links. You can auto add nofollow tag to affiliate links, shorten links, and redirect them properly.

Pretty Link Lite also provides analytics with an easier way to purge older hits from your database. This ensures that these hit logs don’t take too much space on your database and backup files.

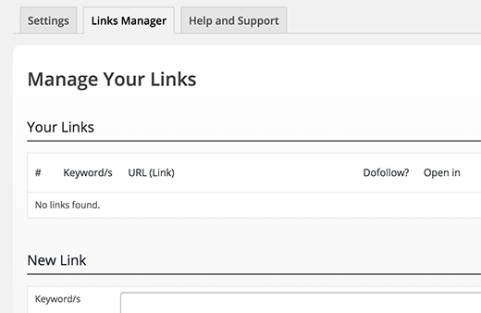
3. Easy Affiliate Links

Easy Affiliate Links settings

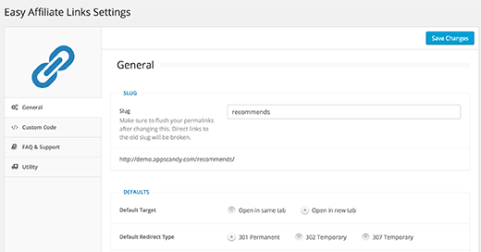
Easy Affiliate Links is an easy to use link cloaking plugin for affiliate marketers. It allows you to cloak links, add and manage all your affiliate links from a single dashboard.

Basically it has all the features that you would want from a link management plugin with a nicer and easier interface.

4. WP Wizard Cloak

WP Wizard Cloak

WP Wizard Cloak is another WordPress affiliate link management plugin. It comes with all the whistles and bells you would need from an affiliate link management tool.

It provides URL shortening and link cloaking with easy to use tools to add and manage your affiliate links in WordPress.

5. Links Auto Replacer

Link Auto Replacer

Links Auto Replacer is a bit different than most other plugins in the list. As the name suggests, its main use is to automatically add links for certain keywords. You can manage your links and add new links just like any other link management plugin.

6. WooCommerce Cloak Affiliate Links

WooCommerce Cloak Affiliate Links

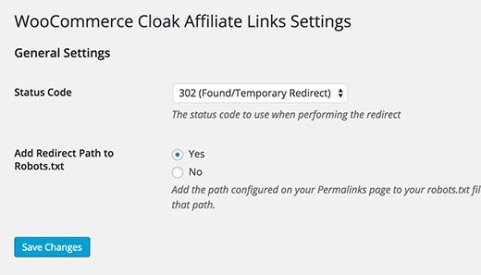
As the name suggests, WooCommerce Cloak Affiliate Links plugin is for eCommerce sites built on WooCommerce platform.

This plugin cloaks all external links on a WooCommerce site automatically. You can choose a URL slug by visiting Settings » Permalinks page. You can also change the redirect type. But that’s about it, this plugin is not a link manager so you cannot use it to add or manage your affiliate links.

7. Affiliate Link Manager

Affiliate link manager

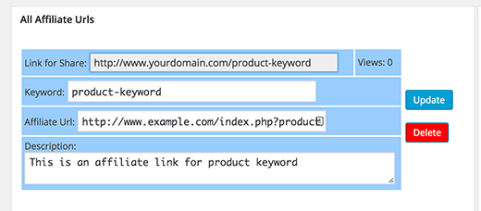
Affiliate Link Manager plugin takes a different approach for link cloaking. It does not add a URL base like most other plugins in the list. Instead it allows you to use a keyword as the URL slug for the cloaked link. In terms of features it is very limited, but it does the job. It also offers some basic stats for your cloaked link views.

We hope this tutorial helped you learn how to cloak links on your WordPress site.

Easy Guide to Limit Comment Length in WordPress

In this tutorial, we will show you how to limit comment length in WordPress, so you can set both minimum and maximum comment length limit for your WordPress site.

Why limit comment length in WordPress?


In our experience of moderating online discussions for the past decade, we have found that most helpful comments are above 60 characters and below 5000 characters in length.

When a person writes a one-word comment, it usually is not very helpful. In most cases, it is spam because the author is simply trying to earn a back link from your site.

However when a person writes a comment above 5000 characters, its usually a rant / complaint that in most cases is not relevant to that particular article.

By setting comment length limits in WordPress, you can improve the quality of your comments.

There are two methods to limit comment length in WordPress. The first method requires you to install a plugin. The second method uses a simple code snippet that you can add to your site.

Method 1: Limiting Comment Lenght Using a Plugin

First thing you need to do is install and activate Control Comment Lengthplugin. Upon activation, simply go to Settings » Control Comment Length to configure the plugin settings.

Controlling comment length in WordPress using a plugin

The plugin’s user interface is in German with English. You can set both minimum and maximum number of characters a comment can have. We recommend using 60 for minimum and 5000 for maximum character count.

You can also add messages that will be visible to users when there comments are either too short or too long. The plugin only provides these messages in the German language. You can replace it with your own message.

Method 2: Limit Comment Length Using Code Snippet

The second method is for users who don’t mind dealing with code code. We will add a filter hook to preprocess_comment. This filter is run before WordPress saves any comments to database or runs any other pre-processing on submitted comments. We will use it to check the comment length. If it is above or below the set comment length parameters, then we will show users an error message.

Simply add this code to your theme’s functions.php file or a site-specific plugin.

add_filter( 'preprocess_comment', 'wpb_preprocess_comment' );
 
function wpb_preprocess_comment($comment) {
    if ( strlen( $comment['comment_content'] ) > 5000 ) {
        wp_die('Comment is too long. Please keep your comment under 5000 characters.');
    }
if ( strlen( $comment['comment_content'] ) < 60 ) {
        wp_die('Comment is too short. Please use at least 60 characters.');
    }
    return $comment;
}

Comment too long error

We hope this tutorial helped you limit comment length in WordPress.

Easy Guide to Add the New Facebook Page Plugin in WordPress

In this tutorial, we will show you how to add the Facebook page plugin in WordPress.

What is Facebook Page Plugin?


Facebook page plugin is the replacement of what was previously known as the Facebook Like box. It allowed you to promote your Facebook page on your website. The new Facebook Page plugin does the exact same thing.

It has a new and improved look which now displays your Facebook cover photo as well. It comes with two buttons. Users can Like your page, and they can also share it. You have the option to show users which of their friends have already liked your page. You can also display recent posts from your Facebook page.

How to Add The New Facebook Page Plugin in WordPress

First you need to visit Facebook’s Page Plugin website. You will find the options to configure the appearance of your Facebook page embed.

Simply provide the URL of your Facebook page. Next you will need to enter the width and height for the box. Alternatively, you can leave it blank, and Facebook will try to automatically adjust it.

You can show your cover photo, posts, and friend’s faces in the page plugin. Once you are satisfied with the appearance, click on the Get Code button to continue.

Facebook will now show you two code snippets. Copy the first code snippet and paste it in your theme or child theme‘s header.php file right after the <body> tag.

Next, copy the second code snippet and paste it anywhere you want to display the page like box. You can also paste this code snippet into a text widget by going to Appearance » Widgets.

We hope this tutorial helped you add Facebook Page plugin to your WordPress site.

Easy Guide to Add an iframe Border Around a Video Embed

Adding Border Around iframe Videos in WordPress

First thing you need to do is to open a post or page containing your iframe video embed code. A typical iframe embed code should looks something like this:

[youtube https://www.youtube.com/watch?v=qzOOy1tWBCg&w=560&h=315]

You can add a border around it by adding inline style to the code like this:

[youtube https://www.youtube.com/watch?v=qzOOy1tWBCg&w=560&h=315]


Simply change the width of the border as well as the color, and you’re done.

While adding an iframe border works, there is actually a better way to add a border around videos in WordPress. That’s by using oEmbed.

Adding Border Around oEmbed Videos in WordPress

WordPress comes with built-in oEmbed support. Basically WordPress allows you to paste the link of the video, and it will automatically get the embed code for them. Now this only works for oEmbed enabled sites such as YouTube, Vimeo, DailyMotion, Hulu, etc. (See: how to easily add videos in WordPress using oEmbed)

Now that you know how to add a video with oEmbed, here is how you can add a border around oEmbed videos in WordPress.

When adding a video using oEmbed, simply wrap the URL in span tag with inline style parameters, like this:

<span style="border:3px solid #EEE;">http://www.youtube.com/watch?v=qzOOy1tWBCg</span>

If you want to add a same border around all video iframes, then it would be best to add a CSS class to your theme’s stylesheet.

.frame-border { 
border:3px solid #EEE; 
}

Now you can use the CSS class in your iframe embed code like this:

[youtube https://www.youtube.com/watch?v=qzOOy1tWBCg&w=560&h=315]

You can also use the same CSS class in the span tag around your oEmbed video URLs, like this:

<span class="frame-border">http://www.youtube.com/watch?v=qzOOy1tWBCg</span>

The benefit of using a single CSS class is that if you change themes later, then you can easily change the colors with one click vs going back and editing each video individually.

We hope this tutorial helped you add an iframe border around a video embed in WordPress.

Easy Guide to Show Recent Posts by Category in WordPress

In this tutorial, we will cover how to show recent posts by category in your WordPress sidebar.


Display Recent Posts by Category (Plugin Method)

First thing you need to do is install and activate the Category Posts Widgetplugin.

Upon activation, you need to visit Appearance » Widgets, there you will notice the new Category Posts widget in the list of available widgets.

Simply drag and drop Category Posts widget to a sidebar where you want to display recent posts by category.

visit Appearance » Widgets

The widget options are quite self explanatory. First you need to provide a title for the category posts section and choose a category. After that you can choose other display options like number of posts, excerpts, featured image, etc.

Once you are done, click the save button to store your widget settings. You can now visit your site to see recent posts by category in action.

Display Recent Posts by Category without a Plugin (Code Snippet)

In this method, we will use a code snippet to display recent posts from a category.

First you need to add this code in your theme’s functions.php file or a site-specific plugin.

function wpb_postsbycategory() {
// the query
$the_query = new WP_Query( array( 'category_name' => 'announcements', 'posts_per_page' => 10 ) ); 
 
// The Loop
if ( $the_query->have_posts() ) {
    $string .= '


Make sure that you replace 'announcements' with your own category slug.

This code simply queries WordPress to retrieve 10 posts from a specified category. It then displays the posts in a bulleted list. If a post has a featured image (post thumbnail), then it will show the featured image as well.

In the end, we created a shortcode 'categoryposts' and enabled shortcode in text widgets.

There are three ways of displaying the recent posts by category using this code snippet.

First, you can simply paste the following code anywhere in your desired template file location (such as footer.php, single.php, etc).


Second and third method relies on using the shortcode in the widget area or inside your posts / pages.

Simply visit Appearance » Widgets and add a text widget to your sidebar. Next add [categoryposts] shortcode in the text widget and save it. You can now preview your website to see recent posts by category in the sidebar.

If you want to show recent posts by categories on specific post or pages, then simply paste the shortcode in the post content area.

By default, your list may not look very good. You will need to use CSS to style the category posts list. You can use the code below as an starting point in your theme or child theme’s stylesheet.

ul.postsbycategory {
list-style-type: none;
}
 
.postsbycategory img {
float:left; 
padding:3px;
margin:3px;
border: 3px solid #EEE;
}

use CSS to style the category posts list

That’s all, we hope this tutorial helped you display recent posts by category in WordPress sidebar.

Easy Guide to Import and Export Custom Post Types in WordPress

In this tutorial, we will show you how to import and export custom post types in WordPress. We will also show you how to import any custom taxonomies associated with your post types.

There are two steps involved in exporting and importing a custom post type in WordPress. First step involves migrating the actual custom post type and taxonomies. The second step is to import the post type data.

Often custom post types in WordPress are associated with their own custom taxonomies. We will show you how to export/import your custom taxonomies along with your post type.


Exporting Custom Post Types and Taxonomies in WordPress

Some users prefer to create their custom post types and taxonomies by adding code in their theme’s functions.php file or a site-specific plugin. In that case, all you need to do is copy that code and paste it on the site where you want to import them.

However, in some cases you may not be able to locate the code. Don’t worry you can still create the same custom post type on the new site.

All you need to know is the post key value. This is the name used for the post type in your WordPress database. You can find it by simply visiting the post type in your WordPress admin area.

post key value

Once you have the post key, visit the site where you want to import the post type and use Custom Post Types UI plugin to create your custom post type.

import the post type

You can also get custom taxonomy key by simply viewing the custom taxonomy in the admin area.

simply viewing the custom

Use CPT UI plugin to create the same taxonomy on the target site where you want to import the taxonomy.

Use CPT UI plugin

Repeat the process for all custom post types and taxonomies that you want to import.

Bonus Tip: If you used the CPT UI plugin to create your post type, then you can also use it to migrate them. But this only works if the original custom post type was created using this plugin. Visit the Import / Export section in the plugin settings and follow onscreen instructions.

Custom Post Types & Taxonomies Created by Plugins

Many popular WordPress plugins use custom post types and taxonomies to handle custom content types. For example, Soliloquy uses them to create sliders, eCommere plugins use them to create products, etc.

If you want to keep using those plugins, then you don’t need to import CPTs. Simply install the plugin on the target site, and you will have the custom post types and taxonomies ready on your site.

Many such plugins come with their own import/export features but if a plugin does not have that feature you can still export the data.

Exporting / Importing Custom Post Type and Taxonomies Data in WordPress

WordPress comes with a powerful import/export tool which allows you to export and import WordPress data. Simply go to Tools » Export.

Exporting / Importing Custom Post Type

You will see all your post types listed there. Select the post types you want to export and press the Download Export File button.

WordPress will now prepare an XML export file and your browser will start downloading it.

Now switch to your target site where you want to import this data. Go to Tools » Import. You will see a number of options, click on WordPress.

This will bring up a popup asking you to install WordPress importer plugin. Click on the install button and then click on Activate Plugin & Run importerlink.

l WordPress importer plugin

On the importer screen, you need to click on the choose file button and then select the XML file you downloaded earlier. Next, click on the upload file and export button.

Next, click on the upload file

WordPress will now import your custom post type data. All the custom post types you selected earlier will be imported. WordPress will also automatically add terms to the custom taxonomies.


8 Proven Methods to Promote Old Posts in WordPress

In this tutorial, we will show you some of the best ways to promote old posts in WordPress.


But before we start, let’s take a look at why it’s important to promote old posts.

1. Regularly Share Your Old Posts on Social Media

Regularly Share Your Old Posts on Social Media

Most of your social media updates are seen by a fraction of your followers. Mainly because there is so much noise and not everyone is online at the same time.

That’s why it is recommended to share at various different times of the day. The Revive Old Post plugin automatically shares your old posts on social media networks like Twitter, Facebook, and LinkedIn. It spreads out your updates for different times allowing you to maximize your exposure.

For detailed instructions see our guide on how to automatically share your old WordPress posts.

2. Showcase Related Posts on Your Blog

Showcase Related Posts on Your Blog

When you visit popular blogs like TechCrunch, Mashable, or even WPCademy, you will notice that there is related content next to or below each article.

If a user has scrolled down to read your entire article, then they are engaged. Using a related posts plugin, you can provide them an opportunity to explore more of your website.

3. Display Your Popular Posts

Display Your Popular Posts

It’s true that 20% of your website content gets 80% of your traffic. Some articles are simply more popular than others.

Why not get more traffic to them? You can start showcasing your most popular content with a few simple clicks. People coming to your website are more likely to read what many other users have already found interesting.

Here are some great popular posts plugins for WordPress that you can use.

4. Create Better 404 Pages

Create Better 404 Pages

Most WordPress themes come with a default 404 page template. A 404 page is displayed when a page that the user is looking for cannot be found.

You can use this opportunity to showcase the most important content of your website, and keep that visitor engaged. You can also add a search form on the page, so that users can locate the content they were looking for.

Here are detailed instructions on how to improve your 404 page template in WordPress.

5. Better WordPress Search

Better WordPress Search

The default search feature in WordPress is fairly limiting, but you can improve the search feature. There are two common approaches for that.

The first one is to use Google Custom Search form to replace the WordPress search. The other method is to use a search plugin like SearchWP.

Both of these solutions will help improve your WordPress search.

6. Custom Archive Pages

Custom Archive Pages

Creating a custom archive page is one of the best way to highlight your old but still useful content.

You can show the most popular articles, most commented posts, recent posts, and so on. You can even display all your post categories / tags, add compact archives, and include a search form. This will help people not only in finding content, but will also help them understand what your blog is about. Don’t forget to add an email sign up form on the page.

You may also want to check out WPCademy archives.

7. Interlink Old Articles

Interlink Old Articles

Building internal links is one of the most important SEO strategy. You need to make internal linking a habit.

It’s helpful to the user when you link to your old posts whenever it is relevant. People browse the web by clicking on one link to another. Make sure that there are plenty of your own links for them to click on.

Check out our guide on WordPress SEO tips for beginners for some more SEO advice.

8. Link Old Articles in Comments

Link Old Articles in Comments

When answering user comments on your own blog, you should try to use links to point them to other articles on your own website.

It’s not something you should force, rather it’s important to keep it in the back of your mind, and you will be surprised how many opportunities will come up.

This builds trust and increases your pageviews. This link you add is going to stay there and any future visitors with the same question will continue to click on that link.

We hope this tutorial helped you fine some new ways to promote old posts on your WordPress site.