Easy Guide to Link to External Links from the Post Title in WordPress

In this tutorial, we will learn how to link to external links from the post title in WordPress.

Method 1: Linking Post Title to an External Link in WordPress using Plugin

This method is easier and is recommended for beginners.

First thing you need to do is install and activate the Page Links To plugin. For more details, see our step by step guide on how to install a WordPress plugin.

Upon activation, simply create a new post or edit an existing one. You will notice the new ‘Page Links To’ meta box below the post editor.

WordPress using Plugin

Click on ‘A custom URL’ to add the link you want to add to post title. Now you can save or publish your post.

That’s all. The post title will now link to the custom URL you provided.

It is not necessary to use it for external links only. You can also use it to send users to different posts and pages on your WordPress site.

Method 2: Add External Link to Post Title Using Code

This method requires you to add code to your WordPress site. You can use this method if you are comfortable with pasting snippets from web into WordPress.

Simply add this code to your theme’s functions.php file or a site-specific plugin.

function print_post_title() {
global $post;
$thePostID = $post->ID;
$post_id = get_post($thePostID);
$title = $post_id->post_title;
$perm = get_permalink($post_id);
$post_keys = array(); $post_val = array();
$post_keys = get_post_custom_keys($thePostID);
 
if (!empty($post_keys)) {
foreach ($post_keys as $pkey) {
if ($pkey=='external_url') {
$post_val = get_post_custom_values($pkey);
}
}
if (empty($post_val)) {
$link = $perm;
} else {
$link = $post_val[0];
}
} else {
$link = $perm;
}
echo '
'.$title.'
'; }

This code looks simply looks for a custom field containing your custom URL. If the post has the custom field, then it outputs the post title linked to your URL.

The next step is to replace your theme’s default display of post title with this function. You will find it in archives.php, content.php, category.php and other templates. It would look something like this:

?php the_title( sprintf( '</p> <h2 class="entry-title"><a href="%s" rel="bookmark">', esc_url( get_permalink() ) ), '</a></h2> <p>' ); ?

You need to replace it with this code:

 ?php print_post_title() ?

The code part is over, now you need to add the external URL to the post. Simply edit the post or create a new one. On the post editor page, look for the custom fields meta box.

If you cannot see the custom fields meta box, then you need to click Screen Options in the top right corner of the screen. This will bring down a menu where you need to check the box next to ‘Custom Fields’.

 custom fields meta box in  wordpress

You will find the custom fields meta box below the post editor.

Click on ‘Enter New’ and then enter external_url in the ‘Name’ field and the URL you want to add to post title in the ‘Value’ field.

Enter New’ and then enter external_url.  also add to post title in the ‘Value’ field.

You can now save or publish your post. That’s all, your post title will now be linked to the URL you added in the custom field.

Next time you need to add a link, you just need to select the external_urlcustom field from the drop down menu and enter your external link in the value field.

We hope this tutorial helped you learn how to link to external links from the post title in WordPress.

Easy Guide to Stop Storing IP Address in WordPress Comments

In this tutorial, we will learn how to stop storing IP address in WordPress comments.

Pros and Cons of Not Storing IP Address in WordPress Comments

By default, WordPress logs and stores IP addresses of users leaving comments on your website. These IP addresses are permanently stored in your database.

The reason for storing IP addresses with each comment is to help site owners combat with unwanted comments or spam. Plugins like Akismet can block comments from IP addresses known to be exploited by spammers.

Unless your users are using a VPN service, their real IP addresses can still be found in your site logs. Most WordPress hosting providers keep an access log of all visitors to your website for a limited period of time.

On the other hand by not storing IP address in WordPress comments, you can improve privacy of commenters on your website. They may feel more confident about expressing their opinions knowing that your site doesn’t store IP addresses with comments.

Method 1: Stop Storing IP Addresses in Comments with Plugin

This method is easier and recommended for new websites and beginners.

First thing you need to do is install and activate the Remove IP plugin. For more details, see our step by step guide on how to install a WordPress plugin.

Once activated, the plugin will replace user IP with 127.0.0.1, which is an IP address typically used by localhost.

The plugin will not delete IP addresses stored with older comments. If you have older comments with IP addresses stored with them, then you may want to delete those IP addresses as well. We will show you how to do that later in this article.

Method 2: Manually Stop Storing IP Addresses with WordPress Comments

If you are comfortable pasting code snippets in WordPress, then you should use this method instead.

Simply add this code to your theme’s functions.php file or a site-specific plugin.

function wpb_remove_commentsip( $comment_author_ip ) {
return '';
}
add_filter( 'pre_comment_user_ip', 'wpb_remove_commentsip' );

This is basically the same code used by the plugin we mentioned in the first method. However, instead of storing 127.0.0.1, it leaves the IP field blank.

Remove IP Address From Old Comments

Regardless of which method you use to stop storing comments IP, old comments on your WordPress site will always have IP addresses stored with them.

If you have old comments on your site, then you may want to remove IP addresses from those comments.

We will show you how to do that by running a MySQL query on your WordPress database. It is really important to make sure that you have the most recent WordPress database backup.

Next you need to login to your WordPress hosting control panel and look for phpMyAdmin.

Make sure that you have selected your WordPress database by clicking on the database name in the column on your left hand. After that you need to click on the SQL menu.

WordPress database clicking

This will bring you a text area where you need to enter this query:

UPDATE 'wp_comments' SET 'comment_author_IP' = '';

Click on the Go button below the textarea to run your query. That’s all, it will remove all IP addresses stored with comments in WordPress database.

Note: if you have a custom WordPress database prefix, then please adjust the wp_comments to your custom table prefix.

We hope this tutorial helped you learn how to stop storing IP address in WordPress comments.

Easy Guide to Setup Facebook Instant Articles for WordPress (Step by Step)

In this step by step tutorial, we will explain what are the pros and cons of Facebook Instant Articles as well as show you how to easily setup Facebook Instant Articles for WordPress.

What is Facebook Instant Articles?

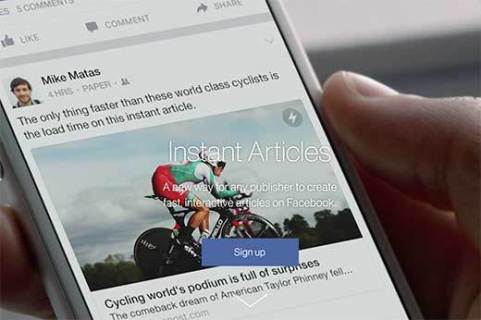
Instant Articles is a Facebook feature which allows you to load your content 10 times faster by using a customized mobile format. It is based on the same technology used in Facebook apps for mobile devices.

Instant Articles load up to 10 times faster than a normal web page. This incredible boost in speed provides a better user experience for mobile users.

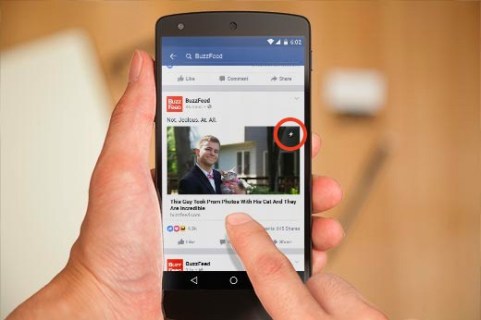
Many popular media sites like BuzzFeed, TechCrunch, Mashable, and countless others are using it on their websites. You can easily spot instant articles in your Facebook feed by the lightning bolt icon.

Facebook feed icon

Pros and Cons of Facebook Instant Articles

Like everything else, there are some advantages and disadvantages of using instant articles on your website.

Pros of Using Facebook Instant Articles

  • Faster load time means significant improvement in user experience.
  • Due to speed, users are more likely to share your content.
  • Access to monetization options through Facebook Audience Network.
  • Boosted Facebook Page Reach.
  • Facebook’s massive user base can bring new wave of traffic to your site.

Cons of Using Facebook Instant Articles

  • Users will not see your sidebars. It will hide your useful widgets, email list forms, and everything else that is not part of the article.
  • You may witness a drop in advertising revenue, as Facebook instant articles limits the advertisers as well as the number of ads you can show on an article.
  • You can use some images and videos on your article, but Facebook instant articles will limit that as well.
  • Most shortcodes, custom fields, and other WordPress features will not be displayed in your articles.

Considering the pros and cons of using Facebook Instant Articles, it is a mix bag for publishers. It actually depends on the type of content you produce and your business goals.

If you’re a news media site, then it makes sense for you to add it. If you’re a business website, then it may not be a huge difference maker.

What Do You Need to Enable Facebook Instant Articles in WordPress?

There are a few requirements for setting up Facebook Instant articles on your WordPress site. You need a:

  • Facebook page for your WordPress website.
  • Facebook page app (we will show you how to create it later in this article).
  • At least 10 or more articles on your website.
  • Instant Articles for WP plugin (We will show you how to set it up later in this article).

Having said that, let’s get started by applying for Facebook Instant Articles.

Signing up for Facebook Instant Articles

First you need to visit Facebook Instant Articles website and click on the sign up button to get started.

Facebook Instant Articles

Facebook will now ask you to select a page. Here you need to select the Facebook Page for your website.

After that check the box to agree with Instant Articles terms and then click on ‘Access Instant Articles Tools’ button.

Facebook check the box‘Access Instant Articles Tools’ 

This will take you to the publisher tools on your Facebook page, which will now have an instant articles section.

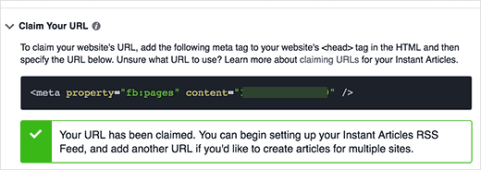
First, you need to prove the ownership of your website by claiming your URL.

claiming your URL

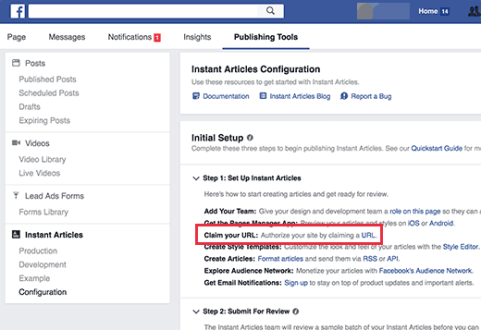
Scroll down a little to the Tools section on the page and click on the ‘Claim your URL’ to expand it. Facebook will show you a code snippet.

Facebook will show you a code snippet

You need to copy the code and insert it into the <head> section of your WordPress site.

There are two ways you can add this code to your website.

You can edit the header.php file in your child theme and paste the code just before <head> tag.

But if you are not using a child theme, then you can use Insert Headers and Footers plugin. For more details, see our step by step guide on how to install a WordPress plugin.

After activating the plugin, go to Settings » Insert Headers and Footers page and paste the code into the header section.

Insert Headers and Footers

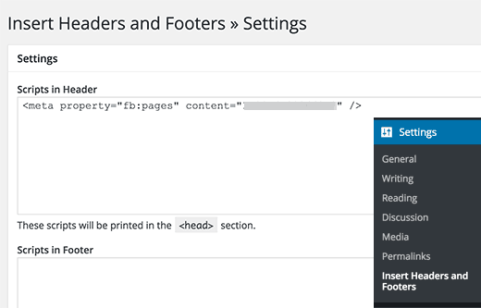
Click on save button to store your changes.

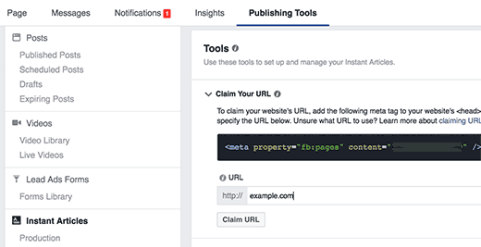
Once you have added the code to your website, you need to switch back to the publisher tools section of your Facebook page.

Add your website URL below the code you copied earlier and then click on the claim URL button.

URL below the code on the claim URL button

The next step is to add an Instant Articles RSS feed for your website. Here is how you can generate an Instant Article feed for your WordPress site.

Simply install and activate the Instant Articles for WP plugin. Upon activation, the plugin will generate an instant articles feed for your WordPress site.

You can find the feed by adding /feed/instant-articles after your site’s URL, like this:

http://www.example.com/feed/instant-articles

Copy your instant articles feed URL and switch back to your Facebook page’s publishing tool section. Scroll down to the Tools section and click on ‘Production RSS Feed’ to expand it.

 Facebook page’s publishing tool section

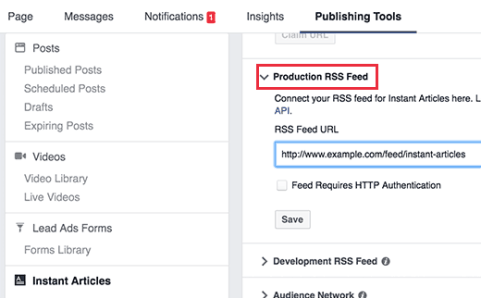
Paste your Instant Articles feed URL and click on the save button. Facebook will show you a success message that your feed is added.

Setting up Facebook Instant Articles plugin for WordPress

In the previous step we installed Instant Articles for WP plugin to generate RSS feed for instant articles. Now you need to set up rest of the plugin settings.

You will notice that upon activation the plugin added a new menu item in your WordPress admin bar labeled ‘Instant Articles’. Clicking on it will take you to the plugin’s settings page.

activation the plugin added a new menu item

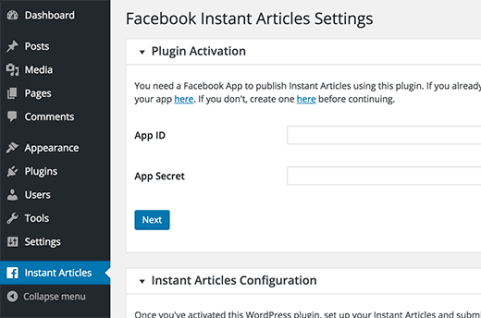
This plugin requires an App ID and Secret keys for activation. You will need to create a Facebook app for your page to get those keys. Let’s take a look at how you can do that.

Creating a Facebook App for Your Page

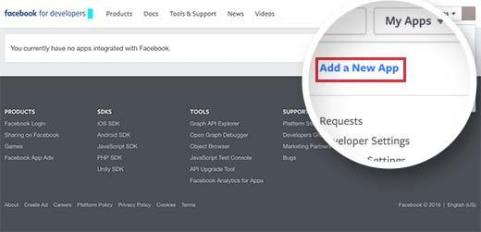
First, you need to visit the Facebook for Developers website. Click on the drop down menu next to My Apps menu on the upper right corner of the screen next to your profile photo.

Facebook for Developers website.

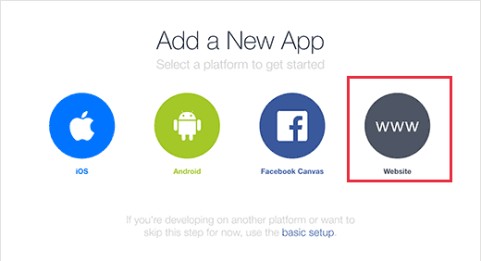
This will bring up a popup on screen. You need to click on website.

add new app

This will take you to a quick setup wizard. You need to enter a name for your Facebook app. This could be anything that helps you identify the app.

Click on the ‘Create New Facebook App ID’ button to continue.

 Facebook App ID

A new popup will appear asking you to provide a contact email address and select a category for your app.

Enter an email address and select Apps for Pages as app category.

new  Apps create

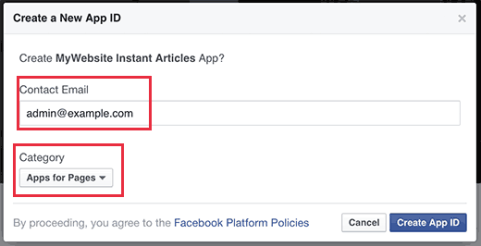
Click on create App ID button to continue.

The popup will disappear and Facebook will now create an app for you. On the quick start page, you will see new information about how to use the app.

You just need to scroll down a little to ‘Tell us about your website’ section.

Tell us about your website’ section

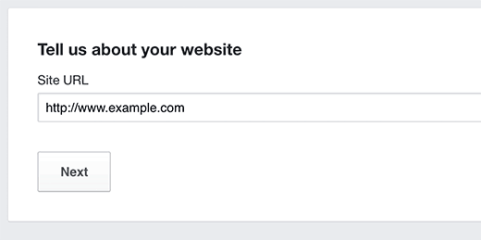
Enter your WordPress website address here and click on the next button to continue.

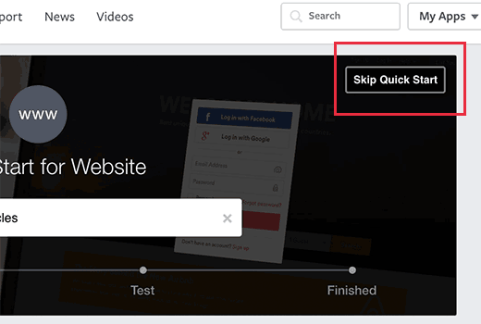
Even though Facebook will be showing you that there are more steps in the set up wizard, but that’s all the information you needed to enter.

You can now click on the ‘Skip Quick Start’ button at the top right corner of the page.

Skip Quick Start’ button

You will be redirected to your newly created app’s dashboard. You will be able to see your App ID and to see your App secret key you will need to click on ‘Show’ button.

see your App ID and to see your App secret key

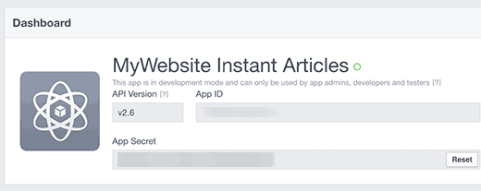
Before you copy these keys, first you need to make your app live and publicly available.

Click on the ‘App Review’ link from the menu on your left.

Click on the ‘App Review’ link from the menu

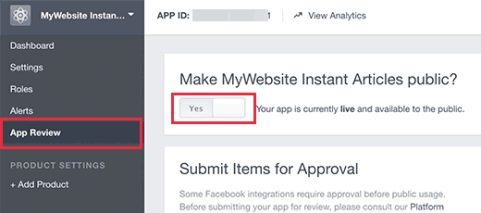
On the next screen, you will see that your app is under development mode. Click on the toggle to switch it to ‘Yes’ and make your app live.

Now click on the dashboard link from the left hand column to go back to your app’s dashboard. Copy your App ID and Secret keys.

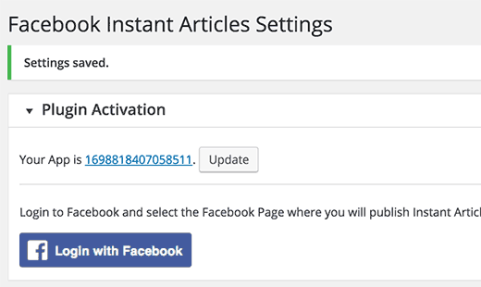
Return to your Instant Articles for WP plugin’ settings page on your WordPress site and paste your App ID and Secret keys there.

App ID and Secret keys

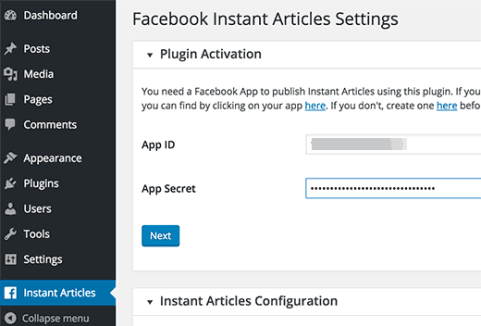
Click on the next button to continue.

The plugin’s settings page will now show you a login with Facebook button.

login with Facebook button

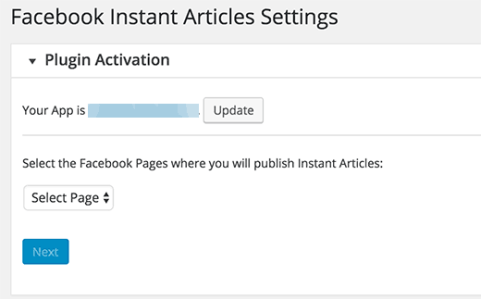
This will take you to Facebook, and you will be asked to give the app permission to access your profile information.

After giving permissions, you will be redirected back to your WordPress site. Click on the ‘Select Page’ drop down menu to select your Facebook page.

'Select Page’ drop down menu

Your WordPress site is now ready for Instant Articles. There are still two more steps left.

Setup Style and Branding for Your Instant Articles

Visit your Facebook page and from the admin bar and click on Publishing Tools. From your left hand menu, click on ‘Configuration’ under Instant Articles.

 Facebook page and from the admin bar and click on Publishing Tools

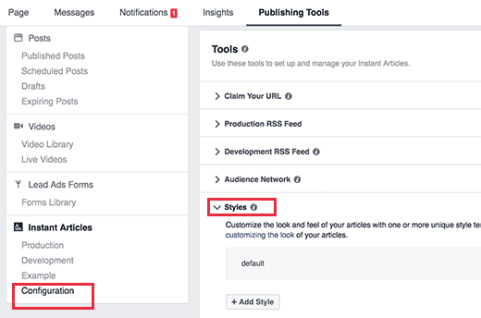
Scroll down to the Tools section and then click on the Style tab to expand it. Facebook has already added a default style for your website.

Click on the default style to customize it.

This will open up a popup where you can upload your website logo. Facebook requires images that are 690 by 132 pixel minimum.

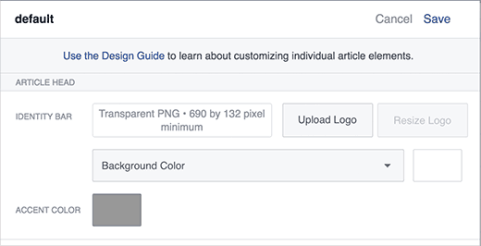
After uploading the logo, click on Save and then click on Done.

Submit Your Instant Articles Feed for Review

Before you can submit your Instant Articles feed for review, you need to make sure that you have at least 10 articles in your Instant Articles feed.

If you have already published more than 10 articles on your website, but the feed is not showing all of them, then you need to edit your last 10 articles and simply click on the update button.

Once you are sure that you have 10 articles in your Instant Articles feed, you are now ready to submit it to Facebook for review.

Go to your Facebook page and click on Publishing Tools from the admin bar. After that click on the ‘Configuration’ link under Instant Articles on your left hand menu.

Look for ‘Step 2: Submit For Review’ on the configuration settings page.

Submit For Review’ on the configuration settings page.

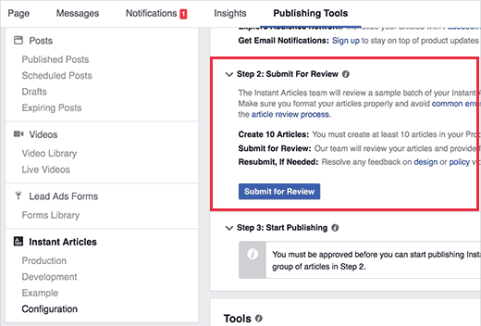
If there are no errors with your Instant Articles feed, then you will see a ‘Submit for Review’ button. Go ahead and click on this button to send your feed for review.

That’s all, Instant Articles will become available for your website once Facebook team has reviewed and approved your feed.

Troubleshooting Tips:

Facebook requires that your Instant Articles feed match specifications described on their developer website. Instant Articles for WP plugin handles that part for you.

However depending on the theme or plugins you are using on your site, you might see some errors or warnings. An easier way to troubleshoot those errors is by editing a post and scrolling down to the Facebook Instant Articles meta box below the post editor.

Instant Articles facebook

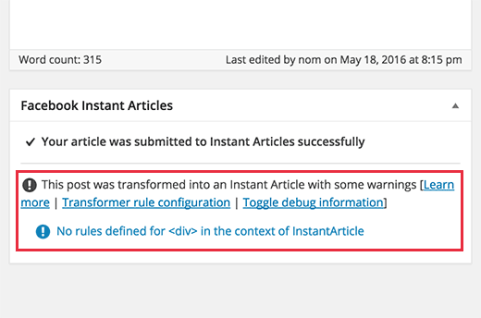
Most of the errors are caused by plugins or theme adding content into your posts that is not supported by transformer rules used by Instant Articles for WP plugin.

You can create your own custom transformer rules. Refer to the plugin’s documentation to learn how to add your custom transformer rules.

However, we feel that it would be difficult for most beginners to do that on their own, so you may need a developer. You can try to configure your other plugins and themes and stop them from adding content blocks into your posts.

Incorrect URLs

If you are continuously getting Empty Feed error when submitting your Instant Articles feed, then check the URL you are trying to add.

http://www.example.com/feed/instant-articles

http://example.com/feed/instant-articles

These are two different URLs, and depending on your WordPress setup, entering the incorrect URL may result into a 404 error.

If you are still seeing the empty feed error, then try updating the last ten posts on your site. This will change their time modified and will add them to the feed.

We hope this tutorial helped you set up Facebook Instant Articles for WordPress.

Easy Guide to Change Akismet’s Delete Spam Schedule in WordPress

In this tutorial, we will learn how to change Akismet’s delete spam schedule in WordPress.

Why Change How Akismet Deletes Spam in WordPress?

This tutorial is for Akismet plugin only. If you are not using it, then check our guide on why you should start using Akismet.

Akismet allows you to combat comment spam in WordPress. It monitors all comments, pingbacks and trackbacks.

Spam comments reside in your database, which means they increase your database backup size. Deleting them sooner may help keep your database size a bit smaller.

While some users may believe that deleting spam comments improves database performance, we don’t think it has a major effect on database performance in most circumstances.

If you are receiving thousands of spam comments, and you try to delete them manually, then it could affect your site’s performance. See our guide on how to batch delete spam comments in WordPress.

On the other hand, some users may want to keep spam comments for a longer period, so that they can review them later to avoid false positives.

Having said that, let’s see how you can change the delete schedule for spam comment in WordPress with Akismet.

Changing Spam Comment Delete Schedule in WordPress with Akismet

Akismet automatically deletes spam comments after keeping them for 15 days in your database. This gives you time to manually review spam comments.

If it marked a genuine comment as spam, then you can mark it as not spam. This is how Akismet learns and improves it’s algorithms to catch spam comments more efficiently.

Changing Spam Comment Delete Schedule in WordPress

You can change the number of days Akismet should keep spam comments in your database. Simply add this code to your theme’s functions.php file or in a site-specific plugin.

add_filter( 'akismet_delete_comment_interval', 'custom_spam_delete_interval' );
 
function custom_spam_delete_interval() {
    return 7;
}

Change 7 with the number of days you want to keep a comment. This filtersimply modifies Akismet’s spam deletion schedule.

Changing the number to 0, will allow Akismet to delete all comments on its next comment delete schedule. This will not give you much time to review spam comments.

You can see your changes in action by visiting Settings » Akismet page. Scroll down to the bottom of the page, and you will see a note in tiny letters saying ‘Spam in the spam folder older than 7 days is deleted automatically.’

 Settings » Akismet Scroll down to the bottom of the page.

It will replace 7 days with the number of days you used in your filter.

Note: When spam comments are deleted, they are not sent to trash, so you cannot retrieve them back.

We hope this tutorial helped you change Akismet spam comment delete schedule in WordPress.

Easy Guide to Move GoDaddy Website Builder Site to WordPress

In this tutorial, we will learn how to move GoDaddy website builder site to WordPress.

Step 0: Getting Started

The success of your WordPress site depends on the WordPress hosting you choose. If you already have GoDaddy’s hosting service, then you can use that for your WordPress site.

Step 1: Preparing to Move From GoDaddy Website Builder to WordPress

WordPress has import tools for many services and tools like Blogger, Tumblr, LiveJournal, etc. But it does not have an import tool for Website Builder.

This is why you will need to backup your Website Builder site manually. It can be a little consuming, depending on how much content you have on your website.

Backing up GoDaddy Website Builder Content

If you have just a few pages, then you can backup by simply saving images and copying text into text files on your computer.

You can also visit each page on your website in your browser, and then press CTRL+S (Command+S on Mac) on your keyboard.

This will bring up the save dialog box. Make sure that you select ‘Webpage, Complete’ in the ‘format’ or ‘save as type’ field.

Saving a complete webpage using your browser

Repeat the process for all pages on your website.

Make sure that you have downloaded all your images and text. Disconnect internet on your computer and then open the files you have downloaded to double-check.

Alternatively, you can use the free HTTrack tool to copy the website on your computer.

HTTrack is a website copier. You can simply enter the URL of your website, and it will make a copy of it on your computer.

Copying websites using HTTrack.

The problem is that, GoDaddy website builder and its templates store their files on different CDN servers. The name and addresses of these servers vary from one site to another.

This makes it harder to download all your image files. However, if your website is mainly based on text and you don’t mind losing images, then Httrack is the fastest way to copy your website.

Once you disable website builder, you will not be able to get back to your website. Take your time to make sure that you have a backup of all your website data.

At this time, you’re probably wondering why isn’t there an easier way. Probably because Godaddy doesn’t want you to switch. That’s why choosing the right platform is an important decision, but we’re glad that you have made the right choice to go with WordPress.

Backing up Your Link Structure

You will need to redirect people visiting old URLs of your website to the new URLs in WordPress. To do that, you need to have a list of all URLs on your website.

If you have just a few pages, then you can simply copy and paste the URL of each page on your site in a plain text file.

Alternately, you can use online tools to extract URLs from your site. You can use Klipper, a Google Chrome extension to save URLs in a txt file.

Don’t worry if you miss out a page. We will also show you how to automatically set up alerts for 404 errors in WordPress and redirect users in WordPress.

Step 2: Moving Website Builder Site to GoDaddy Shared Hosting

This step is only for users who will be using GoDaddy’s hosting service to run their WordPress site. If you are using some other WordPress hosting provider like Bluehost, Siteground, Hostgator, etc, then skip this and jump to the next step.

Disable GoDaddy Website Builder

If you want to use GoDaddy’s hosting service for your WordPress website, then you cannot install WordPress on that domain until you deactivate Website Builder service.

Simply login to your GoDaddy account and click on your username on the toolbar at top. This will display a flydown menu where you need to click on ‘Manage Website Builder’.

Manage website builder in GoDaddy account

This will show your Website Builder account. You need to click on the options button next to your domain name.

Manage website builder options in GoDaddy

It will bring you to the Website Builder options page. Under the overview tab, you will find a link to cancel your account. Click on it to deactivate Website Builder on your domain name.

Deactivating your Website Builder account in GoDaddy

Your website builder account will now be deactivated, and your domain would become available to host your WordPress website. It will take nearly an hour before your Website Builder account is fully deactivated.

Adding Hosting to Your Domain

Now that your domain is free from GoDaddy website builder. You still need to add hosting service to that domain.

Click on web hosting under account manager and then click on manage button next to your account.

Manage GoDaddy Webhosting

This will bring you to the cPanel dashboard of your hosting account. You need to scroll down to the domains section and then click on Add on domains.

Addon domains in GoDaddy cPanel

Now you can enter your domain name. The subdomain and document root fields will be automatically filled.

Adding domain to GoDaddy hosting

You also need to check the box to create an FTP account. Simply select a username and password for your FTP account. Finally, click on the add domain button.

That’s all you have successfully freed up your domain from Website Builder and added web hosting for your domain.

You can now jump to Step 4, to learn how to install WordPress and continue moving your website.

Step 3: Pointing Domain to Other WordPress Hosting Services

This step is for users who have their domain registered with GoDaddy and want to use it with some other WordPress hosting provider like BlueHost or Siteground.

Log in to your GoDaddy account and click on your username on the toolbar at top. This will reveal a flydown menu where you need to click on manage my domains.

Manage your domains in GoDaddy

Select your domain from the list and click on the Nameservers button on the top and then select set nameservers.

Editing a domain name in GoDaddy

This will bring up a popup where you need to click on custom and then click on the link to enter custom nameserver.

Adding custom nameserver

A new popup will appear with two fields. You can add your new WordPress hosts nameservers here. If your WordPress host has more than two nameservers, then you can click on the Add Nameserver button to add another line.

Add nameservers

Click on the OK button and then click on the save button to store your settings. Remember that DNS changes may take upto 24 hours to propagate throughout the internet. Although it usually only takes a few hours.

Once your domain starts pointing to your new WordPress host, you can proceed to the next step.

Step 4: Installing WordPress

By now your domain should be pointing to your hosting service and you are ready to install WordPress. Whether you are using GoDaddy or any other hosting service, the process is the same.

WordPress is famous for its 5-minute install. Most hosting companies offer 1-click installers for new WordPress websites, which allows you to install WordPress on your website with just a few clicks.

For more details, see our step by step WordPress installation tutorial for beginners.

Step 5: Importing Website Builder Content in WordPress

As we mentioned earlier that you will have to manually backup your Website Builder content. It is not possible to automatically import content from Website Builder.

By default WordPress comes with two built-in content types called posts and pages. See our guide on the difference between posts and pages.

You need to create new pages or posts on your website and copy paste your GoDaddy website builder content.

Creating posts and pages in WordPress is really simple. See our detailed tutorial on how add a new post in WordPress and utilize all the features.

Step 6: Setting up Redirects

If you have the list of links from old website builder site, then you can go right ahead and setup redirects.

First thing you need to do is install and activate the Simple 301 Redirectsplugin. For more details, see our step by step guide on how to install a WordPress plugin.

Upon activation, you need to visit Settings » 301 Redirects page. Enter your old URL under the ‘Request’ field and enter the new WordPress URL for that page in the ‘Destination’ field.

Simple 301 Redirects

Click on save changes button to store this redirect. Repeat the process for all other URLs.

For more detailed instructions and other ways to setup redirects, take a look at our beginner’s guide to creating redirects in WordPress.

Step 7: Customizing Your WordPress Site

WordPress comes with thousands of beautiful themes both paid and free. Take a look at our guide on selecting the perfect theme for WordPress.

Easy Guide to Change the Color of Address Bar in Mobile Browser in WordPress

In this tutorial, we will show you how to change the color of address bar in mobile browser to match your WordPress site.


Why Match Address Bar Color in Mobile Browser?

Most popular WordPress themes are mobile responsive. This makes your site looks great on mobile devices. However, it still looks and feels like a website.

Matching the color of address bar to your WordPress site, gives it a native app-like feel. This improves user experience, which ultimately boosts sales and conversions.

Color address bars in mobile browser on Android

However, please note that currently it only works for Google Chrome web browser on Android devices using Lollipop or newer versions.

Match Address Bar Color on Mobile Browser to Your WordPress Theme

Simply add this code in your theme or child theme‘s header.php file just before the closing </head> tag.

<meta name="theme-color" content="#ff6600" />

This line is a HTML meta tag used by Google Chrome on Android to change color of address bar in mobile browser. The content field has the hex code for the color you want to use as theme color.

Not sure how to get the hex color code?

You can get the HEX value of a color using any image editing software like Adobe Photoshop, Gimp, Paint, etc.

photoshop color picker for wp mobile browser

You can also pick a color using online HTML color picker tools.

If you want to pick a color from a web page, then you can use a browser extension like ColorZilla.

That’s all, we hope this tutorial helped you learn how to change the color of address bar in mobile browser to match your WordPress site.

Easy Guide to Easily Bulk Delete All WordPress Comments

In this tutorial, we will learn how to easily bulk delete all WordPress comments.

Before you Delete All WordPress Comments

There are many legitimate scenarios when a user really needs to delete all WordPress comments without any hesitation.

For example, you filled WordPress with dummy comments on a development site just to see how they would look. You would want to delete those comments before moving to a live site.

There are many other scenarios as well, where a site owner would want to get rid of the comments from their WordPress site.

However, if you just want to delete the spam comments, then take a look at our guide on how to batch delete spam comments in WordPress. If you are upset about comment spam on your WordPress, then make sure you check these tips and tools to combat comment spam in WordPress.

If there are comments showing up on your pages, then take a look at how to disable comments on pages in WordPress.

If none of the above scenarios apply, then continue reading.

First you need to create a complete WordPress backup of your site.

Deleting all comments in WordPress is an irreversible action. You will not be able to undo it once you have deleted those comments. This is why it is important that you have a backup.

Method 1: Deleting All WordPress Comments Using Plugin

First thing you need to do is install and activate the Delete All Comments plugin. For more details, see our step by step guide on how to install a WordPress plugin.

Upon activation, you need to visit Tools » Delete All Comments page. This is where you will see the total number of comments on your website, a confirmation box, and the delete button.

Deleting all WordPress comments using a plugin

Clicking the delete all button will permanently delete all comments from your WordPress site. Including those in spam and trash.

You can now visit the comments page, and you will see all comments safely deleted from your WordPress site.

Method 2: Delete All WordPress Comments Using phpMyAdmin

You can also quickly delete all WordPress comments using MySQL or phpMyAdmin. This method is only recommended for more advanced users.

Login to cPanel dashboard of your WordPress hosting account. Under the database section, click on phpMyAdmin.

phpMyAdmin in cPanel

Inside phpMyAdmin, you will need to locate your WordPress database. You will see a page like this showing all your WordPress database tables.

Emptying WordPress comments tables using phpMyAdmin

Check the box next to wpprefix_comments and wpprefix_commentmetatable. The name of your comments tables may differ depending on the table prefix you choose during your WordPress installation.

After selecting comments table, locate the ‘With selected:’ drop down menu below the table list and select ‘Empty’ from the drop down menu.

PhpMyAdmin will now show you a warning asking if you really want to empty those tables.

Delete all WordPress comments using phpMyAdmin

Click on the yes button to continue. This will delete all WordPress comments from your database.

You can also delete all WordPress comments using MySQL console (command line). Simply log into your MySQL console and run this command:

TRUNCATE `wp_commentmeta`;
TRUNCATE `wp_comments`;

That’s all, we hope this tutorial helped you learn how to easily delete all comments in WordPress.