Easy Guide to Add the Skype Share Button in WordPress

In this tutorial, we will learn how to easily add a Skype share button in WordPress.

First thing you need to do is install and activate Skype share plugin (see our beginner’s guide on how to install a WordPress plugin).

Upon activation, go to Settings » Skype share button page to configure the plugin.

Skype share button settings page

The first option is to enable the share button. You must check this box to enable the Skype share button on your WordPress site.

Next, you need to choose a button size. Available sizes for the button are large share, small share, circle icon, and square icon.

Lastly, you need to choose the location of the button. You can either choose to show it on top of the article, below the article, or both.

Skype share can automatically detect the language of your WordPress site. But if it doesn’t, then you can manually select the language.

Don’t forget to click on the save changes button to store your settings.

That’s all, you can now visit your website to see the Skype Share button in action.

preview of Skype share button

Manually Add Skype Share in WordPress Template

If you want to manually add this in your theme files, then you can follow the manual code instructions below.

First add the following script in the head section of your file. You can either do this by directly editing your header.php file or do it the proper way of adding scripts by using Enqueue scripts.

// Place this code in the head section of your HTML file 
(function(r, d, s) {
    r.loadSkypeWebSdkAsync = r.loadSkypeWebSdkAsync || function(p) {
        var js, sjs = d.getElementsByTagName(s)[0];
        if (d.getElementById(p.id)) { return; }
        js = d.createElement(s);
        js.id = p.id;
        js.src = p.scriptToLoad;
        js.onload = p.callback
        sjs.parentNode.insertBefore(js, sjs);
    };
    var p = {
        scriptToLoad: 'https://swx.cdn.skype.com/shared/v/latest/skypewebsdk.js',
        id: 'skype_web_sdk'
    };
    r.loadSkypeWebSdkAsync(p);
})(window, document, 'script');

After that add the following code in your single.php, loop.php, index.php, page.php, category.php, and archive.php as long as it is placed within the post loop.

<div class='skype-share' data-href='' data-lang='en-US' data-text='' data-style='large' >


You can change the data-style to large, small, circle, or square.

You can also change the language to your desire language.

Basically, the code above will allow the user to share the individual post with the post title as the message.

We hope this tutorial helped you add Skype share button on your WordPress site.

Easy Guide to Add Twitter Cards in WordPress

In this tutorial, we will learn how to add twitter cards in WordPress.

How Does Twitter Cards Work?

When your tweet has a link to a site that has twitter cards enabled, there is an option to view summary. Whenever another user clicks on the tweet, they will see this summary like the screenshot below.

The biggest advantage of having twitter cards is that it increases the number of people following your twitter accounts through content attribution. Often people tweet your links without giving you proper attribution.

How to Add Twitter Cards in WordPress

There are two ways of adding twitter cards in WordPress. Let’s take a look at both of them.

Method 1: Yoast SEO plugin

If you are using WordPress SEO by Yoast plugin, then you are in luck. Yoast has built-in integration for twitter cards, so turning it on is a matter of few clicks.

Simply go to the “Social” page of Yoast SEO settings page. Enter your Twitter username and save changes.

twitter social media account set up

After that click on the Twitter tab. Under the Twitter tab you need to check the box for Add Twitter card meta data. Select a default card type to choose. You can choose to show summary or summary with large image.

Next thing you need to do is go to Users » My Profile page. You will see a new field under Contact Info for your twitter username. Enter your twitter username there.

If you are running a multi-author site, then advise your authors to complete this part in their profile. This way each specific author gets credit for their work as well. See the example below:

That’s all you have successfully added Twitter Cards meta tags to your WordPress site.

This method is by far the easiest method. Since we use WordPress SEO by Yoast on all of our websites, we are using this method.

Method 2: Hard Code it yourself

This method requires adding code to your theme or child theme files. Simply open the header.php file and add this code just before the </head> tag.

ID), full );
    $twitter_thumb  = $twitter_thumbs[0];
      if(!$twitter_thumb) {
      $twitter_thumb = 'http://www.gravatar.com/avatar/8eb9ee80d39f13cbbad56da88ef3a6ee?rating=PG&size=75';
    }
  $twitter_name   = str_replace('@', '', get_the_author_meta('twitter'));
?>

<meta name="twitter:url" value="" />
<meta name="twitter:title" value="" />
<meta name="twitter:description" value="" />
<meta name="twitter:image" value="" />


<meta name="twitter:creator" value="@" />

Source: Ryan Cullen @artesea

If you don’t know how to work with PHP or running into issues with Method 2, then please use Method 1.

Final Step: Test and Validate

Before links from your WordPress site start showing Twitter Cards, you need to first check it in Twitter card validator.

Simply head over to the Card Validator page on Twitter developers website. Enter URL of any post from your WordPress site and click on preview card button.

Twitter will show you a preview of your Twitter card.

Update: Previously you had to apply for participation in the Twitter Cards. However, Twitter has implemented a system that automatically whitelists domains when you test them with the validator or just share a URL on Twitter.

We hope this tutorial helped you add Twitter cards in WordPress.

Easy Guide to Use Social Media to Boost Email Subscribers in WordPress

In this  tutorial, we’ll discuss why email and social media integration is so important for every business, and show you how to use social media to boost email subscribers in WordPress.

Email Marketing vs. Social Media – Which Is Better?

One of the most common questions we get asked from new business owners is which is better when it comes to email marketing vs social media?

Social media platforms offer a great opportunity to interact with your users and keep them engaged. However, nothing beats email marketing when it comes to engagement.

First, email marketing is very cost effective. For every $1 spent, email marketing generates $38 in return. On the other hand, less than half of marketers agree that social media gives them any return on investment at all.

Social platforms like Facebook tightly control your reach to your own followers. Only about 2% of your Facebook fans will see your updates. Even your tweets are visible to the user for a very short time before it gets pushed down by other tweets. Social media platforms also retain the right to block your account at any time, for any reason.

Even if social media marketing is working well for you now, that’s not guaranteed to last. Social media websites come and go (no one uses Friendster, MySpace, or Digg anymore). When they disappear, all the hard work you put into building a following is gone too.

Email gives you direct access to your subscribers. Most importantly, you own your email list and no one can take away your users.

We’re not saying that you shouldn’t use social media to promote your website. However, your focus should be more on building an email list for higher ROI and long term marketing goals.

Many successful website owners will tell you that not starting an email list was the biggest mistake they made when starting out. See our article on why building your email list is so important today for more on this topic.

Convinced about the importance of your email list? Let’s see how you can leverage your social media profiles to get even more email subscribers.

What Do You Need to Start Building Your Email List?

There are three things you will need to start building your email list.

  • A website or blog
  • An email marketing service
  • Lead generation software

All three of them are quite easy to set up without learning any technical skills.

If you don’t have a website or blog yet, then see our step by step guide on how to start a blog.

You will also need an email marketing service. It helps you collect email addresses, manage your email lists, and send out emails. Most importantly, using an email marketing service will help you to stay compliant with email spam laws, and ensure that your emails don’t end up in the spam folder.

We recommend using Constant Contact. It is one of the largest and most popular email marketing services in the world. For more recommendations, see our list of the best email marketing services for small business.

Once you’ve got your website, email newsletter, and lead generation software set up, you can get started with these email and social media integration techniques.

1. Collect Email Addresses From Your Facebook Page

If you have a successful Facebook page, you may have a lot of fans who have never visited your website before. An easy way to convert those fans into subscribers is by adding a prominent link right to an email signup form.

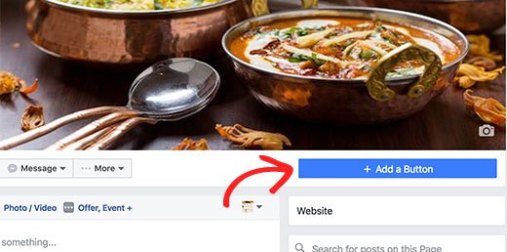
Luckily, Facebook has made this easy by introducing call to action buttons for business pages. These buttons are prominently displayed on top of your cover image and are visible without scrolling.

To add a signup button to your Facebook page, you’ll need to visit your Facebook page and click the blue Add a button button.

This will bring up a popup with multiple choices. You need to click on the Get in touch with us tab and then select Sign up.

Next, you need to provide a link to your website where users will be taken when they click signup.

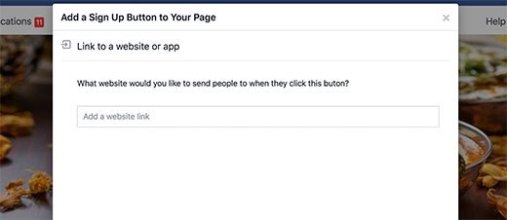
The link should be to a page on your website that features an email signup form. Don’t forget to click on add button to save your changes.

That’s all! Visitors to your Facebook page will now see a prominent call to action button leading them to sign up for your email list.

2. Use Facebook Retargeting/Remarketing Pixel

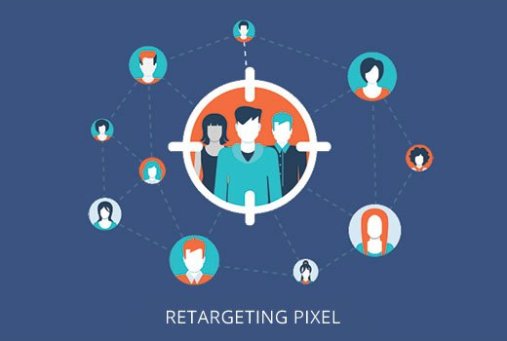
Have you noticed that after you visit a website, you often start seeing their ads on Facebook?

This is called retargeting or remarketing. Those websites use Facebook’s retargeting technology, commonly known as Facebook Pixel.

The retargeting pixel does not add anything visible to your website visitors. It simply sends a browser cookie to your visitors, so that Facebook can recognize them.

After your website visitors leave your site and go on Facebook, they’ll see your ads targeted just to them.

Follow our step by step guide on how to install Facebook retargeting/remarketing pixel in WordPress. Then, check out these tips for optimizing your Facebook ads for conversions.

3. Use Facebook Ads to Promote Pages with Special Offers

Often people are hesitant to give out their email addresses, but become much more willing to share when you offer them something of value in exchange.

These special offers in exchange for email addresses are also called lead magnets. Common lead magnets include e-books, cheat sheets, templates, reports, coupons, and more. The more targeted your offer is towards a specific audience, the more email addresses you’ll get.

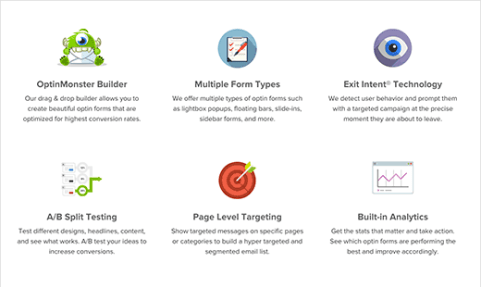
You can create a landing page or blog post on your website that features your lead magnet, and use an OptinMonster campaign to capture email addresses. Here’s a guide on how to create your first OptinMonster campaign to build your email list.

Then, create an ad on Facebook for your free special offer that links to your landing page. This technique is even more powerful when combined with Facebook retargeting, because you’re advertising to people who have already displayed an interest in what you have to offer.

4. Add Links to Your Signup Pages in YouTube Videos


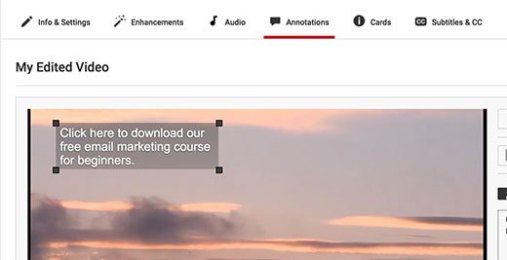
Do you run a YouTube channel? You can stay in touch with your viewers by adding calls to action and URLs right in your videos.

Again, it’s smart to offer an incentive for users to click on the links. Many online marketers do that by offering bonus content, learning material, coupons, and special discounts.

You can easily add a link to your video by going to your Video Manager, then clicking on Edit » Cards » Add card. Then you can add a link to your website.

Once the user lands on your website, you can use a landing page with an OptinMonster campaign to show them targeted offers. OptinMonster’s referral detection feature makes it easy to target your campaign so that only your YouTube fans will see it.

5. Run Twitter Ad Campaign

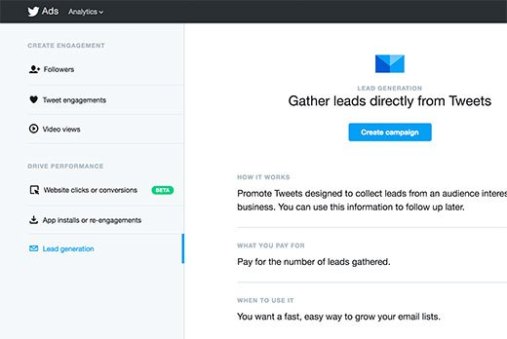
Twitter Ads is another social platform that you can use to boost your lead generation efforts.

In fact, Twitter even allows you to run lead generation campaigns directly in the user’s Tweet stream. This way users can sign up for your email list without even leaving Twitter.

You can also use Twitter Ads to drive traffic to your website landing page.

6. Promote Old Posts With Targeted Optins

If you have been blogging for a while, then you already have plenty of content that your new followers may not have seen.

Sharing old posts allows you a chance to share more content with your users on social media platforms. This boosts user engagement on your social profiles, at the same time it brings more traffic to your website.

You can use the Revive Old Post plugin to automatically share your old posts on social media websites. For detailed instructions see our guide on how to automatically share your old WordPress posts.

Then, you can use targeted optins that only display to visitors who click on those older posts. You can use content upgrades, special offers, free downloads, etc.

7. Use Pinterest Boards for Lead Generation

Pinterest is another powerful social media platform that you can utilize to boost email subscriptions. Similar to Facebook and Twitter, you can offer your Pinterest followers content upgrades, coupons, and discounts.

You can also offer free downloads like ebooks, PDFs, audio or video content, and display a welcome gate to entice visitors to subscribe as soon as they visit your site.

9. Ask Influencers to Share Links to Your Special Offers

Don’t just keep your special offers limited to your own social profiles. Ask your friends, family, and followers to share your special offers.

You can also reach out to influential users that you are connected with and ask if they can help you spread the word. People love to help out, but they will not be able to do that if you don’t ask them.

Your offer becomes more valuable when it is recommended by influencers. It makes users feel that they can trust you with their information.

That’s all for now. We hope this  tutorial helped you learn how to use social media to increase email subscribers in WordPress.

Easy Guide to Add Feature Boxes With Icons in WordPress

In this tutorial, we will learn how to easily add feature boxes with icons in your WordPress site.

What is Feature Boxes With Icons?

Most people when they visit websites don’t actually read them. As humans, we’re becoming professional scanners.

This means that as a business owner, you need to present important information in an easily scanable and highly engaging format.

That’s why most popular business websites usually have a large image or a slider on top with a call to action button.

Just below that, you can use a features box which allows you to showcase the important features of your product or service. Each feature box can have its own call to action which can lead users to learn more.

Here’s an example from our OptinMonster website:

Example of feature boxes on the homepage of a WordPress powered website

Adding Feature Boxes with Icons on Your WordPress Homepage

First thing you need to do is install and activate the Advanced WP Columnsplugin. Upon activation you need to visit Settings » Advanced WP Columns to configure the plugin.

Simply scroll down to the option ‘Column class’ and enter mycolumns next to it. Don’t forget to click on the save changes button to store your settings.

Adding CSS class for your columns

Next, you will need a plugin to insert beautiful SVG icons into your feature boxes. Install and activate WP SVG Icons plugin.

You are now ready to create your feature boxes.

Start by editing the page where you want to add the feature boxes.

You will notice two new buttons on the post editor screen. The first one is the Add Icon button located just above the editor. The second button is located as the last item in the visual editor menu.

If your visual editor is only showing one row of buttons, then you need to click on the toggle toolbar button to expand it.

Advanced columns and svg icon buttons in post editor

First, you need to click on the Advanced WP Columns button. This will bring up a popup where you need to click on Empty and then select the number of columns you want to add.

Creating feature boxes columns

After that you need to click on each column to add some text. If you don’t add some text now, then it will be difficult to see the columns in post editor. Once you are done click on the add columns button at the bottom.

You will see the columns in your post editor now. The next step is to add icons above the text.

Take your mouse to the beginning of the text area in the first column and click on the enter button. This will move the text down and give space to insert your icons.

Now you need to click on the Add icon button, which will bring up a nice popup like this:

Adding icons to feature boxes in WordPress

From there, you can select the icon you want to use by clicking on it. Next, you need to click on the span button, so your icon is wrapped inside <span> element.

Finally, click on the insert button. You will now see the shortcode for the SVG icon in your post editor. Depending on the name of the icon you selected, it will look something like this:

[wp-svg-icons icon="rocket" wrap="span"]

Repeat the process to add icons in other feature boxes as well.

Once you are finished, simply click on the Update button to save your page.

You are nearly done, but if you preview your page, then you will notice that icons are too small and your feature boxes are barely noticeable.

Feature boxes with small icons and no styling

You will need to add a little CSS to solve this problem. Simply add this CSS snippet into your theme or child theme‘s stylesheet.

span.wp-svg-rocket.rocket { 
font-size:100px; 
} 
 
span.wp-svg-cloud.cloud { 
font-size:100px; 
} 
span.wp-svg-headphones.headphones { 
font-size:100px; 
} 
.mycolumns { 
border:1px solid #eee;
min-height:250px; 
padding-top:20px !important;
}

Don’t forget to adjust the CSS to match the names of the icons you are using.

feature boxes with proper styling and large icons

We hope this tutorial helped you add a beautiful features boxes section on your homepage.

Easy Guide to Disable Visual Editor Formatting Shortcuts in WordPress

In this tutorial, we will learn how to disable visual editor formatting shortcuts in WordPress.

What are Formatting Shortcuts and How to Use Them?

WordPress 4.3 came with a new feature called formatting shortcuts. It allows users to quickly add common text formatting without removing their hands from the keyboard and without writing any HTML.

  • Using * or  will start an unordered list.
  • Using 1. or 1) will start an ordered list.
  • Using # will transform into h1. ## for h2, ### for h3 and so on.
  • Using > will transform into blockquote.

Editor shortcuts

Disabling Visual Editor Formatting Shortcuts

While we think that formatting shortcuts are awesome, some users are finding this feature a bit confusing and distracting.

If you want to disable the formatting shortcuts in WordPress, then follow the instructions below:

Copy and paste this code in your theme’s functions.php file or in a site-specific plugin.

function disable_mce_wptextpattern( $opt ) {
 
    if ( isset( $opt['plugins'] ) && $opt['plugins'] ) {
        $opt['plugins'] = explode( ',', $opt['plugins'] );
        $opt['plugins'] = array_diff( $opt['plugins'] , array( 'wptextpattern' ) );
        $opt['plugins'] = implode( ',', $opt['plugins'] );
    }
 
    return $opt;
}
 
add_filter( 'tiny_mce_before_init', 'disable_mce_wptextpattern' );

This code simply removes text formatting shortcuts from your WordPress visual editor. Your other WordPress keyboard shortcuts will work as usual.

We hope this tutorial helped you disable visual editor formatting shortcuts in WordPress 4.3 and later versions.

Easy Guide to Fix “Site contains harmful programs” Error in WordPress

In this tutorial, we will learn how to fix this site ahead contains harmful programs error in WordPress.

Reasons for This Site Contains Harmful Programs Error

The number one reason for this error is that your website is hacked and is believed to be distributing a malware. This code spreads itself from the infected website to website visitors and can even spread to other websites.

Google marks a website with this warning if they find any suspicious code that could be a malware or trojan. This warns users to be careful when visiting these sites.

This site contains harmful programs error in Google Chrome

Another common reason for this error is showing ads from low quality advertising networks. These networks may sometime display ads linking to websites distributing malicious code.

To find this malicious code on your site, take a look at our tutorial on how to scan your WordPress site for potentially malicious code.

You can also check your site using Google’s safe browsing analysis tool.

All you need to do is add your site’s domain name as the query parameter to the URL like this:

https://www.google.com/safebrowsing/diagnostic?site=YourDomain.com

Now that you know why the error happens, let’s take a look at how to fix it.

Fix This Site Contains Harmful Program Error

Before we start, please make a complete backup of your WordPress site. If you already had a backup system in place, then keep it handy as you may need it.

Removing malware and recovering a website can become a very complicated task. Sometimes even when you clean your site thoroughly, the malicious code can keep coming back until you find and remove the backdoor placed on your site.

Backdoor is referred to a method of bypassing normal authentication and gaining the ability to remotely access the server while remaining undetected. Finding the backdoor is not an easy task either. It could be a compromised password, unsafe file permissions, or a cleverly disguised file. We have a detailed guide on how to find a backdoor in a hacked WordPress site and fix it.

Once you have successfully removed the backdoor, you will still need to thoroughly check all your files and database for any malicious code.

As you can see that cleaning up and infected WordPress site can be a very tedious task. This is why we use Sucuri on all our websites.

Sucuri

Sucuri is a website monitoring and security service for WordPress users. It monitors your site 24/7 for suspicious activity, blocks any hacking attempts on your site, and clean up your site of any malware.

Getting The Warning Removed by Google

Once you are absolutely certain that your website is clean, then you can ask Google to remove this warning from search results.

You will need to use Google’s Webmaster tools for that. If you have not already added your site to webmaster tools, then follow our tutorial on how to add your WordPress site to Google webmaster tools.

Once there, you need to click on the security issues section in webmaster tools. This page will list any security issues Google may have found on your website. You will also see the links to resources on clean up on your site.

Once you have fixed the issues, click on the checkbox and request a review.

In case you do not see any security issues in Google Webmaster tools, then you should the following form to report incorrect phishing warning.

Incorrect phishing warning report

We hope this tutorial helped you fix this site ahead contains harmful programs error.

Easy Guide to Disable Self Pingbacks in WordPress

In this tutorial, we will learn how to disable self pingbacks in WordPress.

What is a Pingback?

Pingbacks give softwares the ability to communicate between websites. Its almost like remote comments. Think of it like this:

  • We write a post on WPCademy blog.
  • Then you write a post on your blog mentioning/linking to our article.
  • Your blogging software (WordPress) will automatically send us a pingback.
  • Our blogging software (WordPresS) will receive the ping. It will then automatically go to your blog to confirm that the pingback originates there (check if the link is present).
  • Then we will have the ability to display your pingback as a comment on our post. This will solely be a link to your site.

Pingbacks also work within your site. So if one of your posts link to another post, then your WordPress will send a self-ping. This can get really annoying.

Self Pingbacks on a WordPress site

Fore more details, take a look at our guide about trackbacks and pingbacks.

Now that you know what is a pingback, let’s take a look at how to disable self pingbacks.

There are multiple ways you can disable self pingbacks on your WordPress site. We will show you both plugin method and manual code method.

Disable Self Pingbacks in WordPress Using Plugins

There are two plugins that you can use to turn off self pings.

1. Using No Self Pings Plugin

First thing you need to do is install and activate the No Self Pings plugin. The plugin works out of the box, and there are no settings for you to configure. Simply activating the plugin will turn off self pingbacks.

You will notice that No Self Pings plugin hasn’t been updated for more than two years. Usually we do not recommend installing plugins that haven’t been updated this long. Simply because in most cases those plugins do not work. However, No Self Pings is very simple plugin, and it works even with the latest version of WordPress (4.2.3 At the time of writing this article).

We recommend you to read our guide on the issue of installing plugins not tested with your WordPress version.

2. Using Disabler Plugin

Simply install and activate the Disabler plugin. Upon activation, visit Settings » Disabler page to configure the plugin.

Disabler plugin settings page

You will notice that the plugin allows you to turn off several WordPress features. You need to scroll down to Back End Settings section and check the box next to Disable self pings option.

Click on the save changes button to store your settings.

Turn Off Self Pings Without Using a Plugin

If you do not want to use a plugin, then you can use these two methods to turn off self pings on your site.

1. Turn off Pingbacks Globally

WordPress allows you to turn off pingbacks on your site. By using this option will disable pingback feature completely on your site.

Simply go to Settings » Discussion page. Under the Default article settingssection, uncheck the box next to ‘Attempt to notify any blogs linked to from the article’ option. Click on the save changes button to store your settings.

Disable all outgoing pinbacks from your site

2. Manually Insert Code to Disable Self Pingbacks

If you are comfortable with adding code snippets to your WordPress theme files, then you can use this method to switch off self pings.

Simply copy and paste this code in your theme’s functions.php file or a site-specific plugin.

function no_self_ping( &$links ) {
    $home = get_option( 'home' );
    foreach ( $links as $l => $link )
        if ( 0 === strpos( $link, $home ) )
            unset($links[$l]);
}
 
add_action( 'pre_ping', 'no_self_ping' );

That’s all, we hope this tutorial helped you disable self pings on your WordPress site.