Easy Guide to Style Contact Form 7 Forms in WordPress

In this tutorial, we will learn how to style contact form 7 forms in WordPress.

We have a step by step guide on how to create contact form in WordPress.

Getting Started

We are assuming that you have already installed Contact Form 7 plugin and have created your first contact form. The next step is to copy the shortcode for your contact form and paste it in a WordPress post or a page where you would like your form to appear.

For the sake of this article, we have used the default contact form and added it into a WordPress page. This is how the contact form looked on our test site.

Default Contact Form 7 form on a WordPress site using default WordPress theme

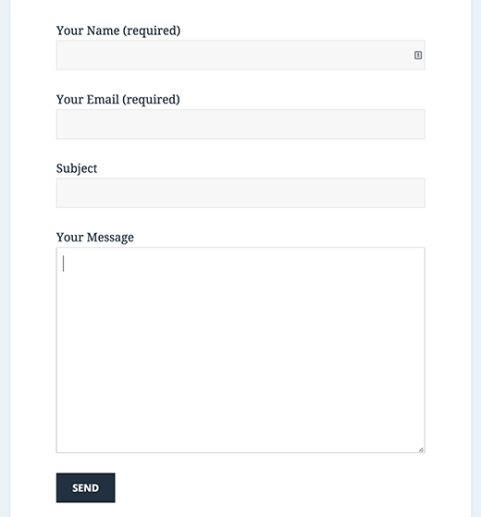
As you can see that the contact form inherits some form styles from your WordPress theme. Apart from that it’s very basic.

We will be styling Contact Form 7 forms using CSS. All the CSS goes into your theme or child theme‘s stylesheet.

Styling Contact Form 7 Forms in WordPress

Contact Form 7 generates a very useful and standard compliant code for the forms. Each element in the form has a proper ID and CSS class associated with it.

Each contact form uses the CSS class .wpcf7 which you can use to style your form.

In this example we are using a Google font Lora in our input fields. See how to add Google Fonts in WordPress.

div.wpcf7 { 
background-color: #fbefde;
border: 1px solid #f28f27;
padding:20px;
}
.wpcf7 input[type="text"],
.wpcf7 input[type="email"],
.wpcf7 textarea {
background:#725f4c;
color:#FFF;
font-family:lora, sans-serif; 
font-style:italic;    
}
.wpcf7 input[type="submit"],
.wpcf7 input[type="button"] { 
background-color:#725f4c;
width:100%;
text-align:center;
text-transform:uppercase;
}

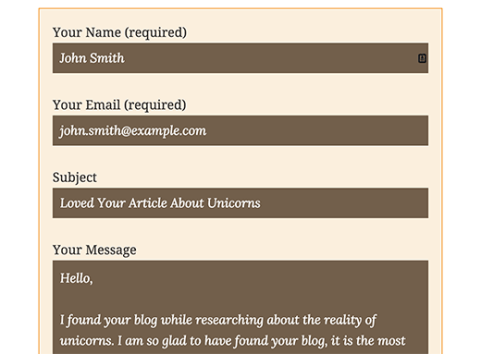
This is how our contact form looked after applying this CSS.

Styling Contact Form 7 forms with CSS in WordPress

Styling Multiple Contact Form 7 Forms

The problem with the CSS we used above is that it will be applied to all Contact Form 7 forms on your website. If you are using multiple contact forms and want to style them differently, then you will need to use the ID generated by contact form 7 for each form.

Simply open a page containing the form you want to modify. Take your mouse to the first field in the form, right click and select Inspect Element. The browser screen will split, and you will see the source code of the page. In the source code, you need to locate the starting line of the form code.

Finding the element ID for your contact form

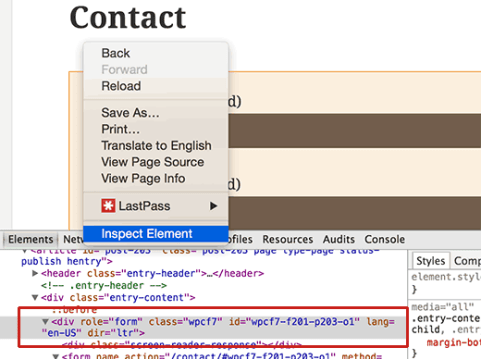
As you can see in the screenshot above, our contact form code starts with the line:

<div role="form" class="wpcf7" id="wpcf7-f201-p203-o1" lang="en-US" dir="ltr">

The id attribute is a unique identifier generated by Contact Form 7 for this particular form. It is a combination of form id and the post id where this form is added.

We will use this ID in our CSS to style our contact form. We will replace .wpcf7 in our first CSS snippet with #wpcf7-f201-p203-o1.

div#wpcf7-f201-p203-o1{ 
background-color: #fbefde;
border: 1px solid #f28f27;
padding:20px;
}
#wpcf7-f201-p203-o1 input[type="text"],
#wpcf7-f201-p203-o1 input[type="email"],
#wpcf7-f201-p203-o1 textarea {
background:#725f4c;
color:#FFF;
font-family:lora, "Open Sans", sans-serif; 
font-style:italic;    
}
#wpcf7-f201-p203-o1 input[type="submit"],
#wpcf7-f201-p203-o1 input[type="button"] { 
background-color:#725f4c;
width:100%;
text-align:center;
text-transform:uppercase;
}

Styling Contact Form 7 Forms with CSS Hero

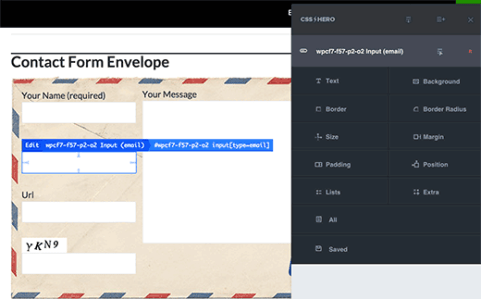
Many WordPress beginners don’t have any experience of writing CSS, and they don’t want to spend time learning it. Luckily, there is a wonderful solution for beginners that will allow you to not just style your contact form but almost every aspect of your WordPress site.

Simply install and activate the CSS Hero plugin and go to the page containing your form. Click on the CSS Hero toolbar and then click on the element you want to style. CSS Hero will provide you an easy user interface to edit the CSS without ever writing any code.

Styling Contact Form 7 Form Using CSS Hero

That’s all we hope this tutorial helped you learn how to style Contact Form 7 forms in WordPress.

Easy Guide to Add Email Subscriptions to Your WordPress Blog

In this tutorial, we will learn how to add email subscriptions to your WordPress blog and start building your email list.

Why You Should Add Subscribe via Email Option to Your Site?

While social media is a great way to interact with your readers, email is the most reliable and direct way of communication. By offering email subscription on your blog, you can build a steady stream of regular visitors for your site.

Email subscription also gives your users yet another way to consume your content as some folks may not be on social media. See our complete guide on why you should start building your email list right away.

Often beginners think that adding email subscription is some complicated process. That’s not true at all.

The WordPress RSS to email subscription setup is quite straight forward, and it will take you less than 30 minutes. Once you set it up, your readers will automatically get daily or weekly emails containing your new content.

Now since there are multiple services and plugins that allow you to setup email subscriptions in WordPress, we will only cover the top 3 email subscription plugins and services.

MailChimp RSS to Email

MailChimp is one of the most popular email marketing service providers. It is a paid service, but they do offer a free option for those with less than 2000 subscribers.

To quickly get started with MailChimp see our guide on using MailChimp and WordPress.

For the sake of this article, we are assuming that you have signed up for MailChimp and created your first email list. The next step is to setup an RSS to Email campaign.

Simply visit Campaigns » Create Campaign to create a new campaign.

Creating a new MailChimp Campaign

MailChimp will now show you different types of campaigns that you can create. You need to click on the RSS Driven Campaign option.

Creating RSS to email campaign in MailChimp

This will bring you to the campaign settings page where you need to provide your WordPress site’s RSS feed link. Your feed URL is yoursite.com/feed/

You will also need to choose the time and frequency of emails. You can choose to send daily, weekly, or monthly emails.

rss feed send time details

On the next page, you will have to provide campaign info. You will notice that MailChimp has already pre-filled most fields on the page. These settings should work for most blogs, but feel free to change them as needed.

Changing RSS to email campaign info

Now you need to click on the next button to select a template for your emails. MailChimp allows you to customize the template by adding your own logo, by-line, and any other elements that you may want to add.

Design your RSS to email template

When you are finished customizing, click on the next button and then click on Save and Exit.

That’s all, you have successfully created your WordPress RSS to Email newsletter using MailChimp.

To add the email subscription form to your website, simply visit the Lists page on your MailChimp account and click on the downward arrow icon next to your email list. After that select signup forms from the menu.

Creating MailChimp email signup form

MailChimp will then ask you, what kind of signup form you want to create. Select Embedded Forms.

On the next screen, you can customize your email sign up form and generate the embed code. You can then copy and paste this code in a text widget on your WordPress website.

Alternatively, you can use OptinMonster a plugin created by the WPCademy team that will make this process a lot easier and offer you pretty signup forms, floating bars, slide-ins, exit-intent popups, and more.

Aweber RSS to Email

Aweber is another popular email marketing service provider. It’s a paid service, but they offer a 30 day free trial. A lot of bloggers and internet marketers prefer to use AWeber.

If you are just joining Aweber, then you will be directed to create your first email list when you login for the first time.

Once you are logged into your Aweber dashboard, simply visit Messages » Blog Broadcasts.

Creating blog broadcasts - RSS to email subscription in Aweber for WordPress

On the next screen, click on the green button labeled ‘Create a Blog Broadcast’.

Create a blog broadcast

This will bring you to the new page where you can setup your RSS to email campaign. First you need to enter the URL of your blog’s RSS feed. After that you need to provide a subject line for the emails.

Aweber RSS to email settings

Scroll down a little, and you can choose a template for your email. Select the one you like and then click on load template.

Choosing a template for your email

After choosing your template, scroll further down to configure time and frequency of emails. You can setup to send an email as soon as new item appears in your RSS feed. You can also send daily, weekly, or even monthly email digests.

Set email timings and frequency in Aweber

Once you are done setting up these options, you need to click on Save Blog Broadcast button.

That’s all, you have successfully set up Aweber RSS to email subscription.

If you have not already added the email signup form to your WordPress site, then the next step is to add a signup form to your WordPress sidebar. Simply click on the ‘Signup Forms’ in the Aweber dashboard to design your email signup form.

Creating Aweber Email Signup form

Follow the on screen instructions and save your form. Finally you will reach the publish section. There you need to click on the ‘I will install my form’ button and copy the form embed code.

Copy the email signup form code for your WordPress site

Now go to Appearance » Widgets on your WordPress site and paste this code in a text widget.

Alternatively, you can use OptinMonster a plugin created by the WPCademy team that will make this process a lot easier and offer you pretty signup forms, floating bars, slide-ins, exit-intent popups, and more.

Using Jetpack Subscriptions

Jetpack is another option for users who want to add email subscriptions to their WordPress site. It is completely free, but the downside is that you don’t control your list.

Jetpack Subscriptions is not a full newsletter. For example, if you wanted to send an email apart from your daily blog posts, then you will not be able to do that using Jetpack Subscriptions. Also, if later you decide to move to a proper email marketing service which most bloggers do, then your users will have to opt-in to the email list again.

Having said that, here is how to add Jetpack email subscriptions to your self hosted WordPress site. First thing you need to do is install and activate the Jetpack plugin. Upon activation, the plugin will add a new menu item labeled Jetpack to your WordPress admin bar. Clicking on it will take you to the plugin’s settings page.

Jetpack requires you to link your site to WordPress.com

Jetpack plugin requires you to create a WordPress.com account and link your site with it (See our guide on the difference between WordPress.com and self-hosted WordPress.org sites). If you have a WordPress.com account, then you can use that or you can create a free account.

Once you have connected Jetpack to WordPress.com, you need to visit Appearance » Widgets. Drag and drop Blog Subscriptions (Jetpack) widget to a sidebar and then click on Save button store your widget settings.

You can also enable subscription option below your comment form. Visit Settings » Discussion page and scroll down to the Jetpack subscription section. Check the box next to blog subspcription and comment subscription options. Click on the save changes button to store your settings.

Adding subscription options in comment form

That’s all you have successfully set up Jetpack email subscriptions on your WordPress site.

We hope this article helped you add email subscription to your WordPress blog.

Easy Guide to Fix Category and Comment Count in WordPress

In this tutorial, we will learn how to fix category and comments count after importing WordPress.

As you noticed in the screenshot above, after the import our comment count and category count is showing 0 instead of the actual number. Let’s take a look at how to fix it.

Lets get started

First you need to create a complete WordPress backup of your site. You should do this every time you are going to perform a major change on your site. We recommend using BackupBuddy, it is the most comprehensive WordPress backup plugin on the market.

Once you have made the backup, let’s move on to the next step.

Open a plain text editor like Notepad and simply copy and paste the following code:

<?php
include("wp-config.php");
if (!mysql_connect(DB_HOST, DB_USER, DB_PASSWORD)) {  die('Could not connect: ' . mysql_error());  }
if (!mysql_select_db(DB_NAME)) {  die('Could not connect: ' . mysql_error());  }
 
$result = mysql_query("SELECT term_taxonomy_id FROM ".$table_prefix."term_taxonomy");
while ($row = mysql_fetch_array($result)) {
  $term_taxonomy_id = $row['term_taxonomy_id'];
  echo "term_taxonomy_id: ".$term_taxonomy_id." count = ";
  $countresult = mysql_query("SELECT count(*) FROM ".$table_prefix."term_relationships WHERE term_taxonomy_id = '$term_taxonomy_id'");
  $countarray = mysql_fetch_array($countresult);
  $count = $countarray[0];
  echo $count."
";
 mysql_query("UPDATE ".$table_prefix."term_taxonomy SET count = '$count' WHERE term_taxonomy_id = '$term_taxonomy_id'");
        }
 
$result = mysql_query("SELECT ID FROM ".$table_prefix."posts");
while ($row = mysql_fetch_array($result)) {
  $post_id = $row['ID'];
  echo "post_id: ".$post_id." count = ";
  $countresult = mysql_query("SELECT count(*) FROM ".$table_prefix."comments WHERE comment_post_ID = '$post_id' AND comment_approved = 1");
  $countarray = mysql_fetch_array($countresult);
  $count = $countarray[0];
  echo $count."
";
  mysql_query("UPDATE ".$table_prefix."posts SET comment_count = '$count' WHERE ID = '$post_id'");
        }
?>

You need to replace DB_HOST, DB_USER, DB_PASSWORD with your WordPress database host (usually localhost), database username, and password.

You can find all this information by logging into your WordPress hosting cPanel or by looking at your wp-config.php file using a file manager.

Once you have replaced the information, save this file as comments-fix.phpon your desktop.

Now you will need to upload this file to your site’s root directory. You can do that by using an FTP client or by using the file manager in your web hosting control panel.

After uploading the file to your website, you need to open your web browser and go to this file:

http://example.com/comments-fix.php

Replace example.com with your site’s address.

Visiting this file in your browser will run the script which simply loops through your posts, category, tags, comments, etc and update the count.

Fixing taxonomy terms and comment count numbers

Important: Once you’re done fixing your WordPress comment count, you need to delete comments-fix.php file from your server.

That’s all, we hope this tutorial helped you update comments count after importing WordPress.

Easy Guide to Add Facebook Author Tag in WordPress

In this tutorial, we will learn how add the Facebook author meta tag in WordPress.

How Does Facebook Author Tag Work?

Once you add the Facebook author tag on your site, it will display your name with a link back to your profile any time your article is shared.

This is great for both single author blogs and multi-author blogs because it bring more exposure to your personal brand.

There are several ways to add the Facebook Author tag on your site. We will show you both the plugin method as well as the code method to add Facebook Author meta tag on your WordPress site.

Add Facebook Author Tag Using Yost WordPress SEO Plugin

If you are using Yoast WordPress SEO plugin, then you are in luck because it has Facebook open graph meta data support.

You just need to visit SEO » Social page in your WordPress admin and make sure that the box next to ‘Add Open Graph meta data’ option is checked.

Enable Facebook open graph meta data in WordPress

The next step is to add your Facebook ID in your WordPress account. Simply visit Users » Your Profile page and enter your Facebook profile URL and click on the save changes button to store your settings.

facebook author settings in wordpress

That’s all, WordPress SEO will now automatically insert Facebook author tag or published by tag when you publish an article. WordPress SEO also allows you to easily add a page title and description for Facebook, and you can even explicitly set Facebook thumbnail for your posts.

Add Facebook Author Tag in WordPress using Code

Since we already use Yoast SEO plugin on our site, it made sense for us to use the above method. However if you want to add Facebook author meta tag on your site without a plugin, then simply add the following code in your site’s <head> section.

Make sure to replace the links above with your site’s Facebook page link and your personal profile link.

We hope this tutorial helped you add Facebook author tag in your WordPress site.

Easy Guide to Create Short Amazon Affiliate Links in WordPress

In this tutorial, we will learn how to easily create short amazon affiliate links in WordPress.

Why Use Short Affiliate Links for Amazon?

By default an Amazon affiliate link is a long URL containing strings and IDs.

This link is lengthy, and it is hard to look at. It also increases your chances of accidentally making a typo and breaking the URL.

One possible solution is to cloak affiliate links in WordPress by using a plugin like ThirstyAffiliates. Using an affiliate link manager allows you to redirect users while using your own custom short URLs like this:

http://www.example.com/refer/prowp

The problem with using a cloacked URL is that users do not know where they will be taken when they click on that link. You may want to show users that they will be redirected to Amazon’s website, because Amazon is a trusted brand name.

This could potentially increase your earnings, particularly if you most recommend products from Amazon.

Amazon comes with its own short URL option that allows affiliates to easily transform any Amazon link into a short URL using amzn.com domain name.

Creating Short Amazon Affiliate Links

There are two type of short URLs that you can create for your Amazon affiliate links. The first one uses Amazon.com domain name.

You need to simply add /dp/yourproductid/?tag=youraffiliatetag.

Take a look at this example:

http://amazon.com/dp/0470560541/?tag=aff0-link

You can create an even shorter URL by using amzn.com domain name. Simply remove the /dp/ prefix and add your product id with your affiliate tag.

http://amzn.com/0470560541/?tag=aff0-link

That’s all, we hope this tutorial helped you easily create short amazon affiliate links in WordPress.

Easy Guide to Display Recent Posts in WordPress

In this tutorial, we will show you how to display recent posts in WordPress with a plugin, widget, shortcode, and the manual method with the recent post function.

Using The WordPress Recent Posts Widget

WordPress comes with a built-in default widget to display recent posts in your site’s sidebar or any widget ready area. Inside your WordPress admin, simply visit Appearance » Widgets and add Recent Posts widget to a sidebar.

Using the default WordPress recent posts widget

The built-in recent posts widget is very basic. You can provide an alternate title to the widget, show date, and add the number of posts you want to display. Next, click on the save button to store your widget settings.

Using Recent Posts Widget Extended Plugin

As you noticed that the built-in widget we mentioned above is quite limited, and it doesn’t even allow you to show thumbnails or excerpts which is often a priority for users.

What if you wanted to display thumbnails and excerpts with your recent posts? What if you wanted to limit them to specific categories or tags?

Well, that’s when Recent Posts Widget Extended plugin comes in handy.

First thing you need to do is install and activate the WordPress Recent Posts Widget Extended plugin. Upon activation, simply visit Appearance » Widgetsand add Recent Posts Extended widget to a sidebar.

Recent posts extended widget settings

Recent Posts Extended widget comes with a lot options and gives you full control on how you want to display recent posts on your WordPress site. You can show thumbnails, excerpts, limit categories and tags, ignore sticky posts, and much more. You can even use the widget to display recent posts from any other post type on your site.

Recent posts with thumbnail and excerpt in sidebar widget

Displaying Recent Posts in WordPress Using Shortcode

Adding recent posts to a sidebar is fairly easy, but what if you wanted to show recent posts inside a WordPress post or page? The easiest way to display recent posts in WordPress posts and pages is by using shortcodes.

First thing you need to do is install and activate the Display Posts Shortcodeplugin. It works out of the box and there are no settings for you to configure.

Simply edit a post or page where you want to display your recent posts. Next, use the shortcode [display-posts] with your own parameters inside the post. The plugin offers a whole range of parameters that you can use with the shortcode. Here are some examples:

Display 5 recent posts with thumbnails and excerpt

 [display-posts posts_per_page="5" image_size="thumbnail" include_excerpt="true"]

Display recent pages instead of posts

  [display-posts posts_per_page="5" post_type="page"]

Change the order to title instead of date.

  [display-posts posts_per_page="5" orderby="title"]

Display recent pages under a specific parent page.

  [display-posts posts_per_page="5" post_type="page" post_parent="5"]

For a full list of parameters visit the plugin’s documentation.

You can also use these shortcodes inside a text widget, but first you will need to enable shortcodes in your text widgets by adding this code to your theme’s functions.php file or a site specific plugin.
add_filter(‘widget_text’, ‘do_shortcode’);

Displaying Recent Posts Manually in WordPress Theme Files

More advanced WordPress users may want to add recent posts directly in their WordPress theme files. There are multiple ways to do this, but the easiest one is to use the built-in WP_Query class. Simply add this code where you want to display the recent posts.

Define our WP Query Parameters // Start our WP Query have_posts()) : $the_query -> the_post(); ?> // Display the Post Title with Hyperlink

// Repeat the process and reset once it hits the limit

This code simply displays five most recent posts with their title and excerpt. The WP_Query class has tons of parameters that allows you to customize it any way that you like. For more information please refer to the codex.

We hope that this tutorial helped you learn how to display recent posts in WordPress.

Easy Guide to Add Content Locking in WordPress

In this tutorial, we will learn how to add content locking in WordPress without annoying users.

What is Content Locking & When You Need It?

Content Locking is a technique used by site owners. It forces users to perform an action before getting access to your content.

Content lock example

If it is not used properly, then it could annoy your users. But when it is done right, it could be very effective in generating leads and achieving your marketing goals.

The best time to use content locking is when you are offering highly valuable content such as a free course, an ebook download, or something similar.

It uses the same psychological trick as content upgrades. Users wouldn’t mind performing a little task in exchange of valuable content.

Now that you know the use case, let’s see how you can easily add content locking in WordPress like a pro.

What Do You Need for Content Locking in WordPress?

For this tutorial, we will be using OptinMonster. It is the best lead generation solution in the market. You will need a plus or pro plan of OptinMonster for content locking.

WPCademy users can get a 10% discount by using this OptinMonster coupon.

Adding Content Locking in WordPress

First thing you need to do is install and activate the OptinMonster plugin. For more details, see our step by step guide on how to install a WordPress plugin.

This plugin is just a connector between your WordPress site and your OptinMonster account.

Upon activation, click on the OptinMonster menu item in your WordPress admin bar. You will be asked to provide your OptinMonster API username and key.

Authentic OptinMonster account

You can find the API information under your account on the OptinMonster website. Simply login and then click on the API link.

OptinMonster API Keys

Next, copy and paste the API username and key into the OptinMonster plugin page and then click on connect to OptinMonster button.

Once you are successfully connected, you need to click on the create new optin button.

New optin

This will take you to the OptinMonster website. You need to provide a title for your optin campaign and select your website from the drop down menu.

You also need to select ‘After post / Inline’ as your optin type. This will load some ready to use templates in the right column. Click on a template to use it as a starting point.

Create new optin screen

It will open OptinMonster’s form builder where you can customize the appearance of your optin and configure its settings.

Feel free to edit fonts, add text or images, change colors, etc.

OptinMonster's optin builder

Next you need to click on the ‘Optin’ Menu and scroll down to content blocking section. Turn on content blocking for this optin by clicking on the on/off switch.

Turn on content blocking for this optin

Turning it on will show you the options to determine how you want content blocking to work. First you need to choose a content blocking method.

You can use obfuscation which blurs content, or removal which totally removes the content below optin.

Content blocking options

You also need to change success cookie duration to 0. This will prevent cookie from being set until users submits the optin.

After that go through the Integration setting to connect your email marketing service and also configure the analytics setting.

Once you are done, click on the Save button on the top right corner of the builder to save your settings.

Save your optin and get the embed code

Now you need to visit your WordPress site and click on the OptinMonster menu.

You will see your content lock optin under the list of optins. If you don’t see it, then click on refresh optins button.

Edit optin output settings

Take your mouse to the optin title and then click on ‘Edit optin output settings’ link.

On the next page, click on the checkbox below ‘Enable optin on site’ option.

Enable optin on site

Don’t forget to click on the save settings button at the bottom of the page.

Next, you need to click on the OptinMonster menu again to go back to Optins overview page. This time you need to copy the optin slug.

Copy the optin slug

Now you need to edit the post or page where you want to enable content locking and add this shortcode before any other content in your post (or after the first paragraph).

Replace your-optin-slug with the optin slug you copied earlier.

OptinMonster Shortcode

Now you can save and publish your post or page. Visit the post or page in a new browser window to see content locking in action.

How to Add Content Lock to All WordPress Posts

If you want to automatically add content locking to all your WordPress posts, then there is an easier way to do this.

Simply install and activate the Insert Post Ads plugin.

Upon activation, you need to visit Post Adverts » Settings to configure the plugin settings.

Post ad settings

Select where you want to enable post ads plugin posts or pages and then click on save settings button.

Now you need to visit Post Adverts » Add New page. Provide a title for this content locking script and then add your content lock optin shortcode in the advert code section.

Site wide content lock in WordPress

Under ‘Display the advert’ dropdown menu, you can select before the content or choose to add this after the first paragraph and click on the publish button.

That’s all, the plugin will now enable content locking for all your WordPress posts.

Pro Tip: The reason why you may want to add it after the first paragraph is because you can use the first paragraph as a teaser to tell users why they really need to read the rest.

We hope this tutorial helped you add content locking in WordPress.