How To Install Dropbox on Ubuntu 16.04 LTS

Install Dropbox on Ubuntu 16

Dropbox is a useful file-sharing and syncing service that lets you sync files between different machines over the Internet for free. It’s very useful for backing up your important documents, pictures, MP3 files, video files, and other data.

Install Dropbox on Ubuntu 16.04 LTS

This article assumes you have at least basic knowledge of linux, know how to use the shell, and most importantly, you host your site on your own VPS. The installation is quite simple and assumes you are running in the root account, if not you may need to add ‘sudo’ to the commands to get root privileges. I will show you through the step by step installation Dropbox on a Ubuntu 16.04 (Xenial Xerus) server.

Step 1. First make sure that all your system packages are up-to-date by running these following apt-get commands in the terminal.

sudo apt-get update
sudo apt-get upgrade

Step 2. Installing Dropbox.
Run the following commands in Terminal to install Dropbox:

### Ubuntu 32-Bit ###
sudo apt-get install libappindicator1
wget https://d1ilhw0800yew8.cloudfront.net/client/dropbox-lnx.x86-7.3.29.tar.gz
tar -xvf dropbox-lnx.x86-7.3.29.tar.gz
cd .dropbox-dist/ ./dropboxd

### Ubuntu 64-Bit ###
sudo apt-get install libappindicator1
wget https://d1ilhw0800yew8.cloudfront.net/client/dropbox-lnx.x86_64-7.3.29.tar.gz
tar -xvf dropbox-lnx.x86_64-7.3.29.tar.gz
cd .dropbox-dist/ ./dropboxd

Once installed, open Dropbox from Ubuntu Dash or Terminal and enter your Dropbox credentials, and you can start using Dropbox with Ubuntu 16.04 Xenial Xerus.

Congratulation’s! You have successfully installed Dropbox. Thanks for using this tutorial for installing Dropbox on Ubuntu 16.04 LTS (Xenial Xerus) system. For additional help or useful information, we recommend you to check the official Dropbox web site.

How To Install Chamilo on Ubuntu 16.04 LTS

Install Chamilo on Ubuntu 16

Chamilo is an open-source (under GNU/GPL licensing) e-learning and content management system, aimed at improving access to education and knowledge globally. It is backed up by the Chamilo Association, which has goals including the promotion of the software, the maintenance of a clear communication channel and the building of a network of services providers and software contributors. The Chamilo project aims at ensuring the availability and quality of education at a reduced cost, through the distribution of its software free of charge, the improvement of its interface for 3rd world countries devices portability and the provision of a free access public e-learning campus.

Install Chamilo on Ubuntu 16.04 LTS

This article assumes you have at least basic knowledge of linux, know how to use the shell, and most importantly, you host your site on your own VPS. The installation is quite simple and assumes you are running in the root account, if not you may need to add ‘sudo’ to the commands to get root privileges. I will show you through the step by step installation Chamilo on a Ubuntu 16.04 (Xenial Xerus) server.

Step 1. First make sure that all your system packages are up-to-date by running these following apt-get commands in the terminal.

sudo apt-get update
sudo apt-get upgrade

Step 2. Install LAMP (Linux, Apache, MariaDB, PHP) server.

A Ubuntu 16.04 LAMP server is required. If you do not have LAMP installed, you can follow our guide here. Also install all required PHP modules:

apt-get install php7.0-curl php7.0-gd php7.0-mbstring php7.0-mysql libapache2-mod-php7.0 php7.0-mcrypt php7.0-bz2 php7.0-zip php7.0-json

You’ll need to also adjust some settings in your php.ini. Open up the file and edit these two variables:

nano /etc/php/7.0/apache2/php.ini

Also, add/modify the following settings:

date.timezone = 'America/New_York'
max_execution_time = 300
max_input_time = 600
memory_limit = 256M
post_max_size = 100M
upload_max_filesize = 100M
short_open_tag = Off
safe_mode = Off
magic_quotes_gpc = Off
magic_quotes_runtime = Off
session.cookie_httponly = On
extension = xapian.so

Step 3. Installing Chamilo.

First thing to do is to go to Chamilo’s download page and download the latest stable version of Chamilo, At the moment of writing this article it is version 1.10:

wget https://github.com/chamilo/chamilo-lms/archive/v1.10.0.zip

Unpack the Chamilo archive to the document root directory on your server:

unzip v1.10.0.zip
mv chamilo-lms-1.10.0/ /var/www/html/chamilo

We will need to change some folders permissions:

chown -R www-data: /var/www/html/chamilo

Step 4. Configuring MariaDB for Chamilo.

By default, MariaDB is not hardened. You can secure MariaDB using the mysql_secure_installation script. you should read and below each steps carefully which will set root password, remove anonymous users, disallow remote root login, and remove the test database and access to secure MariaDB:

mysql_secure_installation

Configure it like this:

- Set root password? [Y/n] y
- Remove anonymous users? [Y/n] y
- Disallow root login remotely? [Y/n] y
- Remove test database and access to it? [Y/n] y
- Reload privilege tables now? [Y/n] y

Next we will need to log in to the MariaDB console and create a database for the Chamilo. Run the following command:

mysql -u root -p

This will prompt you for a password, so enter your MariaDB root password and hit Enter. Once you are logged in to your database server you need to create a database for Chamilo installation:

CREATE DATABASE chamilodb;
CREATE USER 'chamilouser'@'localhost' IDENTIFIED BY 'Pa$$worD123';
GRANT ALL PRIVILEGES ON chamilodb.* TO 'chamilouser'@'localhost';
FLUSH PRIVILEGES;
quit

Step 5. Configuring Apache web server for Chamilo.

Create a new virtual host directive in Apache. For example, create a new Apache configuration file named ‘chamilo.conf’ on your virtual server:

touch /etc/apache2/sites-available/chamilo.conf
ln -s /etc/apache2/sites-available/chamilo.conf /etc/apache2/sites-enabled/chamilo.conf
nano /etc/apache2/sites-available/chamilo.conf

Add the following lines:


ServerAdmin [email protected]
DocumentRoot /var/www/html/chamilo
ServerName your-domain.com
ServerAlias www.your-domain.com

Options FollowSymLinks
AllowOverride All

ErrorLog /var/log/apache2/your-domain.com-error_log
CustomLog /var/log/apache2/your-domain.com-access_log common

Save and close the file. Restart the apache service for the changes to take effects:

systemctl restart apache2

Step 6. Accessing Chamilo.

Chamilo will be available on HTTP port 80 by default. Open your favorite browser and navigate to http://yourdomain.com/ or http://server-ip/ and complete the required the steps to finish the installation. If you are using a firewall, please open port 80 to enable access to the control panel.

Congratulation’s! You have successfully installed Chamilo. Thanks for using this tutorial for installing Chamilo e-learning and content management system on your Ubuntu 16.04 LTS (Xenial Xerus) system. For additional help or useful information, we recommend you to check the official Chamilo web site.

You Might Also Like: How To Install LAMP Stack on Ubuntu

How To Install HAProxy on Ubuntu 16.04 LTS

Install HAProxy on Ubuntu 16

HAProxy is a free HTTP/TCP high availability load balancer and proxy server. It spreads requests among multiple servers to mitigate issues resulting from single server failure. HA Proxy is used by a number of high-profile websites including GitHub, Bitbucket, Stack Overflow, Reddit, Tumblr, Twitter and Tuenti and is used in the OpsWorks product from Amazon Web Services.

Install HAProxy on Ubuntu 16.04 LTS

This article assumes you have at least basic knowledge of linux, know how to use the shell, and most importantly, you host your site on your own VPS. The installation is quite simple and assumes you are running in the root account, if not you may need to add ‘sudo’ to the commands to get root privileges. I will show you through the step by step installation HAProxy on a Ubuntu 16.04 (Xenial Xerus) server.

Step 1. First make sure that all your system packages are up-to-date by running these following apt-get commands in the terminal.

sudo apt-get update
sudo apt-get upgrade

Step 2. Network Details.

Below is our network server. There are 3 web servers running with Apache2 and listening on port 80 and one HAProxy server:
Web Server Details:

Server 1: web1.wpcademy.com 192.168.1.101
Server 2: web2.wpcademy.com 192.168.1.102
Server 3: web3.wpcademy.com 192.168.1.103
HAProxy Server:
HAProxy: haproxy 192.168.1.16

Step 3. Installing HAProxy.

Now install HAProxy with the following command:

apt-get -y install haproxy

After the installation you can double check the installed version number with the following:

haproxy -v

Step 4. Configuring HAProxy.

We have to modify the configuraion file of haproxy i.e. /etc/haproxy/haproxy.cfg as per our requirement. (Change this configuration as your network requirements). For more configuration details check this url.

### nano /etc/haproxy/haproxy.cfg

global
log /dev/log local0
log /dev/log local1 notice
chroot /var/lib/haproxy
stats socket /run/haproxy/admin.sock mode 660 level admin
stats timeout 30s
user haproxy
group haproxy
daemon

# Default SSL material locations
ca-base /etc/ssl/certs
crt-base /etc/ssl/private

# Default ciphers to use on SSL-enabled listening sockets.
# For more information, see ciphers(1SSL). This list is from:
# https://hynek.me/articles/hardening-your-web-servers-ssl-ciphers/
ssl-default-bind-ciphers ECDH+AESGCM:DH+AESGCM:ECDH+AES256::RSA+AES:RSA+3DES:!aNULL:!MD5:!DSS
ssl-default-bind-options no-sslv3

defaults
log global
mode http
option httplog
option dontlognull
timeout connect 5000
timeout client 50000
timeout server 50000
errorfile 400 /etc/haproxy/errors/400.http
errorfile 403 /etc/haproxy/errors/403.http
errorfile 408 /etc/haproxy/errors/408.http
errorfile 500 /etc/haproxy/errors/500.http
errorfile 502 /etc/haproxy/errors/502.http
errorfile 503 /etc/haproxy/errors/503.http
errorfile 504 /etc/haproxy/errors/504.http

frontend Local_Server
bind 192.168.1.16:80
mode http
default_backend My_Web_Servers

backend My_Web_Servers
mode http
balance roundrobin
option forwardfor
http-request set-header X-Forwarded-Port %[dst_port]
http-request add-header X-Forwarded-Proto https if { ssl_fc }
option httpchk HEAD / HTTP/1.1rnHost:localhost
server web1.wpcademy.com 192.168.1.101:80
server web2.wpcademy.com 192.168.1.102:80
server web3.wpcademy.com192.168.1.103:80

listen stats *:1936
stats enable
stats hide-version
stats refresh 30s
stats show-node
stats auth username:password
stats uri /stats

Since you have done with all necessary configurations for proxy server, verify configuration file before restarting service using following command:

haproxy -c -f /etc/haproxy/haproxy.cfg

If above command return output as “configuration file is valid” then restart HAProxy service:

systemctl restart haproxy

Step 5. Accessing HAProxy.

Open your favorite browser and access port 80 on ip 192.168.0.16 (as configured above) in web browser and hit refresh. You will see that HAProxy is sending requests to backend server one by one (as per round robin algorithm).

Congratulation’s! You have successfully installed HAProxy. Thanks for using this tutorial for installing HAProxy load balancing on Ubuntu 16.04 LTS (Xenial Xerus) system. For additional help or useful information, we recommend you to check the official HAProxy web site.

You Might Also Like: How To Install and Configure HAproxy on CentOS 6

How To Install OpenXenManager on Ubuntu 16.04 LTS

Install OpenXenManager on Ubuntu 16

OpenXenManager is open source free software and popularly known as alternate of XenCenter for linux. It is mainly written in python and pyGTK helps user to interact on its GUI.

Install OpenXenManager on Ubuntu 16.04 LTS

This article assumes you have at least basic knowledge of linux, know how to use the shell, and most importantly, you host your site on your own VPS. The installation is quite simple and assumes you are running in the root account, if not you may need to add ‘sudo’ to the commands to get root privileges. I will show you through the step by step installation OpenXenManager on a Ubuntu 16.04 (Xenial Xerus) server.

Step 1. First make sure that all your system packages are up-to-date by running these following apt-get commands in the terminal.

sudo apt-get update
sudo apt-get upgrade

Step 2. Installing package dependencies OpenXenManager.

Run following command to install the packages:

apt-get install python-gtk2 glade python-gtk-vnc python-glade2 python-configobj

Step 3. Installing OpenXenManager.

Clone the git repo by given below command:

git clone https://github.com/OpenXenManager/openxenmanager.git

Now change to cloned repo directory:

cd openxenmanager

Next install the package by running below given command:

python setup.py install

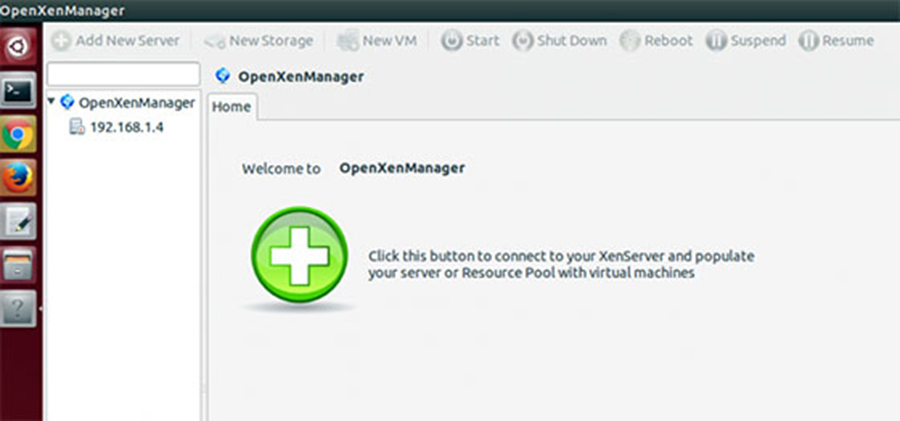
Step 4. Accessing OpenXenManager.

After completion of the installation you can use the package on your system, simply run the command:

openxenmanager

openxenmanager-ubuntu
Congratulation’s! You have successfully installed OpenXenManager. Thanks for using this tutorial for installing OpenXenManager on Ubuntu 16.04 LTS (Xenial Xerus) system. For additional help or useful information, we recommend you to check the official OpenXenManager web site.

How To Install SMPlayer on Ubuntu 16.04 LTS

Install SMPlayer on Ubuntu 16

SMPlayer is an open source and free multimedia player available for Linux and MS Windows, released under GNU General Public License. Unlike other players it doesn’t require you to install codecs to play something because it carries its own all required codecs with itself. You don’t need to find and install third party codecs. SMPlayer can also play YouTube videos and it’s also available an optional plugin to search for YouTube videos.

This article assumes you have at least basic knowledge of linux, know how to use the shell, and most importantly, you host your site on your own VPS. The installation is quite simple and assumes you are running in the root account, if not you may need to add ‘sudo’ to the commands to get root privileges. I will show you through the step by step installation SMPlayer on a Ubuntu 16.04 (Xenial Xerus) server.
SMPlayer Features

Complete preferences dialog to change colors, key shortcuts and fonts of the subtitles, and many more.
Supports Multiple speed playback. You can play video at 2X, 4X and even in slow motion.
Delay adjustments for Audio and Video subtitles and allows you to sync audio and subtitles.
Provided search function to search and download subtitles from opensubtitles.org.
Included YouTube browser to download and play videos online.
Currently supports more than 30 languages, including Italian, Spanish, French, Russian, German, Chinese, Japanese.
Options to change style and icon set of the interface.

Install SMPlayer on Ubuntu 16.04 LTS
Step 1. First make sure that all your system packages are up-to-date by running these following apt-get commands in the terminal.

sudo apt-get update
sudo apt-get upgrade

Step 2. Installing SMPlayer on Ubuntu.
Open Terminal and run the following commands in Terminal to install SMPlayer on Ubuntu:

sudo add-apt-repository ppa:rvm/smplayer
sudo apt-get update
sudo apt-get install smplayer smplayer-themes smplayer-skins

Once installed, start the SMPlayer from Ubuntu Dash or by running the following command in Terminal:

smplayer

Congratulation’s! You have successfully installed SMPlayer. Thanks for using this tutorial for installing SMPlayer on Ubuntu 16.04 LTS (Xenial Xerus) system. For additional help or useful information, we recommend you to check the official SMPlayer web site.

How To Install Deb File on Ubuntu Using Gdebi

Install Deb File on Ubuntu Using Gdebi

Gdebi is a simple tool to install deb files. It lets you install local deb packages resolving and installing its dependencies. apt does the same, but only for remote (http, ftp) located packages. It can also resolve build-depends of debian/control files.

This article assumes you have at least basic knowledge of linux, know how to use the shell, and most importantly, you host your site on your own VPS or Dedicated server. The installation is quite simple and assumes you are running in the root account, if not you may need to add ‘sudo’ to the commands to get root privileges. I will show you through the step by step installation deb file on Ubuntu using Gdebi on a Ubuntu 16.04 (Xenial Xerus) server.
Install Deb File on Ubuntu Using Gdebi

Step 1. First make sure that all your system packages are up-to-date by running these following apt-get commands in the terminal.

sudo apt-get update
sudo apt-get upgrade

Step 2. Installing Gdebi.

Gdebi isn’t installed by default on Ubuntu. To use gdebi on Ubuntu, first install gdebi using the following command:

sudo apt-get install gdebi

Once gdebi is installed, it can be used to install a local deb package. The command format to install deb file using gdebi is:

sudo gdebi package_name.deb

There are many gdebi command options:

–version Show program’s version number and exit.
-h, –help Show this help message and exit.
–n, –non-interactive Run non-interactive (dangerous!).
–o APT_OPTS, –option=APT_OPTS Set an APT configuration option.
–q, –quiet Do not show progress information.
–apt-line Simulate only and print a apt-get install compatible line to stderr.
–root=ROOTDIR Use alternative root dir.

Congratulation’s! You have successfully installed Gdebi. Thanks for using this tutorial for installing deb using Gdebi on Ubuntu 16.04 LTS (Xenial Xerus) system. For additional help or useful information, we recommend you to check the official Gdebi web site.

How To Install Gitlab on Ubuntu 16.04 LTS

Install Gitlab on Ubuntu 16

Gitlab is graphical implementation of git, it is an open source repository management and version control system. GitLab is developed on Ruby on Rails. Using GitLab you can host your source code on your own server. This ensures security of the code, and gives you total freedom on the number of users as well as number of repositories and number of files. GitLab provides you with a platform to collaborate on projects and to keep track of changes in code. GitLab is widely used for software development and version control related tasks. In many ways it is similar to GitHub, except you can install it in your own server.

This article assumes you have at least basic knowledge of linux, know how to use the shell, and most importantly, you host your site on your own VPS. The installation is quite simple and assumes you are running in the root account, if not you may need to add ‘sudo’ to the commands to get root privileges. I will show you through the step by step installation Gitlab on a Ubuntu 16.04 (Xenial Xerus) server.
GitLab Features

GitLab provides you web interface to edit files, directories and create merge requests.
It is self hosted, hence you have full control over your server and the source code hosted inside.
It provides LDAP user authentication and has two factor authentication system which makes the application very secure.
You can insert your own branding in the login page and it also supports project import from GitHub and other sources to GitLab.
It has lots of features like code reviews, issue tracking, activity feeds and inbuilt wiki.
It provides a fine work flow management which gives you ability to create groups for a project, ability to fork a repository as well as it provides ability to manage large binaries with git LFS.
GitLab comes with GitLab CI for continuous integration. You can also Docker with GitLab CI.
It’s free and open source hence you won’t have to deal with any licensing issues.

Install Gitlab on Ubuntu 16.04 LTS

Step 1. First make sure that all your system packages are up-to-date by running these following apt-get commands in the terminal.

sudo apt-get update
sudo apt-get upgrade

Step 2. Install and Configure the necessary dependencies.

Before we going to install Git-lab, we have to install some prerequisites like ssh and mail services:

sudo apt-get install ca-certificates curl openssh-server postfix

Step 3. Installing GitLab.

Use following command to install GitLab packages on server:

curl -sS https://packages.gitlab.com/install/repositories/gitlab/gitlab-ce/script.deb.sh | sudo bash

The script will set up your server to use the GitLab maintained repositories. This lets you manage GitLab with the same package management tools you use for your other system packages. Once this is complete, you can install the actual GitLab application with apt:

sudo apt-get install gitlab-ce

If you are not comfortable installing the repository through a piped script, you can find the entire script here.

Step 4. Configure GitLab on Server.

Now start the configuration by using the gitlab-ctl command:

sudo gitlab-ctl reconfigure

Step 5. Accessing Gitlab.

Gitlab will be available on HTTP port 80 by default. Open your favorite browser and navigate to http://yourdomain.com/ or http://server-ip and then login with a “root” user and with initial password “5iveL!fe”. If you are using a firewall, please open port 80 to enable access to the control panel.
install-gitlab
Congratulation’s! You have successfully installed Gitlab. Thanks for using this tutorial for installing Gitlab on Ubuntu 16.04 LTS (Xenial Xerus) system. For additional help or useful information, we recommend you to check the official Gitlab web site.