How To Install Ubuntu 17.04 Server Zesty Zapus

Install Ubuntu 17.04 Server

Ubuntu 17.04 Zesty Zapus is the first release of the year 2017 for one of the most popular Linux distribution in the world. Let’s learn how to install it in 10 easy steps.

This article assumes you have at least basic knowledge of Linux, know how to use the shell, and most importantly, you host your site on your own VPS. The installation is quite simple and assumes you are running in the root account, if not you may need to add ‘sudo’ to the commands to get root privileges. I will show you through the step by step installation ubuntu 17.04 server Zesty Zapus.
Install Ubuntu 17.04 Server Zesty Zapus

Step 1. First, get the mini.iso image for your machine.

Step 2. Insert your Ubuntu install CD into your system and boot from it. When you install the OS in a virtual machine like I do it here, then you should be able to select the downloaded ISO file as source for the CD/DVD drive in VMWare and Virtualbox without burning it on CD first.

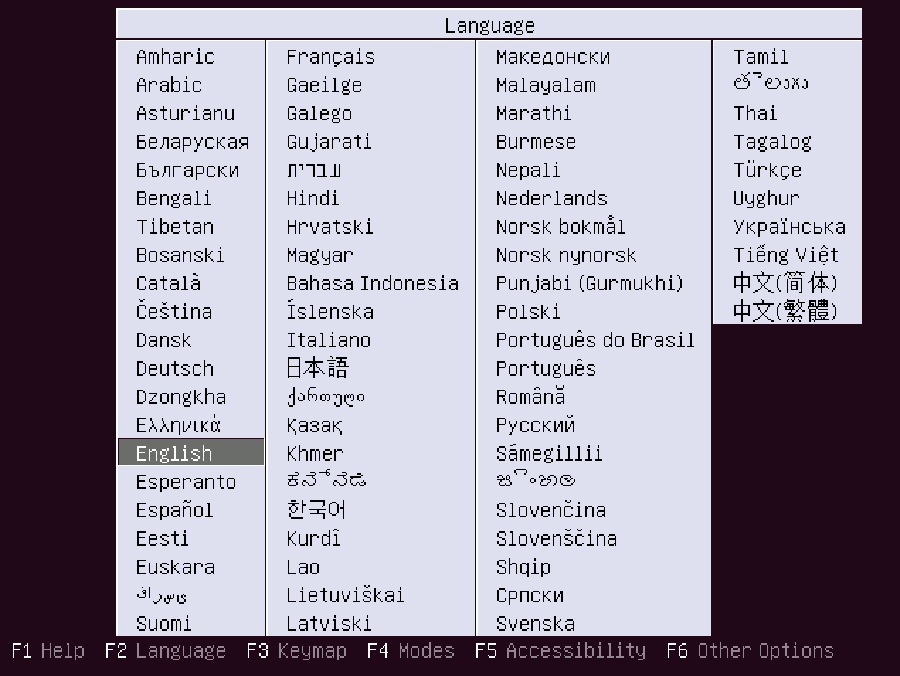
Step 3. The first screen will show the language selector. In this case, we’ll choose English.
install-ubuntu-17-04-server
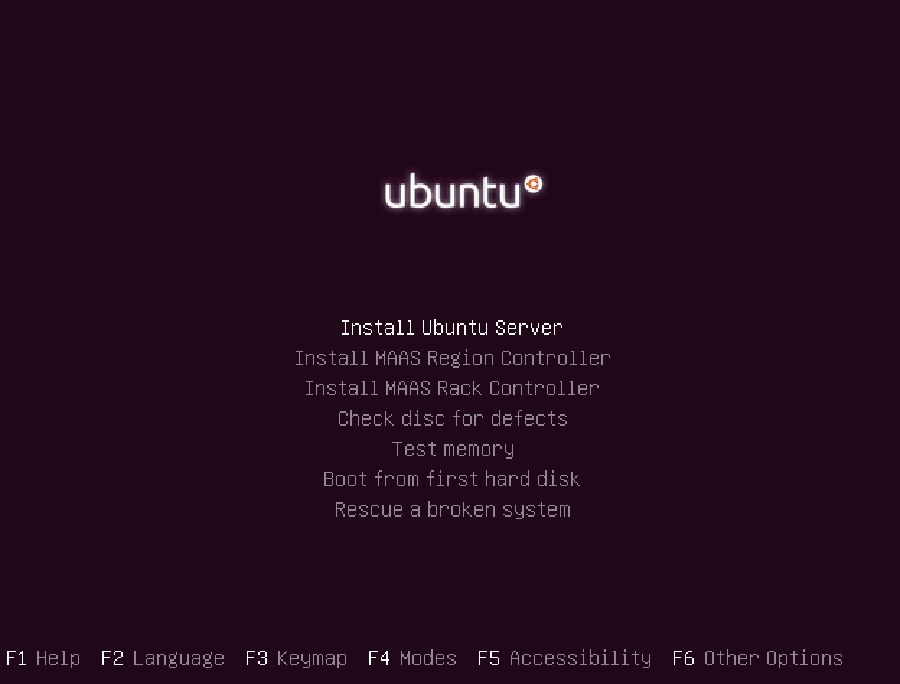
Step 4. Then choose the option Install Ubuntu Server.
install-ubuntu-17-04-server-1
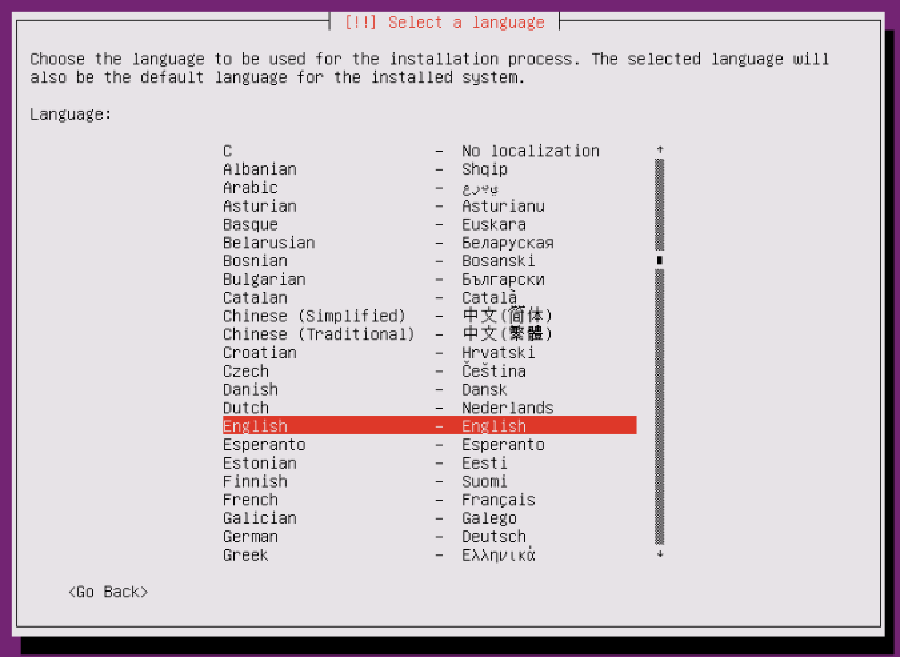
Step 5. Select your language again, we have to specify the language that will be used during the installation process. We’ll continue using English.
install-ubuntu-17-04-server-2
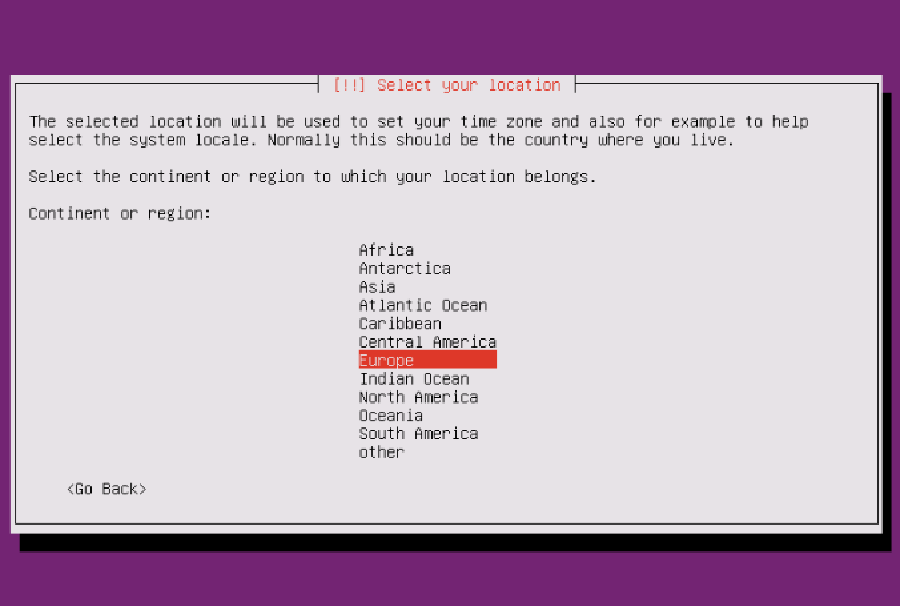
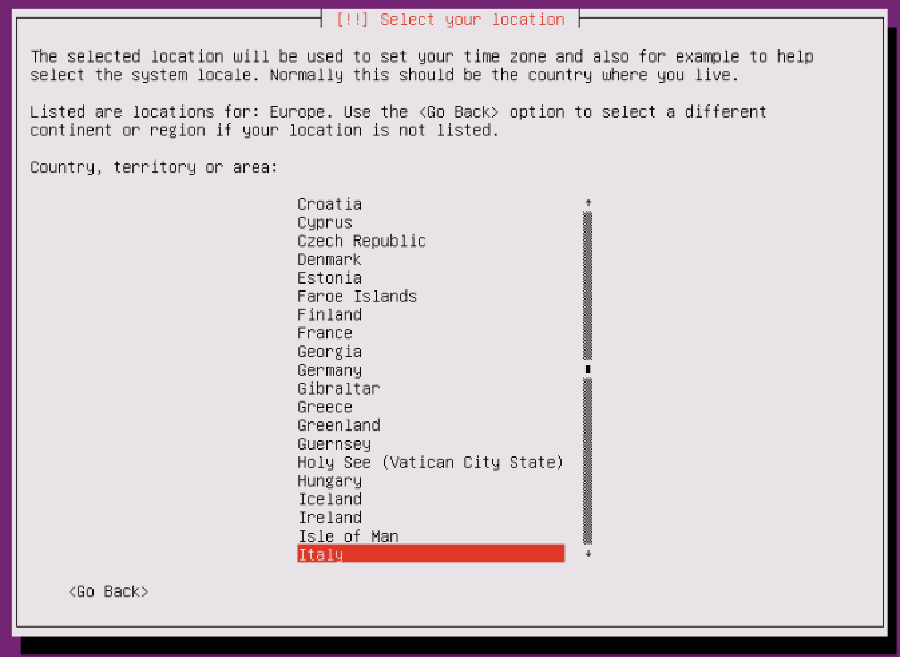
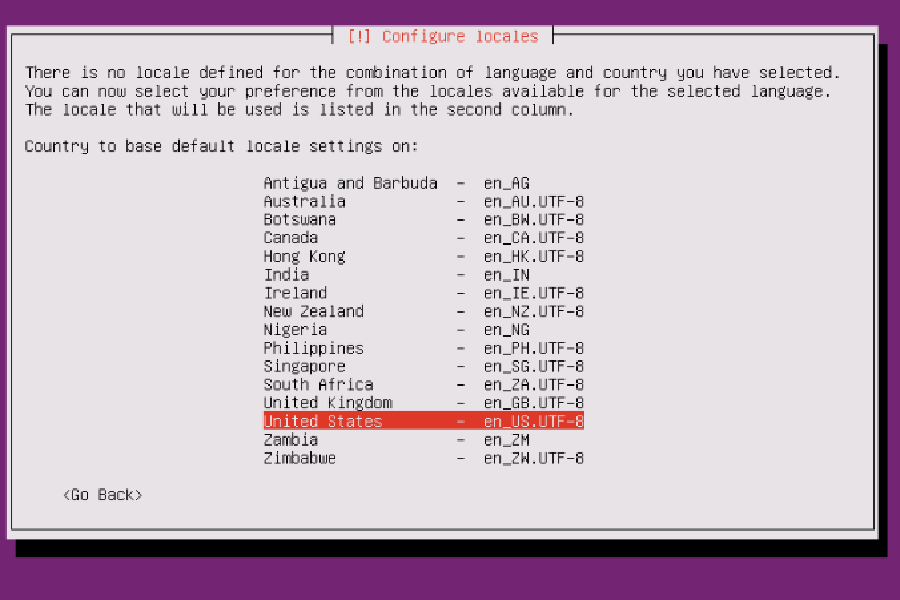
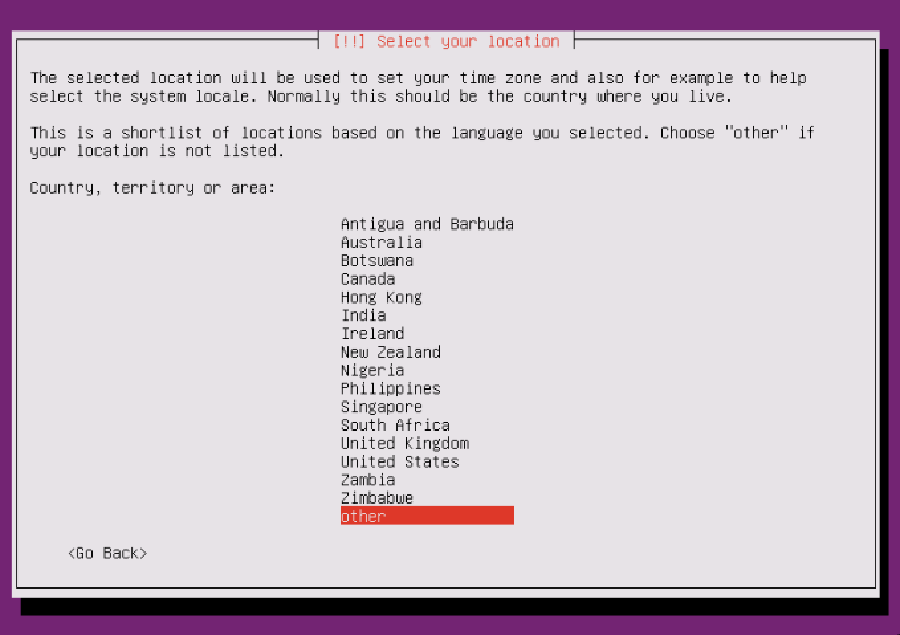
Step 6. Then choose your location. We need to tell Ubuntu where we are located. In our case, we’ll select other/Europe/Italy.
install-ubuntu-17-04-server-3
install-ubuntu-17-04-server-4install-ubuntu-17-04-server-5
install-ubuntu-17-04-server-6

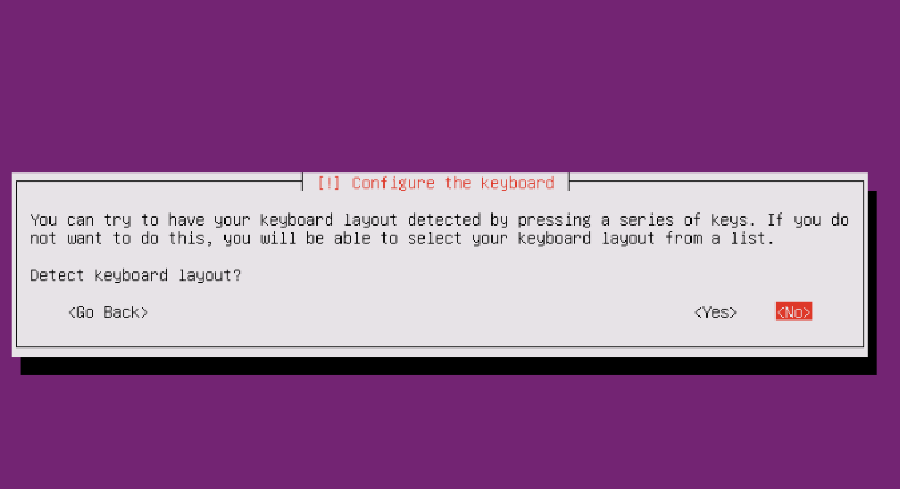
Step 7. Choose a keyboard layout. First of all, the installer will ask if it can detect the layout. We’ll select No here.
install-ubuntu-17-04-server-7
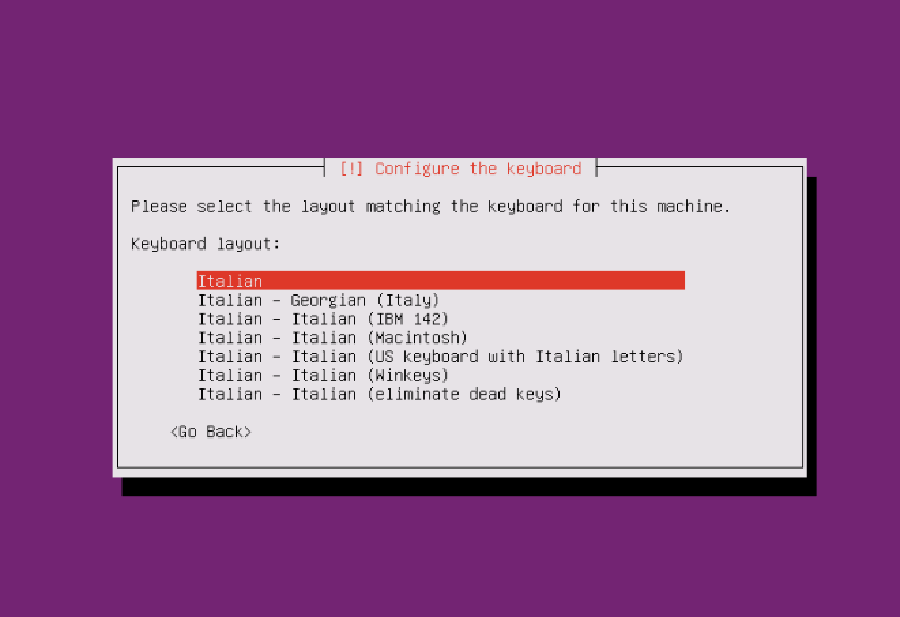
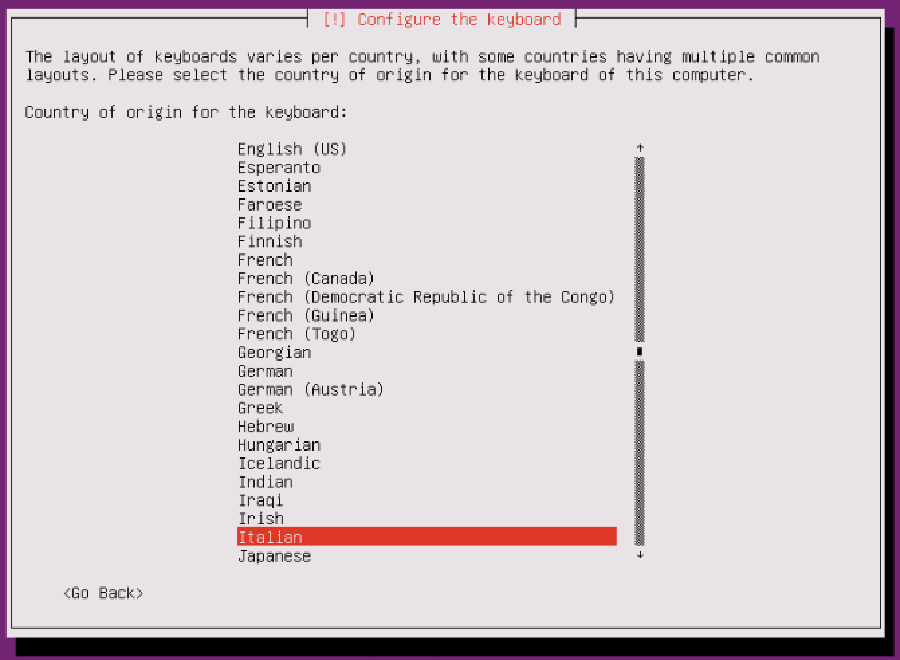
Next step, we’ll choose the Italian layout:
install-ubuntu-17-04-server-8
install-ubuntu-17-04-server-9
Step 8. Enter the hostname of the system. We’ll use server.example.com.
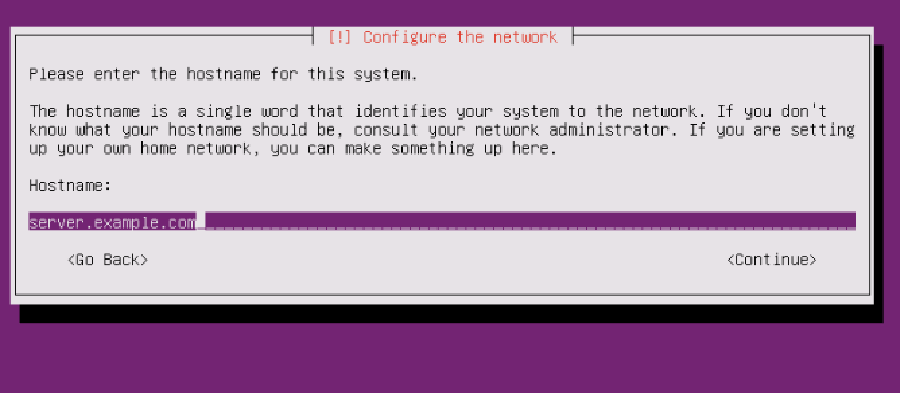
install-ubuntu-17-04-server-10
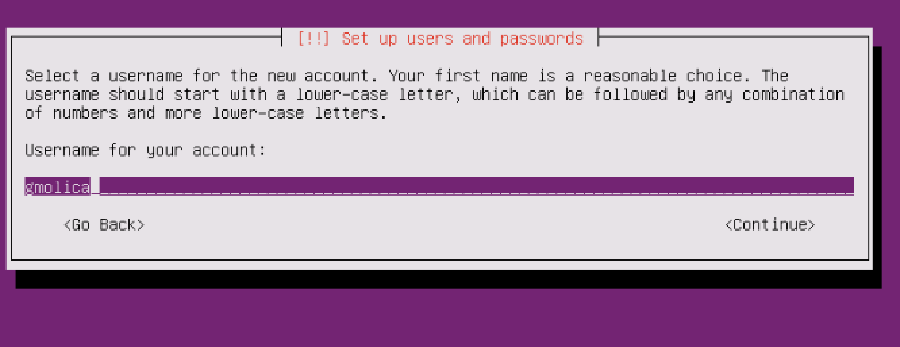
Step 9. The next step is to create a new user account. You’ll need to fill in the forms with your data. Ubuntu does not let you log in as root user directly. Therefore, we create a new system user here for the initial login.
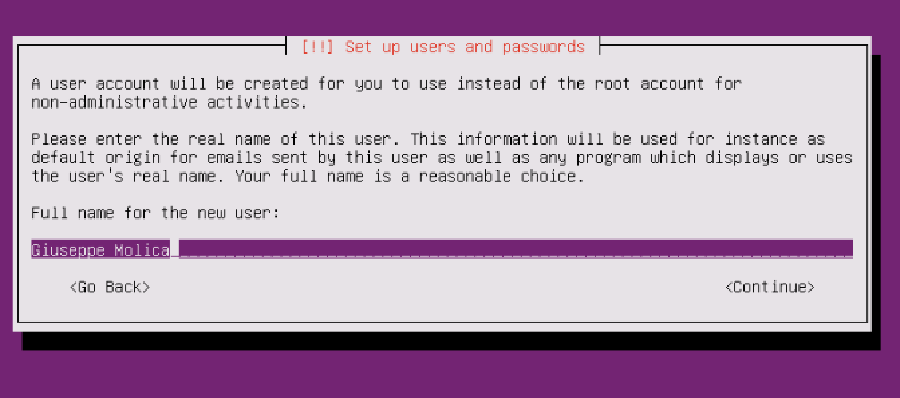
install-ubuntu-17-04-server-11
install-ubuntu-17-04-server-12
I don’t need an encrypted private directory, so I choose No here:
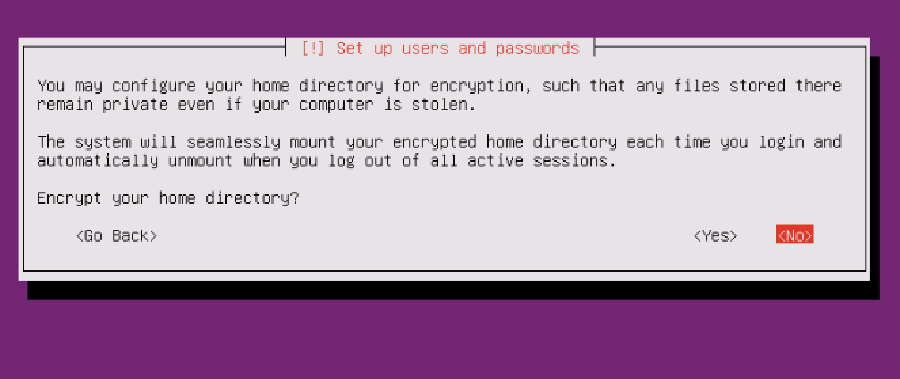
install-ubuntu-17-04-server-13
Step 10. Please check if the installer detected your time zone correctly. If so, select Yes, otherwise No.

Step 11. Now you have to partition your hard disk. For simplicity’s sake I select Guided – use entire disk and set up LVM, this will create one volume group with two logical volumes, one for the / file system and another one for swap.
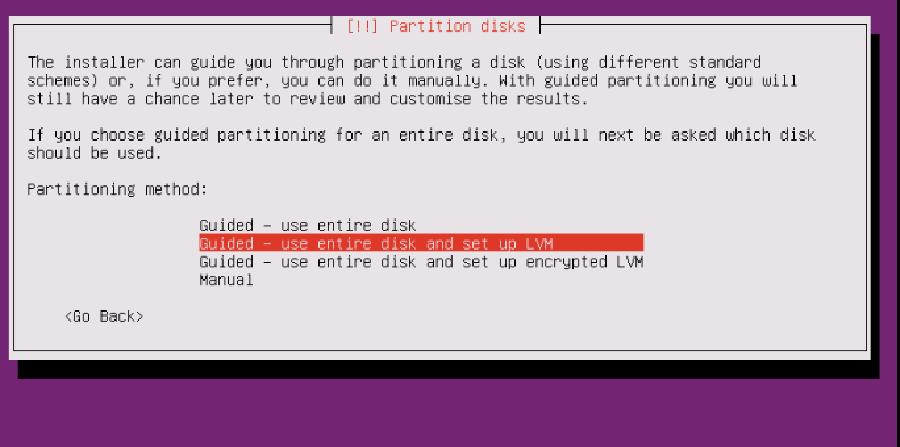
install-ubuntu-17-04-server-14
Select the disk that will be partitioned:
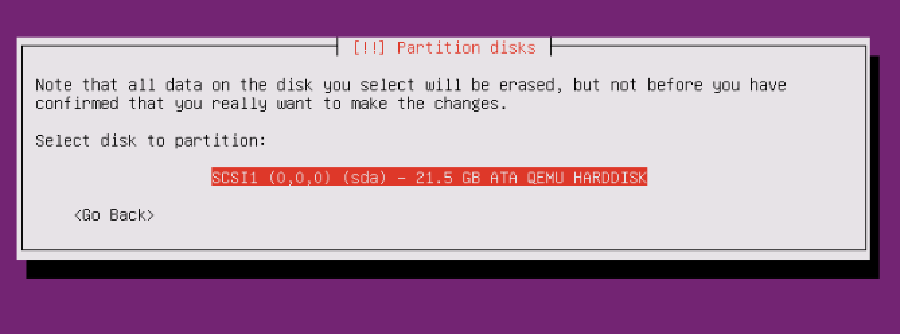
install-ubuntu-17-04-server-15

install-ubuntu-17-04-server-16
Select the ‘amount of volume group’. Of course, there are different options here, but we’ll keep it easy and choose the maximum size:
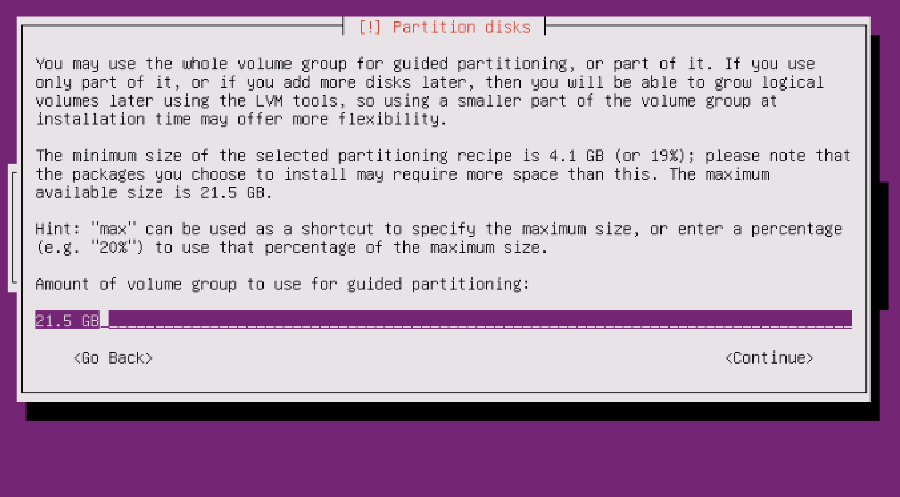
install-ubuntu-17-04-server-17
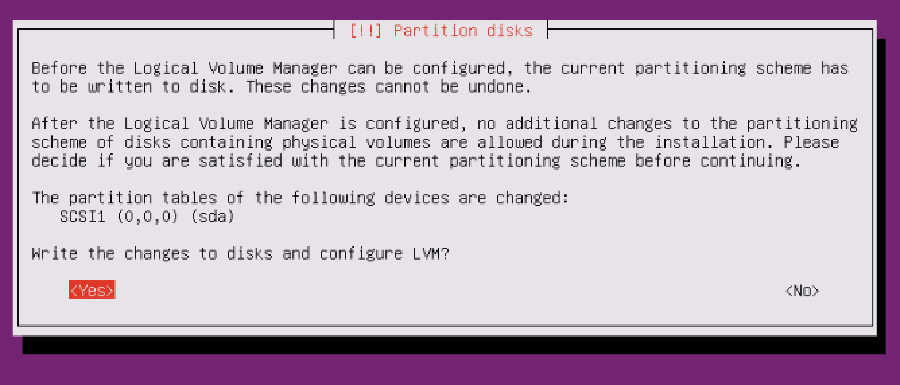
Check one last time and then allow the installer to write changes to disk:
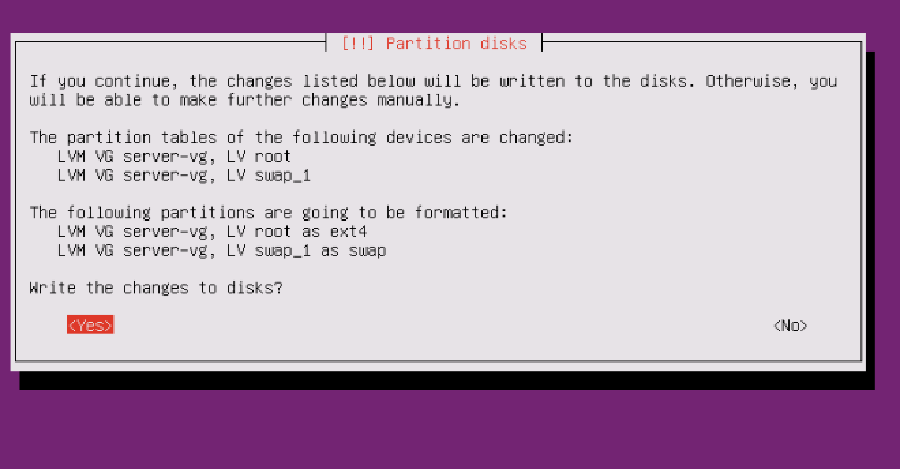
install-ubuntu-17-04-server-18
install-ubuntu-17-04-server-19
Step 12. Now the package manager “apt” gets configured. Leave the HTTP proxy line empty unless you’re using a proxy server to connect to the Internet:
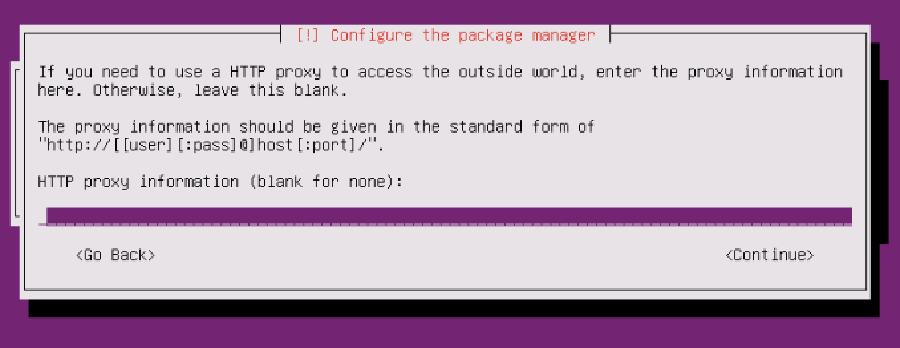
install-ubuntu-17-04-server-20
install-ubuntu-17-04-server-21
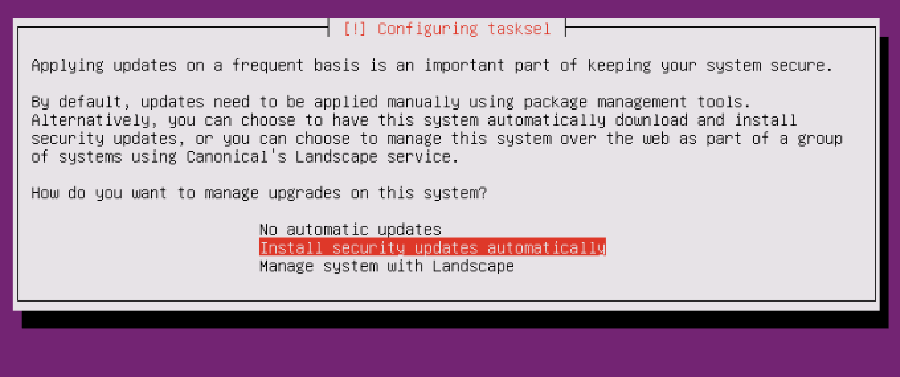
Step 13. Configure updates, It is possible to install security updates automatically, or choose to do everything manually. I like to update my servers automatically.
install-ubuntu-17-04-server-22
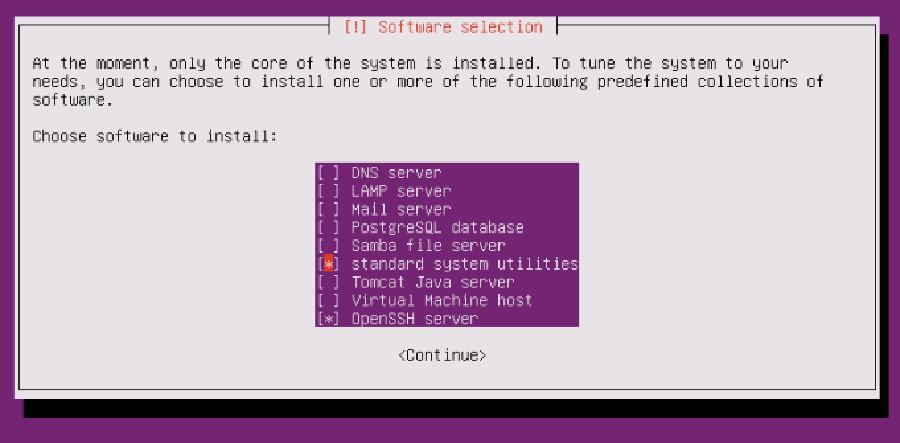
This tutorial is about a basic server, so we will just select standard system utilities and OpenSSH server:
install-ubuntu-17-04-server-23
install-ubuntu-17-04-server-24
Step 14. Installing the boot loader
install-ubuntu-17-04-server-25
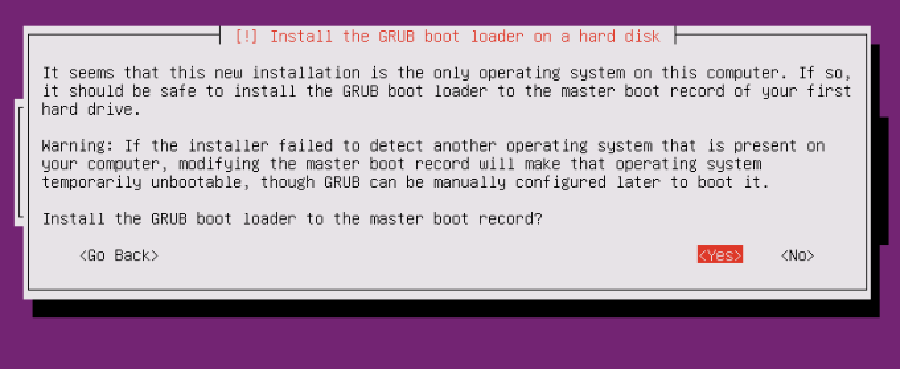
Select Yes when you are asked Install the GRUB boot loader to the master boot record?:

install-ubuntu-17-04-server-26
Step 15. The installer now finished the Ubuntu installation.

At the end the installer will ask you to remove the installation media. Select Continue and your machine will reboot:
install-ubuntu-17-04-server-27
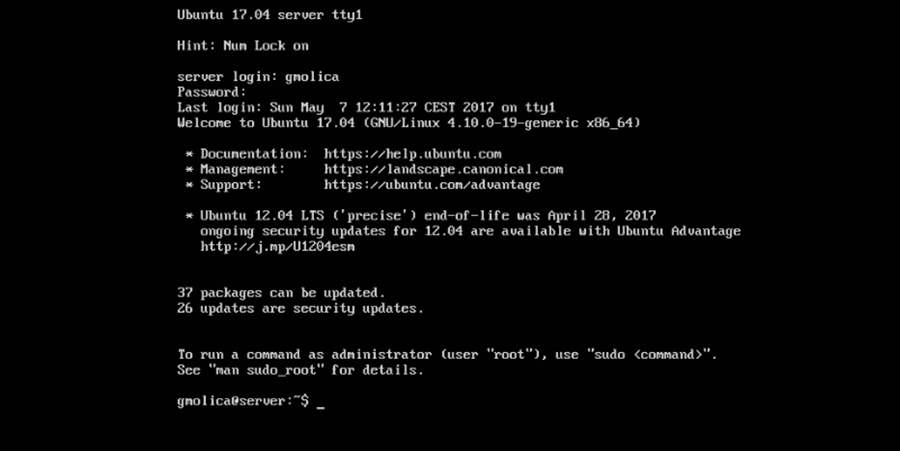
Finally, select continue to reboot the machine after the installation. When you restart, your computer will prompt you for a username and password:
install-ubuntu-17-04-server-28

Congratulation’s! You have successfully installed Ubuntu 17.04. Thanks for using this tutorial for installing Ubuntu 17.04 Server Zesty Zapus system. For additional help or useful information, we recommend you to check the official Ubuntu web site.

How To Install uTorrent on Ubuntu 17.04

Install uTorrent on Ubuntu 17

uTorrent is a freeware and a closed source BitTorrent Client. One of the most used lightweight BitTorrent Client, Now it is available for Linux as uTorrent server. The µTorrent is designed to use minimal computer resources while offering functionality comparable to larger BitTorrent clients such as Vuze or BitComet and also it provides performance, stability, and support for older hardware and versions of operating system. It is available for Microsoft Windows and Mac OS X.

This article assumes you have at least basic knowledge of Linux, know how to use the shell, and most importantly, you host your site on your own VPS. The installation is quite simple and assumes you are running in the root account, if not you may need to add ‘sudo’ to the commands to get root privileges. I will show you through the step by step installation uTorrent on BitTorrent Client on Ubuntu 17.04 Zesty Zapus server.
Install uTorrent on Ubuntu 17.04 Zesty Zapus

Step 1. First, make sure that all your system packages are up-to-date by running these following apt-get commands in the terminal.

sudo apt-get update
sudo apt-get upgrade

Step 2. Install required dependencies.

Open Terminal and run the following command to install dependency libraries. Assign the password for the user when asked:

sudo apt-get install libssl1.0.0 libssl-dev

Step 3. Installing uTorrent.

First thing to do is to go to uTorrent’s download page and download the latest stable version of uTorrent, At the moment of writing this article it is version 3.3:

### 32-bit system ###
wget http://download-new.utorrent.com/endpoint/utserver/os/linux-i386-ubuntu-13-04/track/beta/ -O utserver.tar.gz

### 64-bit system ###
wget http://download-new.utorrent.com/endpoint/utserver/os/linux-x64-ubuntu-13-04/track/beta/ -O utserver.tar.gz

Run command to extract the downloaded server to /opt/:

sudo tar -zxvf utserver.tar.gz -C /opt/

Set an executable permission to the extracted directory for running the uTorrent server:

sudo chmod 777 /opt/utorrent-server-alpha-v3_3/

Run the command to link uTorrent server to the /user/bin directory:

sudo ln -s /opt/utorrent-server-alpha-v3_3/utserver /usr/bin/utserver

Finally start uTorrent server:

utserver -settingspath /opt/utorrent-server-alpha-v3_3/ &

Step 4. Accessing uTorrent.

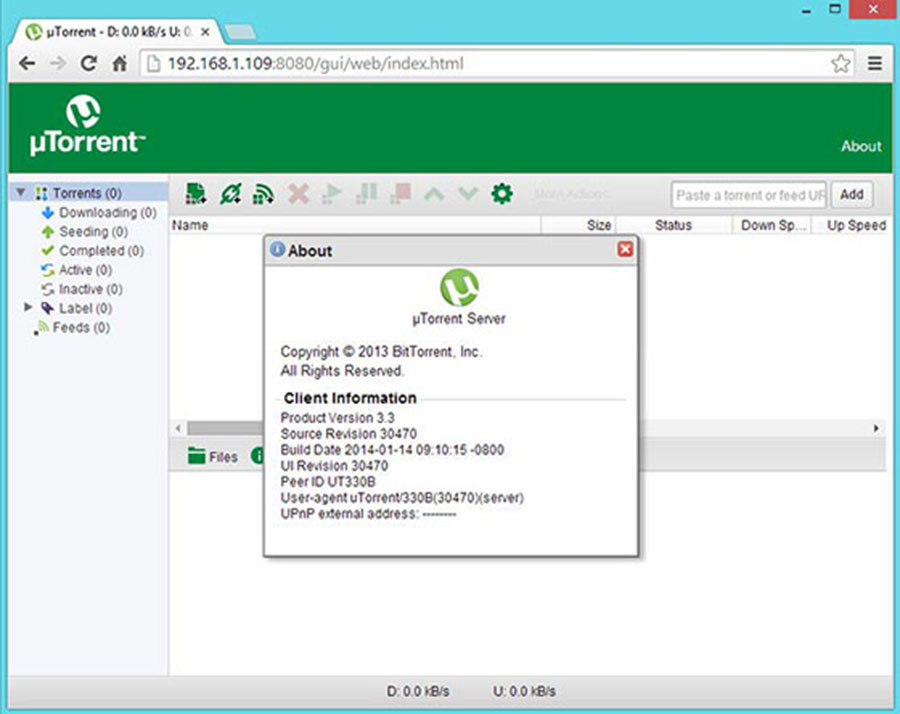
uTorrent will be available on HTTP port 8080 by default. Open your favorite browser and navigate to http://yourdomain.com:8080 or http://your-ip-address:8080/gui. It will ask you the username and password. The default username is admin and leave the password field empty.
Utorrent-Ubuntu-14.04

Congratulations! You have successfully installed uTorrent. Thanks for using this tutorial for installing μTorrent (uTorrent) BitTorrent Client in Ubuntu 17.04 Zesty Zapus systems. For additional help or useful information, we recommend you to check the official uTorrent web site.

How To Install SimpleNote on Ubuntu 17.04

Install SimpleNote on Ubuntu 17

SimpleNote is an open-source alternative to EverNote. It’s free, lightweight and available for Linux, Mac, Windows, Android, iOS and the web. SimpleNote is developed by Automattic, the same company behind WordPress blogging platform.

This article assumes you have at least basic knowledge of Linux, know how to use the shell, and most importantly, you host your site on your own VPS. The installation is quite simple and assumes you are running in the root account, if not you may need to add ‘sudo’ to the commands to get root privileges. I will show you through the step by step installation SimpleNote on Ubuntu 17.04 Zesty Zapus server.
SimpleNote Features

Your notes stay updated across all your devices while no buttons are pressed
Find notes quickly with instant searching as well as simple tags
Share a list, post some instructions, or publish your thoughts
Your notes are backed up when you change them. Just drag the version slider to go back in time
Type what you’re looking for, and your list updates instantly. You’ll never misplace an important thought again
Notes can be backed up, synced and shared – it’s all completely free
History: drag the History slider to view previous versions.
Collaboration: share your note with others as well as allowing them to edit.
Publishing: make your note public with its own URL.
Tags: organize your notes effectively with tags.
Pinning: pin notes right from the note list so they’re easy to find.

Install SimpleNote on Ubuntu 17.04 Zesty Zapus

Step 1. First, make sure that all your system packages are up-to-date by running these following apt-get commands in the terminal.

sudo apt-get update
sudo apt-get upgrade
sudo apt-get install gdebi

Step 3. Installing SimpleNote.

First thing to do is to go to SimpleNote’s download page and download the latest stable version of SimpleNote, At the moment of writing this article it is version 1.0.8:

wget https://github.com/Automattic/simplenote-electron/releases/download/v1.0.8/simplenote-1.0.8.deb

Run command to install SimpleNote:

sudo gdebi simplenote-1.0.8.deb

Once installed, next you can start SimpleNote by searching for it Unity Dash. If the app icon doesn’t show up, try logging out and logging back in.
install-simplenote-on-linux
Congratulations! You have successfully installed simplenote. Thanks for using this tutorial for installing simplenote in Ubuntu 17.04 Zesty Zapus systems. For additional help or useful information, we recommend you to check the official simplenote web site.

How To Install XFCE Desktop on Ubuntu 16.04 LTS

Install XFCE Desktop on Ubuntu 16

XFCE is one of the most popular desktop environment for linux desktop. XFCE is a free lightweight, fast and easy to use software desktop environment for Unix/Linux like operating systems. It is designed for productivity and aims to be fast and low on system resources. Unlike GNOME and KDE desktops which are heavier, but XFCE uses fewer system resources. Furthermore, it offers better modularity and less dependencies to install and takes less time and low disk space on your hard drive.

This article assumes you have at least basic knowledge of linux, know how to use the shell, and most importantly, you host your site on your own VPS. The installation is quite simple and assumes you are running in the root account, if not you may need to add ‘sudo’ to the commands to get root privileges. I will show you through the step by step installation Xfce Desktop Environment on a Ubuntu 16.04 (Xenial Xerus) server.
Install XFCE Desktop on Ubuntu 16.04 LTS
Step 1. First make sure that all your system packages are up-to-date by running these following apt-get commands in the terminal.

sudo apt-get update
sudo apt-get upgrade

Step 2. Installing Xfce Desktop Environment.
Run following command to install XFCE desktop environment:

apt-get install xfce4

After installation there is no need to restart the system you can get the XFCE desktop. Now log off from current user and login back once again but click on ubuntu logo which is at right corner at user login box. On clicking the ubuntu logo, menu will appear select the XFCE one.

Congratulation’s! You have successfully installed XFCE Desktop. Thanks for using this tutorial for installing Xfce Desktop Environment on Ubuntu 16.04 LTS (Xenial Xerus) system. For additional help or useful information, we recommend you to check the official XFCE web site.

How To Install LAMP Stack on Ubuntu 17.04

Install LAMP Stack on Ubuntu 17

LAMP represents a full featured stack containing the most popular web server known as Apache, the most popular database server MySQL and the most popular open-source web programming language known as PHP. All components are free and open-source software, and the combination is suitable for building dynamic web pages.

This article assumes you have at least basic knowledge of linux, know how to use the shell, and most importantly, you host your site on your own VPS. The installation is quite simple. I will show you through the step by step installation LAMP (Linux Apache, MySQL and PHP) on Ubuntu 17.04 Zesty Zapus server.
Install LAMP Stack on Ubuntu 17.04

Step 1. First make sure that all your system packages are up-to-date by running these following apt-get commands in the terminal.

apt-get update
apt-get upgrade

Step 2. Installing Apache on Ubuntu 17.04.

We will be installing Apache with apt-get, which is the default package manager for ubuntu. Your also required to install libapache2-mod-php module to work PHP with Apache2:

apt-get install apache2 libapache2-mod-php

After installing apache services on your system, start all required services:

systemctl enable apache2
systemctl start apache2
systemctl status apache2

Check Apache version:

apache2 -v

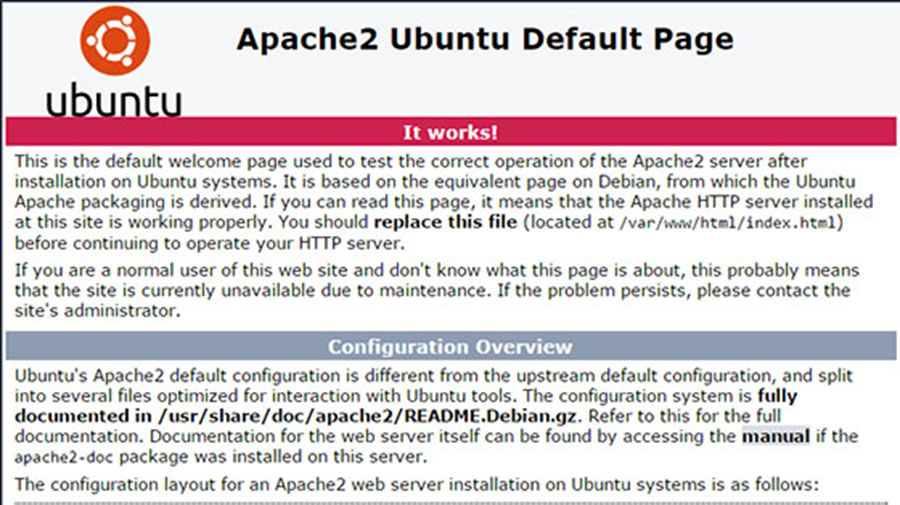
You can verify that Apache is really running by opening your favorite web browser and entering the URL http://your-server’s-address, if it is installed, then you will see this:
apache2-ubuntu-default-page
Step 3. Installing MySQL on Ubuntu 17.04

Now that we have our web server up and running, it is time to install MySQL. MySQL is a database management system. Basically, it will organize and provide access to databases where our site can store information:

apt-get install mysql-server php7.1-mysql

Once complete, you can verify MySQL is installed by running the below command:

systemctl status mysql
systemctl enable mysql
systemctl start mysql

By default, MySQL is not hardened. You can secure MySQL using the mysql_secure_installation script. you should read and below each steps carefully which will set root password, remove anonymous users, disallow remote root login, and remove the test database and access to secure MySQL:

mysql_secure_installation

Configure it like this:

- Set root password? [Y/n] y
- Remove anonymous users? [Y/n] y
- Disallow root login remotely? [Y/n] y
- Remove test database and access to it? [Y/n] y
- Reload privilege tables now? [Y/n] y

To log into MySQL, use the following command (note that it’s the same command you would use to log into a MySQL database):

mysql -u root -p

Step 4. Installing PHP 7 on Ubuntu 17.04

PHP 7.1 is now the default PHP package shipping in Ubuntu LTS 17.04 (Zesty Zapus), Now install PHP 7 with the following command:

sudo apt-get install -y php7.1 php7.1-cgi php7.1-cli php7.1-fpm php7.1-mysql php7.1-mcrypt php7.1-mbstring php7.1-common php7.1-curl php7.1-pgsq

If you like to search all the available PHP 7 modules you can use to command:

sudo apt-cache search php- | less

Your server should restart Apache automatically after the installation of both MySQL and PHP. If it doesn’t, execute this command:

sudo systemctl restart apache2
sudo systemctl restart mysql

To test PHP, create a test file named info.php with he content below. Save the file, then browse to it to see if PHP is working:

nano /var/www/html/info.php

In this file, paste the following code:

<?php phpinfo(); ?>

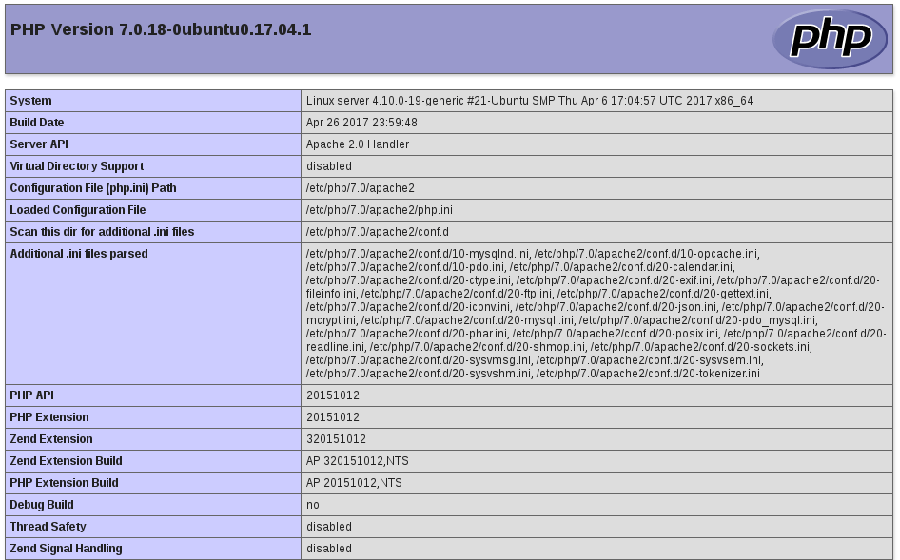
Try to access it at http://your_server_ip/info.php . If the PHP info page is rendered in your browser then everything looks good and you are ready to proceed further.
install-php7-ubuntu-17.04

Congratulation’s! You have successfully installed LAMP stack. Thanks for using this tutorial for installing LAMP (LinuxApache, MySQLand PHP) in Ubuntu 17.04 (Zesty Zapus) system. For additional help or useful information, we recommend you to check the official Apache, MySQL and PHP web site.

How To Install Munin on Ubuntu 17.04

Install Munin on Ubuntu 17

Munin is a free and open-source networked resource monitoring tool. It offers monitoring and alerting services for servers, switches, applications, and services. Munin uses the RRDtool to create graphs which are accessible over a web browser. Also, Munin can be configured to send alerts when some service/application etc. is not working and Munin will automatically send an additional email alert once the problem has been resolved.

This article assumes you have at least basic knowledge of Linux, know how to use the shell, and most importantly, you host your site on your own VPS. The installation is quite simple and assumes you are running in the root account, if not you may need to add ‘sudo’ to the commands to get root privileges. I will show you through the step by step installation Munin monitoring tool on Ubuntu 17.04 Zesty Zapus.
Install Munin on Ubuntu 17.04 Zesty Zapus

Step 1. First make sure that all your system packages are up-to-date by running these following apt-get commands in the terminal.

sudo apt-get update
sudo apt-get upgrade

Step 2. Installing Apache web server.

Munin will generate graphs that are viewed via a web application. So the first thing we need is an Apache web server:

apt-get install apache2 apache2-utils libcgi-fast-perl libapache2-mod-fcgid

Once the installation process is complete, we must ensure that the fcgid module is enabled. Check using the following command:

a2enmod fcgid

Step 3. Installing Munin.

Install Munin and extra plugins using the following command:

apt-get install munin munin-node munin-plugins-extra

Step 4. Configure Munin Master.

Munin puts all its configuration files in /etc/munin. We can start with editing the Munin configuration file /etc/munin/munin.conf:

nano /etc/munin/munin.conf

Edit the Munin configuration file and add/modify the following lines:

dbdir /var/lib/munin
htmldir /var/cache/munin/www
logdir /var/log/munin
rundir /var/run/munin
tmpldir /etc/munin/templates

[localhost]
    address 127.0.0.1
    use_node_name yes

Step 5. Configuring Apache web server.

Next, you will be editing Munin’s apache configuration file to point apache in the right direction when you request the monitoring information:

mv /etc/munin/apache.conf /etc/munin/apache.conf.bak

Edit the ‘/etc/munin/apache.conf’ configuration file and add the following lines:

#nano /etc/munin/apache.conf
<VirtualHost *:80>
   ServerName munin.your-domain.com
   ServerAlias www.munin.your-domain.com
   ServerAdmin [email protected]
      DocumentRoot "/var/cache/munin/www"
      DirectoryIndex index.html

   <Directory "/var/cache/munin/www">
      Options Indexes Includes FollowSymLinks MultiViews
      AllowOverride AuthConfig
      AuthUserFile /etc/munin/htpasswd
      AuthName "munin"
      AuthType Basic
      Require valid-user
      Order allow,deny
      Allow from all
   </Directory>

   CustomLog /var/log/apache2/munin.your-domain.com-access.log combined
   ErrorLog /var/log/apache2/munin.your-domain.com-error.log

   <Directory "/etc/munin/static">
      Require all granted
   </Directory>

   <Directory "/usr/lib/munin/cgi">
      Options +ExecCGI
      Require all granted
   <IfModule mod_fcgid.c>
      SetHandler fcgid-script
   </IfModule>
   <IfModule !mod_fcgid.c>
      SetHandler cgi-script
   </IfModule>
   </Directory>
</VirtualHost>

Restart Apache and Munin:

systemctl restart apache2
systemctl restart munin-node

Step 6. Accessing Munin.

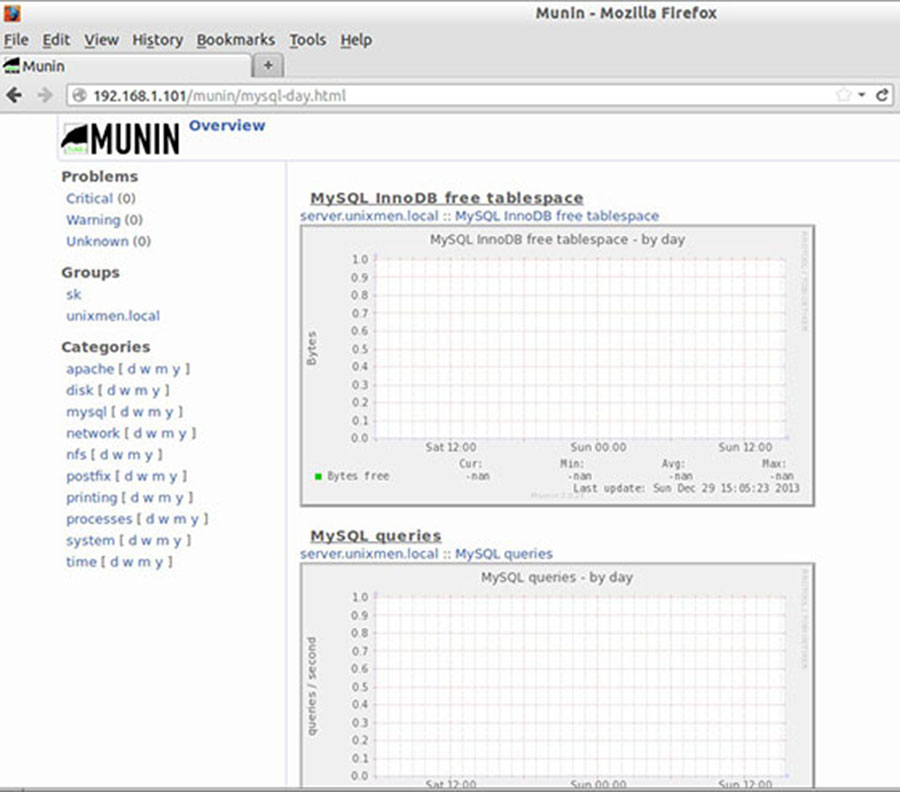
Munin will be available on HTTP port 80 by default. Open your favorite browser and navigate to http://yourdomain.com/munin or http://server-ip/munin. Using ‘admin’ as username and the previously generated munin password as password and you will be able to access Munin graphs and data.
Munin-graphs-data

Congratulation’s! You have successfully installed Munin. Thanks for using this tutorial for installing Munin monitoring tool on Ubuntu 17.04 Zesty system. For additional help or useful information, we recommend you to check the official Munin web site.

How To Install Gogs on Ubuntu 16.04 LTS

Install Gogs on Ubuntu 16

Gogs is a free and open source self-hosted Git service written in the Go programming language. It is very similar to GitLab and aims to be the easiest and most painless way to set up self-hosted Git service in your development environment.

This article assumes you have at least basic knowledge of Linux, know how to use the shell, and most importantly, you host your site on your own VPS. The installation is quite simple and assumes you are running in the root account, if not you may need to add ‘sudo’ to the commands to get root privileges. I will show you through the step by step installation Gogs on Ubuntu 16.04 Xenial Xerus server.
Install Gogs on Ubuntu 16.04 LTS

Step 1. First make sure that all your system packages are up-to-date by running these following apt-get commands in the terminal.

sudo apt-get update
sudo apt-get upgrade

Step 2. Install LAMP (Linux, Apache, MariaDB and PHP) server.

A Ubuntu 16.04 LAMP server is required. If you do not have LAMP installed, you can follow our guide here. Also install all required PHP modules:

apt-get install php7.0-curl php7.0-gd php7.0-mbstring php7.0-mysql libapache2-mod-php7.0 php7.0-mcrypt php7.0-zip

Step 3. Installing Gogs.

First thing to do is to go to Gogs’s download page and download the latest stable version of Gogs, At the moment of writing this article it is version 0.11.4:

cd /opt && wget https://dl.gogs.io/0.11.4/linux_amd64.zip

Unpack the Gogs archive to the document root directory on your server:

unzip linux_amd64.zip
mv gogs/ /var/www/html/gogs

Next, change the directory to the gogs and run the following command to start gogs:

cd /var/www/html/gogs
./gogs web &

Step 4. Configuring MariaDB for Gogs.

By default, MariaDB is not hardened. You can secure MariaDB using the mysql_secure_installation script. you should read and below each steps carefully which will set root password, remove anonymous users, disallow remote root login, and remove the test database and access to secure MariaDB:

mysql_secure_installation

Configure it like this:

- Set root password? [Y/n] y
- Remove anonymous users? [Y/n] y
- Disallow root login remotely? [Y/n] y
- Remove test database and access to it? [Y/n] y
- Reload privilege tables now? [Y/n] y

Next we will need to log in to the MariaDB console and create a database for the Gogs. Run the following command:

mysql -u root -p

This will prompt you for a password, so enter your MariaDB root password and hit Enter. Once you are logged in to your database server you need to create a database for Gogs installation:

MariaDB [(none)]> CREATE DATABASE gogs;
MariaDB [(none)]> GRANT ALL PRIVILEGES ON gogs.* TO 'gogs'@'localhost' IDENTIFIED BY 'your_gogs_password';
MariaDB [(none)]> FLUSH PRIVILEGES;
MariaDB [(none)]> \q

Step 5. Configuring Apache web server for Gogs.

Create a new virtual host directive in Apache. For example, create a new Apache configuration file named ‘gogs.conf’ on your virtual server:

sudo a2enmod rewrite
touch /etc/apache2/sites-available/gogs.conf
ln -s /etc/apache2/sites-available/gogs.conf /etc/apache2/sites-enabled/gogs.conf
nano /etc/apache2/sites-available/gogs.conf

Add the following lines:

<VirtualHost *:80>
ServerAdmin [email protected]
DocumentRoot /var/www/html/gogs/
ServerName your-domain.com
ServerAlias www.your-domain.com
<Directory /var/www/html/gogs/>
Options FollowSymLinks
AllowOverride All
Order allow,deny
allow from all
</Directory>
ProxyRequests Off
ProxyPass / http://192.168.77.20:3000/
ProxyPassReverse / http://192.168.77.20:3000/
ErrorLog /var/log/apache2/your-domain.com-error_log
CustomLog /var/log/apache2/your-domain.com-access_log common
</VirtualHost>

Now, we can restart Apache web server so that the changes take place:

systemctl restart apache2.service

Step 6. Accessing Gogs.

Gogs will be available on HTTP port 80 and 3000 by default. Open your favorite browser and navigate to http://yourdomain.com or http://server-ip and complete the required the steps to finish the installation. If you are using a firewall, please open port 80 to enable access to the control panel.

Congratulations! You have successfully installed Gogs. Thanks for using this tutorial for installing Gogs in Ubuntu 16.04 Xenial Xerus systems. For additional help or useful information, we recommend you to check the official Gogs web site.