How To Install Java on Ubuntu 18.10 Cosmic Cuttlefish

Install Java on Ubuntu 18

In this tutorial we will show you how to install Oracle Java on your Ubuntu 18.10 LTS. For those of you who didn’t know, Java is a programming language and computing platform. It was first released by Sun Microsystems in 1995. Many programs and scripts that require Java to run it, but usually Java are not installed by default on a VPS or Dedicated Server.

This article assumes you have at least basic knowledge of Linux, know how to use the shell, and most importantly, you host your site on your own VPS. The installation is quite simple and assumes you are running in the root account, if not you may need to add ‘sudo’ to the commands to get root privileges. I will show you through the step by step installation JRE (Java Runtime Environment) and JDK (Java Development Kit) on Ubuntu 18.10 Cosmic Cuttlefish.
Install Oracle Java on Ubuntu 18.10 Cosmic Cuttlefish

Step 1. First make sure that all your system packages are up-to-date by running these following apt-get commands in the terminal.

sudo apt-get update
sudo apt-get upgrade

Step 2. Installing Oracle Java on Ubuntu 18.10.

Method 1.

Run the following commands to install the Oracle JDK by Oracle:

sudo apt install openjdk-11-jdk

Method 2.

Using Webupd8 Team’s PPA repository we can install Oracle Java on Ubuntu automatically using the apt command:

sudo add-apt-repository ppa:webupd8team/java
sudo apt update
sudo apt install oracle-java8-set-default

Please note that during the Java installation process, you will have to accept the Oracle License agreement in order to complete the installation.

Verify Installed Java version.

java -version

Result:

java 10.0.2 2018-07-17
Java(TM) SE Runtime Environment 18.3 (build 10.0.2+13)
Java HotSpot(TM) 64-Bit Server VM 18.3 (build 10.0.2+13, mixed mode)

If we have multiple Java versions installed on the server we can change the default version using the update-alternatives system:

update-alternatives --config java

Congratulation’s! You have successfully installed Java. Thanks for using this tutorial for installing Oracle Java (JRE or JDK) on Ubuntu 18.10 Bionic Beaver system. For additional help or useful information, we recommend you to check the official Java web site.

You Might Also Like: How To Install Oracle Java on Ubuntu 17.04

How to fix Potential for Information Disclosure in CakePHP

fix Potential for Information Disclosure in CakePHP

The default application skeleton contained a beforeRender() method on the AppController that could potentially lead to unwanted information disclosure in your application. The unsafe default code was present between 3.1.0 and 3.5.0 of the application skeleton.

Risks

The default beforeRender hook would automatically serialize all view variables into JSON/XML if the _serialize view variable was not defined by the controller action. Controller methods that define the _serialize variable would behave correctly and only expose the named variables.

This behavior is triggered by the AppController and ErrorController loading RequestHandlerComponent, which configures the View class to be used based on the client’s Accept header. Then code in AppController::beforeRender() would enable all view variables to be serialized if no variables were explicitly listed.

The default controllers generated by bake set the _serialize view variable. This helps limit the impact, but could still lead to unwanted information exposure if entity classes are not correctly configured.

How to fix

You can fix the potential for information disclosure by modifying your application code. Unfortunately we cannot resolve this problem for you through a patch release of CakePHP or its appplication skeleton.

If you don’t have ErrorController in your src/Controller directory (CakePHP <= 3.3)

If you are using CakePHP 3.3.0 or greater and do not have an ErrorController in your application, you should download an ErrorController and put it into your src/Controller directory.

If you don’t use JSON/XML response based on client requests

  • Remove $this->loadComponent(‘RequestHandler’) from the initialize() method of your AppController and ErrorController.
  • Remove $this->set(‘_serialize’, true); from the beforeRender() of your AppController.

If you use JSON/XML response based on client requests

  • Remove $this->set(‘_serialize’, true); from the beforeRender() of your AppController.
  • Remove $this->set(‘_serialize’, [ (variable names) ]) from all controller actions, that should not return JSON/XML.
  • Add $this->set(‘_serialize’, [ (variable names) ]) explicitly to some actions of your controllers, which you want to return JSON/XML.

While we have no reports of information disclosure in the wild, this issue was found by Kurita Takashi and we felt this was important to disclose.

Read From Official CakePHP blog

How To Fix 504 Gateway Time-out on Nginx Web Server

Fix 504 Gateway Time-out on Nginx

In this tutorial we are going to learn how to fix 504 gateway time-out on Nginx web server on Linux server. If you run a Nginx web server you may have already encountered the annoying 504 Gateway Time-out errors. This is pretty common error, are generated most probably by the PHP max execution time limit or by the FastCGI read timeout settings.

This article assumes you have at least basic knowledge of linux, know how to use the shell, and most importantly, you host your site on your own VPS. The installation is quite simple and assumes you are running in the root account, if not you may need to add ‘sudo’ to the commands to get root privileges. I will show you through the step by step installation to fix nginx 504 gateway timeout on the nginx webserver.

Fix 504 Gateway Time-out on Nginx

Changes in php.ini

Try raising max_execution_time setting in php.ini file (CentOS path is /etc/php.ini):

 max_execution_time = 150

Changes in PHP-FPM

Try raising request_terminate_timeout setting in php.ini file (CentOS path is /etc/php-fpm.d):

 request_terminate_timeout = 150

Changes in Nginx Config

Finally, add fastcgi_read_timeout variable inside our Nginx virtual host configuration:

location ~* \.php$ {
    include         fastcgi_params;
    fastcgi_index   index.php;
    fastcgi_read_timeout 150;
    fastcgi_pass    127.0.0.1:9000;
    fastcgi_param   SCRIPT_FILENAME    $document_root$fastcgi_script_name;
}

Reload PHP-FPM and Nginx

 
service php-fpm restart
service nginx restart

For Nginx as Proxy for Apache web server, this is what you have to try to fix the 504 Gateway Timeout error:

Add following variables to nginx.conf file:

proxy_connect_timeout       600;
proxy_send_timeout          600;
proxy_read_timeout          600;
send_timeout                600;

Once complete, simply reload Nginx:

 service nginx restart

Congratulation’s! You have successfully fix error nginx 504 gateway time out. Thanks for using this tutorial for fix 504 gateway timeout error in Linux system. For additional help or useful information, we recommend you to check the official Nginx web site.

How To Enable Gzip Compression on Nginx CentOS

Enable Gzip Compression on Nginx CentOS

Nginx is one of the most popular web servers in the world and is responsible for hosting some of the largest and highest-traffic sites on the internet. It is more resource-friendly than Apache in most cases and can be used as a web server or a reverse proxy. So today we’re going to learn how to setup enable Gzip compression on Nginx on CentOS 6 or 7. Compressing your scripts and images is a good idea to optimize your website’s load times.

This article assumes you have at least basic knowledge of linux, know how to use the shell, and most importantly, you host your site on your own VPS. In this post, I will talk about an easy way to enable GZIP compression on nginx servers. It’s really not that difficult. Let’s start with Nginx.

Enable Gzip Compression on Nginx

Step 1. Configure nginx.conf (/etc/nginx/nginx.conf)

gzip on;
gzip_http_version 1.0;
gzip_comp_level 2;
gzip_proxied any;
gzip_min_length  1100;
gzip_buffers 16 8k;
gzip_types text/plain text/html text/css application/x-javascript text/xml application/xml application/xml+rss text/javascript;
gzip_disable "MSIE [1-6].(?!.*SV1)";
gzip_vary on;

Step 2. Now, you simply need to restart your server.

 service nginx restart

If you wish to test if GZIP is enabled, use this command:

 curl -H "Accept-Encoding: gzip" -I https://wpcademy.com

With that file now in place, restart your server and you will now be serving site assets with gzip compression. Google takes site speed into account when ranking and placing your sites in their search engine so do your users a favor and strive for the fastest site possible, especially for mobile users.

Congratulation’s! You have successfully enable Gzip on Nginx. Thanks for using this tutorial for enable gzip compression Nginx on Linux system. For additional help or useful information, we recommend you to check the official Nginx web site.

How To Hide Nginx Server Default Header

Hide Nginx Server Default Header

In this tutorial we will learn How To Hide Nginx Server Default Header on your Linux server.  In default Nginx configuration, the server sends HTTP Header with the information of Nginx version number of the Server. The HTTP response header “Server” displays the version number of the server. This information can be used to try to exploit any vulnerabilities in the Nginx, specially if you are running an older version with known vulnerabilities.

Hiding nginx version is very easy and it’s done using server_tokens directive. This tutorial helps you customize the name of the server on your host.

Hide Nginx Server Header

Step 1. Go to nginx/conf folder (it can be located at /etc/nginx/nginx.conf or /usr/local/nginx/conf/nginx.conf file)

Step 2. Hide Nginx version.

Add following in nginx.conf under server section:

 server_tokens off;

Step 3. Restart nginx web server:

 service nginx restart

Let’s verify if we see the server information now:

curl -I https://wpcademy.com/
HTTP/1.1 200 OK
Server: nginx
Date: Sun, 03 Aug 2014 06:06:52 GMT
Content-Type: text/html; charset=UTF-8
Connection: keep-alive
Vary: Accept-Encoding
X-Pingback: https://wpcademy.com/xmlrpc.php

Congratulation’s! You have successfully hide Nginx version. For additional help or useful information, we recommend you to check the official Nginx web site.

You Might Also Like: How To Install Nginx Web Server On CentOS

How To Check Disk Space Usage on Linux With Ncdu Utility

Disk Space Usage on Linux With Ncdu

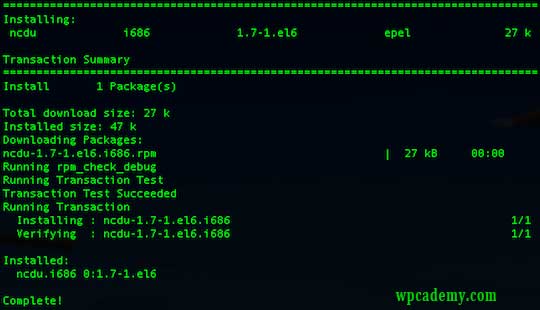
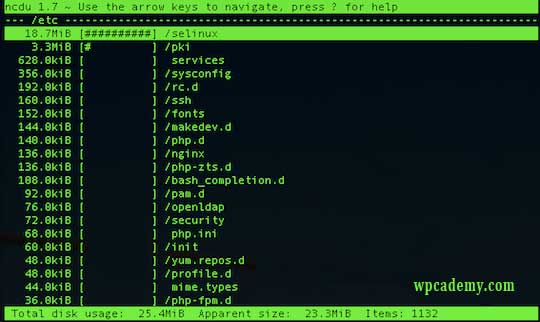
Ncdu (NCurses Disk Usage)  is a command line tool to view and analyse disk space usage on linux. It can drill down into directories and report space used by individual directories. This way it is very easy to track down space consuming files/directories. This article walks you through the process of installing and using NCDU on a Linux server.

In this tutorial we will learn How To Check Disk Space Usage on Linux With Ncdu Utility on linux server.

Check Disk Space Usage With Ncdu Utility

 apt-get install ncdu -y

Install ncdu on RHEL/CentOS

 yum install ncdu -y

Ncdu-linux

Ncdu sample usage

To start  ncdu type following command on your terminal:

 ncdu

Ncdu-sample-usage

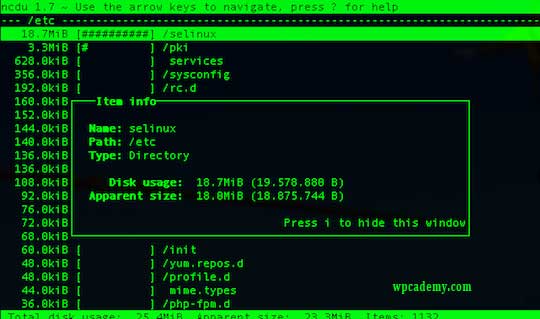
To get more information on selected directory press “i” button:

Disk Space Usage on Linux With Ncdu

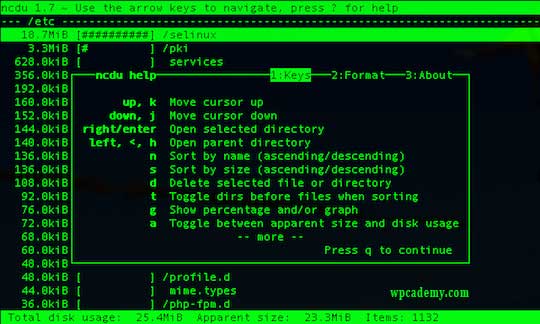
To see help window with ncdu available options press  “Shift+?” key combination. You can use arrow keys to move up and down for more options.

Ncdu windows help

For command line options and other information, go through the man page of ncdu command.

If you are not satisfied with the standard du command and are looking for a fast, ncurses based du-like utility then try out ncdu. It provides lots of customization options. You’ll definitely like it. Follow Wpcademy Facebook page

You Might Also Like: How To Install NCDU on Ubuntu 17.04

How To Install Nginx Web Server On CentOS

How To Install Nginx Using Yum Command On CentOS

Nginx is one of the most popular web servers in the world and is responsible for hosting some of the largest and highest-traffic sites on the internet. It is more resource-friendly than Apache in most cases and can be used as a web server or a reverse proxy.

This article assumes you have at least basic knowledge of linux, know how to use the shell, and most importantly, you host your site on your own VPS. So today I’m going to show you how to setup Nginx webserver on CentOS 6 or 7. In this tutorial we will learn how to install and configuration of Nginx web server on your CentOS server.

Install Nginx Using Yum Command On CentOS

Step 1. To install, first you must add the Webtatic yum repository information corresponding to your CentOS/RHEL version to yum:

CentOS/RHEL 7.x:

rpm -Uvh https://mirror.webtatic.com/yum/el7/epel-release.rpm
rpm -Uvh https://mirror.webtatic.com/yum/el7/webtatic-release.rpm

CentOS/RHEL 6.x:

 rpm -Uvh https://mirror.webtatic.com/yum/el6/latest.rpm

Step 2. Install nginx package and dependencies using the below command :

 yum install nginx16

Starting and stopping the server

To start the Nginx server, issue the following command:

 service nginx start

Top stop the Nginx server, issue the following command:

 service nginx stop

Configuration files/folders

  • The main configuration file for Nginx is /etc/nginx/nginx.conf
  • Virtual hosts are defined in /etc/nginx/sites-available/default
  • PHP will be configured in /etc/php5/fpm/php.ini

Before you close that terminal window, it’s necessary to set the Nginx service to start at boot. Just issue the following command:

 chkconfig nginx on

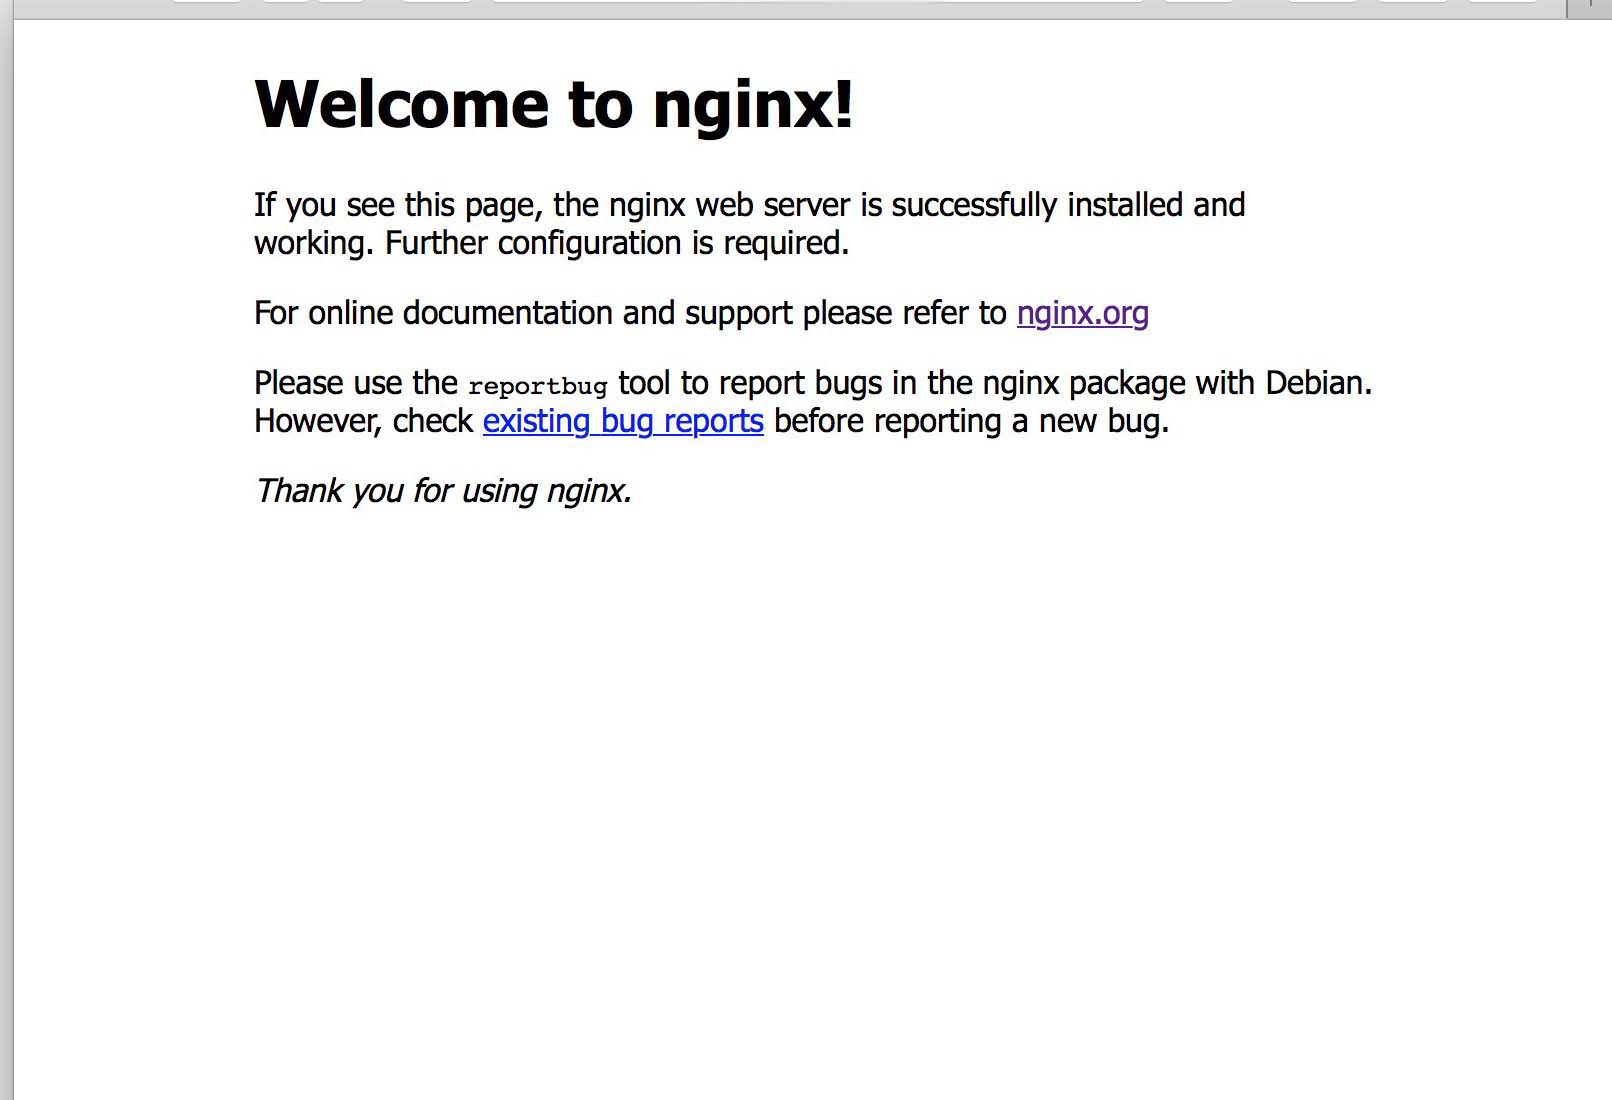
Navigating to your Server’s IP address (assuming you have no other server listening on port 80), you will be greeted with the standard welcome page:

nginx-default

The steps above should produce a running Nginx which serves the Nginx default pages on port 80. We’ll start working through various configurations and optimizations to round out the series. Enjoy your new web server!

Click here to learn How To Install Nginx Web Server on Ubuntu