How to install and configure shadowsocks in ubuntu machine

shadowsocks wpcademy

Installing and configuring Shadowsocks on an Ubuntu machine involves several steps, including updating the system, installing necessary dependencies, downloading and setting up Shadowsocks, and configuring it to run as a service. Here’s a step-by-step guide to help you through the process:

Step 1: Update the System

First, ensure your system is up to date:

sudo apt update
sudo apt upgrade -y

Step 2: Install Necessary Dependencies

Shadowsocks requires Python and pip (Python package manager). Install them with:

sudo apt install python3 python3-pip -y

Step 3: Install Shadowsocks

Use pip to install Shadowsocks:

sudo pip3 install shadowsocks

Step 4: Configure Shadowsocks

Create a configuration file for Shadowsocks. The default location for the configuration file is /etc/shadowsocks/config.json. You might need to create the directory first:

sudo mkdir -p /etc/shadowsocks

Then create the configuration file:

sudo nano /etc/shadowsocks/config.json

Here’s a sample configuration:

{
    "server": "0.0.0.0",
    "server_port": 8388,
    "local_address": "127.0.0.1",
    "local_port": 1080,
    "password": "your_password",
    "timeout": 300,
    "method": "aes-256-cfb",
    "fast_open": false
}

Replace "your_password" with a strong password. You can also adjust the "server_port" and "method" as needed.

Step 5: Run Shadowsocks

To start Shadowsocks manually, use the following command:

sudo ssserver -c /etc/shadowsocks/config.json

Step 6: Configure Shadowsocks to Run as a Service

To ensure Shadowsocks starts automatically on system boot, create a systemd service file:

sudo nano /etc/systemd/system/shadowsocks.service

Add the following content to the file:

[Unit]
Description=Shadowsocks Proxy Server
After=network.target

[Service]
ExecStart=/usr/local/bin/ssserver -c /etc/shadowsocks/config.json
Restart=on-failure

[Install]
WantedBy=multi-user.target

Save and close the file. Then, enable and start the Shadowsocks service:

sudo systemctl enable shadowsocks
sudo systemctl start shadowsocks

Step 7: Verify the Service

Check the status of the Shadowsocks service to ensure it is running correctly:

sudo systemctl status shadowsocks

If everything is set up correctly, the status should indicate that Shadowsocks is active and running.

Additional Configuration

For enhanced security and performance, consider configuring additional settings such as:

Firewall Rules: Allow the Shadowsocks server port through the firewall.

sudo ufw allow 8388/tcp
sudo ufw allow 8388/udp
sudo ufw enable
  • Optimizations: Adjust TCP settings or use fast_open if your kernel supports it.

By following these steps, you should have a fully functional Shadowsocks server running on your Ubuntu machine.

Read more from Shadowsocks documentation

Initial Server Setup with Ubuntu

ubuntu-server-setup

Introduction
As part of the initial setup for a brand-new Ubuntu server, you should carry out a few crucial configuration tasks. These changes will improve your server’s security and usability and lay a strong foundation for further activities.

Step 1 — Logging in as root

log in now as the root user using the following command (substitute the highlighted portion of the command with your server’s public IP address

ssh root@your_server_ip

Accept the warning about host authenticity if it appears. If you are using password authentication, provide your root password to log in.

The root user is the administrative user in a Linux environment that has very broad privileges. Because of the heightened privileges of the root account, you are discouraged from using it on a regular basis. This is because the root account is able to make very destructive changes, even by accident.

The next step is setting up a new user account with reduced privileges for day-to-day use.

Step 2 — Creating a New User

Once you are logged in as root, you’ll be able to add the new user account. In the future, we’ll log in with this new account instead of root.

This example creates a new user called john, but you should replace that with a username that you like:

adduser john

You will be asked a few questions, starting with the account password.

Enter a strong password and, optionally, fill in any of the additional information if you would like. This is not required and you can just hit ENTER in any field you wish to skip.

Step 3 — Granting Administrative Privileges
Now we have a new user account with regular account privileges. However, we may sometimes need to do administrative tasks.

To avoid having to log out of our normal user and log back in as the root account, we can set up what is known as superuser or root privileges for our normal account. This will allow our normal user to run commands with administrative privileges by putting the word sudo before the command.

To add these privileges to our new user, we need to add the user to the sudo group.

usermod -aG sudo john

Step 4 — Setting Up a Basic Firewall
Ubuntu servers can use the UFW firewall to make sure only connections to certain services are allowed. We can set up a basic firewall using this application.

Applications can register their profiles with UFW upon installation. These profiles allow UFW to manage these applications by name. OpenSSH, the service allowing us to connect to our server now, has a profile registered with UFW.

You can see this by typing:

ufw app list
Output
Available applications:
  OpenSSH

We need to make sure that the firewall allows SSH connections so that we can log back in next time. We can allow these connections by typing:

ufw allow OpenSSH

Afterwards, we can enable the firewall by typing:

ufw enable

Type y and press ENTER to proceed. You can see that SSH connections are still allowed by typing:

ufw status

As the firewall is currently blocking all connections except for SSH, if you install and configure additional services, you will need to adjust the firewall settings to allow traffic in.

Step 5 — Enabling External Access for Your Regular User

Now that we have a regular user for daily use, we need to make sure we can SSH into the account directly.

If you logged in to your root account using a password, then password authentication is enabled for SSH. You can SSH to your new user account by opening up a new terminal session and using SSH with your new username:

ssh john@your_server_ip

After entering your regular user’s password, you will be logged in. Remember, if you need to run a command with administrative privileges, type sudo before it like this:

sudo command_to_run

You will be prompted for your regular user password when using sudo for the first time each session (and periodically afterwards).

Easy Guide to Fix “Site contains harmful programs” Error in WordPress

In this tutorial, we will learn how to fix this site ahead contains harmful programs error in WordPress.

Reasons for This Site Contains Harmful Programs Error

The number one reason for this error is that your website is hacked and is believed to be distributing a malware. This code spreads itself from the infected website to website visitors and can even spread to other websites.

Google marks a website with this warning if they find any suspicious code that could be a malware or trojan. This warns users to be careful when visiting these sites.

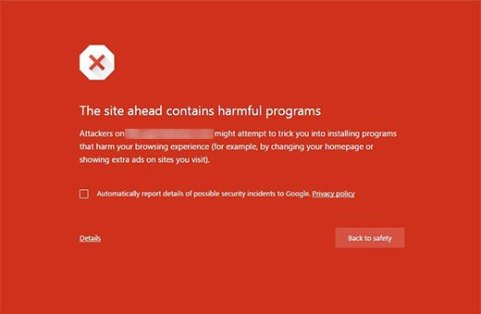
This site contains harmful programs error in Google Chrome

Another common reason for this error is showing ads from low quality advertising networks. These networks may sometime display ads linking to websites distributing malicious code.

To find this malicious code on your site, take a look at our tutorial on how to scan your WordPress site for potentially malicious code.

You can also check your site using Google’s safe browsing analysis tool.

All you need to do is add your site’s domain name as the query parameter to the URL like this:

https://www.google.com/safebrowsing/diagnostic?site=YourDomain.com

Now that you know why the error happens, let’s take a look at how to fix it.

Fix This Site Contains Harmful Program Error

Before we start, please make a complete backup of your WordPress site. If you already had a backup system in place, then keep it handy as you may need it.

Removing malware and recovering a website can become a very complicated task. Sometimes even when you clean your site thoroughly, the malicious code can keep coming back until you find and remove the backdoor placed on your site.

Backdoor is referred to a method of bypassing normal authentication and gaining the ability to remotely access the server while remaining undetected. Finding the backdoor is not an easy task either. It could be a compromised password, unsafe file permissions, or a cleverly disguised file. We have a detailed guide on how to find a backdoor in a hacked WordPress site and fix it.

Once you have successfully removed the backdoor, you will still need to thoroughly check all your files and database for any malicious code.

As you can see that cleaning up and infected WordPress site can be a very tedious task. This is why we use Sucuri on all our websites.

Sucuri

Sucuri is a website monitoring and security service for WordPress users. It monitors your site 24/7 for suspicious activity, blocks any hacking attempts on your site, and clean up your site of any malware.

Getting The Warning Removed by Google

Once you are absolutely certain that your website is clean, then you can ask Google to remove this warning from search results.

You will need to use Google’s Webmaster tools for that. If you have not already added your site to webmaster tools, then follow our tutorial on how to add your WordPress site to Google webmaster tools.

Once there, you need to click on the security issues section in webmaster tools. This page will list any security issues Google may have found on your website. You will also see the links to resources on clean up on your site.

Once you have fixed the issues, click on the checkbox and request a review.

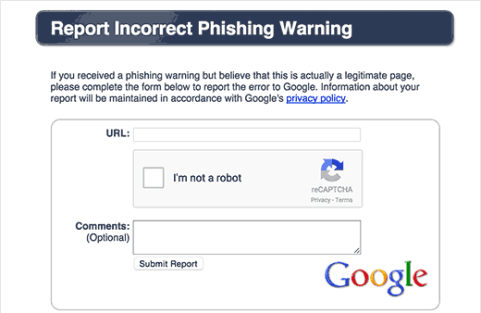
In case you do not see any security issues in Google Webmaster tools, then you should the following form to report incorrect phishing warning.

Incorrect phishing warning report

We hope this tutorial helped you fix this site ahead contains harmful programs error.

Easy Guide to Automatically Change WordPress SALT Keys

In this article, we will show you how to automatically change WordPress SALT keys without any code.

What are SALT Security Keys?

Salt Keys aka security keys in WordPress are the variables that store your login credentials in an encrypted form. By default, WordPress saves your login information in cookies which given the right conditions can be compromised specially when using public computers.

One way to stay ahead of this risk is to change your security keys manually from your wp-config.php file that is available in the root folder of your WordPress site. The security and SALT keys will look like this:

Security Config Keys

We recommend changing these codes on a regular basis to improve your website security (every 3 – 6 months). You can manually generate the Salt keys from WordPress.org secret-key service.

While changing the keys manually isn’t hard, it’s still time consuming to manually edit a core file and upload via FTP. In case, you don’t have coding knowledge, or don’t have the time, then this solution is for you.

Let’s take a look at how easily you can set an automated process to change security and SALT keys in WordPress:

How to Change WordPress SALT Keys?

The first thing you need to do is install and activate Salt Shaker plugin. For more details, see our guide on how to install a WordPress plugin.

Once the plugin is activated, you need to go to Tools » Salt Shaker page in your WordPress admin to set a schedule for changing the SALT keys.

You need to check the option for automatically changing the Salt keys and then select your schedule from the dropdown. You can automatically change the authentication keys daily, weekly, and monthly.

In case you want to change the security and Salt keys manually, then you can do so by clicking on the Change Now button.

Note: Every time your WordPress SALT keys are changed, you and other users will be automatically logged out from your WordPress site on all devices. You can easily re-login to your WordPress dashboard by going to the WordPress login page.

We hope this article helped you automatically change the WordPress SALT keys.

How to Scan & Detect Malware in WordPress Themes – Easy Guide

scan and detect malware in wordpress theme

WordPress Themes are ready-made layouts created for WordPress — one of the most popular content management systems used for blogging, news websites and e-commerce projects. These templates are custom solutions for building an online resource from scratch or easily revamping an existing one.

Need To Make Sure That WordPress Theme Is Free From Malware? In this blog, we will help you scan your WordPress website theme for hidden malware or malicious code along-with best plugins you can use to scan your WordPress theme for potentially malicious code.

What is A Nulled WordPress Theme?

Nulled means Cracked or Hacked Version of a WordPress Theme. Basically,its a Premium WordPress Theme which is available for free (or illegally). These themes mostly come up with the back door hack for entering your website which loosens the website security and makes it prone to hacking.

Why WordPress Themes Are infected By Malware?

WordPress is featuring premium themes in its latest versions which are highly secure and malware insusceptible. Unfortunately when it comes to free themes, they are the most easily targeted preys for web attackers. The reason behind is that downloading a free theme from an unknown source or pirated websites may affect the security of your websites.

Such themes are poorly coded and lead to create unauthorized access to websites through loopholes. An unknown source of theme may be created by a hacker who tweaks it for their own profits. There are several reasons behind the exploitation of such themes.

Some of the common reasons are:

  • ​To get a back link from the blog posts on your websites
  • For redirecting your website to spam links
  • To add adverts.
  • To create a backdoor to your website

Look For Presence Of Malicious Code in WordPress Themes

Before discussing the steps to How to Detect Malicious Code or Malware on WordPress Themes, let us hammer out the locations where the malicious code is generally inserted by the hackers. The two common locations on target of smart hackers are the footer.php file and the style.css file.

Apart from this, you should manually check all the files within the theme. The WordPress themes might include some basic files for its functioning. But, if you find additional files that are called without the .php function then your themes are injected with serious malware.

Signs that suspect your WordPress themes are infected with malicious content:

  1. Google Warning Messages: Your website will be displayed with a malware warning message with either an entirely blocked website or partially blocked website.
  2. WordPress White Screen of Death: When your website suddenly starts showing white screen of death, it means that your site is probably exploited with malware infection.
  1. .htaccess pirate: If your .htaccess file is corrupted, it keep redirecting your website to other spam links which you can’t understand.
  2. Popups: When there are several popup ads running on your website start redirecting towards malicious links or other popups if you tend to close, this means your website is a victim of malware exploitation.

Detect Malicious code in  WordPress Themes?

Performing a Google search is a good way to check if there’s a malicious code in a particular WordPress theme. If someone out there has found a malicious code in a theme they got from the same location, such a person must have sounded out a warning to others.

Initial step in discovering hidden malware or malicious code in your WordPress theme is to check if the files contained in the theme are all required

  • Scan WordPress Theme before Installation

The most frequent technique to detect malware on your installed themes is to scan your entire website. This will scan all the files on your website. You can do so in several ways:

  • Ask Google:

Google Safe Browsing is a tool that alerts the webmasters when their websites are compromised with unsafe content or malicious files.  You can use this tool to diagnose your website for surreptitious malware and resolve it.

https://www.google.com/safebrowsing/diagnostic?site=

Insert your website url in the above mentioned link and press ENTER. For example –

https://www.google.com/safebrowsing/diagnostic?site=example.com

When you press ENTER, it will provide you the Safe Browsing status of the website with the unsafe content found on your website.

  • Search Files

Make a cross file search for eval. If you find this one then the author (or someone who ripped it) has something to hide. Read more about eval(base64_decode hack.


  • Tools & Scanners to Detect Malware and Malicious in WordPress Themes

You can also use free malware scanners for scanning your website. A short overview of such scanners:

  • PCRisk: It is a free online tool that can be utilized to can any website for malicious codes, vulnerability exploits, infected files and other suspicious activities.
  • SiteGuarding.Com: Another popular online tool to check your website for malware and security issues.
  • After downloading the plugin or theme, The first thing you should do is to check for virus, trojans and other worms using Virus Total.
scan wp theme with virus total

  • WP Hacked Help: A free online wordpress malware scanner tool. You can scan your website for potential malware with this tool.


WordPress Theme Checker Plugins To Detect Malicious Code

Sometimes people download free themes from anywhere other the author’s page. The themes installed this way are poorly coded which makes it easier for hackers to insert back links to their websites.

Another effective way to deal with malicious code disguised in your free WordPress themes is to install best plugins that are designed for this purpose only.


​1. Theme Authenticity Checker (TAC)

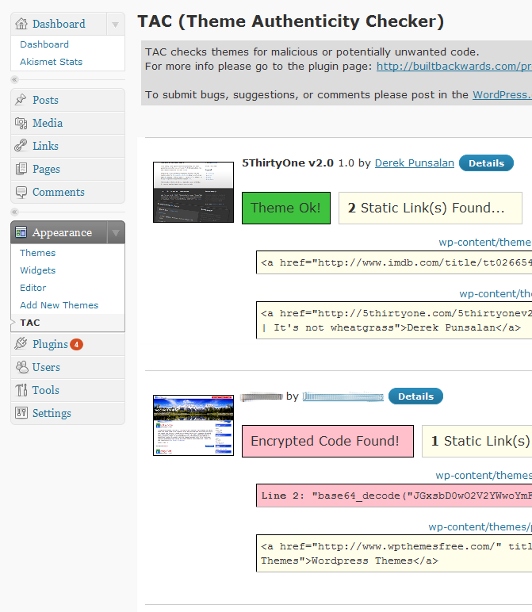
tac plugin for wp theme check

TAC scans the source files of all the WordPress themes installed on your website. It takes you to the particular theme, the line number and a small piece of the distrusted code​ where the suspected malware is found. You can analyze the code and hence, easily​ remove the malware. To download this plugin, click here.

2. Quttera Web Malware Scanner​

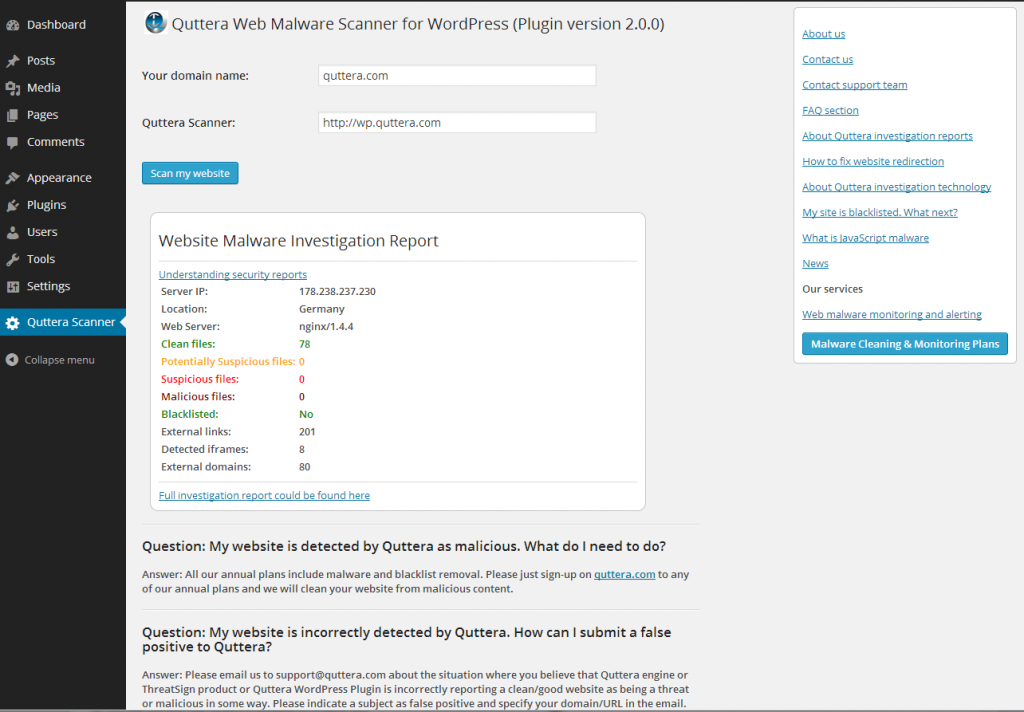
quttera web malware scanner for wordpress

This plugin is specialised in detecting hidden malware, viruses malicious codes, spam links, blacklisting status and much more. So, you can use this tool to scan your website for free by installing this plugin. Quttera​ offers different malware cleanup plans for websites. To check these plans, you can visit the website.

​3. BulletProof Security:

BulletProof Security is one of the best wordpress security plugins of 2018, it comes with a number of salient features for WordPress security protection. This plugin has MS Malware scanner to scan each and every file present on your WordPress website. It also offers .htaccess Website Security Protection (Firewalls). Other features are login security. database backups, anti-spam and regular monitoring of website for website protection.

4. Anti-Malware​:

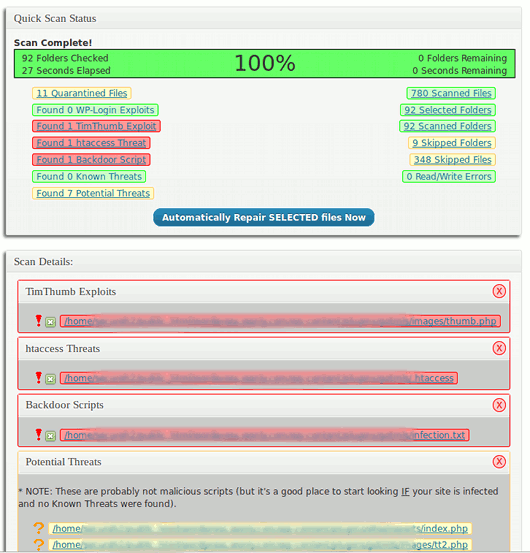
gotmls plugin for wp theme

Anti Malware is one of he popular plugins used to scan and detect malware from WordPress websites. Free version of WordPress offers detection of malware whereas you can also choose premium version for additional features. A premium Anti Malware plugin checks the website for brute-force attacks and DDos Attacks. You can get it here for free.

Best Tips To Make Sure That WordPress Theme is Safe.

  • Never download any free theme from other than author’s website. It can make your website vulnerable.
  • Scan your website regularly with reputable WP scanner.  It checks your website for WordPress infections like Malicious Redirects, Malware Injections, Backdoors, Google Blacklisting. We start cleaning up your website once your request is submitted.
  • Use Tools to Check Your Themes such as Themecheck.infoTheme Check & Exploit Scanner
  • Keep backup of your website at hand.
  • Make sure you have a highly secure hosting service.
  • Always use the latest version of WordPress.
  • Keep the plugins and themes up-to-date with the latest versions.

How To Install Mod_Security Apache on CentOS 7

Install Mod_Security Apache on CentOS 7

ModSecurity is an open source, cross platform web application firewall (WAF) developed by Trustwave’s SpiderLabs. It has a robust event-based programming language which provides protection from a range of attacks against web applications and allows for HTTP traffic monitoring, logging and real-time analysis. In this tutorial we will learn how To Install Mod_Security Apache on CentOS 7

This article assumes you have at least basic knowledge of Linux, know how to use the shell, and most importantly, you host your site on your own VPS. The installation is quite simple and assumes you are running in the root account, if not you may need to add ‘sudo’ to the commands to get root privileges. I will show you through the step by step installation ModSecurity on a CentOS 7 server.

Install Mod_Security Apache on CentOS 7

Step 1. First, let’s start by ensuring your system is up-to-date.

yum clean all
yum -y update

Step 2. Installing Mod_Security Apache on CentOS

Install Dependencies for mod_security:

yum install gcc make httpd-devel libxml2 pcre-devel libxml2-devel curl-devel git

Next, download latest stable release of mod_security source code from their official website to your server:

wget https://www.modsecurity.org/tarball/2.9.3/modsecurity-2.9.3.tar.gz
tar xzf modsecurity-apache_2.9.3.tar.gz
cd modsecurity-apache_2.9.3
./configure
make install
cp modsecurity.conf-recommended /etc/httpd/conf.d/modsecurity.conf
cp unicode.mapping /etc/httpd/conf.d/

Step 3. Configuring Mod_Security.

# nano /etc/httpd/conf/httpd.conf
LoadModule security2_module modules/mod_security2.so

Now set the basic rule set in your httpd.conf file. Add the following lines of code at the end of the file:

<IfModule security2_module>
    Include conf.d/modsecurity.conf
</IfModule>

Save the changes and restart Apache:

systemctl restart httpd

Step 4. Download and configure OWASP (Open Web Application Security Project) core rule set for a base configuration.

cd /etc/httpd
git clone https://github.com/SpiderLabs/owasp-modsecurity-crs.git
mv owasp-modsecurity-crs modsecurity-crs
cd modsecurity-crs
cp modsecurity_crs_10_setup.conf.example modsecurity_crs_10_config.conf

Open the Apache configuration file again, and add the following lines at the end of the file:

# nano /etc/httpd/conf/httpd.conf

Include modsecurity-crs/modsecurity_crs_10_config.conf
Include modsecurity-crs/base_rules/*.conf

Next, restart the Apache service to enable mod_security module:

systemctl restart httpd

Congratulation’s! You have successfully installed Mod_Security. Thanks for using this tutorial for installing Mod_Security on CentOS 7 system. For additional help or useful information, we recommend you to check the official ModSecurity website.

How to set correct file permission for your WordPress website

file permission wordpress

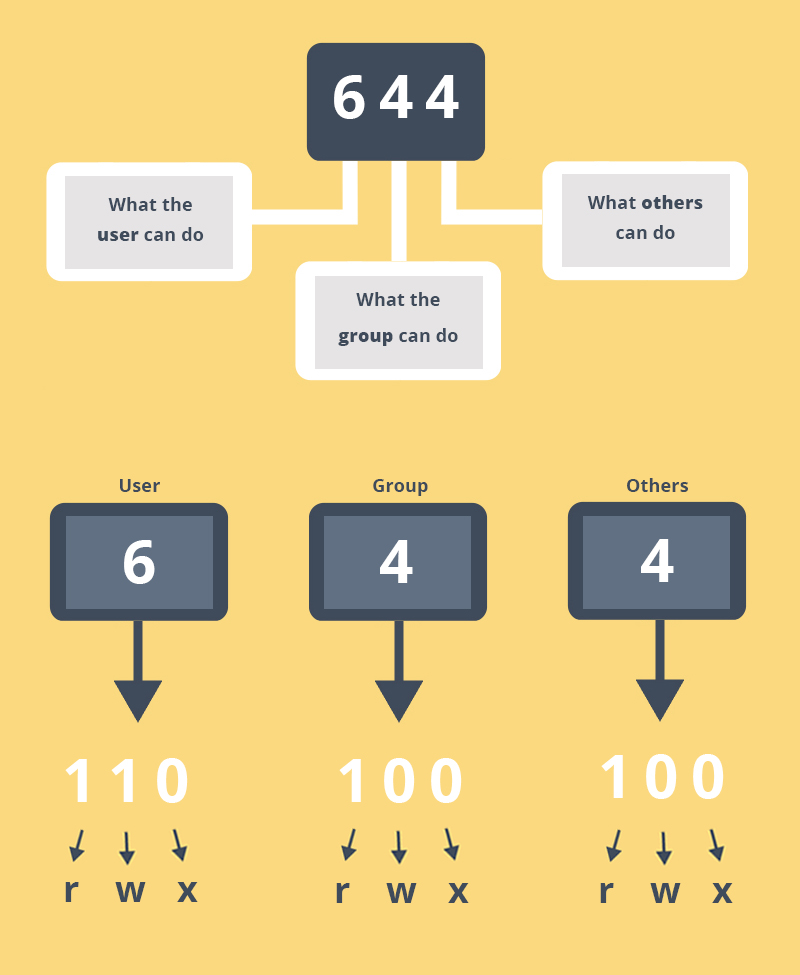
There a number of ways to accomplish this change. There are also a number of variations to these permissions that include changing them to be more restrictive. These however are the default recommendations. Check with your host before making permissions changes as they can have adverse affects on the performance and availability of your site.

Avoid having any file or directory set to 777. The default permission scheme should be:

Folders – 750
Files – 640

understanding file permission in wp

When you setup WP you (the webserver) may need write access to the files. So the access rights may need to be loose.

chown www-data:www-data  -R * # Let Apache be owner
find . -type d -exec chmod 755 {} \;  # Change directory permissions rwxr-xr-x
find . -type f -exec chmod 644 {} \;  # Change file permissions rw-r--r--

After the setup you should tighten the access rights, according to Hardening WordPress all files except for wp-content should be writable by your user account only. wp-content must be writable by www-data too.


chown :  -R * # Let your useraccount be owner
chown www-data:www-data wp-content # Let apache be owner of wp-content

Maybe you want to change the contents in wp-content later on. In this case you could

  • Temporarily change to the user to www-data with su,
  • Give wp-content group write access 775 and join the group www-data or
  • Give your user the access rights to the folder using ACLs.

Whatever you do, make sure the files have rw permissions for www-data.

For a detailed explanation of unix file permissions, see File system permissions – on Wikipedia