How To Install GoAccess on CentOS 7

GoAccess on CentOS 7

GoAccess is a real time web log analyzer and a visualizer for Both Linux and Unix operating systems. It functions as an interactive app from the Terminal, and after models also supplies an HTML report, which can be Conveniently viewed in the browser.

Table of Contents

Step 1. First let’s start by ensuring your system is up-to-date.

Step 2. Installing GoAccess.

Step 3. Using GoAccess.


Prerequisites

This article assumes you have at least basic knowledge of Linux, know how to use the shell, and most importantly, you host your site on your own VPS. The installation is quite simple and assumes you are running in the root account, if not you may need to add ‘sudo’ to the commands to get root privileges. I will show you through the step by step installation GoAccess open source real-time web log analyzer on a CentOS 7 server.
Install GoAccess on CentOS 7

Step 1. First let’s start by ensuring your system is up-to-date.

yum clean all
yum -y update

Step 2. Installing GoAccess.

Method 1.

Execute the following command to install GoAccess:

yum -y install goaccess

Method 2.

If using another operating system, you can search for pre-compiled binaries at the official website:

wget http://tar.goaccess.io/goaccess-1.2.tar.gz
tar xvzf goaccess-1.2.tar.gz
cd goaccess-1.2
./configure --enable-utf8 --enable-geoip=legacy
make && make install

Step 3. Using GoAccess.

GoAccess has many options to analys your log files, the most simple way you can use to see your log file with GoAccess is below:

goaccess /var/log/boot.log

You can see the whole flags and capabilities of GoAccess with the command below:

goaccess --help

GoAccess live reporting in HTML format:

First, install Apache as our web server:

yum install httpd

After the installation process is finished, execute the following commands to start your Apache service:

systemctl start httpd
systemctl enable httpd

For example, using the following command will create an analyzed HTML file from the Apache access log and place it in Apache’s default document root:

goaccess /var/log/httpd/access_log --log-format=COMBINED -a -o /var/www/html/report.html

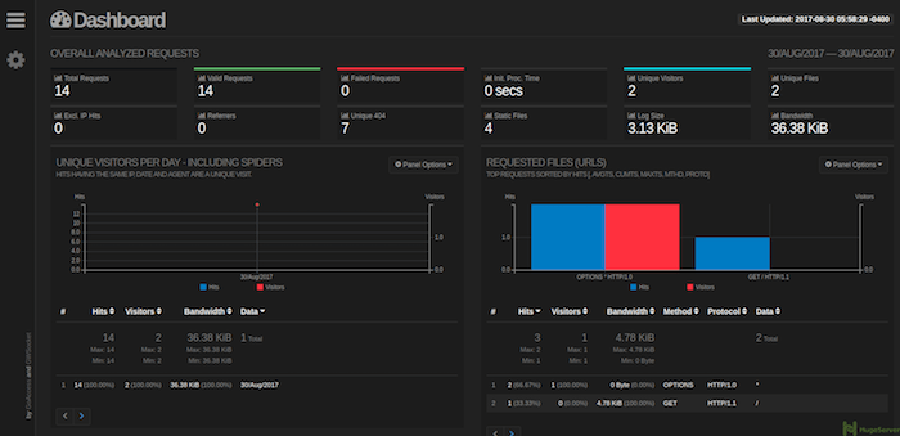
Now you can open your browser, Enter your IP address or your Domain name and add “/report.html” in the end to see your HTML output:
goaccess-dashboard
Congratulation’s! You have successfully installed GoAccess. Thanks for using this tutorial for installing GoAccess open source real-time web log analyzer on CentOS 7 systems. For additional help or useful information, we recommend you to check the official GoAccess web site.

How To Install Bolt CMS on Centos 7

Bolt CMS on Centos 7

Bolt CMS is a lightweight open source Content Management Tool, written in PHP and it’s built upon the Silex frame.

Table of Contents

Step 1. First let’s start by ensuring your system is up-to-date.

Step 2. Install LEMP server.

Step 3. Installing Composer.

Step 4. Installing Bolt CMS.

Step 5. Configure Nginx Web Server for Bolt CMS.

Step 6. Accessing Bolt CMS.

Prerequisites

This article assumes you have at least basic knowledge of Linux, know how to use the shell, and most importantly, you host your site on your own VPS. The installation is quite simple and assumes you are running in the root accge of Linount, if not you may need to add ‘sudo’ to the commands to get root privileges. I will show you through the step by step installation Bolt CMS on a CentOS 7 server.
Install Bolt CMS on Centos 7

Step 1. First let’s start by ensuring your system is up-to-date.

yum clean all
yum -y update

Step 2. Install LEMP server.

A CentOS 7 LEMP stack server is required. If you do not have LEMP installed, you can follow our guide here. Also install required PHP modules:

yum install php-gd php-imap php-ldap php-odbc php-pear php-xml php-xmlrpc php-mbstring php-mcrypt php-mssql php-snmp php-soap php-tidy curl curl-devel

Step 3. Installing Composer.

Download and install Composer by executing the following command:

curl -sS https://getcomposer.org/installer | php
mv composer.phar /usr/local/bin/composer

Step 4. Installing Bolt CMS.

Install Bolt CMS using the “composer create-project” command:

composer create-project bolt/composer-install:^3.3 /var/www/boltchedelics --prefer-dist

The installer will ask you if you want to use Bolt’s standard folder structure. Choose “yes” and proceed with the installation.

By default, Bolt is configured to use an SQLite database, since we will be using a MySQL database we need to change the settings in app/config/config.yml file and enter the details of the database we created previously:

nano /var/www/boltchedelics/app/config/config.yml
# database:
# driver: sqlite
# databasename: bolt

database:
 driver: mysql
 username: bolt
 password: your_bolt_passwd
 databasename: bolt

We will need to change some folders permissions:

chown -R nginx: /var/www/boltchedelics
find /var/www/boltchedelics -type d -exec chmod 755 {} \;
find /var/www/boltchedelics -type f -exec chmod 644 {} \;

Step 5. Configure Nginx Web Server for Bolt CMS.

Create a new Nginx virtual host:

nano /etc/nginx/conf.d/boltchedelics.conf

Add the following lines:

server {
 listen 80;
 server_name boltchedelics;

root /var/www/boltchedelics/public;
 index index.php;

access_log /var/log/nginx/boltchedelics.access.log;
 error_log /var/log/nginx/boltchedelics.error.log;

location / {
 try_files $uri $uri/ /index.php?$query_string;
 }

location = /bolt {
 try_files $uri /index.php?$query_string;
 }

location ^~ /bolt/ {
 try_files $uri /index.php?$query_string;
 }
 
 location ^~ /thumbs {
 try_files $uri /index.php; #?$query_string;
 
 access_log off;
 log_not_found off;
 expires max;
 add_header Pragma public;
 add_header Cache-Control "public, mustrevalidate, proxy-revalidate";
 add_header X-Koala-Status sleeping;
 }
 
 location ~* ^.+\.(?:atom|bmp|bz2|css|doc|eot|exe|gif|gz|ico|jpe?g|jpeg|jpg|js|map|mid|midi|mp4|ogg|ogv|otf|png|ppt|rar|rtf|svg|svgz|tar|tgz|ttf|wav|woff|xls|zip)$ {
 access_log off;
 log_not_found off;
 expires max;
 add_header Pragma public;
 add_header Cache-Control "public, mustrevalidate, proxy-revalidate";
 add_header X-Koala-Status eating;
 }
 
 location = /(?:favicon.ico|robots.txt) {
 log_not_found off;
 access_log off;
 }

 location ~ /index.php/(.*) {
 rewrite ^/index.php/(.*) /$1 permanent;
 }

location ~ /\. {
 deny all;
 }
 
 location ~ /\.(htaccess|htpasswd)$ {
 deny all;
 }
 
 location ~ /\.(?:db)$ {
 deny all;
 }
 
 location ~* /(.*)\.(?:markdown|md|twig|yaml|yml)$ {
 deny all;
 }

location ~ [^/]\.php(/|$) {
 try_files /index.php =404;
 
 fastcgi_split_path_info ^(.+?\.php)(/.*)$;
 fastcgi_param SCRIPT_FILENAME $document_root$fastcgi_script_name;
 fastcgi_param HTTP_PROXY "";
 fastcgi_param HTTPS $https if_not_empty;
 fastcgi_pass 127.0.0.1:9000;
 include fastcgi_params;
 }

}

Save and close the file. Restart the Apache service for the changes to take effects:

nginx -t
systemctl restart nginx

Step 6. Accessing Bolt CMS.

Bolt CMS will be available on HTTP port 80 by default. Open your favorite browser and navigate to http://yourdomain.com/ or http://server-ip and register your first user. Administrative access is automatically granted to the first registered user.

Congratulation’s! You have successfully installed Bolt CMS. Thanks for using this tutorial for installing Bolt CMS on CentOS 7 systems. For additional help or useful information, we recommend you to check the official Bolt CMS web site.

How To Install Askbot on CentOS 7

Askbot on CentOS 7

Askbot is a question and answer web forum and it looks like StackOverflow Q&A web forums. It is based on Django web framework and written in Python programming language. It is an open source Q&A web forum project maintained and developed by Evgeny Fadeev.Some most popular open source projects like Ask-Fedora and Ask-LibreOffice uses the AskBot to provide support for their users and clients.

Table of Contents

Step 1. First let’s start by ensuring your system is up-to-date.

Step 2. Installing Dependencies Askbot.

Step 3. Installing PostgreSQL.

Step 4. Create Database For Askbot.

Step 5. Installing Askbot.

Prerequisites

This article assumes you have at least basic knowledge of Linux, know how to use the shell, and most importantly, you host your site on your own VPS. The installation is quite simple and assumes you are running in the root account, if not you may need to add ‘sudo’ to the commands to get root privileges. I will show you through the step by step installation Askbot on a CentOS 7 server.
Install Askbot on CentOS 7

Step 1. First let’s start by ensuring your system is up-to-date.

yum clean all
yum -y update

Step 2. Installing Dependencies Askbot.

Install required packages:

yum group install 'Development Tools'
yum install epel-release
yum install python-pip python-devel python-six

Step 3. Installing PostgreSQL.

Askbot uses PostgreSQL as database system to store its data, so install it executing the following command:

yum install postgresql-server postgresql-devel postgresql-contrib

Start postgres and enable it to launch automatically at the boot time:

postgresql-setup initdb
systemctl start postgresql

Step 4. Create Database For Askbot.

First of all we will create a database techbrown for AskBot project:

postgres=# create database askbotdb;
postgres=# create user askbotusr with password 'usr_strong_passwd';
postgres=# grant all privileges on database askbotdb to askbotusr;

The next step is to edit the postgres configuration for authentication setup, which you can do by heading to the ‘pgsql/data’ directory and editing the ‘pg_hba.conf’ file with nano:

nano /var/lib/pgsql/data/pg_hba.conf

Once inside the file, change all authentication to md5, as shown below:

local all all md5
 # IPv4 local connections:
 host all all 127.0.0.1/32 md5
 # IPv6 local connections:
 host all all ::1/128 md5

Save, close the file and restart PostgreSQL:

systemctl restart postgresql

Step 5. Installing Askbot.

We will install Askbot under a user named ‘askbot’, and using the virtualenv python. So let’s begin:

useradd -m -s /bin/bash askbot
passwd askbot

Next, add this new user to the wheel group:

usermod -a -G wheel askbot

Upgrade pip to the latest version:

pip install --upgrade pip

Next, install the virtualenv package:

pip install virtualenv six

Log in as the askbot user previously created, and create a new virtual environment with virtualenv:

su - askbot
virtualenv wpcademy/

Activate this new virtual environment, by executing the following command:

source wpcademy/bin/activate

Next, install Askbot and other required packages with pip:

pip install six askbot psycopg2

Next, create a new directory for the ‘Askbot’ project. Please make sure you don’t use ‘askbot’ as the directory name:

mkdir testing

Initialize a new Askbot project by executing the following commands:

cd testing
askbot-setup

So Askbot is now installed on the ‘testing directory. Now we need to generate Askbot Django static files and the database. Run the command below to generate Askbot Django static files:

python manage.py collectstatic

Generate the database:

python manage.py syncdb

So, Askbot has been installed and the testing project configured. Test it with runserver:

python manage.py runserver 0.0.0.0:8080

With a web browser, go to the server IP address, and you should see a forum page.

Congratulation’s! You have successfully installed Askbot. Thanks for using this tutorial for installing Askbot on your CentOS 7 system. For additional help or useful information, we recommend you to check the official Askbot web site.

How To Install OpenVPN on CentOS 7

OpenVPN on CentOS 7

OpenVPN is an open source application which is widely used to create secure virtual private networks over the unsecured public Internet. OpenVPN is an SSL VPN solution which drains your system connection securely through the Internet. OpenVPN functions in the client server structure. All the devices connected to a virtual private network act as if they’re linked to your local area network. The packets sent through the VPN tunnel are encrypted with 256 bit AES encryption making data theft impossible.

Table of Contents

Step 1. First let’s start by ensuring your system is up-to-date.

Step 2. Installing OpenVPN on CentOS 7.

Step 3. Configuring Easy-rsa.

Step 4. Generating a server key and certificate.

Step 5. OpenVPN server configuration.

Step 6. Configure Iptables for OpenVPN.

Step 7. Create client certificate and key.

Prerequisites

This article assumes you have at least basic knowledge of Linux, know how to use the shell, and most importantly, you host your site on your own VPS. The installation is quite simple and assumes you are running in the root account, if not you may need to add ‘sudo’ to the commands to get root privileges. I will show you through the step by step installation OpenVPN open source virtual private network on a CentOS 7 server.
Install OpenVPN on CentOS 7

Step 1. First let’s start by ensuring your system is up-to-date.

yum clean all
yum -y install epel-release
yum -y update

Step 2. Installing OpenVPN on CentOS 7.

We will now install OpenVPN and Easy-RSA package. The Easy-RSA package is provided so we can have an easier way of generating certificates:

yum install openvpn easy-rsa

Step 3. Configuring Easy-rsa.

Now that you have installed OpenVPN successfully, you have to create keys and certificates, follow this section step by step:

mkdir -p /etc/openvpn/easy-rsa/keys

Next, we will copy the certificate generation scripts from their default location to our OpenVPN folder:

cp -rf /usr/share/easy-rsa/2.0/* /etc/openvpn/easy-rsa

We will go to the easy-rsa directory and source the variables:

cd /etc/openvpn/easy-rsa
source ./vars

Then run “./clean-all” right away to ensure that we have a clean certificate setup:

./clean-all

Now you have to generate a “Certificate Authority (ca)” file. you will be asked for country name etc. that you edited in the “vars” file. you can hit “Enter” to accept your default values.

Now move to the following directory:

cd /etc/openvpn/easy-rsa/2.0/
./build-ca

Step 4. Generating a server key and certificate.

Run the command below in the current directory:

./build-key-server server

We will also need to create a Diffie-Hellman file. Creation of this file will depends on the length of the key. For this default we will use 2048 bit key but you can always change it by editing the vars file in the easy-rsa folder:

./build-dh

Step 5. OpenVPN server configuration.

We will now configure the OpenVPN server. First, create a configuration file named server.conf:

nano /etc/openvpn/server.conf

Paste the configurations below (you may change the values of port etc.):

local 192.168.77.20
port 443
proto tcp
dev tun
tun-mtu 1500
tun-mtu-extra 32
mssfix 1450
ca /etc/openvpn/easy-rsa/2.0/keys/ca.crt
cert /etc/openvpn/easy-rsa/2.0/keys/server.crt
key /etc/openvpn/easy-rsa/2.0/keys/server.key
dh /etc/openvpn/easy-rsa/2.0/keys/dh1024.pem
server 10.8.0.0 255.255.255.0
#-ifconfig-pool-persist ipp.txt
push "redirect-gateway def1"
push "dhcp-option DNS 8.8.8.8"
push "dhcp-option DNS 4.2.2.1"
keepalive 2 30
comp-lzo
persist-key
persist-tun
status 443status.log
log-append 443log.log
verb 3

Save the file and enable and start the OpenVPN service:

systemctl enable openvpn@server
systemctl start openvpn@server

Step 6. Configure Iptables for OpenVPN.

We will need to enter some iptable rules to enable internet on the client machine:

### KVM ###
iptables -t nat -A POSTROUTING -s 10.8.0.0/24 -o eth0 -j MASQUERADE

### OpenVZ ###
iptables -t nat -A POSTROUTING -s 10.8.0.0/24 -j SNAT --to 192.168.77.20
iptables-save

Next, edit systctl.conf to enable packet forwarding:

nano /etc/sysctl.conf

Add the line:

net.ipv4.ip_forward=1

Step 7. Create client certificate and key.

The following commands will generate a client certificate and key:

nano client

Add following line:

cd /etc/openvpn/easy-rsa/2.0/
echo -en "Nama Client: "
read client
echo -en "Server IP: "
read servip
echo -en "TCP or UDP?: "
read proto
echo -en "Server port: "
read servport
. ../vars
source ./vars
echo "####################################"
echo "Feel free to accept default values"
echo "####################################"
./build-key $client
cd /etc/openvpn/easy-rsa/2.0/keys
rm -rf $client
echo "client
dev tun
proto $proto
remote $servip $servport
resolv-retry infinite
nobind
tun-mtu 1500
tun-mtu-extra 32
mssfix 1450
persist-key
persist-tun
ca ca.crt
cert $client.crt
key $client.key
;auth-user-pass
comp-lzo
verb 3" > $client.ovpn
mkdir d${client}
cp ${client}* d${client}
cp ca.crt d${client}
mv d${client} $client
zip -r $client.zip $client
cp $client.zip /var/www/html
echo "Now grab the $client.zip file and extract it under your Openvpn\config dir!"

Set file permissions and make executable:

chmod 755 client
./client

Congratulation’s! You have successfully installed OpenVPN. Thanks for using this tutorial for installing OpenVPN open source virtual private network on your CentOS 7 system. For additional help or useful information, we recommend you to check the official OpenVPN web site.

How To Install Wagtail on CentOS 7

Wagtail on CentOS 7

Wagtail is a free and open source Content Management System written in Python and constructed on Django. It is easy, fast, beautiful and provides a fast, appealing interface for both editors. Wagtail is a flexible Django content management program focused on flexibility and consumer expertise.

Table of Contents

Step 1. First let’s start by ensuring your system is up-to-date.

Step 2. Installing Required Packages.

Step 3. Create a new system user.

Step 4. Installing Wagtail.

Step 5. Create a python virtual environment and your Wagtail project.

Step 6. Installing and configure Nginx and uWSGI.

Step 6. Wagtail CMS.


Prerequisites

This article assumes you have at least basic knowledge of Linux, know how to use the shell, and most importantly, you host your site on your own VPS. The installation is quite simple and assumes you are running in the root accge of Linount, if not you may need to add ‘sudo’ to the commands to get root privileges. I will show you through the step by step installation Wagtail CMS on a CentOS 7 server.
Install Wagtail on CentOS 7

Step 1. First let’s start by ensuring your system is up-to-date.

yum clean all
yum -y install epel-release
yum -y update

Step 2. Installing Required Packages.

Install necessary packages:

yum install python-pip python-virtualenv pcre-devel python-imaging python-devel libjpeg-turbo-devel make gcc -y

Step 3. Create a new system user.

Before installing Wagtail, you will need to create a new system user for Wagtail:

adduser --comment 'Wagtail User' --home-dir /home/wagtail wagtail
chmod 755 /home/wagtail

Step 4. Installing Wagtail.

Next, install Wagtail with the pip command as below:

pip install wagtail

Step 5. Create a python virtual environment and your Wagtail project.

Once Wagtail is installed, you will need to create a python virtual environment and your Wagtail project:

su - wagtail

Create a new Wagtail project:

wagtail start mysite

Create a new virtualenv using the following command:

virtualenv wagtail-env

Switch to the new virtualenv:

source ~/wagtail-env/bin/activate

Next, install all the required dependencies by running the pip command:

cd mysite
pip install -r requirements.txt

Next, create a new SQLite database:

python manage.py migrate
python manage.py createsuperuser

Step 6. Installing and configure Nginx and uWSGI.

Add the official Nging repository first:

rpm -Uvh http://nginx.org/packages/centos/7/noarch/RPMS/nginx-release-centos-7-0.el7.ngx.noarch.rpm

Once Nginx repository is installed, install Nginx with the following command:

yum install nginx -y

Next, create a new Nginx vhost:

nano /etc/nginx/conf.d/YOUR_WAGTAIL_DOMAIN.conf

Add the following lines:

server {
 server_name your-domain;
 
 client_body_in_file_only clean;
 client_body_buffer_size 64K;
 client_max_body_size 40M;
 sendfile on;
 send_timeout 300s;

error_log /var/log/nginx/mywagtailsite_error.log;
 access_log /var/log/nginx/mywagtailsite_access.log;

location / {
 uwsgi_pass unix:/home/wagtail/mysite/mysite/wagtail.socket;
 include /etc/nginx/uwsgi_params;
 uwsgi_param UWSGI_SCHEME $scheme;
 uwsgi_param SERVER_SOFTWARE nginx/$nginx_version;
 }
}

Next, you will need to install uWSGI to your server:

pip install --upgrade uwsgi

Create uwsgi configuration file for Wagtail:

mkdir /etc/uwsgi.d/
nano /etc/uwsgi.d/wagtail.ini

Add the following lines:

[uwsgi]
chmod-socket = 666
virtualenv = /home/wagtail/wagtail-env
mount = /=wsgi:application
chdir = /home/wagtail/mysite/
wsgi-file = mysite/wsgi.py
socket = /home/wagtail/mysite/mysite/%n.socket
stats = /home/wagtail/mysite/mysite/%n.stats.socket
logto = /home/wagtail/mysite/mysite/%n.log
workers = 4
uid = wagtail
gid = wagtail
limit-as = 512

Next, create a new service file for Wagtail:

nano /etc/systemd/system/uwsgi.service

Add the following code lines:

[Unit]
Description=uWSGI Emperor Service
After=syslog.target

[Service]
ExecStart=/usr/bin/uwsgi --master --die-on-term --emperor /etc/uwsgi.d
ExecReload=/bin/kill -HUP $MAINPID
KillSignal=SIGINT
Restart=always
Type=notify
StandardError=syslog
NotifyAccess=all

[Install]
WantedBy=multi-user.target

Start uWSGI service and enable it to start on boot with the following command:

systemctl enable uwsgi
systemctl start uwsgi

Finally, start Nginx service and enable it to start on boot time with the following command:

systemctl enable nginx
systemctl start nginx

Step 6. Wagtail CMS.

Wagtail CMS will be available on HTTP port 80 by default. Open your favorite browser and navigate to http://yourdomain.com/ or http://server-ip and complete the required the steps to finish the installation.

Congratulation’s! You have successfully installed Wagtail. Thanks for using this tutorial for installing Wagtail CMS on CentOS 7 systems. For additional help or useful information, we recommend you to check the official Wagtail CMS web site.

How To Install Grafana on Ubuntu CentOS 7

Grafana on Ubuntu CentOS 7

Grafana is an open source data visualization and tracking suite. It offers support for Graphite, Elasticsearch, Included, Prometheus, and a lot more databases. The application gives a beautiful dashboard and metric analytics, with capability to control and create your own dashboard to your own apps or infrastructure performance monitoring.

Table of Contents

Step 1. First let’s start by ensuring your system is up-to-date.

Step 2. Installing Grafana.

Step 3. Configure Firewall for Grafana.

Step 4. Accessing Grafana.

Prerequisites

This article assumes you have at least basic knowledge of Linux, know how to use the shell, and most importantly, you host your site on your own VPS. The installation is quite simple and assumes you are running in the root accge of Linount, if not you may need to add ‘sudo’ to the commands to get root privileges. I will show you through the step by step installation Grafana open source data visualization on a CentOS 7 server.
Install Grafana on Ubuntu CentOS 7

Step 1. First let’s start by ensuring your system is up-to-date.

yum clean all
yum -y update

Step 2. Installing Grafana.

First, Add new Grafana repository:

cat <<EOF | sudo tee /etc/yum.repos.d/grafana.repo
[grafana]
name=grafana
baseurl=https://packagecloud.io/grafana/stable/el/6/$basearch
repo_gpgcheck=1
enabled=1
gpgcheck=1
gpgkey=https://packagecloud.io/gpg.key https://grafanarel.s3.amazonaws.com/RPM-GPG-KEY-grafana
sslverify=1
sslcacert=/etc/pki/tls/certs/ca-bundle.crt
EOF

Now we can start Grafana installation with the following command:

yum install grafana

After the installation process is finished, execute the following commands to start your Grafana service:

systemctl daemon-reload
systemctl start grafana-server
systemctl enable grafana-server

Step 3. Configure Firewall for Grafana.

By default, Grafana is running on port 3000. In case your server is using a firewall, open the port using command below:

firewall-cmd --permanent --zone=public --add-port=3000/tcp
firewall-cmd --reload

Step 4. Accessing Grafana.

Grafana will be available on HTTP port 3000 by default. Open your favorite browser and navigate to http://mydomain.com:3000 and complete the required the steps to finish the installation. If you are using a firewall, please open port 3000 to enable access to the control panel.

Congratulation’s! You have successfully installed Grafana. Thanks for using this tutorial for installing Grafana open source data visualization on CentOS 7 systems. For additional help or useful information, we recommend you to check the official Grafana web site.

How To Install Apache Maven on CentOS 7

Apache Maven on CentOS 7

Apache Maven is a free and open source project management tool used for Java projects. You can easily handle a project’s build, reporting, and Documentation from a central piece of advice using Apache Maven. Apache Maven provides a complete framework to automate the job’s Build infrastructure.

Table of Contents

Step 1. First make sure that all your system packages are up-to-date by running these following apt-get commands in the terminal.

Step 2. Installing Java.

Step 3. Installing Apache Maven.

Step 4. Setup Environment Variables.

Step 5. Verify Installation Apache Maven.


Prerequisites

This article assumes you have at least basic knowledge of Linux, know how to use the shell, and most importantly, you host your site on your own VPS. The installation is quite simple and assumes you are running in the root accge of Linount, if not you may need to add ‘sudo’ to the commands to get root privileges. I will show you through the step by step installation Apache Maven on a CentOS 7 server.
Install Apache Maven on CentOS 7

Step 1. First make sure that all your system packages are up-to-date by running these following apt-get commands in the terminal.

sudo apt-get update
sudo apt-get upgrade

Step 2. Installing Java.

Java development kit is the primary requirement of Apache Maven. So you need to install Java development kit (JDK) on your system.

Verify the Java version by running the following command:

### java -version

java version "1.8.0_144"
Java(TM) SE Runtime Environment (build 1.8.0_144-b01)
Java HotSpot(TM) 64-Bit Server VM (build 25.144-b01, mixed mode)

Step 3. Installing Apache Maven.

First thing to do is to go to Apache Maven’s download page and download the latest stable version of Apache Maven, At the moment of writing this article it is version 3.5.2:

wget http://www-eu.apache.org/dist/maven/maven-3/3.5.2/binaries/apache-maven-3.5.2-bin.tar.gz

Now extract downloaded archive using following command:

tar xzf apache-maven-3.5.2-bin.tar.gz
ln -s apache-maven-3.5.2 maven

Step 4. Setup Environment Variables.

Now set the environments variables by creating new file /etc/profile.d/maven.sh:

nano /etc/profile.d/apache-maven.sh

Add following content:

export M2_HOME=/usr/local/maven
export PATH=${M2_HOME}/bin:${PATH}

Now load the environment variables in current shell using following command:

source /etc/profile.d/apache-maven.sh

Step 5. Verify Installation Apache Maven.

Once everything has been successfully configured, check the version of the Apache Maven:

### mvn -version

Apache Maven 3.5.2 (138edd61fd100ec658bfa2d307c4e466940a5d7d; 2017-12-18T13:28:13+05:30)
Maven home: /usr/local/maven
Java version: 1.8.0_144, vendor: Oracle Corporation
Java home: /opt/jdk1.8.0_144/jre
Default locale: en_IN, platform encoding: UTF-8
OS name: "linux", version: "4.4.0-93-generic", arch: "amd64", family: "unix"

Congratulation’s! You have successfully installed Apache Maven. Thanks for using this tutorial for installing Apache Maven on CentOS 7 systems. For additional help or useful information, we recommend you to check the official Apache Maven web site.