How To Install DenyHosts on Ubuntu 16.04 LTS

Install DenyHosts on Ubuntu 16

DenyHosts is a log-based intrusion prevention security tool for SSH servers written in Python. It is intended to prevent brute-force attacks on SSH servers by monitoring invalid login attempts in the authentication log and blocking the originating IP addresses. Due to the simplicity of DenyHost and the ability to manually configure your rules it is widely used as an alternative to Fail2ban which is a bit more complicated to use and configure. DenyHosts unfortunately does not support IPv6.

DenyHosts v2.1 includes the following:

  • restricted username feature,
  • Synchronization download resiliency.
  • reset on success
  • Synchronization mode is now supported by command line/cron version (with the –sync flag)

Install DenyHosts on Ubuntu 16.04 LTS

This article assumes you have at least basic knowledge of linux, know how to use the shell, and most importantly, you host your site on your own VPS. The installation is quite simple and assumes you are running in the root account, if not you may need to add ‘sudo’ to the commands to get root privileges. I will show you through the step by step installation DenyHosts on a Ubuntu 16.04 (Xenial Xerus) server.

Step 1. First make sure that all your system packages are up-to-date by running these following apt-get commands in the terminal.

sudo apt-get update
sudo apt-get upgrade

Step 2. Installing DenyHosts on Ubuntu 16.04.

Install denyhosts package using apt-get command:

sudo apt-get install denyhosts

Step 3. Configure DenyHosts.

Once the Denyhosts installed, make sure to whitelist your own IP address, so you will never get locked out. To do this, open a file /etc/hosts.allow:

sudo nano /etc/hosts.allow

Below the description, add the each IP address one-by-one on a separate line, that you never want to block. The format should be as follows:

# hosts.allow This file contains access rules which are used to
# allow or deny connections to network services that
# either use the tcp_wrappers library or that have been
# started through a tcp_wrappers-enabled xinetd.
#
# See 'man 5 hosts_options' and 'man 5 hosts_access'
# for information on rule syntax.
# See 'man tcpd' for information on tcp_wrappers
#
sshd: 114.124.37.154
sshd: 114.121.131.131
sshd: 172.16.25.156

You can further configure any settings in the DenyHosts.conf file by going to the following and updating according to your preference:

sudo nano /etc/denyhosts.conf

Save your work and restart DenyHosts by running the commands below:

systemctl restart denyhosts.service
systemctl enable denyhosts.service

View DenyHosts logs:

tail -f /var/log/denyhosts
tail -f /var/log/secure

Congratulation’s! You have successfully installed DenyHosts. Thanks for using this tutorial for installing DenyHosts on Ubuntu 16.04 LTS (Xenial Xerus) system. For additional help or useful information, we recommend you to check the official DenyHosts web site.

How To Install Jenkins on Ubuntu 16.04 LTS

Install Jenkins on Ubuntu 16

Jenkins is an open source continuous integration tool written in Java. Jenkins provides continuous integration services for software development. It is a server-based system running in a servlet container such as Apache Tomcat. It supports SCM tools including AccuRev, CVS, Subversion, Git, Mercurial, Perforce, Clearcase and RTC, and can execute Apache Ant and Apache Maven based projects as well as arbitrary shell scripts and Windows batch commands.

install jenkins on ubuntu 16

Install Jenkins on Ubuntu 16.04 LTS

This article assumes you have at least basic knowledge of linux, know how to use the shell, and most importantly, you host your site on your own VPS. The installation is quite simple and assumes you are running in the root account, if not you may need to add ‘sudo’ to the commands to get root privileges. I will show you through the step by step installation Jenkins on a Ubuntu 16.04 (Xenial Xerus) server.

Step 1. First make sure that all your system packages are up-to-date by running these following apt-get commands in the terminal.

sudo apt-get update
sudo apt-get upgrade

Step 2. Installing Java.

In this step, we will install Java 7 from a PPA repository and install python-software-properties:

apt-get install python-software-properties

Then you can add Java repository:

add-apt-repository ppa:openjdk-r/ppa

Update the Ubuntu repository and install the Java OpenJDK with apt command:

apt-get update
apt-get install openjdk-7-jdk

Verify Java installation by typing the command below:

java -version

Step 3. Installing Jenkins.

Add the key and source list to apt:

wget -q -O - http://pkg.jenkins-ci.org/debian-stable/jenkins-ci.org.key | sudo apt-key add -

Create a sources list for Jenkins:

sudo sh -c 'echo deb http://pkg.jenkins-ci.org/debian-stable binary/ > /etc/apt/sources.list.d/jenkins.list'

After the cache has been updated, start proceed installation Jenkins:

sudo apt-get update
sudo apt-get install jenkins

Start Jenkins service:

systemctl start jenkins

Jenkins will write log files to /var/log/jenkins/jenkins.log. You can also fine-tune the configuration.

Step 4. Installing and Configure Apache web server for Jenkins.

Install Apache web server on your system:

apt-get install apache2

Create a new virtual host directive in Apache. For example, create a new Apache configuration file named ‘jenkins.conf’ on your virtual server:

a2enmod proxy
a2enmod proxy_http
a2ensite jenkins
touch /etc/apache2/sites-available/jenkins.conf
ln -s /etc/apache2/sites-available/jenkins.conf /etc/apache2/sites-enabled/jenkins.conf
nano /etc/apache2/sites-available/jenkins.conf

Add the following lines:


ServerName my.jenkins.id
ProxyRequests Off
ProxyPreserveHost On
AllowEncodedSlashes NoDecode

Order deny,allow
Allow from all

ProxyPass / http://localhost:8080/ nocanon
ProxyPassReverse / http://localhost:8080/
ProxyPassReverse / http://my.jenkins.id/

Save and close the file. Restart the apache and jenkins service for the changes to take effects:

systemctl restart apache2
systemctl restart jenkins

Step 5. Accessing Jenkins.

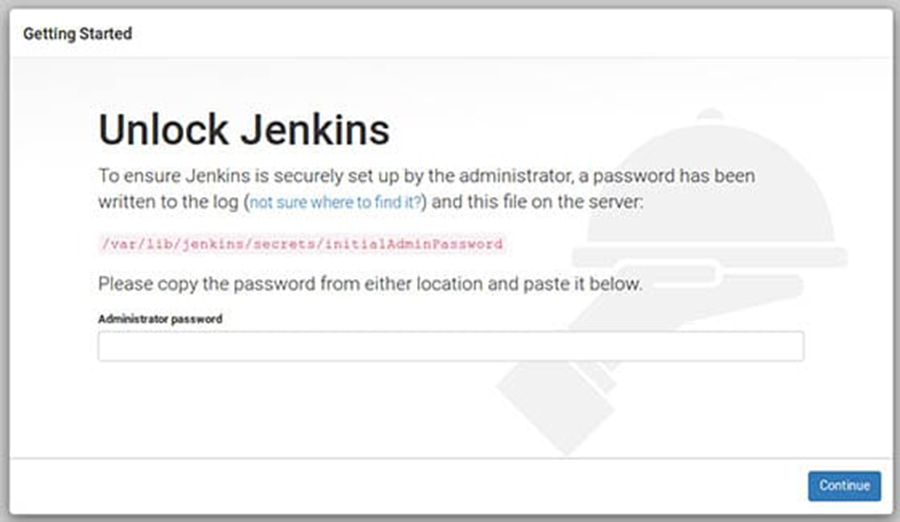
Jenkins will be available on HTTP port 8080 by default. Open your favorite browser and navigate to http://yourdomain.com:8080 or http://server-ip:8080 and complete the required the steps to finish the installation. If you are using a firewall, please open port 8080 to enable access to the control panel. Default installation password can be found at /var/lib/jenkins/secrets/initialAdminPassword as showing in below image.
jenkins-installation
Congratulation’s! You have successfully installed Jenkins. Thanks for using this tutorial for installing Jenkins on Ubuntu 16.04 Xenial Xerus server. For additional help or useful information, we recommend you to check the official Jenkins web site.

How To Install Memcached on Ubuntu 16.04 LTS

Install Memcached on Ubuntu 16

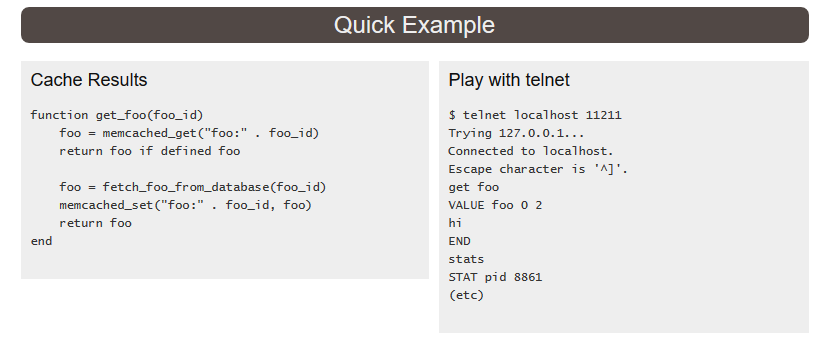
Free & open source, high-performance, distributed memory object caching system, generic in nature, but intended for use in speeding up dynamic web applications by alleviating database load.

Memcached is an in-memory key-value store for small chunks of arbitrary data (strings, objects) from results of database calls, API calls, or page rendering.

Memcached is simple yet powerful. Its simple design promotes quick deployment, ease of development, and solves many problems facing large data caches. Its API is available for most popular languages.

install memcached on ubuntu 16 example

Install Memcached on Ubuntu 16.04 LTS

This article assumes you have at least basic knowledge of linux, know how to use the shell, and most importantly, you host your site on your own VPS. The installation is quite simple and assumes you are running in the root account, if not you may need to add ‘sudo’ to the commands to get root privileges. I will show you through the step by step installation Memcached on a Ubuntu 16.04 (Xenial Xerus) server.

Step 1. First make sure that all your system packages are up-to-date by running these following apt-get commands in the terminal.

sudo apt-get update
sudo apt-get upgrade

Step 2. Installing Memcached.

Now use following command to install memcached service on your system:

sudo apt-get -y install memcached

Step 3. Configuration Memcached.

The default configuration file can be found at:

nano /etc/memcached.conf

When started, Memcached will start on port 11211 by default per the default configuration file:

# Default connection port is 11211
-p 11211

Exit and save the configuration file, and then restart Memcached:

systemctl restart memcached

Install Memcached extension for PHP

You will also need to install required php extension for memcached:

apt-get install php-memcached

Now, we can restart Apache so that the changes take place:

systemctl restart apache2

To test PHP, create a test file named info.php with he content below. Save the file, then browse to it to see if PHP is working:

nano /var/www/html/info.php
<!--?php phpinfo(); ?-->

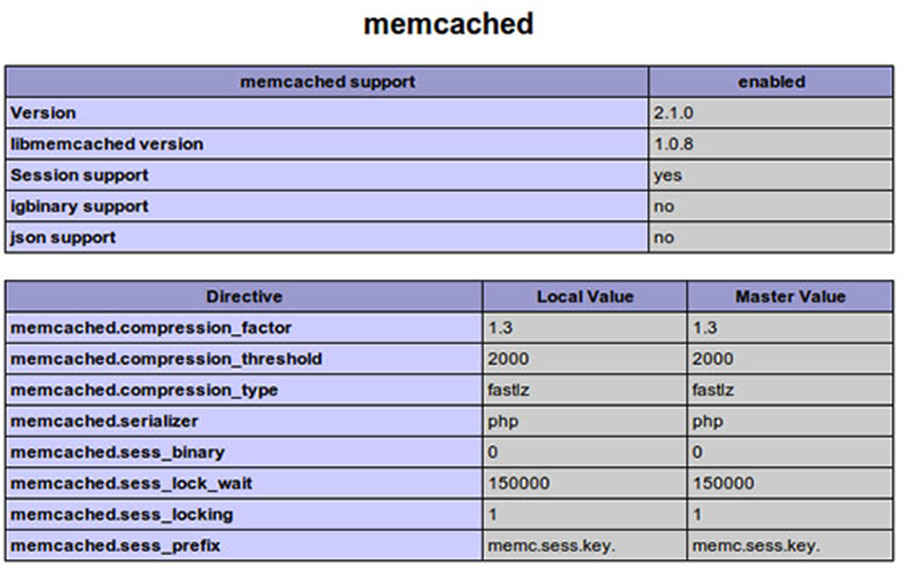
Try to access it at http://your_server_ip/info.php . If the PHP info page is rendered in your browser then everything looks good and you are ready to proceed further.

memcached-php_info
Congratulation’s! You have successfully installed Memcached. Thanks for using this tutorial for installing Memcached on Ubuntu 16.04 LTS (Xenial Xerus) system. For additional help or useful information, we recommend you to check the official Memcached web site.

How To Install Jekyll on Ubuntu 16.04 LTS

Install Jekyll on Ubuntu 16

Jekyll is a static site generator with a templating system that can be adapted for many types of websites, including blogs. It can be run on a server, or run locally and the generated files uploaded to a server. It is the default software used by Github Pages.

Install Jekyll on Ubuntu 16.04 LTS

This article assumes you have at least basic knowledge of linux, know how to use the shell, and most importantly, you host your site on your own VPS. The installation is quite simple and assumes you are running in the root account, if not you may need to add ‘sudo’ to the commands to get root privileges. I will show you through the step by step installation Jekyll on a Ubuntu 16.04 (Xenial Xerus) server.

Step 1. First make sure that all your system packages are up-to-date by running these following apt-get commands in the terminal.

sudo apt-get update
sudo apt-get upgrade

Step 2. Installing Ruby.

You need to install ruby using the following command:

sudo apt-get install ruby-full

Step 3. Installing Jekyll.

Install Jekyll package using gem:

gem install jekyll

We can test Jekyll is working by checking the version installed:

jekyll -v

Step 4. Create blog and up the server using Jekyll.

Now we are ready to create the blog and run the server. The below given command create the directory called wpcademyblog. You can given another name of your choice. In this directory, jekyll configuration file and setup is all set:

cd /home
jekyll new wpcademy.comblog

Change to newly created directory wpcademyblog or the new name which you have given at the time of using command jekyll:

cd wpcademy.comblog

Start the Jekyll application and replace below mentioned ip address with your ip:

jekyll server --host 192.168.77.21 &

Step 5. Accessing Jekyll.

Jekyll will be available on HTTP port 4000 by default. Open your favorite browser and navigate to http://yourdomain.com:4000 or http://server-ip:4000/
jekyll-linux
Congratulation’s! You have successfully installed Jekyll. Thanks for using this tutorial for installing Jekyll on Ubuntu 16.04 LTS (Xenial Xerus) system. For additional help or useful information, we recommend you to check the official Jekyll web site.

How To Install Django on Ubuntu 16.04 LTS

Install Django on Ubuntu 16

Django is a popular Python framework for writing web applications. Web frameworks like Django provide a set of tools which helps the developer to write the application faster as the framework takes care of the internal structure, thus the developer needs to take care of the application development only. Django is free and open source software.

This article assumes you have at least basic knowledge of linux, know how to use the shell, and most importantly, you host your site on your own VPS. The installation is quite simple and assumes you are running in the root account, if not you may need to add ‘sudo’ to the commands to get root privileges. I will show you through the step by step installation Django on a Ubuntu 16.04 (Xenial Xerus) server.
Install Django on Ubuntu 16.04 LTS

Step 1. First make sure that all your system packages are up-to-date by running these following apt-get commands in the terminal.

sudo apt-get update
sudo apt-get upgrade

Step 2. Installing pip and necessary dependencies.

Now you can install pip using the following command:

sudo apt-get install python3-pip

Step 4. Installing Djanggo on Ubuntu 16.04.

Once the pip is installed, run the following command to install Django:

sudo pip3 install django

To verify the Django version, run:

django-admin --version

Step 5. Create a sample Django project.
Now that the Django framework has been installed, you can to give it a test drive by creating a sample project:

cd ~
django-admin startproject myproject

The command above will create a directory myproject in your working directory ~, and store all necessary files within.

Run the commands below in sequence to get your application started. Follow the instructions on screen to provide the superuser’s credentials:

cd myproject/
python3 manage.py migrate
python3 manage.py createsuperuser
python3 manage.py runserver 0.0.0.0:8000

Step 6. Accessing Django.

Django will be available on HTTP port 8080 by default. Open your favorite browser and navigate to http://yourdomain.com:8000 or http://server-ip:8000/admin

Verifying

To verify that Django can be seen by Python, type python from your shell. Then at the Python prompt, try to import Django:

>>> import django
>>> print(django.get_version())
2.2

Congratulation’s! You have successfully installed Django. Thanks for using this tutorial for installing Django web framework on Ubuntu 16.04 Xenial Xerus server. For additional help or useful information, we recommend you to check the official Django web site.

How To Install Piwik on Ubuntu 16.04 LTS

Install Piwik on Ubuntu 16

Piwik is an open source web analytics application. It rivals Google Analytics and includes even more features and allows you to brand your brand and send out custom daily, weekly, and monthly reports to your clients.

Install Piwik on Ubuntu 16.04 LTS

This article assumes you have at least basic knowledge of linux, know how to use the shell, and most importantly, you host your site on your own VPS. The installation is quite simple and assumes you are running in the root account, if not you may need to add ‘sudo’ to the commands to get root privileges. I will show you through the step by step installation Piwik web analytics on a Ubuntu 16.04 (Xenial Xerus) server.

Step 1. First make sure that all your system packages are up-to-date by running these following apt-get commands in the terminal.

sudo apt-get update
sudo apt-get upgrade

Step 2. Install LAMP (Linux, Apache, MariaDB, PHP) server.

A Ubuntu 16.04 LAMP server is required. If you do not have LAMP installed, you can follow our guide here. Also install all required PHP modules:

sudo apt-get install php7.0-curl php7.0-gd php7.0-mbstring php7.0-mysql libapache2-mod-php7.0 php7.0-mcrypt php7.0-geoip php7.0-zip

Step 3. Installing Piwik.

First thing to do is to go to Piwik’s download page and download the latest stable version of Piwik:

cd /var/www/html/
wget http://builds.piwik.org/latest.zip

Unpack the Piwik archive to the document root directory on your server:

unzip latest.zip

We will need to change some folders permissions:

chown -R www-data:www-data /var/www/html/piwik
chmod -R 0755 /var/www/html/piwik/tmp

Step 4. Configuring MariaDB for Piwik.

By default, MariaDB is not hardened. You can secure MariaDB using the mysql_secure_installation script. you should read and below each steps carefully which will set root password, remove anonymous users, disallow remote root login, and remove the test database and access to secure MariaDB:

mysql_secure_installation

Configure it like this:

- Set root password? [Y/n] y
- Remove anonymous users? [Y/n] y
- Disallow root login remotely? [Y/n] y
- Remove test database and access to it? [Y/n] y
- Reload privilege tables now? [Y/n] y

Next we will need to log in to the MariaDB console and create a database for the Piwik. Run the following command:

mysql -u root -p

This will prompt you for a password, so enter your MariaDB root password and hit Enter. Once you are logged in to your database server you need to create a database for Piwik installation:

CREATE DATABASE piwikdb;
CREATE USER piwikadmin@localhost IDENTIFIED BY 'mySecurepassword';
GRANT ALL PRIVILEGES ON piwik.* TO piwikadmin@localhost;
FLUSH PRIVILEGES;
exit

Step 5. Accessing Piwik.

Piwik will be available on HTTP port 80 by default. Open your favorite browser and navigate to http://yourdomain.com/piwik or http://server-ip/piwik and complete the required the steps to finish the installation. If you are using a firewall, please open port 80 to enable access to the control panel.
install-piwik

Congratulation’s! You have successfully installed Piwik. Thanks for using this tutorial for installing Piwik web analytics on Ubuntu 16.04 LTS (Xenial Xerus) system. For additional help or useful information, we recommend you to check the official Piwik web site.

How To Install Logrotate on Ubuntu 16.04 LTS

Install Logrotate on Ubuntu 16

logrotate is designed to ease administration of systems that generate large numbers of log files. It allows automatic rotation, compression, removal, and mailing of log files. Each log file may be handled daily, weekly, monthly, or when it grows too large.

Normally, logrotate is run as a daily cron job. It will not modify a log multiple times in one day unless the criterion for that log is based on the log’s size and logrotate is being run multiple times each day, or unless the -f or –force option is used.

Any number of config files may be given on the command line. Later config files may override the options given in earlier files, so the order in which the logrotate config files are listed is important. Normally, a single config file which includes any other config files which are needed should be used. See below for more information on how to use the include directive to accomplish this. If a directory is given on the command line, every file in that directory is used as a config file.

If no command line arguments are given, logrotate will print version and copyright information, along with a short usage summary. If any errors occur while rotating logs, logrotate will exit with non-zero status.

Install Logrotate on Ubuntu 16.04 LTS

This article assumes you have at least basic knowledge of linux, know how to use the shell, and most importantly, you host your site on your own VPS. The installation is quite simple and assumes you are running in the root account, if not you may need to add ‘sudo’ to the commands to get root privileges. I will show you through the step by step installation Logrotate on a Ubuntu 16.04 (Xenial Xerus) server.

Step 1. First make sure that all your system packages are up-to-date by running these following apt-get commands in the terminal.

sudo apt-get update
sudo apt-get upgrade

Step 2. Installing Logrotate.

To install logrotate, just use your package manager:

sudo apt-get install logrotate

Verify that the installation was successful:

sudo logrotate

Step 3. Configure Logrotate.

The main configuration file for logrotate is /etc/logrotate.conf while application specific configuration files are stored in the /etc/logrotate.d directory. In stock Ubuntu, any config file you put into /etc/logrotate.d is going to run once per day. Logs are typically rotated once per day or less (Apache default in Ubuntu is in fact weekly). Let’s look over Apache’s default in Ubuntu – /etc/logrotate.d/apache2:

/var/log/apache2/*.log {
weekly
missingok
rotate 52
compress
delaycompress
notifempty
create 640 root adm
sharedscripts
postrotate
/etc/init.d/apache2 reload > /dev/null
endscript
prerotate
if [ -d /etc/logrotate.d/httpd-prerotate ]; then \
run-parts /etc/logrotate.d/httpd-prerotate; \
fi; \
endscript
}

This will rotate any files in /var/log/apache2 that end in “.log”. This is why, when we create a new Apache virtual host, we typically put the logs in /var/log/apache2. Logrotate will automatically manage the log files! Let’s go through the options:

weekly: Rotate logs once per week. Available options are daily, weekly, monthly, and yearly.
missingok: If no *.log files are found, don’t freak out
rotate 52: Keep 52 files before deleting old log files (Thats a default of 52 weeks, or one years worth of logs!)
compress: Compress (gzip) log files
delaycompress: Delays compression until 2nd time around rotating. As a result, you’ll have one current log, one older log which remains uncompressed, and then a series of compressed logs. More info on its specifics.
compresscmd: Set which command to used to compress. Defaults to gzip.
uncompresscmd: Set the command to use to uncompress. Defaults to gunzip.
notifempty: Don’t rotate empty files
create 640 root adm: Create new log files with set permissions/owner/group, This example creates file with user root and group adm. In many systems, it will be root for owner and group.
sharedscripts: Run postrotate script after all logs are rotated. If this is not set, it will run postrotate after each matching file is rotated.
postrotate: Scripts to run after rotating is done. In this case, Apache is reloaded so it writes to the newly created log files. Reloading Apache (gracefully) lets any current connection finish before reloading and setting the new log file to be written to.
prerotate: Run before log rotating begins.

For more datails and configuration options you can check the logrotate man page:

man logrotate

Congratulation’s! You have successfully installed Logrotate. Thanks for using this tutorial for installing Logrotate to manage logs on Ubuntu 16.04 LTS (Xenial Xerus) system. For additional help or useful information, we recommend you to check the official Logrotate web site.

Options

-d, –debug

Turns on debug mode and implies -v. In debug mode, no changes will be made to the logs or to the logrotate state file.
-f, –force
Tells logrotate to force the rotation, even if it doesn’t think this is necessary. Sometimes this is useful after adding new entries to a logrotate config file, or if old log files have been removed by hand, as the new files will be created, and logging will continue correctly.
-m, –mail <command>
Tells logrotate which command to use when mailing logs. This command should accept two arguments: 1) the subject of the message, and 2) the recipient. The command must then read a message on standard input and mail it to the recipient. The default mail command is /bin/mail -s.
-s, –state <statefile>
Tells logrotate to use an alternate state file. This is useful if logrotate is being run as a different user for various sets of log files. The default state file is /var/lib/logrotate.status.
–usage
Prints a short usage message.
-?, –help
-Prints help message.
-v, –verbose
Turns on verbose mode.