How To Install Orangescrum on Ubuntu 16.04

Install Orangescrum on Ubuntu 16

Orangescrum is a free, open source, flexible project management web application written using CakePHP. It helps you to manage projects, teams, documents, and tasks, all in one place. Orangescrum provides various features like agile project management, collaboration, issue tracking, notifications, reporting, task management, and traditional project management functionality for small/medium businesses.

Install Orangescrum on Ubuntu 16.04

This article assumes you have at least basic knowledge of linux, know how to use the shell, and most importantly, you host your site on your own VPS. The installation is quite simple and assumes you are running in the root account, if not you may need to add ‘sudo’ to the commands to get root privileges. I will show you through the step by step installation Orangescrum on a Ubuntu 16.04 (Xenial Xerus) server.

Step 1. First make sure that all your system packages are up-to-date by running these following apt-get commands in the terminal.

sudo apt-get update
sudo apt-get upgrade

Step 2. Install LAMP (Linux, Apache, MariaDB, PHP) server.

A Ubuntu 16.04 LAMP server is required. If you do not have LAMP installed, you can follow our guide here. Also install all required PHP modules:

apt-get install imagemagick php7.0-curl php7.0-gd php7.0-mbstring php7.0-mysql libapache2-mod-php7.0 php7.0-mcrypt

Step 3. Installing Orangescrum.

First thing to do is to go to Orangescrum’s download page and download the latest stable version of Orangescrum:

wget https://github.com/Orangescrum/orangescrum/archive/master.zip

After downloading Orangescrum you will need to unzip master.zip. To do this, run:

unzip master.php -d /var/www/html
mv /var/www/html/orangescrum-master/ /var/www/html/orangescrum

We will need to change some folders permissions:

chown -R www-data:www-data /var/www/html/orangescrum

Step 4. Configuring MariaDB for Orangescrum.

By default, MariaDB is not hardened. You can secure MariaDB using the mysql_secure_installation script. you should read and below each steps carefully which will set root password, remove anonymous users, disallow remote root login, and remove the test database and access to secure MariaDB:

mysql_secure_installation

Configure it like this:

- Set root password? [Y/n] y
- Remove anonymous users? [Y/n] y
- Disallow root login remotely? [Y/n] y
- Remove test database and access to it? [Y/n] y
- Reload privilege tables now? [Y/n] y

Next we will need to log in to the MariaDB console and create a database for the Orangescrum. Run the following command:

mysql -u root -p

This will prompt you for a password, so enter your MariaDB root password and hit Enter. Once you are logged in to your database server you need to create a database for Orangescrum installation:

MariaDB [(none)]> CREATE DATABASE orangescrum;
MariaDB [(none)]> GRANT ALL PRIVILEGES ON orangescrum.* TO 'orangescrumuser'@'localhost' IDENTIFIED BY 'PASSWORD';
MariaDB [(none)]> FLUSH PRIVILEGES;
MariaDB [(none)]> \q

Now, change the current working directory and import the Orangescrum data from the database.sql dump file into the newly created MariaDB database:

cd /var/www/html/orangescrum/
mysql -u x2crmuser -p orangescrum < database.sql
'persistent' => false,
'host' => 'localhost',
'login' => 'orangescrumuser',
'password' => 'PASSWORD',
'database' => 'orangescrum',
'prefix' => '',
'encoding' => 'utf8',
);

Next step, edit the ‘constants.php’ file and update the WEB_DOMAIN, FROM_EMAIL_NOTIFY and SUPPORT_EMAIL fields:

### nano app/Config/constants.php

define("WEB_DOMAIN", "YourDomain.com"); //ex. wpcademy.orangescrum.com
define('FROM_EMAIL_NOTIFY', '[email protected]'); //(REQUIRED)
define('SUPPORT_EMAIL', '[email protected]'); //(REQUIRED) From Email

Save and close the file.

Step 5. Configuring Apache web server for Orangescrum.

Create a new virtual host directive in Apache. For example, create a new Apache configuration file named ‘orangescrum.conf’ on your virtual server:

sudo a2enmod rewrite
rm /etc/apache2/sites-enabled/000-default.conf
touch /etc/apache2/sites-available/orangescrum.conf
ln -s /etc/apache2/sites-available/orangescrum.conf /etc/apache2/sites-enabled/orangescrum.conf
nano /etc/apache2/sites-available/orangescrum.conf

Add the following lines:


ServerAdmin [email protected]
DocumentRoot /var/www/html/orangescrum/
ServerName your-domain.com
ServerAlias www.your-domain.com

Options FollowSymLinks
AllowOverride All
Order allow,deny
allow from all

ErrorLog /var/log/apache2/your-domain.com-error_log
CustomLog /var/log/apache2/your-domain.com-access_log common

Now, we can restart Apache web server so that the changes take place:

systemctl restart apache2.service

Step 6. Accessing Orangescrum.

Orangescrum will be available on HTTP port 80 by default. Open your favorite browser and navigate to http://yourdomain.com or http://server-ip and complete the required the steps to finish the installation. If you are using a firewall, please open port 80 to enable access to the control panel.

Congratulation’s! You have successfully installed Orangescrum. Thanks for using this tutorial for installing Orangescrum on Ubuntu 16.04 LTS (Xenial Xerus) system. For additional help or useful information, we recommend you to check the official Orangescrum web site.

How To Install Google Fonts on Ubuntu 16.04

Install Google Fonts on Ubuntu 16

Google Fonts are free and open source fonts. It is huge repository of awesome fonts contributed by many designers.

Install Google Fonts on Ubuntu 16.04

This article assumes you have at least basic knowledge of linux, know how to use the shell, and most importantly, you host your site on your own VPS. The installation is quite simple and assumes you are running in the root account, if not you may need to add ‘sudo’ to the commands to get root privileges. I will show you through the step by step installation Google Fonts on a Ubuntu 16.04 (Xenial Xerus).


Step 1. First make sure that all your system packages are up-to-date by running these following apt-get commands in the terminal.

sudo apt-get update
sudo apt-get upgrade

Step 2. Installing Fontconfig.

using command

Step 3. Create directory .fonts.

Now create a directory in user’s home directory:

mkdir ~/.fonts

Step 4. Download Google Fonts.

Download the google fonts inside directory ~/.fonts which we have just created, Also unzip the google fonts downloaded file inside same .fonts directory:

cd ~/.fonts && wget https://github.com/google/fonts/archive/master.zip && unzip master.zip

Next, build font information cache files:

fc-cache -fv

Wait for a few minutes till the command get successfully finish. That’s all, now in your Ubuntu system google fonts are available. You can find the google fonts available to others application also like gimp,gedit and many more.

Congratulation’s! You have successfully installed Google Fonts. Thanks for using this tutorial for installing Google Fonts on Ubuntu 16.04 LTS (Xenial Xerus) system. For additional help or useful information, we recommend you to check the official Google Fonts web site.

How To Install Ghost on Ubuntu 16.04

Install Ghost on Ubuntu 16

Ghost is a free and open source blogging platform written in JavaScript and built on Node.js, designed to simplify the process of online publishing for individual bloggers as well as online publications.

This article assumes you have at least basic knowledge of linux, know how to use the shell, and most importantly, you host your site on your own VPS. The installation is quite simple and assumes you are running in the root account, if not you may need to add ‘sudo’ to the commands to get root privileges. I will show you through the step by step installation Ghost on a Ubuntu 16.04 (Xenial Xerus) server.

Install Ghost on Ubuntu 16.04

Step 1. First make sure that all your system packages are up-to-date by running these following apt-get commands in the terminal.

sudo apt-get update
sudo apt-get upgrade

Step 2. Install LEMP (Linux, Nginx, MariaDB/MySQL and PHP) server.

A Ubuntu 16.04 LAMP server is required. If you do not have LAMP installed, you can follow our guide here. Also install all required PHP modules:

apt-get install imagemagick php7.0-curl php7.0-gd php7.0-mbstring php7.0-mysql libapache2-mod-php7.0 php7.0-mcrypt

Step 3. Installing Node.JS and NPM.

Node.JS is the server that will be hosting the instance of our Ghost blog. Ubuntu Server’s default repository list has a stable version of Node.JS. This stable version of Node.JS will be ideal for Ghost and can be installed as follows:

apt-get install nodejs

You’ll also need to install NPM, or the Node Package Manager, which Node uses to manage packages and dependencies as follows:

apt-get install npm

After installing both Node and NPM, you can confirm the version of Node running on your server by running the following command:

nodejs -v
npm -v

Step 4. Installing Ghost.

Download and unpack Ghost with the following commands:

mkdir ~/myGhostBlog
wget https://ghost.org/zip/ghost-latest.zip
unzip -d ~/myGhostBlog ghost-latest.zip
rm -f ghost-latest.zip

Change into the ~/myGhostBlog directory and install Ghost:

cd ~/myGhostBlog
npm install --production

After the installation is completed, configure Ghost and update the URL in the config file with your domain. Copy the example config into a new file:

cp config.example.js config.js

We need to open the Ghost config file for editing using the nano text editor:

nano config.js

Find the ‘Production’ section and update the URL with your domain. After modifying it should look like this:

// ### Production
// When running Ghost in the wild, use the production environment.
// Configure your URL and mail settings here
production: {
url: 'http://your_domain.com',

Once the installation process is complete, start Ghost by running the following command:

npm start –production

You should see the following message if Ghost was installed successfully:

Ghost is running in production...
Your blog is now available on http://your_domain.com
Ctrl+C to shut down

By default, Ghost runs on default port 2368. While Ghost is running, you could visit either http://your-ip-address:2368 to view your blog or http://your-ip-address:2368/ghost to create your administrator user.

Step 5. Configure Nginx web server for Ghost.

Create a new Nginx server block with the following content:

nano /etc/nginx/conf.d/mydomain.com

Add following files:

server {
server_name mydomain.com;
listen 80;

access_log /var/log/nginx/myGhostBlog-access.log;
error_log /var/log/nginx/myGhostBlog-error.log;

location / {
proxy_set_header X-Real-IP $remote_addr;
proxy_set_header Host $http_host;
proxy_pass http://127.0.0.1:2368;
}

}

Save and Restart Nginx. You should see a OK message with no errors:

systemctl nginx restart

Step 6. Accessing Ghost.

Ghost will be available on HTTP port 80 by default. Open your favorite browser and navigate to http://yourdomain.com/ghost or http://server-ip/ghost and create an admin user to log in to the Ghost. If you are using a firewall, please open port 80 to enable access to the control panel.

Congratulation’s! You have successfully installed Ghost. Thanks for using this tutorial for installing Ghost CMS on Ubuntu 16.04 LTS (Xenial Xerus) system. For additional help or useful information, we recommend you to check the official Ghost web site.

How To Install Subversion on Ubuntu 16.04

Install Subversion on Ubuntu 16

Subversion is an open source version control system. It helps you keep track of a collection of files and folders. Any time you change, add or delete a file or folder that you manage with Subversion, you commit these changes to your Subversion repository, which creates a new revision in your repository reflecting these changes. You can always go back, look at and get the contents of previous revisions. SVN supports several protocols for network access: SVN, SVN+SSH, HTTP, HTTPS. If you are behind a firewall, HTTP-based Subversion is advantageous since SVN traffic will go through the firewall without any additional firewall rule setting.

Install Subversion on Ubuntu 16.04

This article assumes you have at least basic knowledge of linux, know how to use the shell, and most importantly, you host your site on your own VPS. The installation is quite simple and assumes you are running in the root account, if not you may need to add ‘sudo’ to the commands to get root privileges. I will show you through the step by step installation Subversion on a Ubuntu 16.04 (Xenial Xerus) server.

Step 1. First make sure that all your system packages are up-to-date by running these following apt-get commands in the terminal.

sudo apt-get update
sudo apt-get upgrade

Step 2. Installing Apache web server.

First you need to install Apache web server to access svn server using http urls:

apt-get install apache2

Step 3. Installing Subversion.

Use following command to install subversion packages and there dependencies. Also install svn module for Apache libapache2-mod-svn packages on your system:

apt-get install subversion libapache2-mod-svn libapache2-svn libsvn-dev
a2enmod dav
a2enmod dav_svn

Step 4. Configure Apache for Subversion.

Subversion Apache module package creates an configuration file /etc/apache2/mods-enabled/dav_svn.conf. You just need to make necessary changes to it:

### nano /etc/apache2/mods-enabled/dav_svn.conf

Alias /svn /var/lib/svn

DAV svn
SVNParentPath /var/lib/svn

AuthType Basic
AuthName "Subversion Repository"
AuthUserFile /etc/apache2/dav_svn.passwd

After making above changes, restart Apache service:

systemctl restart apache2

Step 5. Create First SVN Repository.

Create your first svn repository named firstrepo, You can use any suitable name:

mkdir -p /var/lib/svn/
svnadmin create /var/lib/svn/myrepo
chown -R www-data:www-data /var/lib/svn
chmod -R 775 /var/lib/sv

Step 6. Create account and password for SVN.

Following commands will add two users for svn. It will prompt for users password to be assigned.

htpasswd -m /etc/apache2/dav_svn.passwd wpcademy.com
htpasswd -m /etc/apache2/dav_svn.passwd chedelics

Let’s restart Apache service again:

systemctl restart apache2

Step 7. Accessing Repository in Browser.

Subversion will be available on HTTP port 80 by default. Open your favorite browser and navigate to http://yourdomain.com/svn/myrepo/ or http://server-ip/svn/myrepo/ and will prompt for authentication. Use login credentials created in Step 6. If you are using a firewall, please open port 80 to enable access to the control panel.

Congratulation’s! You have successfully installed Subversion. Thanks for using this tutorial for installing Subversion on Ubuntu 16.04 LTS (Xenial Xerus) system. For additional help or useful information, we recommend you to check the official Apache Subversion web site.

How To Install Virtualmin on Ubuntu 16.04

Install Virtualmin on Ubuntu 16

Virtualmin is an advanced web server management panel, and a very good alternative to cPanel, with the same administration structure based on root users, resellers, and clients. Once installed, you will be able to manage Apache, Nginx, PHP, DNS, MySQL, PostgreSQL, mailboxes, FTP, SSH, SSL, Subversion/Git repositories and many more.

This article assumes you have at least basic knowledge of linux, know how to use the shell, and most importantly, you host your site on your own VPS. The installation is quite simple and assumes you are running in the root account, if not you may need to add ‘sudo’ to the commands to get root privileges. I will show you through the step by step installation Virtualmin on a Ubuntu 16.04 (Xenial Xerus) server.
Install Virtualmin on Ubuntu 16.04

Step 1. First make sure that all your system packages are up-to-date by running these following apt-get commands in the terminal.

sudo apt-get update
sudo apt-get upgrade

Step 2. Installing Virtualmin.

Virtualmin provides an install script which allows for an easy installation. Use the following command to download the script to your desire directory:

wget http://software.virtualmin.com/gpl/scripts/install.sh

Once downloaded, do a chmod +x to make the script executable:

chmod +x install.sh

Now it is time to running virtualmin install script. Installation will take approximately 5-15 minutes depends on your server speed and power. To do so, use the command below:

./install.sh
### During the installation it will ask you for the host name make sure you enter this correctly ###

Step 3. Accessing Virtualmin.

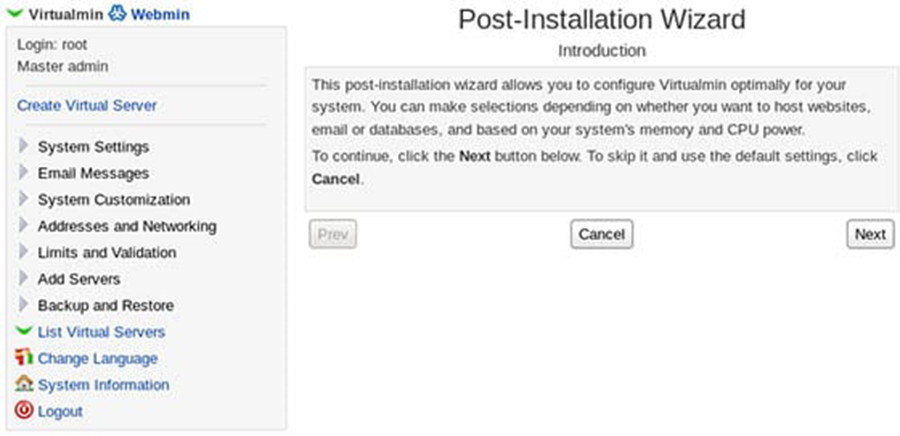
Virtualmin web based monitoring will be available on HTTPS port 10000 by default. Open your favorite browser and navigate to http://yourdomain.com:10000 or http://server-ip:10000. If you are using a firewall, please open port 10000 to enable access to the control panel.
virtualmin-installation
Congratulation’s! You have successfully installed Virtualmin. Thanks for using this tutorial for installing virtualmin web server management panel on Ubuntu 16.04 LTS (Xenial Xerus) system. For additional help or useful information, we recommend you to check the official Virtualmin web site.

How To Secure SSH Using Two Factor Authentication on Ubuntu 16.04 LTS

Two Factor Authentication on Ubuntu 16

Securing SSH with two factor authentication using Google Authenticator Two-step verification (also known as Two-factor authentication, abbreviated to TFA) is a process involving two stages to verify the identity of an entity trying to access services in a computer or in a network. This is a special case of a multi-factor authentication which might involve only one of the three authentication factors (a knowledge factor, a possession factor, and an inheritance factor) for both steps.

This article assumes you have at least basic knowledge of linux, know how to use the shell, and most importantly, you host your site on your own VPS. The installation is quite simple and assumes you are running in the root account, if not you may need to add ‘sudo’ to the commands to get root privileges. I will show you through the step by step secure SSH using two factor authentication on a Ubuntu 16.04 (Xenial Xerus) server.
Secure SSH Using Two Factor Authentication on Ubuntu 16.04 LTS

Step 1. First make sure that all your system packages are up-to-date by running these following apt-get commands in the terminal.

sudo apt-get update
sudo apt-get upgrade

Step 2. Installing the Google Authenticator.

To install the package on Ubuntu, run the following command:

apt-get install libpam-google-authenticator

The next step is to get the verification code. It’s a very simple command to get the verification code and scratch codes by just answering simple questions of server which he will ask you. You can do that step by running the following command:

google-authenticator

You will be prompted to answer a few questions; answer the first two questions with yes (y):

Do you want authentication tokens to be time-based (y/n) y

Big QR code will be generated in your terminal. You can scan the code with the authenticator application on your Android/iOS/Windows phone or tablet or enter the secret key generated on the screen.

Emergency scratch codes will also be generated. You can use these codes for authentication in case you lose your mobile device:
Your emergency scratch codes are:

80461001
68335920
89765548
12485672
11145603
/php]


Save the authentication settings for the root user by answering YES to the next question:
[php]
Do you want me to update your "/root/.google_authenticator" file (y/n) y

Next, you can configure the authenticator to generate one-time passwords. Since they last 30 seconds, all generated passwords can be used once. Answer y to create the file that stores these settings:

Do you want to disallow multiple uses of the same authentication
token? This restricts you to one login about every 30s, but it increases
your chances to notice or even prevent man-in-the-middle attacks (y/n) y

You can use the next setting if you have time syncing issues across your devices, so we will not use this option:

By default, tokens are good for 30 seconds and in order to compensate for
possible time-skew between the client and the server, we allow an extra
token before and after the current time. If you experience problems with poor
time synchronization, you can increase the window from its default
size of 1:30min to about 4min. Do you want to do so (y/n) n

The next setting prevents brute-force attacks. You will only have three chances per 30 seconds to enter the correct password:

If the computer that you are logging into isn't hardened against brute-force
login attempts, you can enable rate-limiting for the authentication module.
By default, this limits attackers to no more than 3 login attempts every 30s.
Do you want to enable rate-limiting (y/n) y

Congratulations! You have finished generating your key and adding it to your client, but some additional configuration is needed before these settings will go into effect.

The next step is to configure the authentication settings in openSSH. To do so, open the “/etc/pam.d/sshd” file and add the following line to the end of the file:

### nano /etc/pam.d/sshd
auth required pam_google_authenticator.so

Save the changes, and open the “/etc/ssh/sshd_config” file and enable Challenge Response Authentication:

### nano /etc/ssh/sshd_config
ChallengeResponseAuthentication yes

Finally, save the file and restart the SSH server for the changes to take effect:

systemctl restart ssh

Congratulation’s! You have successfully secure SSH. Thanks for using this tutorial for secure SSH using two factor authentication on Ubuntu 16.04 LTS (Xenial Xerus) system. For additional help or useful information, we recommend you to check the official SSH web site.

How To Install Google Drive Ocamlfuse on Ubuntu 16.04

Install Google Drive Ocamlfuse on Ubuntu 16

Google Drive Ocamlfuse is a FUSE-based file system powered by Google Drive. It lets you mount your Google Drive on Linux so that you can access your files and folders, either via the command line or through a traditional GUI file manager, like Nautilus, Nemo or Caja.

This article assumes you have at least basic knowledge of linux, know how to use the shell, and most importantly, you host your site on your own VPS. The installation is quite simple and assumes you are running in the root account, if not you may need to add ‘sudo’ to the commands to get root privileges. I will show you through the step by step installation Google Drive Ocamlfuse on a Ubuntu 16.04 (Xenial Xerus) server.
Install Google Drive Ocamlfuse on Ubuntu 16.04

Step 1. First make sure that all your system packages are up-to-date by running these following apt-get commands in the terminal.

sudo apt-get update
sudo apt-get upgrade

Step 2. Installing Google Drive Ocamlfuse.

Run the following commands in Terminal to install Google Drive Ocamlfuse:

sudo add-apt-repository ppa:alessandro-strada/ppa
sudo apt update
sudo apt install google-drive-ocamlfuse

Once installed complete you can go ahead and set up the app to work with your Google Drive account. While there isn’t a fancy-pants GUI front-end for setting things up don’t feel put. GDO is super simple to use via the CLI:

google-drive-ocamlfuse

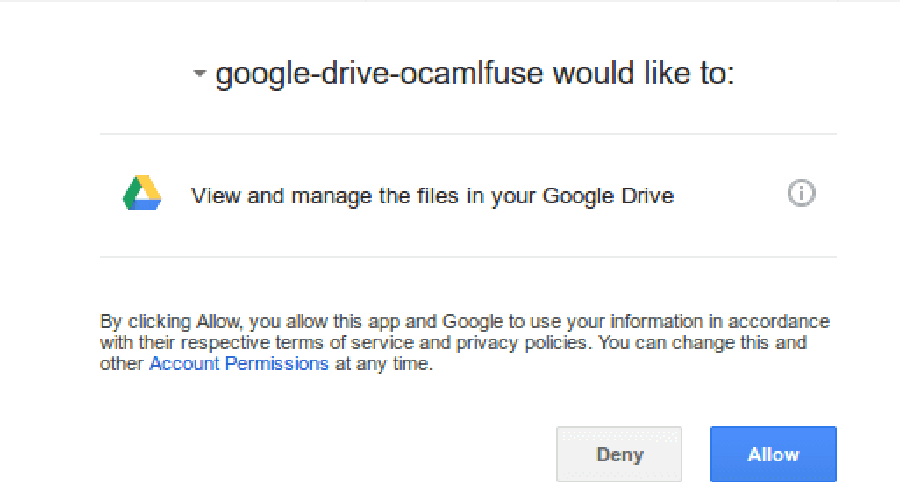
It will open a new tab in your browser asking you to grant it permission to view and manage the files in your Google Drive. Click Allow:
Google-drive-ocamlfuse-browser-auth

Step 3. Mount Your Google Drive.

First, create a mount point for your Google Drive, such as ~/google-drive:

mkdir ~/google-drive
google-drive-ocamlfuse ~/google-drive/

If you have more than one account, you can run:

google-drive-ocamlfuse -label label [mountpoint]

Step 4. Unmount Google Drive:

To unmount the filesystem, run this command:

fusermount -u ~/google-drive

Congratulation’s! You have successfully installed Google Drive. Thanks for using this tutorial for installing Google Drive Ocamlfuse on Ubuntu 16.04 LTS (Xenial Xerus) system. For additional help or useful information, we recommend you to check the official Google Drive web site.