How To Install Joomla on Ubuntu 16.04

Install Joomla on Ubuntu 16

Joomla is a free and open source popular content management that uses a PHP and a backend database, such as MySQL. It offers a wide variety of features that make it an incredibly flexible content management system right out of the box. Furthermore, there are hundreds of free extensions written for that allows users to extend its functionality and customize it to their own objectives. A major advantage of using a content management system (CMS) is that it requires almost no technical skill or knowledge to manage. if you are planning to publish content on your website frequently, then maybe using WordPress will be a better option for you.

This article assumes you have at least basic knowledge of linux, know how to use the shell, and most importantly, you host your site on your own VPS. The installation is quite simple. I will show you through the step by step installation Joomla in Ubuntu 16.04 server.

Install Joomla on Ubuntu 16.04

Step 1. First make sure that all your system packages are up-to-date by running these following apt-get commands in the terminal.

sudo apt-get update
sudo apt-get upgrade

Step 2. Install LAMP (Linux, Apache, MariaDB, PHP) server.

A Ubuntu 16.04 LAMP server is required. If you do not have LAMP installed, you can follow our guide here. Also install all required PHP modules:

apt-get install php7.0-mysql php7.0-curl php7.0-json php7.0-cgi php7.0 libapache2-mod-php7.0 <code>php7.0-mcrypt
</code>

Step 3. Installing Joomla.

First thing to do is to go to Joomla’s download page and download the latest stable version of Joomla, At the moment of writing this article it is version 3.5.1:

wget https://github.com/joomla/joomla-cms/releases/download/3.5.1/Joomla_3.5.1-Stable-Full_Package.zip
mkdir /var/www/html/joomla
unzip Joomla_3.5.1-Stable-Full_Package.zip -d /var/www/html/

We will need to change some folders permissions:

chown -R www-data.www-data /var/www/html
chmod -R 755 /var/www/html

By default, Apache2, installed a test html page in the /var/www/html directory called index.html. Remove that page if you want to. Now, we can restart Apache web server so that the changes take place:

systemctl restart apache2.service

Step 4. Configuring MariaDB for Joomla.

By default, MariaDB is not hardened. You can secure MariaDB using the mysql_secure_installation script. You should read and below each steps carefully which will set root password, remove anonymous users, disallow remote root login, and remove the test database and access to secure MariaDB.

mysql_secure_installation

Configure it like this:

- Set root password? [Y/n] y
- Remove anonymous users? [Y/n] y
- Disallow root login remotely? [Y/n] y
- Remove test database and access to it? [Y/n] y
- Reload privilege tables now? [Y/n] y

Next we will need to log in to the MariaDB console and create a database for the Joomla. Run the following command:

mysql -u root -p

This will prompt you for a password, so enter your MariaDB root password and hit Enter. Once you are logged in to your database server you need to create a database for Joomla installation:

CREATE DATABASE joomladb;
CREATE USER joomlauser@localhost;
SET PASSWORD FOR 'joomlauser'@'localhost' = PASSWORD("your-password");
GRANT ALL PRIVILEGES ON joomladb.* TO 'joomlauser'@'localhost' IDENTIFIED BY 'your-password' WITH GRANT OPTION;
FLUSH PRIVILEGES;
quit

Step 5. Configuring Apache web server for Joomla.

Create a new virtual host directive in Apache. For example, create a new Apache configuration file named ‘joomla.conf’ on your virtual server:

sudo a2enmod rewrite
touch /etc/apache2/sites-available/joomla.conf
ln -s /etc/apache2/sites-available/joomla.conf /etc/apache2/sites-enabled/joomla.conf
nano /etc/apache2/sites-available/joomla.conf

Add the following lines:

ServerAdmin [email protected]
DocumentRoot /var/www/html/
ServerName your-domain.com
ServerAlias www.your-domain.com

Options FollowSymLinks
AllowOverride All
Order allow,deny
allow from all

ErrorLog /var/log/apache2/your-domain.com-error_log
CustomLog /var/log/apache2/your-domain.com-access_log common

Now, we can restart Apache web server so that the changes take place:

systemctl restart apache2.service

Step 6. Accessing Joomla.

Joomla will be available on HTTP port 80 by default. Open your favorite browser and navigate to http://yourdomain.com/ or http://server-ip and complete the required the steps to finish the installation. If you are using a firewall, please open port 80 to enable access to the control panel.
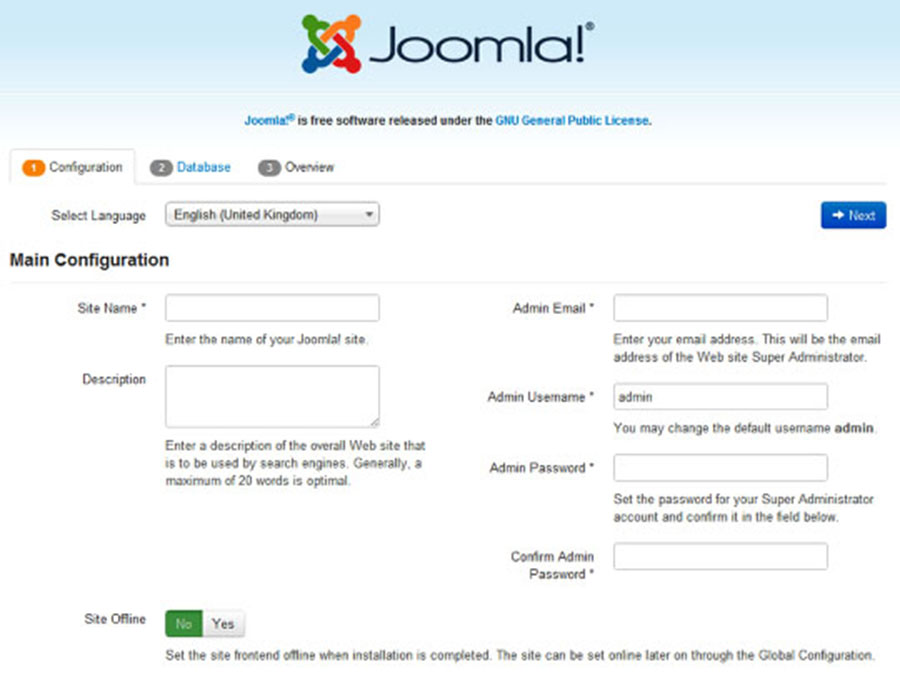
joomla-web-interface
Congratulation’s! You have successfully installed Joomla. Thanks for using this tutorial for installing Joomla CMS (content management system) on Ubuntu 16.04 systems. For additional help or useful information, we recommend you to check the official Joomla web site.

You Might Also Like: How To Install WordPress with Docker on Ubuntu 16.04

How To Install Webmin on Ubuntu 16.04

Install Webmin on Ubuntu 16

Webmin is a free control Panel for managing VPS. Webmin is a web based interface which is used to manage VPS web hosting server. With the help of webmin you can setup user account, apache, dns and file sharing and other actions. Webmin very suitable for beginners who do not know much about the unix or linux command line.

This article assumes you have at least basic knowledge of linux, know how to use the shell, and most importantly, you host your site on your own VPS. The installation is quite simple and assumes you are running in the root account, if not you may need to add ‘sudo’ to the commands to get root privileges. I will show you through the step by step installation Webmin on a Ubuntu 16.04 LTS (Xenial Xerus) server.

Install Webmin on Ubuntu 16.04

Step 1. First you need add Webmin official repository and make sure that all packages are up to date.

sudo nano /etc/apt/sources.list

And add the following lines:

deb http://download.webmin.com/download/repository sarge contrib
deb http://webmin.mirror.somersettechsolutions.co.uk/repository sarge contrib

Fetch and install the GPG key:

sudo wget http://www.webmin.com/jcameron-key.asc
sudo apt-key add jcameron-key.asc

Step 2. Installing Webmin.

Install Webmin with the following command:

apt-get update
apt-get install webmin -y

Now, allow the Webmin default port via a firewall:

sudo ufw allow 10000

Step 3. Access Webmin.

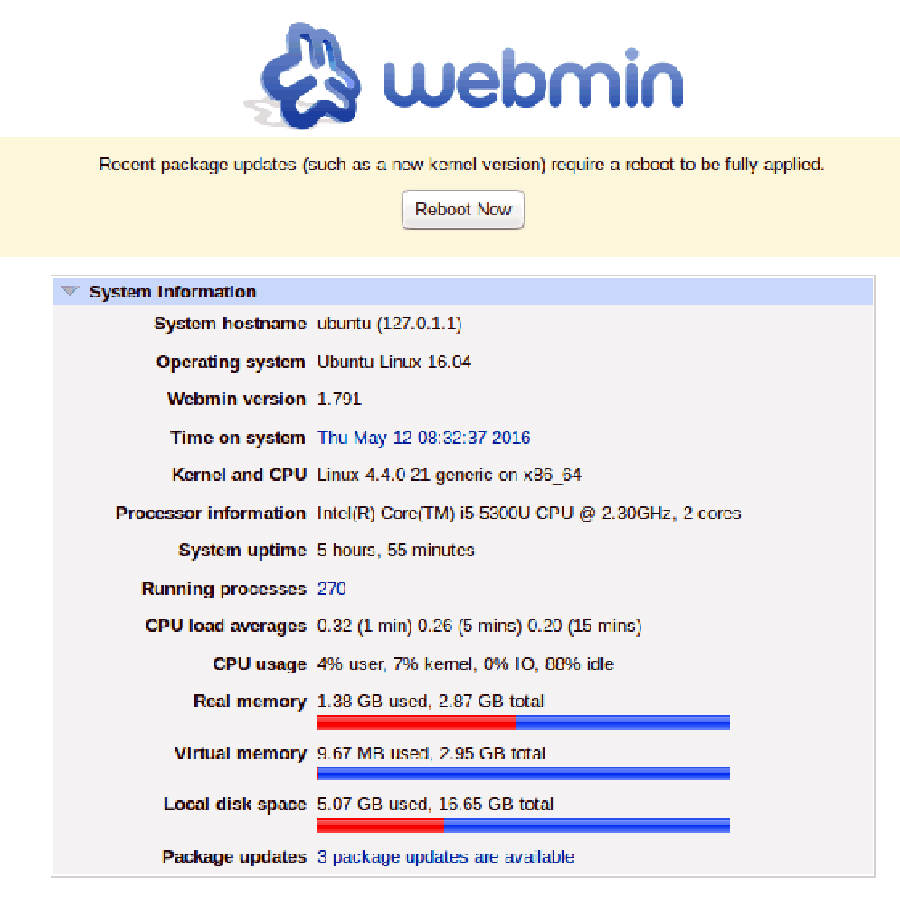
Finaly, we can access the webmin panel using our web browser. Webmin use 10000 as its default port. Type this into our URL address web browser. https://ip-address:10000 then login as super user or root access priviliges. If you are using a firewall, please open port 80 and 10000 to enable access to the control panel.
webmin-ubuntu-16.04
Congratulation’s! You have successfully installed Webmin. Thanks for using this tutorial for installing Webmin control panel in Ubuntu 16.04 system. For additional help or useful information, we recommend you to check the official Webmin web site.

You Might Also Like: How To Install Webmin on CentOS

How to Install Cinnamon on Ubuntu 16.04

Install Cinnamon on Ubuntu 16

Cinnamon is an open source project that provides users with a full featured desktop environment for GNU/Linux operating systems. It is a fork of the GNOME Shell user interface distributed with the GNOME project. It has been designed from the ground up to provide users with a traditional, yet advanced and modern graphical session for their Linux-based operating systems. It’s usually deployed on the Linux Mint distribution.

This article assumes you have at least basic knowledge of linux, know how to use the shell, and most importantly, you host your site on your own VPS. The installation is quite simple and assumes you are running in the root account, if not you may need to add ‘sudo’ to the commands to get root privileges. I will show you through the step by step installation Cinnamon on a Ubuntu 16.04 server.

Install Cinnamon on Ubuntu 16.04

Step 1. First make sure that all your system packages are up-to-date by running these following apt-get commands in the terminal.

sudo apt-get update
sudo apt-get upgrade

Step 2. Installing Cinnamon.

First add the community PPA and this PPA can be used only by Xenial users. And please make sure that idr00t doesn’t provide any guarantee and you understand that you install at your own risk. But the following community PPA has been un-officially given the go ahead by Moorkai, one of the developers behind the popular Cinnamon PPA:

sudo add-apt-repository ppa:embrosyn/cinnamon

Now, type the following command to finally install Cinnamon:

sudo apt-get install cinnamon

To check the installed version of Cinnamon, please issue the below command on your terminal to check whether Cinnamon is installed or not:

cinnamon --version

Step 3. Accessing Cinnamon.

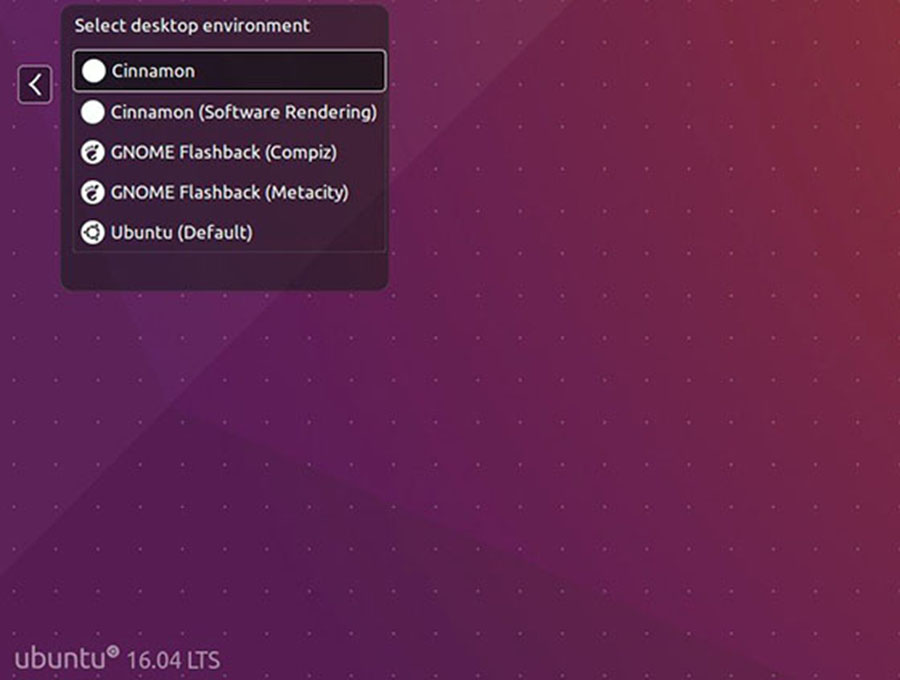
If everything goes OK, log out and select log in with Cinnamon session or Cinnamon (Software Rendering) session if you want it use software rendering to do more of the graphical work):
install-cinnamon
Congratulation’s! You have successfully installed Cinnamon. Thanks for using this tutorial for installing Cinnamon on your Ubuntu 16.04 system. For additional help or useful information, we recommend you to check the official Cinnamon web site.

How To Install MongoDB on Ubuntu 16.04

Install MongoDB on Ubuntu 16

MongoDB is a NoSQL document-oriented database. Refers to a database with a data model other than the tabular format used in relational databases such as MySQL, PostgreSQL, and Microsoft SQL. MongoDB features include: full index support, replication, high availability, and auto-sharding. It is a cross-platform and it makes the process of data integration faster and much easier. Since it is free and open-source, MongoDB is used by number of websites and organizations.

This article assumes you have at least basic knowledge of linux, know how to use the shell, and most importantly, you host your site on your own VPS. The installation is quite simple and assumes you are running in the root account, if not you may need to add ‘sudo’ to the commands to get root privileges. I will show you through the step by step installation MongoDB on a Ubuntu 16.04 LTS (Xenial Xerus) server.

Install MongoDB on Ubuntu 16.04

Step 1. First make sure that all your system packages are up-to-date by running these following apt-get commands in the terminal.

sudo apt-get update
sudo apt-get upgrade

Step 2. Install MongoDB packages.

First to completely remove an existing Mongodb from your machine if you have that in already:

sudo apt-get remove mongodb
sudo apt-get autoremove

A stable version of MongoDB packages are already in the default Ubuntu repository. However, the version in Ubuntu’s repository isn’t the latest. If you want to install the latest version you must add a third-party repository to your system and install it from there:

sudo apt-key adv --keyserver hkp://keyserver.ubuntu.com:80 --recv EA312927

Next, run the commands below to add trusty repository:

echo "deb http://repo.mongodb.org/apt/ubuntu trusty/mongodb-org/3.2 multiverse" | sudo tee /etc/apt/sources.list.d/mongodb-org-3.2.list

After that, update your system and refresh existing repositories by running the commands below:

sudo apt-get update

And now install the latest stable version of MongoDB:

apt-get install -y --allow-unauthenticated mongodb-org

Step 3. Verifying MongoDB database.

To verify it is successfully installed, run the commands below to view its running status:

# sudo service mongodb enable
# sudo service mongodb start
# sudo service mongodb status
● mongodb.service - LSB: An object/document-oriented database
   Loaded: loaded (/etc/init.d/mongodb; bad; vendor preset: enabled)
   Active: active (running) since Thu 2016-06-4 16:40:35 IST; 14s ago
     Docs: man:systemd-sysv-generator(8)
  Process: 2849 ExecStart=/etc/init.d/mongodb start (code=exited, status=0/SUCCESS)
  Main PID: 1593 (code=exited, status=0/SUCCESS)
    Tasks: 13 (limit: 512)
   Memory: 51.9M
      CPU: 100ms
   CGroup: /system.slice/mongodb.service
           └─2861 /usr/bin/mongod --config /etc/mongodb.conf

A good way to start using MongoDB on your Ubuntu 16.04 is to read the MongoDB manual on the official web site.

https://docs.mongodb.org/manual/

Congratulation’s! You have successfully installed MongoDB. Thanks for using this tutorial for installing MongoDB in Ubuntu 16.04 LTS system. For additional help or useful information, we recommend you to check the official MongoDB web site.

You Might Also Like: How To Install MongoDB on CentOS 6

How To Install Textpattern on Ubuntu 16.04

Install Textpattern on Ubuntu 16

Textpattern is an elegant CMS. It is a free open source software that allows web developers, designers, and bloggers to publish their content within a clean and easy interface. Texpattern comes with full range of features and it allows you to easily create, edit and publish content on your website.

This article assumes you have at least basic knowledge of linux, know how to use the shell, and most importantly, you host your site on your own VPS. The installation is quite simple and assumes you are running in the root account, if not you may need to add ‘sudo’ to the commands to get root privileges. I will show you through the step by step installation Textpattern on a Ubuntu 16.04 LTS (Xenial Xerus) server.

Install Textpattern on Ubuntu 16.04

Step 1. First make sure that all your system packages are up-to-date by running these following apt-get commands in the terminal.

sudo apt-get update
sudo apt-get upgrade

Step 2. Install LAMP (Linux, Apache, MariaDB, PHP) server.

A Ubuntu 16.04 LAMP server is required. If you do not have LAMP installed, you can follow our guide here. Also install all required PHP modules:

apt-get install php5 php5-mysql php5-gd php5-curl libssh2-php

Step 3. Installing Textpattern.

First thing to do is to go to Textpattern’s download page and download the latest stable version of Textpattern, At the moment of writing this article it is version 4.5.7:

wget https://textpattern.com/file_download/75/textpattern-4.6.2.zip
unzip Textpattern-4.6.2.zip -d /var/www/html
cd textpattern-4.6.2
cp -a * ..

We will need to change some folders permissions:

chown -R www-data:www-data /var/www/html/
[/hp]


<strong>Step 4. Configuring MariaDB for Textpattern.</strong>

By default, MariaDB is not hardened. You can secure MariaDB using the mysql_secure_installation script. You should read and below each steps carefully which will set root password, remove anonymous users, disallow remote root login, and remove the test database and access to secure MariaDB.
[php]
mysql_secure_installation

Configure it like this:

- Set root password? [Y/n] y
- Remove anonymous users? [Y/n] y
- Disallow root login remotely? [Y/n] y
- Remove test database and access to it? [Y/n] y
- Reload privilege tables now? [Y/n] y

Next we will need to log in to the MariaDB console and create a database for the Textpattern. Run the following command:

mysql -u root -p

This will prompt you for a password, so enter your MariaDB root password and hit Enter. Once you are logged in to your database server you need to create a database for Textpattern installation:

CREATE DATABASE textpattern;
CREATE USER 'Ttextpatternuser'@'localhost' IDENTIFIED BY 'PASSWORD';
GRANT ALL PRIVILEGES ON `textpattern`.* TO 'textpatternuser'@'localhost';
FLUSH PRIVILEGES;

Step 5. Configuring Apache web server for Textpattern.

Create a new virtual host directive in Apache. For example, create a new Apache configuration file named ‘textpattern.conf’ on your virtual server:

sudo a2enmod rewrite
touch /etc/apache2/sites-available/textpattern.conf
ln -s /etc/apache2/sites-available/textpattern.conf /etc/apache2/sites-enabled/textpattern.conf
nano /etc/apache2/sites-available/textpattern.conf

Add the following lines:

<VirtualHost *:80>
ServerAdmin [email protected]
DocumentRoot "/var/www/html/"
ServerName your-domain.com
ServerAlias www.your-domain.com
<Directory "/var/www/html/">
Options FollowSymLinks
AllowOverride All
Order allow,deny
allow from all
</Directory>
ErrorLog /var/log/apache2/your-domain.com-error_log
CustomLog /var/log/apache2/your-domain.com-access_log common
</VirtualHost>

Now, we can restart Apache web server so that the changes take place:

systemctl restart apache2.service

Step 6. Accessing Textpattern.

Textpattern will be available on HTTP port 80 by default. Open your favorite browser and navigate to http://yourdomain.com/setup/index.php or http://server-ip/setup/index.php and complete the required the steps to finish the installation. If you are using a firewall, please open port 80 to enable access to the control panel.

Congratulation’s! You have successfully installed Textpattern. Thanks for using this tutorial for installing Textpattern content management system (CMS) on yourUbuntu 16.04 LTS (Xenial Xerus) system. For additional help or useful information, we recommend you to check the official Textpattern web site.

How To Install Shopware on Ubuntu 16.04

Install Shopware on Ubuntu 16

Shopware is the next generation of open source e-commerce software made in Germany. Based on bleeding edge technologies like Symfony 2, Doctrine 2 and Zend Framework Shopware comes as the perfect platform for your next e-commerce project. Furthermore Shopware provides an event-driven plugin system and an advanced hook system, giving you the ability to customize every part of the platform.

This article assumes you have at least basic knowledge of linux, know how to use the shell, and most importantly, you host your site on your own VPS. The installation is quite simple and assumes you are running in the root account, if not you may need to add ‘sudo’ to the commands to get root privileges. I will show you through the step by step installation Shopware on a Ubuntu 16.04 LTS (Xenial Xerus) server.

Install Shopware on Ubuntu 16.04

Step 1. First make sure that all your system packages are up-to-date by running these following apt-get commands in the terminal.

sudo apt-get update
sudo apt-get upgrade

Step 2. Install LAMP (Linux, Apache, MariaDB, PHP) server.

A Ubuntu 16.04 LAMP server is required. If you do not have LAMP installed, you can follow our guide here. Also install all required PHP modules:

apt-get install php5 php5-mysql php5-gd php5-curl libssh2-php

Step 3. Installing Shopware.

First thing to do is to go to Shopware’s download page and download the latest stable version of Shopware, At the moment of writing this article it is version 5:

wget https://github.com/shopware/shopware/archive/v5.1.6.zip
unzip v5.1.6.zip -d /var/www/html
cd /var/www/html/shopware-5.1.6
cp -a * ..

We will need to change some folders permissions:

chown -R www-data:www-data /var/www/html/

Step 4. Configuring MariaDB for Shopware.

By default, MariaDB is not hardened. You can secure MariaDB using the mysql_secure_installation script. You should read and below each steps carefully which will set root password, remove anonymous users, disallow remote root login, and remove the test database and access to secure MariaDB.

mysql_secure_installation

Configure it like this:

- Set root password? [Y/n] y
- Remove anonymous users? [Y/n] y
- Disallow root login remotely? [Y/n] y
- Remove test database and access to it? [Y/n] y
- Reload privilege tables now? [Y/n] y

Next we will need to log in to the MariaDB console and create a database for the Shopware. Run the following command:

mysql -u root -p

This will prompt you for a password, so enter your MariaDB root password and hit Enter. Once you are logged in to your database server you need to create a database for Shopware installation:

CREATE DATABASE shopware;
GRANT ALL PRIVILEGES ON shopware.* TO 'shopware'@'localhost' IDENTIFIED BY 'strong_password';
FLUSH PRIVILEGES;
\q

Step 5. Configuring Apache web server for Shopware.

Create a new virtual host directive in Apache. For example, create a new Apache configuration file named ‘shopware.conf’ on your virtual server:

sudo a2enmod rewrite
touch /etc/apache2/sites-available/shopware.conf
ln -s /etc/apache2/sites-available/shopware.conf /etc/apache2/sites-enabled/shopware.conf
nano /etc/apache2/sites-available/shopware.conf

Add the following lines:

<VirtualHost *:80>
ServerAdmin [email protected]
DocumentRoot "/var/www/html/"
ServerName your-domain.com
ServerAlias www.your-domain.com
<Directory "/var/www/html/">
Options FollowSymLinks
AllowOverride All
Order allow,deny
allow from all
</Directory>
ErrorLog /var/log/apache2/your-domain.com-error_log
CustomLog /var/log/apache2/your-domain.com-access_log common
</VirtualHost>

Now, we can restart Apache web server so that the changes take place:

systemctl restart apache2.service

Step 6. Accessing Shopware.

Shopware will be available on HTTP port 80 by default. Open your favorite browser and navigate to http://yourdomain.com or http://server-ip and complete the required the steps to finish the installation. If you are using a firewall, please open port 80 to enable access to the control panel.

Congratulation’s! You have successfully installed Shopware. Thanks for using this tutorial for installing Shopware open source e-commerce on your Ubuntu 16.04 LTS (Xenial Xerus) system. For additional help or useful information, we recommend you to check the official Shopware web site.

How To Install Apache Tomcat 8 on Ubuntu 16.04

Install Apache Tomcat 8 on Ubuntu 16

Apache Tomcat is an open source web server and servlet container developed by the Apache Software Foundation. It implements the Java Servlet, JavaServer Pages (JSP), Java Unified Expression Language and Java WebSocket specifications from Sun Microsystems and provides a web server environment for Java code to run in.

This article assumes you have at least basic knowledge of linux, know how to use the shell, and most importantly, you host your site on your own VPS. The installation is quite simple and assumes you are running in the root account, if not you may need to add ‘sudo’ to the commands to get root privileges. I will show you through the step by step installation Apache Tomcat 8 on a Ubuntu 16.04 LTS (Xenial Xerus) server.

Install Apache Tomcat 8 on Ubuntu 16.04

Step 1. Installing Java (JRE or JDK).

Once you have verified if Java is installed or not, choose the type of Java installation that you want with one the following:

sudo apt-get install openjdk-7-jre
sudo apt-get install openjdk-7-jdk

Another alternative Java install is with Oracle JRE and JDK. However, we would need to install additional repositories for a proper installation:

sudo apt-get install python-software-properties
sudo add-apt-repository ppa:webupd8team/java

Then, you will need to fully update the system with the following command and install it:

sudo apt-get update
sudo apt-get install oracle-java8-installer

Verify Installed Java Version.

java -version

Result:

java version "1.8.0_74"
Java(TM) SE Runtime Environment (build 1.8.0_74-b02)
Java HotSpot(TM) 64-Bit Server VM (build 25.74-b02, mixed mode)

Setup JAVA_HOME on Ubuntu 16.04.

Since many programs now days need a JAVA_HOME environment variable to work properly. We will need to find the appropriate path to make these changes. With the following command, you can view your installs and their path:

sudo update-alternatives --config java
sudo nano /etc/profile

Now that you are in the user profile file, add the following code, along with the Path of your installation from the previous step, to the bottom. ( Example: JAVA_HOME=”YOUR_PATH”):

export JAVA_HOME="/usr/lib/jvm/java-1.8.0-openjdk-1.8.0.51-1.b16.el7_1.x86_64"

Reload the file so all your changes could take effect with the following command:

source /etc/profile

Verify that your implementations are correct with the following command:

echo $JAVA_HOME

Step 2. Installing Apache Tomcat.

First thing to do is to go to Apache Tomcat’s download page and download the latest stable version of Apache Tomcat, At the moment of writing this article it is version 8:

cd /opt
wget http://a.mbbsindia.com/tomcat/tomcat-8/v8.0.35/bin/apache-tomcat-8.0.35.zip
tar -xvf apache-tomcat-8.0.35.zip

Add tomcat user and group:

ln -s /opt/apache-tomcat-8.0.35 /opt/tomcat-latest
chown -hR tomcat8: /opt/tomcat-latest /opt/apache-tomcat-8.0.35

Step 3. Configure environment variables.

Before starting Tomcat, configure CATALINA_HOME environment variable in your system using following commands.

# echo "export CATALINA_HOME=\"apache-tomcat-8.0.35\"" >> ~/.bashrc
# source ~/.bashrc

Step 4. Configure Tomcat to run as a service.

cd /opt/apache-tomcat-8.0.35/bin
./startup.sh

You will get the following output.

Using CATALINA_BASE:   /var/local/apache-tomcat-8.0.35
Using CATALINA_HOME:   /var/local/apache-tomcat-8.0.35
Using CATALINA_TMPDIR: /var/local/apache-tomcat-8.0.35/temp
Using JRE_HOME:        /usr
Using CLASSPATH:       /var/local/apache-tomcat-8.0.35/bin/bootstrap.jar:/var/local/apache-tomcat-8.0.35/bin/tomcat-juli.jar
Tomcat starte

You can verify the service running, by default tomcat runs on port no 8080.

[root@wpcademy ~]# netstat -antup | grep 8080
tcp        0      0 0.0.0.0:8080                0.0.0.0:*                   LISTEN
1
2
	
[root@wpcademy~]# netstat -antup | grep 8080
tcp       0     00.0.0.0:8080               0.0.0.0:*                  LISTEN

Step 5. Finally, open Tomcat from your browser, go to your IP or domain with the 8080 port (because Tomcat will always run on the 8080 port) as an example: mydomain.com:8080, replace mydomain.com with your IP or domain.

To shutdown Tomcat you can simply run the shutdown script in the same folder like this:

/opt/apache-tomcat-8.0.35/bin/shutdown.sh

Step 6. Setup user accounts.

Configure Tomcat users so they can access admin/manager sections. You can do this by adding the users in the conf/tomcat-users.xml file with your favorite text editor. Add this text to the file:

nano /opt/apache-tomcat-8.0.35/conf/server.xml

Place the following two lines just above the last line.

<!-- user manager can access only manager section -->
<role rolename="manager-gui" />
<user username="manager" password="_SECRET_PASSWORD_" roles="manager-gui" />

<!-- user admin can access manager and admin section both -->
<role rolename="admin-gui" />
<user username="admin" password="_SECRET_PASSWORD_" roles="manager-gui,admin-gui" />

Save and close the file when you are finished. To put our changes into effect, restart the Tomcat service:

systemctl restart tomcat

Congratulation’s! You have successfully installed Apache Tomcat. Thanks for using this tutorial for installing Apache Tomcat 8 in Ubuntu 16.04 LTS system. For additional help or useful information, we recommend you to check the official Apache Tomcat web site.