How To Install Cacti Monitoring V1.2.3 on Ubuntu 18.04 LTS

Cacti Monitoring

Cacti is an open-source, web-based network monitoring and graphing tool designed as a front-end application for the open-source, industry-standard data logging tool RRDtool. It is used by IT businesses and stores all of the necessary information about bandwidth, hard disk usage, CPU usage, load average, RAM statistics etc in a MySQL database. Cacti creates graphs and populates them with data. It offers SNMP support, 3rd party templates and plugins and has built in user authentications and user permission features.

This article assumes you have at least basic knowledge of Linux, know how to use the shell, and most importantly, you host your site on your own VPS. The installation is quite simple and assumes you are running in the root account, if not you may need to add ‘sudo’ to the commands to get root privileges. I will show you through the step by step installation Cacti Monitoring on a Ubuntu 18.04 (Bionic Beaver) server.

Install Cacti Monitoring on Ubuntu 18.04 LTS

Step 1. First make sure that all your system packages are up-to-date Install Cacti Monitoring on Ubuntu 18

sudo apt-get update
sudo apt-get upgrade

Step 2. Install LAMP (Linux, Apache, MariaDB and PHP) server.

A Ubuntu 18.04 LAMP server is required. If you do not have LAMP installed, you can follow our guide here. Also install all required PHP modules:

apt-get install php7.1-cli php7.1-gd php7.1-opcache php7.1-mysql php7.1-json php7.1-mcrypt php7.1-xml php7.1-curl

Step 3. Configuring MariaDB for Cacti.

By default, MariaDB is not hardened. You can secure MariaDB using the mysql_secure_installation script. you should read and below each steps carefully which will set root password, remove anonymous users, disallow remote root login, and remove the test database and access to secure MariaDB:

mysql_secure_installation

Configure it like this:

- Set root password? [Y/n] y
- Remove anonymous users? [Y/n] y
- Disallow root login remotely? [Y/n] y
- Remove test database and access to it? [Y/n] y
- Reload privilege tables now? [Y/n] y

Next we will need to log in to the MariaDB console and create a database for the Cacti. Run the following command:

mysql -u root -p

This will prompt you for a password, so enter your MariaDB root password and hit Enter. Once you are logged in to your database server you need to create a database for Cacti installation:

Ccreate database cacti;
GRANT ALL ON cacti.* TO cactiuser@localhost IDENTIFIED BY 'cactipassword';
flush privileges;
exit

The newly created database user (cactiuser) should have access to the mysql.time_zone_name Table. To do that, import the mysql_test_data_timezone.sql to mysql database:

mysql -u root -p mysql < /usr/share/mysql/mysql_test_data_timezone.sql

Then, log in to Mariadb:

mysql -u root -p

Grant the permission to cactiuser:

GRANT SELECT ON mysql.time_zone_name TO cactiuser@localhost;
flush privileges;
exit

Step 4. Installing the Cacti packages.

Install SNMP and SNMP and RRDtools:

sudo apt-get install snmp snmpd snmp-mibs-downloader rrdtool

Now use the following command to install Cacti:

apt-get install cacti cacti-spine

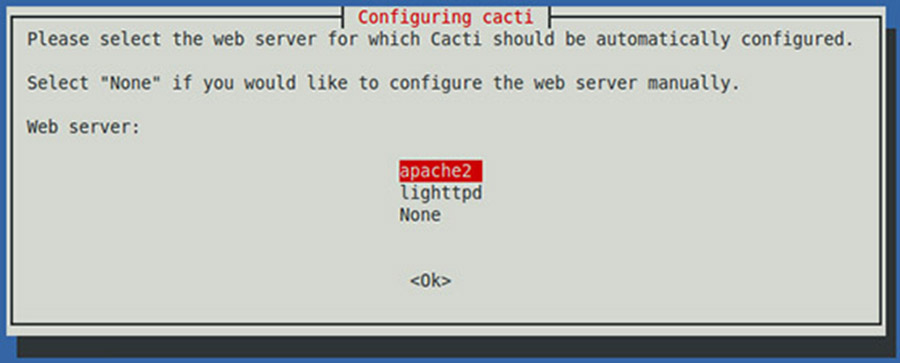
During the installation process you will be prompted to configure Cacti with few options to select from available options. First of all Choose the web server that you wish to use for configure with Cacti like we are using Apache and then press ‘OK’ key to continue:

cacti-installation-ubunut-1

Now it will ask you for a webserver that you will use it, we choose Apache2 since that’s what we installed in the dependencies.
cacti-installation-ubunut-2

Next it will ask to configure the Cacti database, select Yes.
cacti-installation-ubunut-3
Now it will ask for your root password of MySQL/MariaDB database.
cacti-installation-ubunut-4

Once the installation process is complete, you will have to restart all services to reflect the changes made:

systemctl restart apache2.service
systemctl restart mysql.service
systemctl restart snmpd.service

Step 5. Accessing cacti.

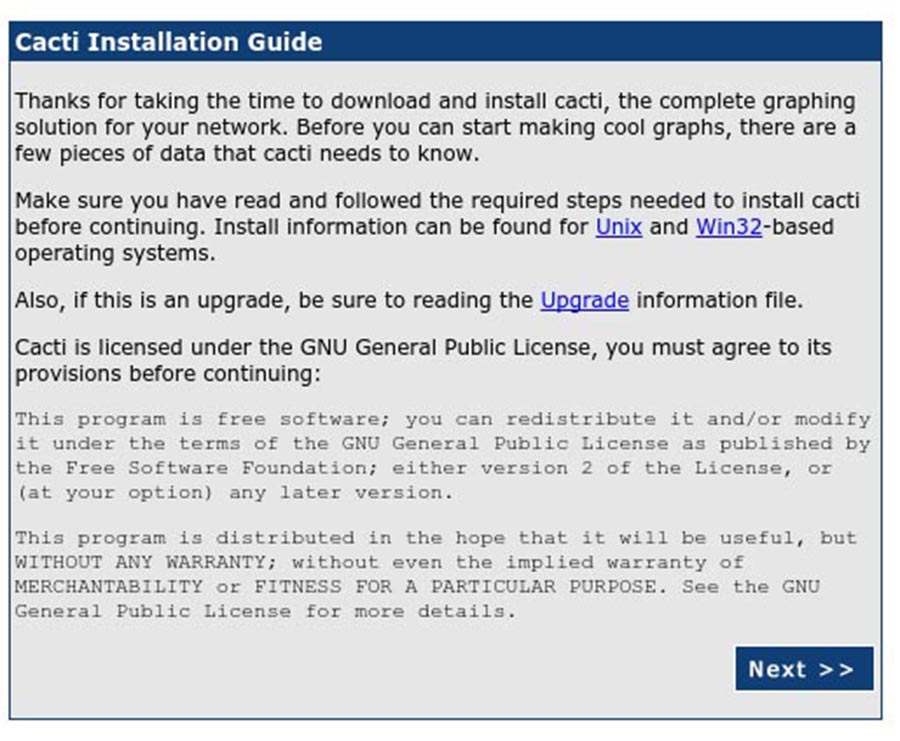
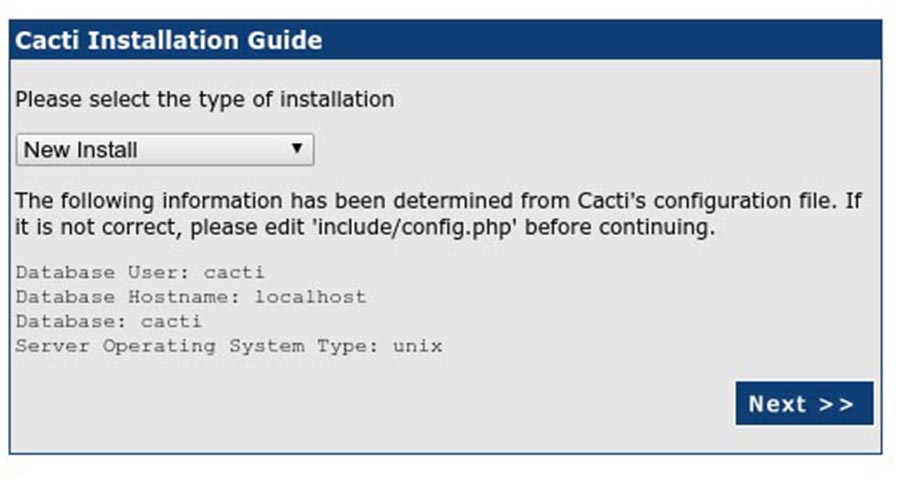
Cacti will be available on HTTP port 80 by default. Open your favorite browser and navigate to http://yourdomain.com/cacti or http://server-ip/cacti and complete the required the steps to finish the installation. You will get the “Cacti Installation Guide” on screen. Click on ‘Next’ button.
In next screen, you will get drop down button. Because this fresh installation select ‘New Install’ and click ‘Next’ button.
Cacti_installing-2
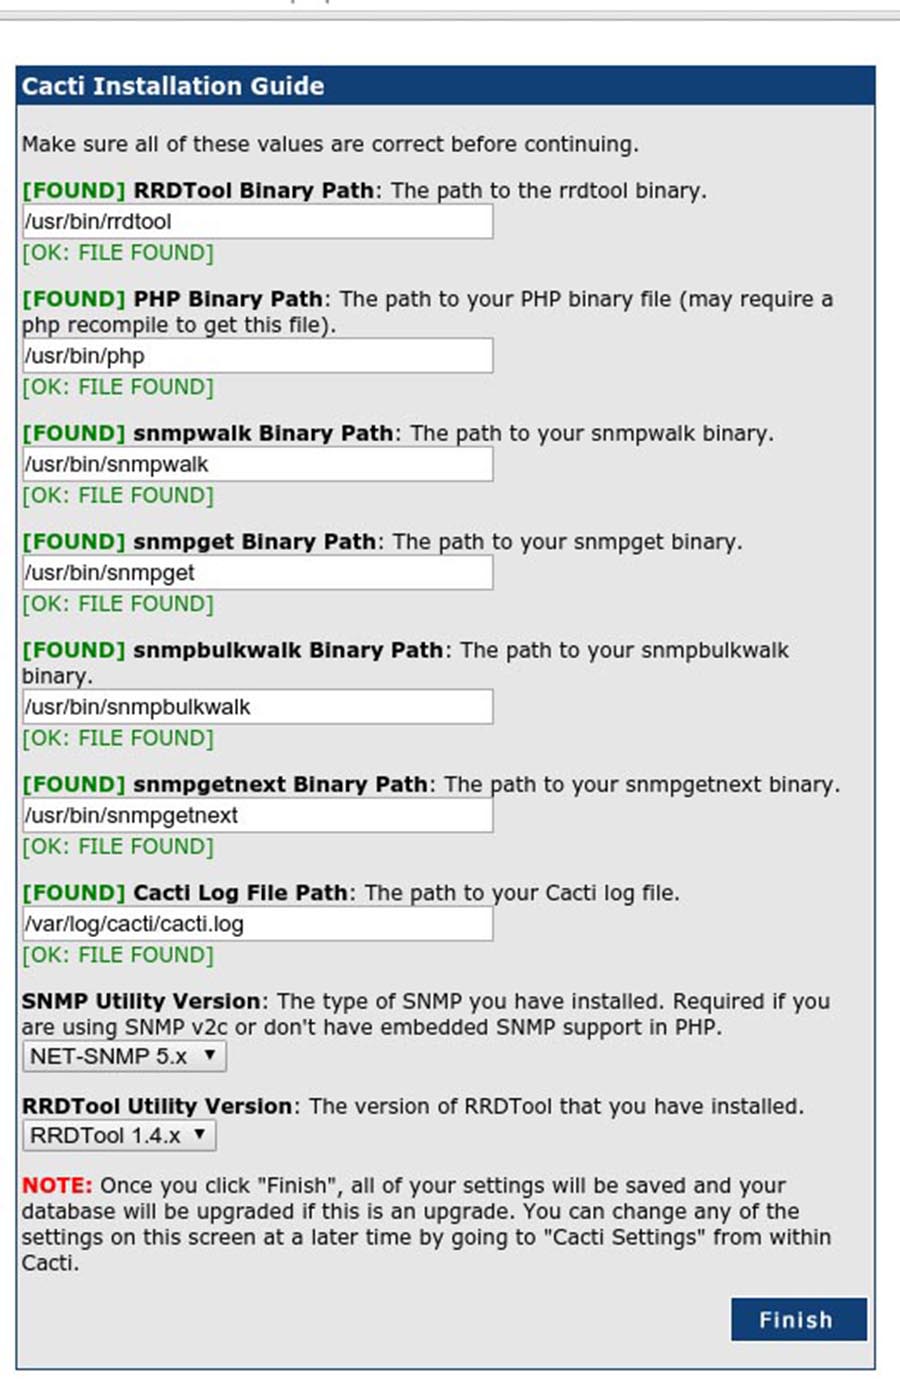
Cacti will now check for the packages it needs to run properly. Make sure all the checks appear with an “OK” status, and then click Finish.
Cacti_installing-3
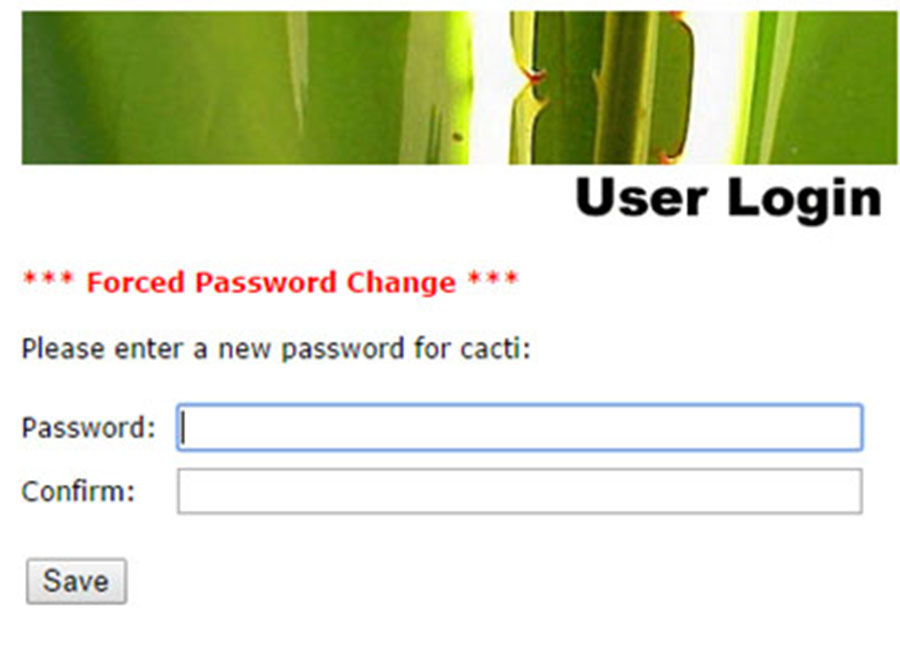
The next page is the login page. The first time you log into Cacti, use admin as username and password.
Cacti-installing-4

Congratulation’s! You have successfully installed Cacti. Thanks for using this tutorial for installing Cacti Monitoring on Ubuntu 18.04 LTS (Bionic Beaver) system. For additional help or useful information, we recommend you to check the official Cacti Monitoring web site.

How To Install Multiple PHP V7.1.28 Version on Ubuntu 18.04 LTS

Install Multiple PHP Version on Ubuntu 18

PHP (recursive acronym for PHP: Hypertext Preprocessor) is an open source, popular general-purpose scripting language that is widely-used and best suited for developing websites and web-based applications. It is a server-side scripting language that can be embedded in HTML.

This article assumes you have at least basic knowledge of Linux, know how to use the shell, and most importantly, you host your site on your own VPS. The installation is quite simple and assumes you are running in the root account, if not you may need to add ‘sudo’ to the commands to get root privileges. I will show you through the step by step installation Multiple PHP Versionon a Ubuntu 18.04 (Bionic Beaver) server.

Install Multiple PHP Version on Ubuntu 18.04 LTS

Step 1. First make sure that all your system packages are up-to-date

sudo apt-get update
sudo apt-get upgrade
sudo apt install apache2 libapache2-mod-fcgid

Step 2. Installing PHP.

First add the PPA to your system:

sudo apt install python-software-properties
sudo add-apt-repository ppa:ondrej/php

For this tutorial, we are using the PHP 5.6 and PHP 7.2 to configure with Apache web server. To use the multiple PHP versions, we will use PHP FPM:

apt update
sudo apt install php5.6 php5.6-fpm
sudo apt install php7.2 php7.2-fpm

After installation, check status PHP services are running:

systemctl status php5.6-fpm
systemctl status php7.2-fpm

Step 3. Apache Web Server Configuration.

First, create two directories on your server:

mkdir /var/www/php56
mkdir /var/www/php72

Next, create a test file named info.php with he content below. Save the file, then browse to it to see if PHP is working:

echo "<?php phpinfo(); ?>" > /var/www/php56/index.php
echo "<?php phpinfo(); ?>" > /var/www/php72/index.php

Let’s start the creation of VirtualHost and edit in your favorite text editor:

nano /etc/apache2/sites-available/php56.example.com.conf

Add the following content:

<VirtualHost *:80>
ServerName php56.example.com
DocumentRoot /var/www/php56
<Directory /var/www/php56>
Options -Indexes +FollowSymLinks +MultiViews
AllowOverride All
Require all granted
</Directory>
<FilesMatch \.php$>
# Apache 2.4.10+ can proxy to unix socket
SetHandler "proxy:unix:/var/run/php/php5.6-fpm.sock|fcgi://localhost/"
</FilesMatch>
</VirtualHost>

Then, create a second VirtualHost configuration file to work with PHP 7.2:

nano /etc/apache2/sites-available/php72.example.com.conf

Add the following content:

<VirtualHost *:80>
ServerName php72.example.com
DocumentRoot /var/www/php72
<Directory /var/www/php72>
Options -Indexes +FollowSymLinks +MultiViews
AllowOverride All
Require all granted
</Directory>
<FilesMatch \.php$>
SetHandler "proxy:unix:/var/run/php/php7.2-fpm.sock|fcgi://localhost/"
</FilesMatch>
</VirtualHost>

Create a symbolic link of config files to this directory or use below command:

sudo a2ensite php56.example.com
sudo a2ensite php72.example.com
sudo a2enmod actions fastcgi alias proxy_fcgi

After making all the changes restart Apache to reload new settings changes:

systemctl restart apache2

Step 4. Test Multiple PHP Version.

Try to access it at php56.example.com shows the version PHP 5.6 and php72.example.com is showing the PHP 7.2 . If the PHP info page is rendered in your browser then everything looks good and you are ready to proceed further.

Congratulation’s! You have successfully installed Multiple PHP Version. Thanks for using this tutorial for installing Multiple PHP on Ubuntu 18.04 LTS (Bionic Beaver) system. For additional help or useful information, we recommend you to check the official PHP web site.

How To Install Tor Browser 8.5a11 on Ubuntu 18.04 LTS

Install Tor Browser on Ubuntu 18

Tor is free software and an open network that helps you defend against traffic analysis, a form of network surveillance that threatens personal freedom and privacy, confidential business activities and relationships, and state security. Tor protects you by bouncing your communications around a distributed network of relays run by volunteers all around the world. it prevents somebody watching your Internet connection from learning what sites you visit, and it prevents the sites you visit from learning your physical location.

This article assumes you have at least basic knowledge of Linux, know how to use the shell, and most importantly, you host your site on your own VPS. The installation is quite simple and assumes you are running in the root account, if not you may need to add ‘sudo’ to the commands to get root privileges. I will show you through the step by step installation Tor Browser on a Ubuntu 18.04 LTS (Bionic Beaver) server.

Install Tor Browser on Ubuntu 18.04 LTS


Step 1. First make sure that all your system packages are up-to-date

sudo apt-get update
sudo apt-get upgrade

Step 2. Intsalling Tor Browser on Ubuntu 18.04 Bionic Beaver.

Run the following commands in Terminal to install Tor Browser on Linux Ubuntu systems:

apt install torbrowser-launcher

Once installed, open Tor from Ubuntu Dash or Terminal. Execute the start-tor-browser.desktop file in a terminal:

torbrowser-launcher

This will launch Tor browser network setting. From here you can either configure or connect to Tor network. Click on connect button to enable Tor connection. Tor browser will then connect to the most secure connection. Once it’s done you can see “Welcome to Tor Browser” message.

Congratulation’s! You have successfully installed Tor Browser. Thanks for using this tutorial for installing Tor Browser on your Ubuntu 18.04 (Bionic Beaver) system. For additional help or useful information, we recommend you to check the official Tor Browser web site.

How To Install Python 3.7.3 on Ubuntu 18.04 LTS

Install Python on Ubuntu 18

Python is an open-source and beginner-friendly programming language. Ubuntu 16.04 and Ubuntu 18.04 come with two versions of Python, Python 2.7 and Python 3.5. At the time of this writing, the latest stable version of Python is 3.6, released on December 23rd, 2016. If you need to use python3 as part of Python application dependency, there are several ways to install python3 on Ubuntu 18.04 LTS.

This article assumes you have at least basic knowledge of Linux, know how to use the shell, and most importantly, you host your site on your own VPS. The installation is quite simple and assumes you are running in the root account, if not you may need to add ‘sudo’ to the commands to get root privileges. I will show you through the step by step installation Python on a Ubuntu 18.04 (Bionic Beaver) server.

Install Python on Ubuntu 18.04 LTS

Step 1. First make sure that all your system packages are up-to-date

sudo apt-get update
sudo apt-get upgrade

Step 2. Installing Python on Ubuntu 18.04 LTS.

Method 1. Installing Python 3.7 on Ubuntu 18.04 from Repository

Use the following command to install Python 3:

sudo apt update
sudo apt-get install python3.7
[php]


Then check the Python version:
[php]
python3.7 -V

Method 2. Compile and Install Python 3.7 on Ubuntu 18.04

First, we need to install some build dependencies using the commands below:

sudo apt install build-essential checkinstall
sudo apt install libreadline-gplv2-dev libncursesw5-dev libssl-dev libsqlite3-dev tk-dev libgdbm-dev libc6-dev libbz2-dev

Then, download Python 3.6 from source:

wget https://www.python.org/ftp/python/3.7.0/Python-3.7.0.tar.xz
tar xvf Python-3.7.0.tar.xz

Now cd into the source directory, configure the build environment and install:

cd Python-3.7.0/
./configure
sudo make altinstall

Once the process is complete, we can check the version of Python 3 that is installed in the system by typing:

python3.7

Congratulation’s! You have successfully installed Python. Thanks for using this tutorial for installing Python on Ubuntu 18.04 LTS (Bionic Beaver) system. For additional help or useful information, we recommend you to check the official Python web site.

How To Install Habari CMS V0.9.2 on Ubuntu 18.04 LTS

Install Habari CMS on Ubuntu 18

Habari is a free and open source blog engine written in PHP and currently supports MySQL, SQLite and PostgreSQL for the database backend and application framework with a modular, object-oriented core.

This article assumes you have at least basic knowledge of Linux, know how to use the shell, and most importantly, you host your site on your own VPS. The installation is quite simple and assumes you are running in the root account, if not you may need to add ‘sudo’ to the commands to get root privileges. I will show you through the step by step installation Habari CMS on a Ubuntu 18.04 LTS (Bionic Beaver) server.

Install Habari CMS on Ubuntu 18.04 LTS


Step 1. First make sure that all your system packages are up-to-date

sudo apt-get update
sudo apt-get upgrade

Step 2. Install LAMP (Linux, Apache, MariaDB and PHP) server.

A Ubuntu 18.04 LAMP server is required. If you do not have LAMP installed, you can follow our guide here. Also install all required PHP modules:

apt-get install php7.1-cli php7.1-gd php7.1-opcache php7.1-mysql php7.1-json php7.1-mcrypt php7.1-xml php7.1-curl

Step 3. Installing Habari on Ubuntu 18.04 LTS.

First thing to do is to go to Habari’s download page and download the latest stable version of Habari, At the moment of writing this article it is version 0.9.2:

wget http://habariproject.org/dist/habari-0.9.2.zip
sudo mkdir -p /var/www/html/habari
sudo unzip habari-0.9.2.zip -d /var/www/html/habari

We will need to change some folders permissions:

sudo chown -R www-data:www-data /var/www/html/habari/
sudo chmod -R 755 /var/www/html/habari/

Step 4. Configuring MariaDB for Habari.

By default, MariaDB is not hardened. You can secure MariaDB using the mysql_secure_installation script. you should read and below each steps carefully which will set root password, remove anonymous users, disallow remote root login, and remove the test database and access to secure MariaDB:

mysql_secure_installation

Configure it like this:

- Set root password? [Y/n] y
- Remove anonymous users? [Y/n] y
- Disallow root login remotely? [Y/n] y
- Remove test database and access to it? [Y/n] y
- Reload privilege tables now? [Y/n] y

Next we will need to log in to the MariaDB console and create a database for the Habari. Run the following command:

mysql -u root -p

This will prompt you for a password, so enter your MariaDB root password and hit Enter. Once you are logged in to your database server you need to create a database for Habari installation:

create database habari;
grant all privileges on habari.* to habariuser@localhost identified by 'your_password';
flush privileges;
exit

Step 5. Configuring Apache web server for Habari.

Create a new virtual host directive in Apache. For example, create a new Apache configuration file named ‘habari.conf’ on your virtual server:

touch /etc/apache2/sites-available/habari.conf
ln -s /etc/apache2/sites-available/habari.conf /etc/apache2/sites-enabled/habari.conf
nano /etc/apache2/sites-available/habari.conf

Add the following lines:

<VirtualHost *:80>
ServerAdmin [email protected]
DocumentRoot /var/www/html/habari
ServerName your-domain.com
ServerAlias www.your-domain.com
<Directory /var/www/html/habari/>
Options FollowSymLinks
AllowOverride All
Order allow,deny
allow from all
</Directory>
ErrorLog /var/log/apache2/your-domain.com-error_log
CustomLog /var/log/apache2/your-domain.com-access_log common
</VirtualHost>

Now, we can restart Apache web server so that the changes take place:

a2ensite habari.conf
a2enmod rewrite
systemctl restart apache2.service

Step 6. Accessing Habari.

Habari will be available on HTTP port 80 by default. Open your favorite browser and navigate to http://yourdomain.com/ or http://server-ip and complete the required the steps to finish the installation. If you are using a firewall, please open port 80 to enable access to the control panel.

Congratulation’s! You have successfully installed Habari. Thanks for using this tutorial for installing Habari Content Management System on your Ubuntu 18.04 LTS (Bionic Beaver) system. For additional help or useful information, we recommend you to check the official Habari web site.

How To Install Odoo 12 on Ubuntu 18.04 LTS

Install Odoo on Ubuntu 18

Odoo is one of the most popular and most powerful Open Source ERP business software based on the Python programming language. It is an web based fully featured application, and comes with Open Source CRM, Point of Sales, Human Resource Management, Point of Sales, Billing and Accounting, Event Management, Email Marketing, Order Tracking etc. This application is helpful to maintain the ERP in any business.

This article assumes you have at least basic knowledge of Linux, know how to use the shell, and most importantly, you host your site on your own VPS. The installation is quite simple and assumes you are running in the root account, if not you may need to add ‘sudo’ to the commands to get root privileges. I will show you through the step by step installation Odoo on a Ubuntu 18.04 (Bionic Beaver) server.

Odoo Features

  • Website Builder, which supports WYSIWYG editor, version control, form builder and Multi Website with an option to add blogs, forum and slide shows.
  • Multiple themes and inbuilt e-commerce software.
  • Odoo has contract management as well as subscription management features.
  • Customizable project management and timesheets options, it has inbuilt Invoicing and Project management features.
  • Full featured Accounting software which includes VoIP integration including an option to send mass mailis and links tracking.
  • Inbuilt CRM which does accurate forecasting and shows real time overview.

Install Odoo on Ubuntu 18.04 LTS

Step 1. First make sure that all your system packages are up-to-date

sudo apt-get update
sudo apt-get upgrade

Step 2. Installing and configure PostgreSQL.

Install the Postgres package from the Ubuntu’s default repositories:

sudo apt-get install postgresql

Once it is installed, enable the PostgreSQL server to start automatically upon server reboot:

systemctl enable postgresql
systemctl start postgresql

Step 3. Installing Odoo on Ubuntu 18.04 LTS.

The first step, add the Odoo repository to the server. In order to do it, run the following commands:

wget -O - https://nightly.odoo.com/odoo.key | apt-key add -
echo "deb http://nightly.odoo.com/11.0/nightly/deb/ ./" >> /etc/apt/sources.list.d/odoo.list

Next, install Odoo using the apt package manager:

apt install odoo

After the installation completes, you can check the status of the Odoo service:

systemctl status odoo

Then, edit Odoo’s configuration file and set the master admin password:

nano /etc/odoo/odoo.conf

Uncomment the ‘admin_passwd’ line, and set a password as shown below:

admin_passwd = MASTER_PASSWORD

Restart the Odoo instance for the changes to take effect:

systemctl restart odoo

Step 4. Accessing Odoo.

Odoo will be available on HTTP port 8069 by default. Open your favorite browser and navigate to http://yourdomain.com:8069 or http://server-ip:8069.

Congratulation’s! You have successfully installed Odoo. Thanks for using this tutorial for installing Odoo Open Source ERP on Ubuntu 18.04 LTS (Bionic Beaver) system. For additional help or useful information, we recommend you to check the official Odoo web site.

How To Install Steam on Ubuntu 18.04 LTS

Install Steam on Ubuntu 18

Steam is a digital distribution platform for video games. As Amazon Kindle is digital distribution platform for e-Books, iTunes for music, similarly Steam is for games. It provides you the option to buy and install games, play multiplayer and stay in touch with other games via social networking on its platform. The games are protected with DRM. Recently, over 4500 games are available through steam and 125 million active users are registered with Steam platform.

This article assumes you have at least basic knowledge of Linux, know how to use the shell, and most importantly, you host your site on your own VPS. The installation is quite simple and assumes you are running in the root account, if not you may need to add ‘sudo’ to the commands to get root privileges. I will show you through the step by step installation Steam on an Ubuntu 18.04 LTS Bionic Beaver server.

Install Steam on Ubuntu 18.04 LTS Bionic Beaver

Step 1. First make sure that all your system packages are up-to-date

sudo apt-get update
sudo apt-get upgrade

Step 2. Installing Steam on Ubuntu 18.04 LTS.

Method 1. Install Steam from Ubuntu Repository.

First, add steam repository from the standard Ubuntu:

sudo add-apt-repository multiverse

Use the following command to install Steam:

sudo apt install steam

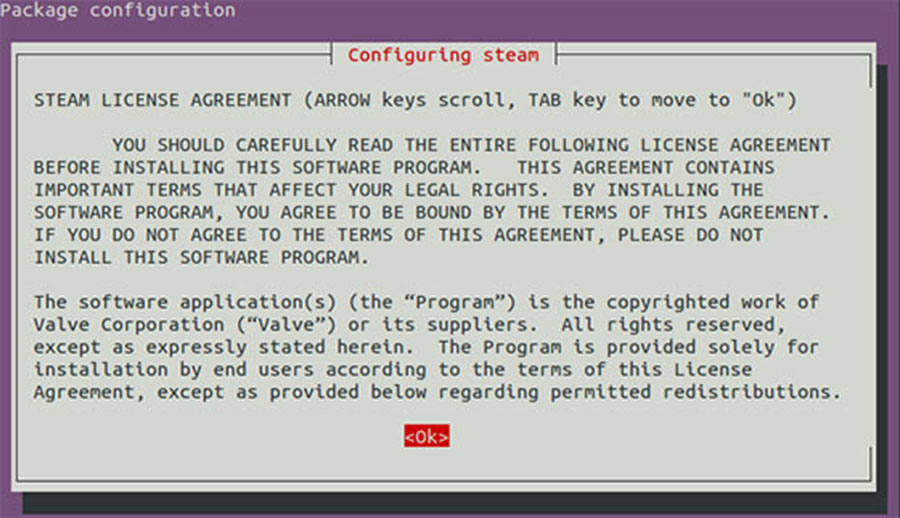
During installation process, “Configuring Steam” window will pop up, you need to read and accept install agreement here. Hit “Ok” to move to next step.

Install-Steam-Ubuntu-1

Next screen will be similar with terms and condition. Press tab to select the option and then press enter.
Install-Steam-Ubuntu-2
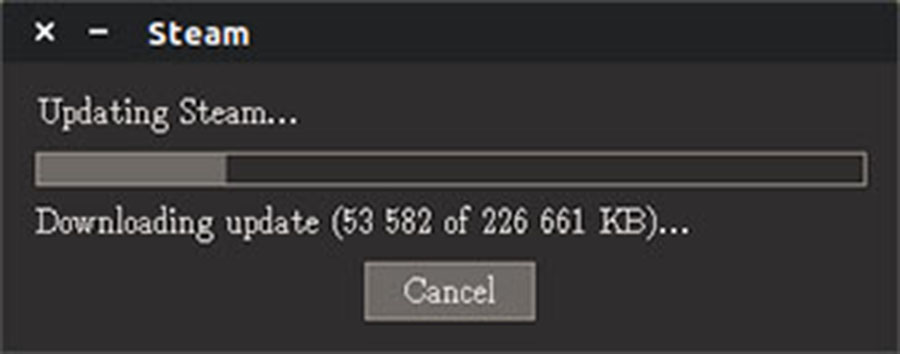
Once installed, go to Unity Dash and look for Steam. Click on it to start it. When you run it for the first time, it will download the necessary package and install the Steam platform.
Install-Steam-Ubuntu-3
As you are running for the first time, you’ll be asked to either create an account or log in to an existing account. It will also ask for agreeing to terms and conditions.
Install-Steam-Ubuntu-4

Method 2. Install Steam from official Steam package.

The following procedure can be used to install steam from the official Steam package. If not available yet, enable the i386 architecture:

sudo dpkg --add-architecture i386
sudo apt update

Next, install prerequisite Steam packages:

php]
sudo apt install wget gdebi-core libgl1-mesa-dri:i386 libgl1-mesa-glx:i386
[/php]

Then, download the official Steam package:

wget http://media.steampowered.com/client/installer/steam.deb

Next, use the gdebi command to install the steam.deb package:

sudo gdebi steam.deb

Violaaaaa… STEAM digital distribution platform is now installed on your system.

Congratulation’s! You have successfully installed Steam. Thanks for using this tutorial for installing Steam on your Ubuntu 18.04 (Bionic Beaver) system. For additional help or useful information, we recommend you to check the official Steam web site.