How to Install WordPress with LEMP on Ubuntu 20.04

Introduction

WordPress is the most popular content management systems (CMS) on the internet currently, allows users to set up flexible blogs and websites using a MySQL backend with PHP processing. WordPress has seen an incredible adoption rate among new and experienced engineers alike, and is a great choice for getting a website up and running efficiently. After an initial setup, almost all administration for WordPress websites can be done through its graphical interface— these features and more make WordPress a great choice for websites built to scale.

In this tutorial, you’ll focus on getting an instance of WordPress set up on a LEMP stack (Linux, Nginx, MySQL, and PHP) for an Ubuntu 20.04 server.

Prerequisites

In order to complete this tutorial, you’ll need access to an Ubuntu 20.04 server. To successfully install WordPress with LEMP on your server, you’ll also need to perform the following tasks before starting this tutorial:

  • Create a sudo user on your server: The steps in this tutorial are using a non-root user with sudo privileges. You can create a user with sudo privileges by following our Ubuntu 20.04 initial server setup tutorial.
  • Install a LEMP stack: WordPress will need a web server, a database, and PHP in order to correctly function. Setting up a LEMP stack (Linux, Nginx, MySQL, and PHP) fulfills all of these requirements. Follow this tutorial to install and configure this software.
  • Secure your site with SSL: WordPress serves dynamic content and handles user authentication and authorization. TLS/SSL is the technology that allows you to encrypt the traffic from your site so that your connection is secure. The way you set up SSL will depend on whether you have a domain name for your site.

When you are finished with setup, log in to your server as the sudo user to continue.

Step 1 — Creating a MySQL Database and User for WordPress

WordPress uses MySQL to manage and store site and user information. Although you already have MySQL installed, let’s create a database and a user for WordPress to use.

To get started, log in to the MySQL root (administrative) account. If MySQL is configured to use the auth_socket authentication plugin (which is default), you can log in to the MySQL administrative account using sudo:

 $ sudo mysql

If you have changed the authentication method to use a password for the MySQL root account, use the following command instead:

 $ mysql -u root -p

You will be prompted for the password you set for the MySQL root account.

Once logged in, create a separate database that WordPress can control. You can call this whatever you would like, but we will be using wordpress in this guide to keep it simple. You can create a database for WordPress by entering:

Mysql> CREATE DATABASE wordpress DEFAULT CHARACTER SET utf8 COLLATE utf8_unicode_ci;
Note: Every MySQL statement must end in a semi-colon (;). If you’ve encountered an error, check to make sure the semicolon is present.

Next, let’s create a separate MySQL user account that we will use exclusively to operate on our new database. Creating single-purpose databases and accounts is a good idea from a management and security standpoint. We’ll use the name wordpressuser in this guide — feel free to change this if you’d like.

In the following command, you are going to create an account, set a password, and grant access to the database you created. Remember to choose a strong password here:

CREATE USER 'wordpressuser'@'localhost' IDENTIFIED BY 'password';
GRANT ALL ON wordpress.* TO 'wordpressuser'@'localhost';

You now have a database and user account, each made specifically for WordPress.

With the database tasks complete, let’s exit out of MySQL by typing:

EXIT

The MySQL session will exit, returning you to the regular Linux shell.

Step 2 — Installing Additional PHP Extensions

When setting up the LEMP stack, it required a very minimal set of extensions to get PHP to communicate with MySQL. WordPress and many of its plugins leverage additional PHP extensions, and you’ll use a few more in this tutorial.

Let’s download and install some of the most popular PHP extensions for use with WordPress by typing:

 $ sudo apt update
 $ sudo apt install php-curl php-gd php-intl php-mbstring php-soap php-xml php-xmlrpc php-zip

Note: Each WordPress plugin has its own set of requirements. Some may require additional PHP extension packages to be installed. Check your plugin documentation to discover its PHP requirements. If they are available, they can be installed with apt as demonstrated above.

When you are finished installing the extensions, restart the PHP-FPM process so that the running PHP processor can leverage the newly installed features:

 $ sudo systemctl restart php7.4-fpm

You now have all of the PHP extensions needed, installed on the server.

Step 3 — Configuring Nginx
Next, let’s make a few adjustments to our Nginx server block files. Based on the prerequisite tutorials, you should have a configuration file for your site in the /etc/nginx/sites-available/ directory configured to respond to your server’s domain name or IP address and protected by a TLS/SSL certificate. We’ll use /etc/apache2/sites-available/wordpress as an example here, but you should substitute the path to your configuration file where appropriate.

Additionally, we will use /var/www/wordpress as the root directory of our WordPress install in this guide. Again, you should use the web root specified in your own configuration.

Note: It’s possible you are using the /etc/nginx/sites-available/default default configuration (with /var/www/html as your web root). This is fine to use if you’re only going to host one website on this server. If not, it’s best to split the necessary configuration into logical chunks, one file per site.

Open your site’s server block file with sudo privileges to begin:

 $ sudo nano /etc/nginx/sites-available/wordpress

Within the main server block, let’s add a few location blocks.

Start by creating exact-matching location blocks for requests to /favicon.ico and /robots.txt, both of which you do not want to log requests for.

Use a regular expression location to match any requests for static files. We will again turn off the logging for these requests and will mark them as highly cacheable, since these are typically expensive resources to serve. You can adjust this static files list to contain any other file extensions your site may use:

/etc/nginx/sites-available/wordpress
server {
    . . .

    location = /favicon.ico { log_not_found off; access_log off; }
    location = /robots.txt { log_not_found off; access_log off; allow all; }
    location ~* \.(css|gif|ico|jpeg|jpg|js|png)$ {
        expires max;
        log_not_found off;
    }
    . . .
}

Inside of the existing location / block, let’s adjust the try_files list. Comment out the default setting by prepending the line with a pound sign (#) and then add the highlighted line. This way, instead of returning a 404 error as the default option, control is passed to the index.php file with the request arguments.

This should look something like this:

/etc/nginx/sites-available/wordpress
server {
. . .
location / {
#try_files $uri $uri/ =404;
try_files $uri $uri/ /index.php$is_args$args;
}
. . .
}

When you are finished, save and close the file.

Now, let’s check our configuration for syntax errors by typing:

 $ sudo nginx -t

If no errors were reported, reload Nginx by typing:

$ sudo systemctl reload nginx

Next, let’s download and set up WordPress.

Step 4 — Downloading WordPress
Now that your server software is configured, let’s download and set up WordPress. For security reasons, it is always recommended to get the latest version of WordPress directly from the project’s website.

Change into a writable directory and then download the compressed release by typing:

 $ cd /tmp

This changes your directory to the temporary folder. Then, enter the following command to download the latest version of WordPress in a compressed file:

curl -LO https://wordpress.org/latest.tar.gz

Note: The -LO flag is used to get directly to the source of the compressed file. -L ensures that fetching the file is successful in the case of redirects, and -O writes the output of our remote file with a local file that has the same name. To learn more about curl commands, visit How to Download Files with cURL
Extract the compressed file to create the WordPress directory structure:

tar xzvf latest.tar.gz

You will be moving these files into our document root momentarily, but before you do, let’s copy over the sample configuration file to the filename that WordPress actually reads:

cp /tmp/wordpress/wp-config-sample.php /tmp/wordpress/wp-config.php

Now, let’s copy the entire contents of the directory into our document root. We’re using the -a flag to make sure our permissions are maintained, and a dot at the end of our source directory to indicate that everything within the directory should be copied (including hidden files):

sudo cp -a /tmp/wordpress/. /var/www/wordpress

Now that our files are in place, you’ll assign ownership to the www-data user and group. This is the user and group that Nginx runs as, and Nginx will need to be able to read and write WordPress files in order to serve the website and perform automatic updates:

sudo chown -R www-data:www-data /var/www/wordpress

Files are now in the server’s document root and have the correct ownership, but you still need to complete some additional configuration.

Step 5 — Setting up the WordPress Configuration File
Next, let’s make some changes to the main WordPress configuration file.

When you open the file, you’ll start by adjusting some secret keys to provide some security for our installation. WordPress provides a secure generator for these values so that you don’t have to come up with values on your own. These are only used internally, so it won’t hurt usability to have complex, secure values here.

To grab secure values from the WordPress secret key generator, type:

curl -s https://api.wordpress.org/secret-key/1.1/salt/

You will get back unique values that look something like this:
Warning: It is important that you request unique values each time. Do NOT copy the values shown below!

Output
define(‘AUTH_KEY’, ‘1jl/vqfs define(‘SECURE_AUTH_KEY’, ‘E2N-h2]Dcvp+aS/p7X DO NOT COPY THESE VALUES {Ka(f;rv?Pxf})CgLi-3’);
define(‘LOGGED_IN_KEY’, ‘W(50,{W^,OPB%PB define(‘NONCE_KEY’, ‘ll,4UC)7ua+8<!4VM+ DO NOT COPY THESE VALUES #`DXF+[$atzM7 o^-C7g’);
define(‘AUTH_SALT’, ‘koMrurzOA+|L_lG}kf DO NOT COPY THESE VALUES 07VC*Lj*lD&?3w!BT#-‘);
define(‘SECURE_AUTH_SALT’, ‘p32*p,]z%LZ+pAu:VY DO NOT COPY THESE VALUES C-?y+K0DK_+F|0h{!_xY’);
define(‘LOGGED_IN_SALT’, ‘i^/G2W7!-1H2OQ+t$3 DO NOT COPY THESE VALUES t6**bRVFSD[Hi])-qS`|’);
define(‘NONCE_SALT’, ‘Q6]U:K?j4L%Z]}h^q7 DO NOT COPY THESE VALUES 1% ^qUswWgn+6&xqHN&%’);

These are configuration lines that you can paste directly in your configuration file to set secure keys. Copy the output you received now.

Now, open the WordPress configuration file:

 $ sudo nano /var/www/wordpress/wp-config.php

Find the section that contains the dummy values for those settings. It will look something like this:
/var/www/wordpress/wp-config.php
. . .

define(‘AUTH_KEY’, ‘put your unique phrase here’);
define(‘SECURE_AUTH_KEY’, ‘put your unique phrase here’);
define(‘LOGGED_IN_KEY’, ‘put your unique phrase here’);
define(‘NONCE_KEY’, ‘put your unique phrase here’);
define(‘AUTH_SALT’, ‘put your unique phrase here’);
define(‘SECURE_AUTH_SALT’, ‘put your unique phrase here’);
define(‘LOGGED_IN_SALT’, ‘put your unique phrase here’);
define(‘NONCE_SALT’, ‘put your unique phrase here’);
Delete those lines and paste in the values you copied from the command line:

/var/www/wordpress/wp-config.php
. . .

define(‘AUTH_KEY’, ‘VALUES COPIED FROM THE COMMAND LINE’);
define(‘SECURE_AUTH_KEY’, ‘VALUES COPIED FROM THE COMMAND LINE’);
define(‘LOGGED_IN_KEY’, ‘VALUES COPIED FROM THE COMMAND LINE’);
define(‘NONCE_KEY’, ‘VALUES COPIED FROM THE COMMAND LINE’);
define(‘AUTH_SALT’, ‘VALUES COPIED FROM THE COMMAND LINE’);
define(‘SECURE_AUTH_SALT’, ‘VALUES COPIED FROM THE COMMAND LINE’);
define(‘LOGGED_IN_SALT’, ‘VALUES COPIED FROM THE COMMAND LINE’);
define(‘NONCE_SALT’, ‘VALUES COPIED FROM THE COMMAND LINE’);
Next, let’s modify some of the database connection settings at the beginning of the file. You’ll have to adjust the database name, the database user, and the associated password that was configured within MySQL.

The other change you should make is to set the method that WordPress uses to write to the filesystem. Since you’ve given the web server permission to write where it needs to, you can explicitly set the filesystem method to “direct”. Failure to set this with our current settings would result in WordPress prompting for FTP credentials when we perform some actions. Add this setting below the database connection settings, or anywhere else in the file:

/var/www/wordpress/wp-config.php
. . .

define( ‘DB_NAME’, ‘wordpress’ );

/** MySQL database username */
define( ‘DB_USER’, ‘wordpressuser’ );

/** MySQL database password */
define( ‘DB_PASSWORD’, ‘password’ );

. . .

define( ‘FS_METHOD’, ‘direct’ );
Save and close the file when you’re done.

Step 6 — Completing the Installation Through the Web Interface
Now that the server configuration is complete, you can finish up the installation through WordPress’ web interface.

In your web browser, navigate to your server’s domain name or public IP address:

http://server_domain_or_IP/wordpress
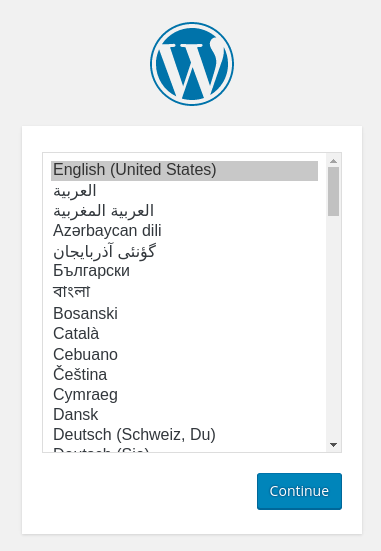
Select the language you would like to use:

WordPress language selection

Next, you will come to the main setup page.

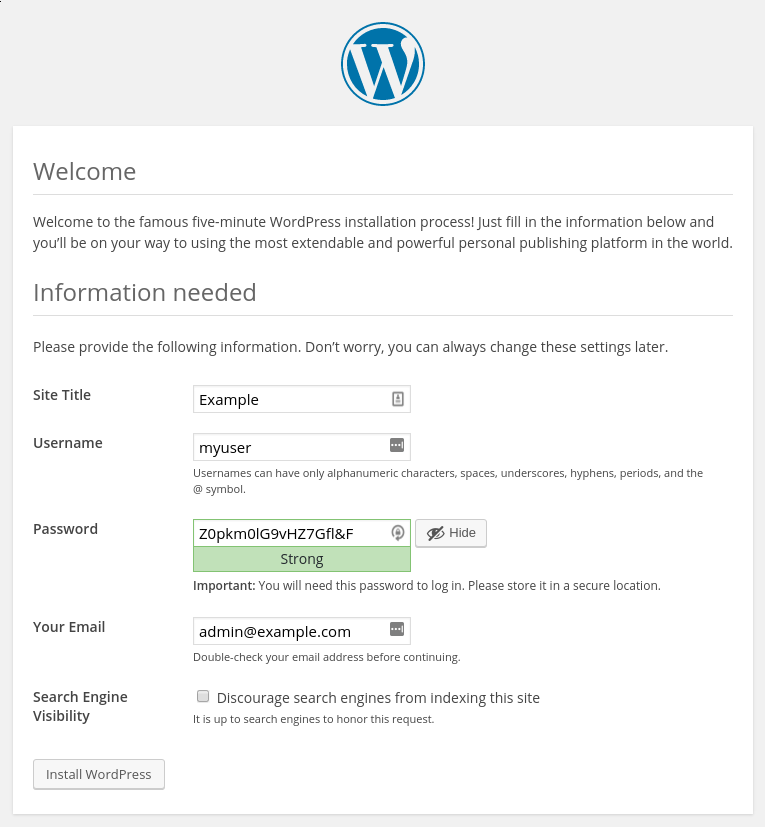
Select a name for your WordPress site and choose a username (it is recommended not to choose something like “admin” for security purposes). A strong password is generated automatically. Save this password or select an alternative strong password.

Enter your email address and select whether you want to discourage search engines from indexing your site:

WordPress setup installation

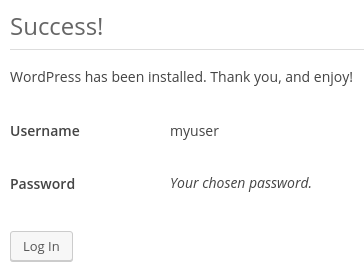
When you click ahead, you will be taken to a page that prompts you to log in:

WordPress login prompt

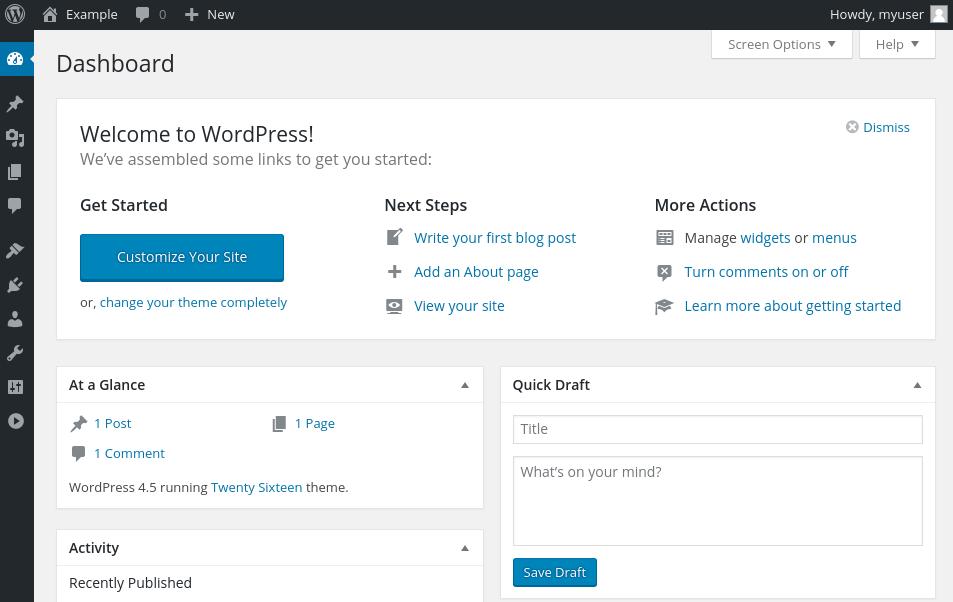
Once you log in, you will be taken to the WordPress administration dashboard:

WordPress login prompt

Conclusion
WordPress should be installed and ready to use! Some common next steps are to choose the permalinks setting for your posts (can be found in Settings > Permalinks) or to select a new theme (in Appearance > Themes). If this is your first time using WordPress, explore the interface a bit to get acquainted with your new CMS.

Easy guide to Add Your WordPress Site in Yandex Webmaster Tools

Add your Wordpress in yandex

In this tutorial, we will share how to add your WordPress site in Yandex webmaster tools to monitor your search engine traffic.

What is Yandex?

Yandex is a popular search engine like Google and Bing based in Russia. You can optimize your site for SEO in Yandex to get more visitors from Russia.


Yandex has a range of tools like generalized search engine, image search, email, videos, maps and more. It also has webmaster tools to help you rank your site, monitor traffic stats, search queries, keywords, and more.

You can connect your WordPress site with Yandex using the Yoast SEO plugin. It works similar to Google search console and Bing Webmaster tools.

Adding WordPress Site in Yandex Webmaster Tools

Before we start, you would need a Yandex Webmaster tools account to connect your site. Once you have created your account, you can login to your WordPress site to configure Yandex webmaster tools with Yoast SEO plugin.

Let’s take a look on how you can add your site in Yandex webmaster tools and start optimizing it right away.

Step 1: Create an Account at Yandex

First thing you need to do is login to your Yandex webmaster tools account. If you don’t have a Yandex account, then you can create one using this link.

After creating the account, you’ll see the Yandex Webmaster page. On this page, you need to click on the ‘+‘ button in top bar to add your site in Yandex.

In the site address field, you need to add your website’s full domain name and click on the Add button.

Note: If your main domain uses ‘www’ in the URL, then you need to add it before the domain (for example www.wpcademy.com)

On the next page, you will be asked to verify website ownership by adding meta content in your WordPress site. Go ahead and copy the content code from this page because you will need it in Step 2.

Step 2: Login to WordPress Admin Area and Add the Code

Now you need to login to your WordPress admin area and add the verification code in the Yoast SEO webmaster settings.

Simply head over to the SEO » General area and click on the Webmaster tools tab.

Next, you need to paste the code in the Yandex verification code field and click on the Save Changes button.

After adding the code in your WordPress site, you need to go back to the Yandex Webmaster tools page where you copied the code from and click on the Check button to verify ownership.

After successful verification, it will show your username that has the rights to manage your site in Yandex Webmaster tools. You can also delegate the rights to other users by adding their username and clicking on the Delegate rights button.

Now that your site is verified and added in Yandex Webmaster tools, you can see traffic stats, search errors, search queries, internal and external links, site information, robots.txt analysis, audit pages for mobile, and more on the Yandex dashboard. You can use the menu on left side of the screen to find any information that you may need.

Yandex Webmaster tools have options for site optimization that are filtered from troubleshooting to important settings like robots.txt and .htaccess. You can further optimize your robots.txt for SEO separately and regularly perform WordPress maintenance tasks to keep your site up to date.

Easy Guide to Fix the WordPress Failed to Open Stream Error

In this tutorial, we will show you how to easily fix the WordPress failed to open stream error.

Why Failed to Open Stream Error Occurs?

Before we try to fix the error, it would be helpful to understand what causes the ‘Failed to open stream’ error in WordPress.

This error occurs when WordPress is unable to load the file mentioned in website code. When this error occurs, sometimes WordPress will continue loading the site and only show a warning message, while other times WordPress will show a fatal error and will not load anything else.

The message phrasing will be different depending on where the error occurs in the code and the reason for failure. It will also give you clues about what needs to be fixed.

Typically, this message would look something like this:

Warning: require(/home/website/wp-includes/load.php): failed to open stream: No such file or directory in /home/website/wp-settings.php on line 19 
 
Fatal error: require(): Failed opening required ‘/home/website/wp-includes/load.php’ (include_path=’.:/usr/share/php/:/usr/share/php5/’) in /home/website/wp-settings.php on line 19

Here is another example:

Last Error: 2018-04-04 14:52:13: (2) HTTP Error: Unable to connect: ‘fopen(compress.zlib://https://www.googleapis.com/analytics/v3/management/accounts/~all/webproperties/~all/profiles?start-index=1): failed to open stream: operation failed’

Having said that, let’s take a look at how to troubleshoot and fix ‘failed to open stream’ error in WordPress.

Fixing Failed to Open Stream Error in WordPress

As we mentioned earlier, the error can be caused by a variety of reasons and the error message will be different depending on the cause and location of the file that’s causing the error.

In each instance, failed to open stream phrase would be followed by a reason. For example, permission denied, no such file or directory, operation failed, and more.

Now if your error message contains ‘no such file or directory’, then you need to look in the code to figure out which file is mentioned at that particular line.

If it is a plugin or theme file, then this means that the plugin or theme files were either deleted or not installed correctly. Simply deactivate and reinstall the theme / plugin in question to fix the error.

However, it is also possible that WordPress is unable to locate the files because of a missing .htaccess file in your root folder. In that case, you need to go to Settings » Permalinks page in your WordPress admin and just click on the ‘Save changes’ button to regenerate the .htaccess file.

If the error message is followed by ‘Permission denied’, then this means that WordPress does not have the right permission to access the file or directory referenced in the code.

To fix this, you need to check WordPress files and directory permissions and correct them if needed.

Lastly, some WordPress plugins load scripts from third-party sources like Google Analytics, Facebook APIs, Google Maps, and other third-party APIs.

Some of these APIs may require authentication or may have changed the way developers can access them. A failure to authenticate or incorrect access method will result in WordPress failing to open the required files.

To fix this, you will need to contact the plugin author for support. They will be able to help you fix the error.

If none of these tips help you resolve the issue, then follow the steps mentioned in our WordPress troubleshooting guide. This step by step guide will help you pinpoint the issue, so you can easily find the solution.

We hope this tutorial helped you fix the WordPress ‘failed to open stream’ error.


Easy Guide to Let Contributors Edit Their WordPress Posts After Being Approved

In this tutorial, we will show you how to let contributors edit their posts after being approved.

Let Contributors Edit Their Posts After Being Approved

Contributors or guest authors with contributor user role write posts and send them to review in WordPress. A user with the administrator or editor user role can review and publish it. Once published, the contributors are unable to edit their own posts. This is a generalized hierarchy in WordPress that distribute user role and status.

However, you can add or remove capabilities to user roles in WordPress. Let’s take a look at how to let contributors edit their published posts.

Method 1: Allow Contributors to Edit Their Posts (Plugin)

This method is easier and recommended for most users. This method also allows you to edit other user roles and permissions right away.

First thing you need to do is install and activate the Capability Manager Enhanced plugin. For more details, see our step by step guide on how to install a plugin in WordPress.

Upon activation, you need to visit Users » Capabilities in your WordPress admin area to edit capabilities of contributor user role.

On this page, you need to select Contributor role on the right side, so you can change their permission level.

Once selected, you’ll see a lot of options in this section. In the Editing Capabilities area, you need to select Edit Published option and scroll to the bottom to click on Save Changes button.

After that you can test the permissions by switching to a contributor role in WordPress and going to the Posts page. You will now see the option to edit published posts. Hint: you can instantly switch between user accounts while testing roles and permissions in WordPress.

Method 2: Manually Allowing Contributor to Edit Their Posts

This method requires you to add code to your WordPress files. If you haven’t done this before, then please take a look at our guide on how to copy and paste code in WordPress.

You’ll need to add the following code to your WordPress theme’s functions.php file or site-specific plugin.

// get the "contributor" role object
$obj_existing_role = get_role( 'contributor' );
 
// add the "Edit published posts" capability
$obj_existing_role->add_cap( 'edit_published_posts' );

This code snippet needs to run only once which means you can save it and then delete it. It will allow contributors to edit their published posts in WordPress.

Even though we have shown you how to allow contributors to edit their published posts, we believe it is not a good practice to let contributors or authors edit their published content.

If there’s a need for any change or correction in the content, then the writer should ask an administrator or editor to update it. This allows you to maintain editorial integrity.

Before publishing a post, an editor checks multiple necessary elements like keywords, images, meta description, URL, and more. These things are important to get better rankings in search results. A user with a contributor user role may not be fully aware of your editorial best practices and can make mistakes that would go unnoticed if not reviewed by an editor or administrator.

One way to deal with this is by sharing a blog post checklist with your contributors and authors. This checklist will help them cover all the tasks before submitting a post to review. It will also help an editor to quickly review a post.

We hope this tutorial helped you learn how to let contributors edit their posts after being approved.

Easy Guide to Set, Get, and Delete WordPress Cookies

In this ultimate guide, we will show you how to set, get, and delete WordPress cookies.


Editors Note: This is an advanced tutorial. It requires you to have proficient understanding of HTML, CSS, WordPress site, and PHP.

What Are Cookies?

Cookies are plain text files that are created and stored in users browser when they visit a website. Cookies are used to add different features on a website.

Following are some of the common usage of cookies on various websites.

  • Store and manage user’s login information
  • Store temporary session information during a users visit
  • Ecommerce stores use cookies to remember cart items during a user’s visit
  • Track user activity on a site to offer personalized user experience
  • and more

As you can see, cookies are highly useful tool for website owners, but they can also be a bit invasive. Recent trends in email marketing, growth hacking, and online marketing as a whole allow websites to set cookies that act as a beacon and can be used to store and even share user activity across websites.

This is why European Union enacted the EU Cookie Law, which requires website owners to declare that they use cookies to store information.

How Cookies are Used in a Typical WordPress Website

By default, WordPress uses cookies to manage logged-in user sessions and authentication. It also uses cookies to remember a user’s name and email address if they fill out a comment form.

However, many WordPress plugins on your website may also set their own cookies.

If you are using third party services on your website like Google Analytics or Google AdSense, then they may also set cookies on your website.

You can view all website cookies in your browser’s settings. For example, in Google Chrome you need to go to settings and search for ‘content settings’.

Content settings in Google Chrome

Under content settings, you will need to click on ‘Cookies’ to open the cookies settings page.

Next, you need to click on the ‘All cookies and site data’ option.

On the next page, you will see a list of all cookies and site data stored on your browser by all websites you visited.

You can type a website address in the search box, and it will show you the data stored by that website.

Clicking on a single item will show you more details about individual cookies and their contents.

How to Set a Cookie in WordPress

To follow this tutorial, you will need to add code to your theme’s functions.phpfile or a site-specific plugin. If you haven’t done this before, then please take a look at our guide on how to copy and paste code snippets in WordPress.

First we will use the setcookie() function in PHP. This function accepts the following parameters.

  • Cookie name
  • Cookie value
  • Expire (Optional: sets a time period after which cookie expires)
  • Path (Optional, by default it will use the site’s root)
  • Domain (Optional, by default uses your website’s domain)
  • Secure (Optional, If true then only transfers cookie data via HTTPS)
  • httponly (Optional, when set true the cookie is only accessible via HTTP and cannot be used by scripts)

Now let’s add a code snippet to your WordPress site. This code stores the exact timestamp when a user visited your website in a cookie.

function wpb_cookies_tutorial1() { 
 
$visit_time = date('F j, Y  g:i a');
 
if(!isset($_COOKIE[$wpb_visit_time])) {
 
// set a cookie for 1 year
setcookie('wpb_visit_time', $current_time, time()+31556926);
 
}
 
} 

You can now visit your website and then check your browser cookies. You will find a cookie with the name wpb_visit_time.

How to Get a Cookie and Use it in WordPress

Now that we have created this cookie that’s stored in user’s browser for 1 year, let’s take a look at how can we use this information on our website.

If you know the name of a cookie, then you can easily call it anywhere in PHP using the $_COOKIE[] variable. Let’s add some code that not only sets the cookie but also uses it to do something on your website.

function wpb_cookies_tutorial2() { 
// Time of user's visit
$visit_time = date('F j, Y g:i a');
 
// Check if cookie is already set
if(isset($_COOKIE['wpb_visit_time'])) {
 
// Do this if cookie is set 
function visitor_greeting() {
 
// Use information stored in the cookie 
$lastvisit = $_COOKIE['wpb_visit_time'];
 
$string .= 'You last visited our website '. $lastvisit .'. Check out whats new'; 
 
return $string;
}   
 
} else { 
 
// Do this if the cookie doesn't exist
function visitor_greeting() { 
$string .= 'New here? Check out these resources...' ;
return $string;
}   
 
// Set the cookie
setcookie('wpb_visit_time',  $visit_time, time()+31556926);
}
 
// Add a shortcode 
add_shortcode('greet_me', 'visitor_greeting');
 
} 
add_action('init', 'wpb_cookies_tutorial2');

We have commented the code to show you what each part does. This code uses the information stored in the cookie and outputs it using the shortcode. You can now add shortcode [greet_me] anywhere on your website, and it will show when a user last visited.

Feel free to modify the code to make it more useful for your website. For example, you can show recent posts to returning users and popular posts to new users.

Deleting a Cookie in WordPress

So far we have learned how to set a cookie and use it later in your website. Now let’s take a look at how to delete a cookie.

To delete a cookie, you need to add the following line to your code.

unset($_COOKIE['wpb_visit_time']);

Don’t forget to replace wpb_visit_time with the name of the cookie you are trying to delete.

Let’s put this code in some context using the same sample code we used above. This time we will delete a cookie and set it again with new information.

function wpb_cookies_tutorial2() { 
// Time of user's visit
$visit_time = date('F j, Y g:i a');
 
// Check if cookie is already set
if(isset($_COOKIE['wpb_visit_time'])) {
 
// Do this if cookie is set 
function visitor_greeting() {
 
// Use information stored in the cookie 
$lastvisit = $_COOKIE['wpb_visit_time'];
 
$string .= 'You last visited our website '. $lastvisit .'. Check out whats new'; 
 
// Delete the old cookie so that we can set it again with updated time
unset($_COOKIE['wpb_visit_time']); 
 
return $string;
}   
 
} else { 
// Do this if the cookie doesn't exist
function visitor_greeting() { 
$string .= 'New here? Check out these resources...' ;
return $string;
}   
}
add_shortcode('greet_me', 'visitor_greeting');
 
// Set or Reset the cookie
setcookie('wpb_visit_time',  $visit_time, time()+31556926);
} 
add_action('init', 'wpb_cookies_tutorial2');

As you can see, this code deletes the cookie once we have used the information stored inside. Later we set the cookie again with the updated time information.

We hope this article helped you learn how to easily set, get, and delete WordPress cookies.

Easy Guide to Fix Custom Fields Not Showing in WordPress

In this article, we will show you how to easily fix custom fields not showing issue in WordPress.

Fixing Custom Fields Not Showing Issue in WordPress

Custom fields are typically associated with WordPress post, pages, or custom post types. Often you will find custom fields mentioned in various WordPress tutorials around the web, but you will likely not see the custom fields option on your site specially if you recently started your WordPress blog.

In the past, custom fields were visible by default on the post edit screen of all WordPress sites. However since it is an advance feature, the WordPress core development team decided to hide custom fields by default for all new users in the WordPress 3.1 release.

They also made it easy for anyone to make them visible with just two clicks from within the post edit screen.

Simply create or edit an existing post / page, and then click on the ‘Screen Options‘ button at the top right corner of the screen. This will show you a menu with several options that you can show or hide on your post edit screen.

Go ahead and click on the checkbox next to ‘Custom Fields’ option.
Show custom fields

Note: If you don’t see the Custom Fields option on your site, then please scroll to the troubleshooting option below in the article.

You can now scroll down on the post edit screen, and you will notice a new meta box labeled ‘Custom Fields’ below your post editor.
Custom Fields box

Since WordPress remembers your display choice, it will continue to display the custom fields box whenever you are editing posts on your website.

You can use this box to add, edit, and delete custom fields and their values.

What are Custom Fields? What Can You Do with them?

By default, when you write a new post, page, or any content type, WordPress saves it into two different areas. The first part is the body of your content that you add using the post editor.

The second part is the information about that particular content. For example, title, author name, date / time, and more. This bit of information about the post is called metadata.

Apart from the default post metadata, WordPress also allows you to save custom metadata by using custom fields.

To learn more, see our beginner’s guide to WordPress custom fields with examples, tips, and tricks that you can use on your website.

WordPress developers use custom fields to store custom post metadata for your posts. For example, the Yoast SEO plugin uses custom fields to store SEO settings for your posts.
Yoast SEO meta box

However instead of using the default custom fields box shown above, these plugin developers create their own custom meta boxes. This makes it easier for users to input information.

If you want to create a custom meta box to easily input custom metadata, then see our guide on how to add custom meta boxes in WordPress.

Troubleshooting

Recently one of our readers came to us with a problem where the Custom Fields option was missing from the WordPress screen options. After some investigation, we were able to find the cause of the issue.

If your WordPress site is missing the custom fields option under the ‘Screen Options’ menu, then you need to check if you have the Advanced Custom Fields (ACF) plugin active on your site.

ACF is a very popular WordPress plugin that developers use to create custom meta boxes. ACF is running on over 1 million websites.

In ACF version 5.5.13, they added a setting to remove the default WordPress custom field metabox to speed up the load times on the post edit page. The idea being that you shouldn’t need the default metabox since you’re using ACF.

However if you need to have the default WordPress custom field metabox enabled, then you need to add the following code to your WordPress theme’s functions.php file.

add_filter('acf/settings/remove_wp_meta_box', '__return_false');

This will solve the custom fields option missing issue in WordPress.

We hope this article helped you fix the custom fields not showing issue on your WordPress site.

Easy Guide to Upload a HTML Page to WordPress without 404 Errors

In this article, we will show you how to properly upload a HTML page to your WordPress site without causing 404 errors.

Why Upload HTML Pages to WordPress?

WordPress comes with a built-in content type to add pages to your website. Often WordPress themes add pre-designed page templates to display your pages.

There are even WordPress landing page plugins that allow you to create beautiful page templates with a drag and drop builder.

This means that in most cases, you shouldn’t need to upload a HTML page to your WordPress site.

However, sometimes a user may have static HTML pages from their old website or a static template that they really like and want to use. In these scenarios, you will need to upload your HTML page to WordPress.

Since, WordPress comes with its own SEO friendly URL structure, it can cause a 404 error if you simply uploaded your HTML page and tried to access it.

That being said, let’s take a look at how to upload a HTML page to your WordPress site without causing 404 errors.

Uploading HTML Page to WordPress Site

Step -01: Before you upload your HTML page to the WordPress site, you need to make sure that the ‘index.html’ file is renamed to ‘index.php’.

HTML Template File

Step-02: After that, you need to add all files including the HTML page, CSS, and other folders to a Zip archive.

Step-03: Windows users can right-click and select Send to » Compressed Zip Folderoption to create a zip file. Next, simply drag and drop all files and folders for your HTML page to the zip file.

Zip Archive HTML Page

Mac users can select the parent folder containing all files and folders, and then right-click to select ‘Compress folder’ option.

Create zip file in Mac

Step – 04: Next, you need to go to the cPanel of your WordPress hosting account. In the cPanel, you need to scroll down to the Files section and then click on the File Manager app.

Step-05: Once you are in File Manager, you need to navigate to the website root folder which is usually called public_html and contains all your WordPress files folders. From there, you need to click on the Folder link from the top menu to create a new empty folder.

A popup will open where you need to add a name for the new folder. Use a name that you want to use as the URL of your HTML page and then click on the Create New Folder button.

Create zip file in Mac

Step -06: After creating the folder successfully, you need to open it and click on the Upload button from the top menu to select and upload the zip file you created earlier from your computer. You’ll see the progress bar while the zip file uploads to your site.

Once uploaded, you need to select the zip file and then click on Extract button from the top menu.

Step -07: You will be asked where to extract the files. Simply select the same new folder that you created and click on the Extract File(s) button.

File Manager will now extract the zip file, and you will be able to see files in your folder.

Note: You can now delete the zip file from here. It doesn’t affect your HTML page or any other folders that are extracted.

Create zip file in Mac

Step – 08: Now you can visit this page in the browser by using the name of the folder (For example, yourwebsite.com/example). If your server doesn’t support the redirection, then you may see a 404 error. It happens because your ‘index.php’ file is not redirected on loading the URL in browser.

It is one of the common WordPress errors and can be fixed easily.

Using the File Manager app, you need to edit .htaccess file in your website’s root folder and add the following code:

RewriteRule ^(.*)index\.(php|html?)$ /$1 [R=301,NC,L]

This code will redirect your ‘index.php’ file and load it in the browser. If you are using a case-sensitive name for a file or folder, then the above code will also redirect that to show you the content.

We hope this article helped you learn how to upload an HTML page to your WordPress site without 404 error.